
First off, while this is about paint protection and care, it is really about the generosity of a fellow NSXPrime member. I can’t express how grateful and appreciative that I am for the generosity of Corry or Autobody Tech. As some of you may or may not know, for the last year I was living with annoying water spots on the hood of my car due to my wife leaving the car in the sun under a sprinkler. I had tried per the advice of everybody almost everything known to man including vinegar, CLR, Scratch X, Clay, prayer, chanting, exorcism and with no luck. Since Corry owns a body shop and has done this for many years, he offered to get together because he knew how to remove the spots.
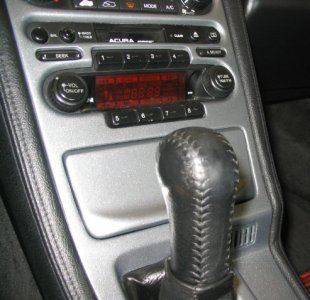
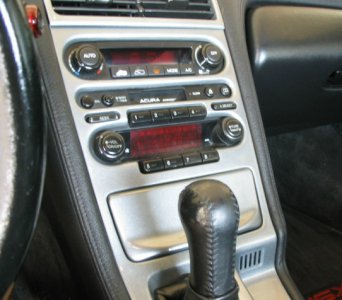
When I spoke to him on the phone, I was right in the middle of a project for the NSX. I had removed the door panels and center console for repainting the plastic pieces due to the metallic film going bad over time. I had attempted this project last year with some success, but wanted to try to do a better job. I had sanded, used the bondo with not the results that I wanted, and had painted them with Krylon paint from Lowes. Upon telling Corry what I have been doing, I could almost hear his jaw dropping through the phone. He said, “you need to get over here because you are not doing it right”. So in addition to the water spots, he was now committed to helping me paint my console pieces. At that point, he didn’t know how much trouble he had gotten himself into. J
With the door panels off and the windows down, I excitedly made the 35-minute trip to his house. The weather was beautiful, it wasn’t too hot, but hey you’re in Missouri, so wait 10 minutes and that will change. I started to notice some darkened clouds approaching. It was then I realized that I left the passenger window switch back at my house so it was staying down whether I liked it or not. Just about then, the temp dropped 15-20 degrees in what seemed seconds, lightning and thunder followed, and then the rain. We were scurrying to do anything to prevent the rain from coming in. We ended up parking it length ways right up against the opening of his garage coupled with plastic bags to stop the massacre.
Just when you thought it was safe, it started to hail. I thought about using Corry’s restroom to clean the excess debris from my Calvin Klein’s as he scrambled to get blankets to put the on rear quarter panel to prevent any damage. I mean I just got her back from the body shop after being rear-ended and now I was going to have to make another claim for hail damage. Ugh! The hail was pelting the cars in the street and when Corry brought me a sample from outside (super ball sized, bigger than marble but smaller than a golf ball), I was almost certain it would not be good.
Unfortunately, it doesn’t stop there. Next comes the wind. Trees were falling down all over his subdivision and a good size branch is ripped off one of his own trees and lands near the end of the driveway. All I need is for my X to be transformed from a sports car to a tree house in an instant.
To make it even more interesting, then the power went out. I guess that is good because at least you don’t have as good of vision when you are viewing the possible demise of your possessions. To my surprise, the storm started to subside, but I had to wait for the rain to let up before I ventured out on the trip home. Waiting, waiting, and waiting. Corry was extremely hospitable and contemplated charging me rent as I was there for a while. I decided that we would try to tape it up with plastic and risk it. I had taken enough of his time and energy. Cory taped everything up really well for me and I made way. About half way into the ride, it started to POUR again. I was amazed by Corry’s taping job held perfect. I didn’t have a drop of water come into the vehicle the whole time. Also, with the blankets, I didn’t have one dent in the car whereas almost every other car on the street did have damage.
To make a long story even longer, I came back over there a few days later, he removed the water spots and we painted the console pieces and it turned out amazing. This is a true test of what kind of people that NSXPrime attracts. His efforts are really appreciated and I can’t thank him enough. Pics attached.
")