• Protip: Profile posts are public! Use Conversations to message other members privately. Everyone can see the content of a profile post.

CTSC High Boost swap to 2.3L blower

Joined
8 November 2003
Messages
2,412
Location
Portland OR
Well, I am seriously sick...

...one very long toke on the go fast crack pipe...

Over a year ago I went to a high boost set up with an AEM on my 3.0 L motor. It was fun and ran well till I lost a ring land on my 120K +, heavily tracked motor. I have been slowly working on the re-build since August, with out much enthusiasm thinking I should just 'put it back together, it's fast enough'...wondering if I am happy with the NSX, do I really want a big torque V8 track car...

Then the skies parted, a moment of clarity, an epiphany of sorts as I had a chance to drive Shad Huntley's(Driving Ambition) ultimate handiwork at Sebring, Kip Olsen's car. It is everything I ever wanted my car to be...good power, pulls strong to red-line, amazing balance, and easy to drive! This car rocks! So now I have some focus...

It's go time on the engine re-build with a goal in mind, 400 RWHP from my 3.0L, with lower intake temps and power that builds to red-line and lots or area under the torque curve. The bigger blower can be turned slower and help with the intake temps, the larger displacement will allow 10+ lb. of boost at 8200 RPM. To support the bigger blower, I am putting in bigger intake valves, porting the heads, high lift springs, titanium retainers and a set of SOS FI cams to get more mixture into the cylinders, while limiting the cross flow through the cylinder. I am also going with forged 9.5 compression pistons, bushed rods and floating wrist pins to keep the bottom end together.

The 2.3L blower head is not quite a bolt up, I will be making an adapter plate for the intake, 6 rib pulleys for the crank, alternator and blower. While I am at it, the alternator pulley will be larger in diameter to slow it down and reduce HP draw. I have the Whipple blower which I bought off E-bay, it is a small block V8 part used on Chevys and Fords so that is the first step on this crazy path. The reason I post this is to share the experience and to see if there are any other crazies who are thinking about going down this path and want to share expense on R&D for parts? My goal is to have this done, running and in break in mode by January 2007. If all of this goes well, I am thinking an 'upgrade REAL high boost kit' might be the end product.
 
Good luck with this project and I am looking forward to seeing your progress.

On a side note, do you still have that BBK available?
 
DVDoughboy said:
On a side note, do you still have that BBK available?
Wilwoods are long gone, can build you a 997S kit if you want...
 
Hey Dave,

I assume you are going to upgrade your fuel system. The old 2.3L whipple had the exact same mounting flange as the 1.6L but you might have one built for a Ford intake or something. If I remember correctly you have one of the hand built Comptech manifolds so I would take this opportunity to update the bypass valve and hose.

It looks like a ride in Kip's car has now inspired 2 people to push the Comptech style system a little further.

Joe
 
Last edited:
I already have a Walbro pump for the High boost, and a 1:1 FPR. I do have one of the hand built intakes, I am pretty sure mine is from before the collapsing by-pass tube time frame, but I will check. Thanks for having my back.

I will need to do something with the alignment of the blower to move the center line of the pulley toward the front of the car so I clear the motor mount with the new bigger pulley. The blower I bought appears to have a 6 bolt mount like on Kip's car, I think this will help with the fab of the adapter plate so the bolts don't have to occupy the same space.
 
titaniumdave said:
I will need to do something with the alignment of the blower to move the center line of the pulley toward the front of the car so I clear the motor mount with the new bigger pulley. QUOTE]

You might be able to just lift it a bit, but leave it in the center, and have it clear. That might help with the clearence for the larger alt pulley also.

Joe
 
I have already done this and can help you with part numbers. I have 8 groove pulleys and i built a 9" crank pulley. I have just one more pulley mod to make and i should be able to hold the belts on. I also have the whipple intercooler. After 16 PSI i loose my belt. It would be a good idea to resleeve you block for starters.I have some info here that may help. http://www.nsxprime.com/forums/showthread.php?t=44805
 
Ken,
Thanks for the input. My plan is to keep at 10-11 Lbs. boost, I have elected to keep to a punched 3.0L bottom end, partially for cost, but also for lower mass and higher RPM potential. With the upgraded valve train my plan is to move the rev limiter up to 8500 RPM, and the bigger blower should keep making power up to there. I am not going for the biggest HP, more about trying to get lots of area under the torque curve so the car is more fun on the track and fits with my style of driving.

How did the 8 rib belt fit in the compartment? If I am going to make pulleys, might as well go all the way and do it BIG...

Did you drop the harmonic damper? I am getting conflicting info as to whether there is a benefit to keeping it, or just making a solid lower pulley...
 
If you are going to make pulleys, you might want to think Cog belt, zero slipe and smaller width to help fit in the tight spaces.


Armando
 
Did you drop the harmonic damper? I am getting conflicting info as to whether there is a benefit to keeping it, or just making a solid lower pulley...

Just my opinion, but I would keep the harmonic balancer if at all possible. What kind of conflicting info?
 
Elite said:
Just my opinion, but I would keep the harmonic balancer if at all possible. What kind of conflicting info?

There have been engine failures linked to the harmonic balancer failing. It is my understanding that the harmonic balancer failure is a separation occurring between the inner core or hub and the outer pulley surface. Apparently the "rubber" filler between the inner and outer surfaces fails and allows the outer portion to move. if it moves outward, away from the engine the failure is losing the belt. If it moves inward and pushes/cuts through the timing belt cover it will bear against the timing belt causing it to jump timing. This leads to the valves contacting the pistons; this condition has proved catastrophic to some engines when it has occurred.
 
The 8 Rib belt was tight. I did keep them on the stock Comptech plate.
I did keep my balancer and my new pulley slipped over the balancer and bolted to the face. Good Luck
 
Elite said:
Just my opinion, but I would keep the harmonic balancer if at all possible. What kind of conflicting info?
Chris at SOS says he has not seen any problems with the motors they have torn down that have been run with a solid pulley, IE. no damper. The research I have seen indicates the damper will greatly prolong the life of the main bearings by adsorbing vibration along the crack caused by the firing of the individual cylinders.

My goal is to have a set up that will run 100K miles, so I am leaning toward a slight drop in performance in exchange for increased long term durability. I am leaning toward a damper of some sort, maybe not stock though, especially if I have to make the pulley.
 
So far from what I have seen only the very early cars had dampner failures..if you get a new one..I would have no concerns about failure.
 
zahntech said:
So far from what I have seen only the very early cars had dampner failures..if you get a new one..I would have no concerns about failure.

You make a good point; it does appear that most failures have occurred on early cars that have seen substantial track time. This may be due to the deterioration of the rubber. Additionally the new replacements have a different look [redesign?] that may prove more durable.
 
A speculation about the cause of the vibration damper failing:
Would it seem possible that the extended high RPM work on the track coupled with a belt that is "slightly" slipping could generate enough heat to cause the rubber or its bond to fail on older units that also had some age deterioration? Just a thought I throw out for your consideration.
 
OK, what's up with this THREAD :confused:

I subscribed to see this thing built.

Bumping this up. So Dave can have a chance to post a few pics of his progress :biggrin:
 
OK, what's up with this THREAD :confused:

I subscribed to see this thing built.

Bumping this up. So Dave can have a chance to post a few pics of his progress :biggrin:

My 2.3 is ordered and so is the AEM; Walbro fuel pump is in house as are many other components. Just need to make a few more decisions before pulling the assembly trigger.:biggrin:
 
I just finished my 6 rib crank pulley, it is at the shop to get balanced with the crank and clutch as an assembly. Will get the whole mess tomorrow and start bolting the bottom end together, then heads, cam timing and finally cutting up my intake for the adapters and intercooler plates, belt routing, new 6 rib(bigger) alternator pulley and sooooo much more...

As far as the concern about the damper coming apart, I have an idea which might be a simple 'fail safe' part to add. Will proto-type it when I build my motor...
 
We want pics, we want pics :biggrin:
 
Cool project, too bad there isn't a simple way to upgrade to a 2.0+ blower.

I do have one of the hand built intakes, I am pretty sure mine is from before the collapsing by-pass tube time frame, but I will check. Thanks for having my back.

I wasn't aware of this issue. How do I know if my manifold is handbuilt with a bad by-pass tube? Any details would be appreciated. FWIW, my kit is circa 1997.
 
Cool project, too bad there isn't a simple way to upgrade to a 2.0+ blower.


I wasn't aware of this issue. How do I know if my manifold is handbuilt with a bad by-pass tube? Any details would be appreciated. FWIW, my kit is circa 1997.

You can tell if yours is hand built because the manifold is made from a stock intake, the center is cut off and the new plenum is welded onto the stock Honda runners where they go into the heads. The hand built one did not have a problem with the by-pass tube collapsing. There were a few from early in the production run which had problems with the rubber tube collapsing under high vacuum. You would know if you had a problem, can't remember the symptom, but the system can't equalize pressure on both sides of the blower when you don't want to be in boost...

The problem was corrected by putting a spring inside of the rubber tube so it can't collapse.
 
Some movement on my part...

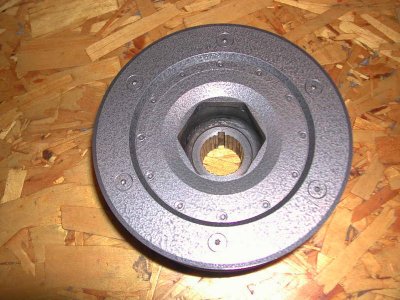
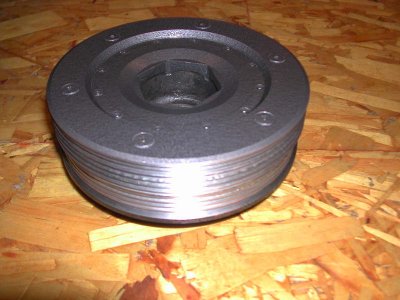
Here are pics of the 6 rib pulley I made, chose to take all the ribs off, they were heavy steel you know...machined a big cylinder with a bottom on it that I froze fit on the stock harmonic balancer, used 6 5M counter-sink screws to secure it. Then I machined the AC pulley and a new 6 rib pulley that is a bit larger than the stock MT pulley, about 6" in diameter. I had the balance checked and I got this one perfect, no need to do anything!

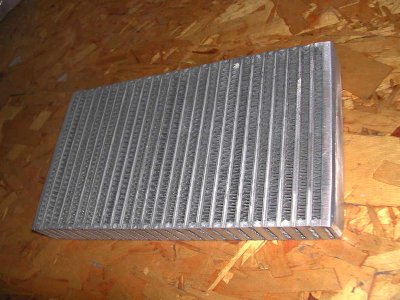
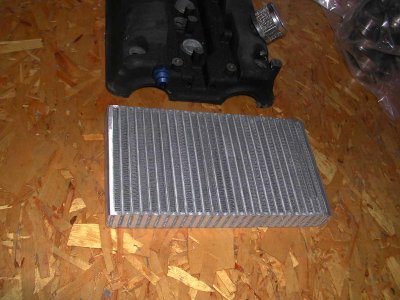
Here is a shot of the intercooler core I plan on using...valve cover for scale.

It is 6"x11", 1 1/4" thick, more pics next week when I have the manifold. John Richards is helping out, he has arranged a swap of my hand built manifold for one of the most recent Comptech manifolds which has the bolt on top. This should save me some time, plus nice that someone gets to drive the original hand built which makes a bit more power, I don't think I will miss those couple of ponies with this build:wink: . Thanks John!

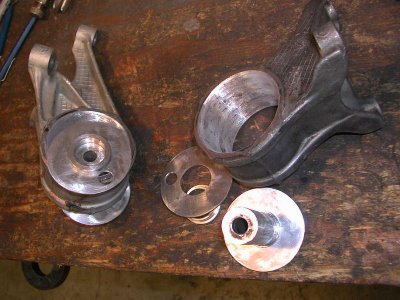
Last shots are the reason why you should buy motor mounts from SOS...I made my own solid Urethane mounts, with aluminum end supports. At this point in time, I hope this is the last time I do this...:frown:

Plan is to have the long block finished this weekend, all the machined parts are sitting in my kitchen, in plastic bags, just waiting for me:rolleyes: I get to degree cams for the first time too, this should be fun!!
 

Attachments

  • DSCN5782.jpg
    DSCN5782.jpg
    94.1 KB · Views: 38
  • DSCN5783.jpg
    DSCN5783.jpg
    69.3 KB · Views: 60
  • DSCN5790.jpg
    DSCN5790.jpg
    88 KB · Views: 56
  • DSCN5791.jpg
    DSCN5791.jpg
    77.6 KB · Views: 53
  • DSCN5784.jpg
    DSCN5784.jpg
    86 KB · Views: 89
Back
Top