• Protip: Profile posts are public! Use Conversations to message other members privately. Everyone can see the content of a profile post.

Honcho's Long Road to Imola Type-S Zero

Brake Overhaul 05

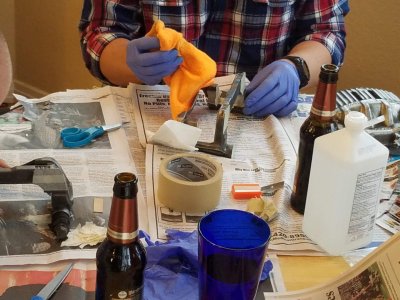
Painting the calipers takes ages to do correctly. You must lay down your coats thinly and wait 10-20 minutes between coats. The wait is longer if it is cold. Thankfully, the weather has been mild and the paint laid down correctly. I settled on silver as the caliper color, as it was the original color and the gold calipers on this real Imola Type-S looked good against the Washi Gray wheels.


Primer dried overnight. Nice and flat.

20181027_195410.jpg

First coats of silver going on.


20181027_195814.jpg
20181027_195821.jpg
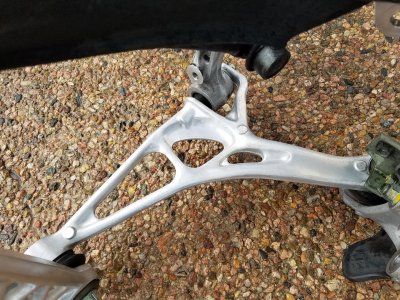
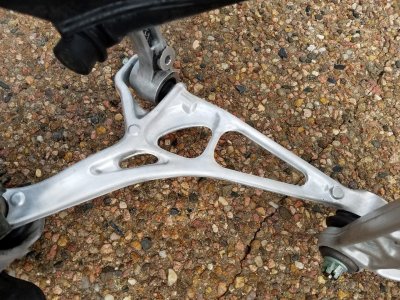
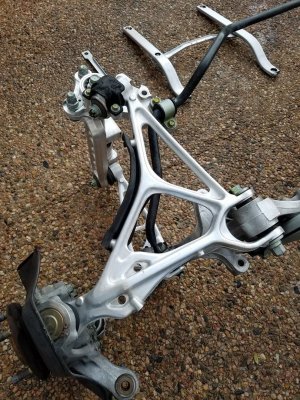
In between coats, I decided to remove the right front caliper to start the stripping process. After removal, I noticed some kind of thin string had wrapped itself around the wheel hub.

20181027_205519.jpg

After almost 20 minutes carefully picking it out of the hub, this is what I pulled out. My first thought was a thin metal wire, but on closer inspection it looked like thin plastic. Maybe fishing line? This car lived on the coast in Charleston, SC for almost 20 years. Perhaps the owner drove through some old fishing line? I'm fairly certain I removed it all, but may still replace the hub during Stage 1 repaint, since I cannot be sure about whether any plastic got into the bearing race or surfaces. More mysteries with this NSX.

20181027_210351.jpg
 
Last edited:
Body and Paint Work 11

Big labor over the weekend. I was inspired by [MENTION=13572]cmc140[/MENTION], so [MENTION=34522]NSX_n00b[/MENTION] came over to lend a hand as we removed the entire front subframe for cleaning and also replacement with the NSX-R suspension and NSX-R splash shields. A few important notes for those members who want to attempt this:

-- The assembly is heavy, but not as heavy as you would think. Two people can lift it easily.
-- At least on my, NSX, the assembly did not just fall down after we removed the last bolts. There was so much undercoat that the friction held it up and we had to carefully use prybars and tapping to walk it down. Still, I recommend loosely threading in one of the bottom bolts to hold the assembly and allow you to control it coming down.
-- There are two L-brackets that connect the front beam cast pieces to the frame rails. We thought it would be easier to leave the brackets bolted to the frame and remove the bolts in the beam instead (they are much easier to access). We were wrong. The upper control arm hangs up on the bracket so the assembly won't drop down. It is better to unbolt the brackets from the frame instead. You cannot use an extension because of interference from the control arm. You have to use a ratchet with a short socket and just muscle off the bolts. We got away with 12-point, but 6-point sockets would be best here.
-- You must remove the wheel speed sensors completely from the subframe. Make sure you get all of the 10 mm bolts, or it will rip out the wires when the subframe drops. The sensor should be dangling loose next to the brake line.
-- You must remove the shocks to slide the subframe out from under the car (unless you have a lift).

The front headlight covers need to be flipped back to access the nuts holding the compliance pivot. Because my front bumper is fitted incorrectly (too close to frame), it was almost impossible to get the covers out. Turns out we did not need to. You just need to flip them back. Affter almost cracking the left side cover pulling it out, we left the right one in there. We may just remove the bumper too, but job for another day.

20181028_133718.jpg


One note- we removed the two long bolts in the front bay, thinking they also went into the compliance pivot. They do not. On further inspection, they anchor a solid aluminum welded plate into the frame rail. There is not need to remove them, which is a royal pain, as it is very tough to get a socket on them. We had to use a 1/2" drive wobble extension. Interestingly, I could not find these bolts anywhere in the service manual. I will re-torque them to 69 ft/lbs, since that is what the other large bolts have on the subframe.

20181029_075642.jpg

20181029_075651.jpg

Left side- no subframe.

20181028_171831.jpg

Right side- no subframe. We used the wheels/tires to support the subframe, as we did not know how heavy it was. Now that we know, you don't really need them.
Notice the factory-fresh R-77 Formula Red paint under where the compliance pivot sits. Such a pretty red when new!

20181028_171846.jpg

Front dampers out. They are in very good condition, so I will sell them once i remove the rears.

20181028_174351.jpg
 
Last edited:
Body and Paint Work 12

Subframe out.


20181028_124259 (1).jpg

It's dirty. Undercoat everywhere.

20181028_124312.jpg

20181028_124347.jpg
Cleaning begins. It's a family affair. You will need at least two bottles of Turtle Wax Bug & Tar Remover, lots of red scrub pads and a good pressure washer. The undercoat is slimy and horrible. It is my new enemy on this car. NSX_n00b kept saying "why would you do this to the car? The aluminum doesn't need to be undercoated!" I was saying the same thing. It seems like a lot more undercoat then Honda used- my black NSX did not have nearly this much. We wondered if it a dealer option- some kind of "rustproofing" service for your exotic car.

20181028_151006.jpg


Preliminary results after almost 4 hours of scrubbing and washing. We need to flip it over and do the other side. Then, we have to scrub the whole thing down with de-greasing soap and power wash one last time. Good news is the ball joint boots are all in really good shape. Still, I probably will send all this out to Steve Ghent or Carbon6 for new ball joints next year.

20181028_164237.jpg


20181028_164243.jpg

20181028_164305.jpg

Put away for now. The red on the pieces is the reflection from the car, not overspray lol.

20181028_171807.jpg
 
Last edited:
Love the attitude towards this build. Fun family time it seems. Some pictures do not load, just FYI. Try opening this page using Incognito Tab in your browser to verify access to the referenced pictures.
 
Love the attitude towards this build. Fun family time it seems. Some pictures do not load, just FYI. Try opening this page using Incognito Tab in your browser to verify access to the referenced pictures.

That's strange as they are all in the shared folder. I'll re-paste the links when I get a minute.
 
haha I have those ski boots...
 
Undercoating like that is usually used to hide damage and repairs. They usually dab in mud while it’s drying to make it look like it’s been on for a long time. Don’t ask how I know.
 
Undercoating like that is usually used to hide damage and repairs. They usually dab in mud while it’s drying to make it look like it’s been on for a long time. Don’t ask how I know.

Interesting. Thankfully, we found no damage anywhere. Based on the areas where the subframe covered the frame rails, it looks like a factory spray job. Maybe the guy at Tochigi went a little heavy with the spray gun on this one?

Links should be fixed. I reloaded Chrome and the links changed inside the shared folder.
 
I'm very much a "Lurker" on Prime but I wanted to let you know that as someone who has restored or helped to restore a few Honda's I'm really enjoying the content. Keep the updates coming and thanks for keeping the "Build Thread" alive. [MENTION=13572]cmc140[/MENTION]'s thread was one of the best and your project has a great start and similar feel.

J.

Thanks. Lots of content to follow, but it will really kick into gear around this time next year when the car changes color!

You're moving right along. It's good to see this NSX being saved.

I like the pics of everyone hard at work cleaning suspension components!

Thanks Dave. Can you PM me your contact info? I have some Q's about some parts of the project.
 
Brake Overhaul 06

This weekend it was snowed out at Honcho's place, so further cleaning and prep of the subframe would have to wait. Instead, we moved inside to the kitchen table for cleaning, masking and first coats of paint on the brakes. I was also able to disassemble and clean/prep the left front brake caliper. The 40 mm piston had some scoring that could not be buffed out, so I decided to replace both 40 mm pistons. Another box is on the way from Japan...

Masking and then a final alcohol wipe down before primer. Some Warsteiner Dunkel made the time go by easier...

received_937082336485957.jpeg

Left front caliper stripped and alcohol prepped. Right front caliper ready for clear coats.

20181111_150801.jpg

The garage was about 30 degrees, so we could not paint in there. However, HVAC just finished the basement runs, so it is now climate controlled down there! A perfect paint booth.

Ready for primer.

20181111_162126.jpg

Primer coats going on. With the VHT product, you should lay down multiple thin coats. My process is 2 primer, 3 color, 2 clear. Wait 10-20 minutes between coats. Then bake.

20181111_164849.jpg

Clear coat going on.


20181111_164840.jpg

Once the front brakes are ready for baking, I will move on the the rear calipers. Hopefully the weather will improve so we can finalize the cleanup of the front subframe, install the NA2 NSX-R suspension and sway bar, and put it back in the car. Also, I have to start a deep clean on the front bay before everything goes back in. Lots more work to do and soon I will have to start painting the basement too...
 

Attachments

  • received_191314911792655.jpeg
    received_191314911792655.jpeg
    267.3 KB · Views: 0
man... these pics are great!!!

Not sure if you know but it's my understanding the Type R front pivot compliance bushings are of different durometer. Might be worth upgrading to. I'm not sure if the bushings are available separate or if need to buy the entire pivot assembly. It's been on my to-do list for years.. just can't cough up the dough for it.

Thanks! The bushings are not available separately, so you have to get the entire pivot assembly, which is about $900 per side. The part numbers are:

51380-SL0-900 (L. Assy.)
51370-SL0-900 (R. Assy.)

Fun fact: the Type-S.Zero also used these pivots.

A cheaper option by far might be the Prothane kit. I think it includes these bushings in a higher-duometer urethane. I'm going to go the Prothane route on the entire suspension, as it will all be disassembled for paint next year. I'll send the pieces out to have the OEM rubber pressed out (I don't have the proper equipment for that) and then install the Prothane bushings myself. I'll probably have the ball joints done too. Can't decide between Carbon6 and Steve Ghent.
 
Brake Overhaul 07

Color coats going on. Let them dry overnight, flip them and and will paint the other sides today.

20181113_203549.jpg
20181113_203542.jpg

20181113_203536.jpg
 
last I checked maybe 2yrs ago now it was still in the $700~ range. See what I mean [MENTION=12356]Mac Attack[/MENTION]?
Thanks! The bushings are not available separately, so you have to get the entire pivot assembly, which is about $900 per side. The part numbers are:

51380-SL0-900 (L. Assy.)
51370-SL0-900 (R. Assy.)

Fun fact: the Type-S.Zero also used these pivots.

A cheaper option by far might be the Prothane kit. I think it includes these bushings in a higher-duometer urethane. I'm going to go the Prothane route on the entire suspension, as it will all be disassembled for paint next year. I'll send the pieces out to have the OEM rubber pressed out (I don't have the proper equipment for that) and then install the Prothane bushings myself. I'll probably have the ball joints done too. Can't decide between Carbon6 and Steve Ghent.
 
Subscribed having Found this great build.

Quick question, as you have the frame out, have you considered the Spoon rigid collar during reinstallation? The Type-S deserves to be as OEM as possible for geometry and these small additions now will surely give you one of the best handling NSX when all finished and back on the road ...

Great colour choice ... has to be the best for the S

Ref the engine bay, I was once told that the Zero and the R have black bays, all others are body colour ...

Happy cleaning and restoring!

Thanks! The frame will come out again for paint next year. Even so, I have considered the Spoon collars, but based on people who used them with the NSX, the car is built to such tight tolerances that they are not changing much. I'm going to skip the mod. Based on my research, the S, S.Zero and R all have black engine bays. However, there were some early Honda press cars (S and S.Zero) that had body-color bays (that particular S.Zero did not have the "Type-S" emblem too). I might do my bay in Imola though, as it just looks so good!
 
Last edited:
Body and Paint Work 13

After stuffing ourselves with Turkey, the refresh center crew (basically [MENTION=34522]NSX_n00b[/MENTION] and my two kids lol) and I got together to resume cleaning of the front subframe. Sunny skies and 60-degree weather meant it was time for more pressure washer action. We flipped over the assembly to clean the other side. We took extra care as this is the side you see when it is on the car. We also were able to do a final clean on the shift cable brace and bracket. They turned out amazing.

20181123_154940.jpg

As Kaz would say, cleaned to this level...

20181123_155110.jpg20181123_155106.jpg

You might notice the red overspray on the sway bar. While we were able to remove most of the overspray from the assembly, we left it here...because I am awaiting a NSX-R front sway from Japan!

20181123_155106.jpg

We noticed the camber plate on the compliance pivot had some kind of metal peeling/stripping around the hex hole. Not sure if this will affect aligning the car. Unfortunately, I could not find this camber plate in the parts catalog...:frown:

20181123_154946.jpg

The other compliance pivot. Compare the camber plate hex hole to the previous photo. Cause for concern? Also, the plastic ball joint covers have seen better days. I will replace them.

20181123_155001.jpg

Compliance pivots look almost new...

20181123_155032.jpg20181123_155044.jpg

Really pleased with how the ball joint bottoms and bronze circlips turned out. They were caked in black crud.

20181123_155005.jpg

The cast cross beam pieces were the toughest. The undercoat stuck in all of the crevices and even into the texture of the aluminum. It was pure misery getting it out. You can see some undercoat residue on the camber bolt. Good tip- the bug and tar remover does NOT remove the factory green Dacron coatings.

20181123_155052.jpg20181123_155056.jpg

Even after turning to the professional paint remover, we could not get all of the red overspray out of this side. But, it is a vast improvement.
 

Attachments

  • 20181123_155012.jpg
    20181123_155012.jpg
    575.5 KB · Views: 0
  • 20181123_155022.jpg
    20181123_155022.jpg
    569 KB · Views: 0
  • 20181123_154921.jpg
    20181123_154921.jpg
    350 KB · Views: 0
  • 20181123_154929.jpg
    20181123_154929.jpg
    320.5 KB · Views: 0
Last edited:
Body and Paint Work 14

As the light faded, we moved back into the garage to work on the front bay. Parts are rolling in from Japan and we will soon be able to reassemble the front subframe. In order to do that, we wanted to clean things up a bit. Working on a clean car is SO much better.

Getting there...
20181123_173329.jpg
20181123_173524.jpg20181123_173542.jpg
Some of these areas are just not reachable even with detail brushes and the microfiber rag. We will have to wait for Stage 1 disassembly to get it all perfectly clean.

20181123_173334.jpg

I was pleased to clean up the ABS reservoir. Even though it will be removed eventually...
20181123_173436.jpg

Brake reservoir also got some attention. I think this is a replacement master cylinder. Too clean on such a dirty car.

20181123_173500.jpg

Was able to clean the brake booster and the area. Better picture of old corrosion. I will paint over this with Rustoleum black when the car is apart next year.

20181123_173514.jpg

Next up is to remove the front bumper for the temporary repair and re-fitting to correct alignments.
 

Attachments

  • 20181123_173430.jpg
    20181123_173430.jpg
    223.9 KB · Views: 0
  • 20181123_173455.jpg
    20181123_173455.jpg
    156.6 KB · Views: 0
Last edited:
Brake Overhaul 08

After a mishap and setback during baking (tip- wait until the paint is DRY before you put the parts in the grill), some more parts were arriving. Still waiting on the new 40 mm pistons from Japan...

Carbotech AX6. After searching the ends of the Earth for my Project Mu HC800 (they were available from about 20 stores for my GT-R...) with no luck, I decided to try the Carbotech equivalent after a nod from @stuntman here. I used XP8 for the circuit on my old NSX and on street tires they were just too much. The AX6 is about 20% less friction than the XP8, but still vastly more than stock and with similar heat resistance. I think it will pair well with the Conti Extremes on 16/17 rubber.

20181123_173702.jpg

Also, I decided some ABS was better than none. Picked up this S2000 pump unit for $49. Need to contact [MENTION=24013]syndicate[/MENTION] to figure out the harness and plug. Also need to talk to Kaz about integrating SCS diagnostic into the harness. Maybe once Stage 2 is done and after I find some Zanardi wheels, I'll spend the $2,000 to get the NSX pump...

20181123_173728.jpg20181123_173741.jpg20181123_173814.jpg

Now, time to order the new brake pipes, prop valve and correct NSX pump bracket. Also, have to repaint the brake parts and bake again...
 
Let me know. I am about to make a run of 10 ABS harnesses. I can put you down for one. I think you only have to short the SCS wire to ground to get it to flash codes. I leave that wire and the DLC wire accessible under the hood. PM me and we can talk about the harnesses.


Sent from my iPhone using Tapatalk
 
Back
Top