-
Protip: Profile posts are public! Use Conversations to message other members privately. Everyone can see the content of a profile post.
You are using an out of date browser. It may not display this or other websites correctly.
You should upgrade or use an alternative browser.
You should upgrade or use an alternative browser.
New owner. Mini fix it / build thread
- Thread starter Tech7042
- Start date

- Joined
- 7 March 2008
- Messages
- 175
Use a good in tank pump some id 1000s and the 044 and you will be good.
Use a good in tank pump some id 1000s and the 044 and you will be good.
That's what I was thinking. The 044 in line should suffice.
Dropping the rotating assembly off at the machine shop today to get balanced today. Will snap pics and update tonight!
- Joined
- 7 March 2008
- Messages
- 175
What injectors do you have? You might be able to use 750s but with e85 you will have to run high base pressure but with the right injectors it woont matter.
Any update?
Still waiting on the machine shop to finish the balancing. Also waiting on some more key parts to arrive.
love the build man
shotty yo!
Lets just trade for a day when both our cars are done.
Got everything back from the machine shop. Plastigauging and assembly of the short block today. Stay tuned!

- - - Updated - - -
Got a lot done today. Pretty much finished up the bottom end. Here is a rundown of all the work I had done:
-Engine blueprinting and balancing-
Requested machine shop to balance rotating assembly under this criteria:
1) Match lightest piston to heaviest pin
2) Match lightest piston/pin set to heaviest connecting rod
3) If needed, machine ONLY the connecting rod cap, and NOT the body of the rod to bring the weights of each piston/rod assembly within .2 grams of each other
4) Based on the weights of the piston/rod assembly, calculate dummy weights needed, or amount of material to remove to balance crankshaft
5) Once internals are balanced, bolt flywheel and harmonic damper onto the crank, and balance. Only if needed- machine ONLY the flywheel to counterbalance any imbalance in the crank
6) Hot tank
7) Dial bore gauge to ensure bore is true and free from egg shaping
I asked them to balance it this way based on information gathered through a buddy of mine who is a Chassis Engineer for Honda. He ran it by the race engine builder at Honda and informed me that this is the way it is done on all of their race engines. Balancing the rotating assembly this way ensures even weight distribution which will result in a naturally balanced assembly- without "marrying" external engine parts to the internal parts.
All in all, a bit of material was taken out of rod caps 1,2,3,5 and 6. Some material was drilled out of the crank counterweights and some material was also taken out of the flywheel. The machinist told me that not much was needed to bring it to balance, as all the factory parts were pretty much well balanced with each other.
Anyway, enough of my OCD rant, on with the pics!
New OEM main bearings installed and plastigauged:

My buddy helped me get this shot:

Once everything was measured, on with assembly. Assembly lubed:

And this is quite possibly the best tool I've ever bought- Wiseco tapered ring compressor makes installing pistons a breeze:

Square it, set it, and literally push it in with your thumbs:

First piston IN:

Another handy tool to have- torque angle gauge. The service manual has you torque the rod nuts to 14lb/ft and then rotate each one to 95*. This allows for the most accurate measurement:

95*

Once that was all done, it was just torquing the main caps and girdle, reinstalling the windage tray, oil pickup, oil pump, jets, new front and rear engine seals, oil pan and voila:

Final measurements are:
Main bearings
Standard (NEW)
0.0009"-0.0019"
1- 0.0015"
2- 0.0015"
3- 0.0015"
4- 0.0015"
Rod Bearings
Standard (NEW)
0.0016"-0.0024"
1- 0.0018"
2- 0.0019"
3- 0.0017"
4- 0.0019"
5- 0.0019"
6- 0.0018"
If I wanted to I could have mixed and match bearings the have all the rod bearings all be the same #. . .but I figure, good enough.
Should be finishing up shortly. Still waiting on some key parts to come in for the turbo setup. Stay tuned!
- - - Updated - - -
Got a lot done today. Pretty much finished up the bottom end. Here is a rundown of all the work I had done:
-Engine blueprinting and balancing-
Requested machine shop to balance rotating assembly under this criteria:
1) Match lightest piston to heaviest pin
2) Match lightest piston/pin set to heaviest connecting rod
3) If needed, machine ONLY the connecting rod cap, and NOT the body of the rod to bring the weights of each piston/rod assembly within .2 grams of each other
4) Based on the weights of the piston/rod assembly, calculate dummy weights needed, or amount of material to remove to balance crankshaft
5) Once internals are balanced, bolt flywheel and harmonic damper onto the crank, and balance. Only if needed- machine ONLY the flywheel to counterbalance any imbalance in the crank
6) Hot tank
7) Dial bore gauge to ensure bore is true and free from egg shaping
I asked them to balance it this way based on information gathered through a buddy of mine who is a Chassis Engineer for Honda. He ran it by the race engine builder at Honda and informed me that this is the way it is done on all of their race engines. Balancing the rotating assembly this way ensures even weight distribution which will result in a naturally balanced assembly- without "marrying" external engine parts to the internal parts.
All in all, a bit of material was taken out of rod caps 1,2,3,5 and 6. Some material was drilled out of the crank counterweights and some material was also taken out of the flywheel. The machinist told me that not much was needed to bring it to balance, as all the factory parts were pretty much well balanced with each other.
Anyway, enough of my OCD rant, on with the pics!
New OEM main bearings installed and plastigauged:
My buddy helped me get this shot:
Once everything was measured, on with assembly. Assembly lubed:
And this is quite possibly the best tool I've ever bought- Wiseco tapered ring compressor makes installing pistons a breeze:
Square it, set it, and literally push it in with your thumbs:
First piston IN:
Another handy tool to have- torque angle gauge. The service manual has you torque the rod nuts to 14lb/ft and then rotate each one to 95*. This allows for the most accurate measurement:
95*
Once that was all done, it was just torquing the main caps and girdle, reinstalling the windage tray, oil pickup, oil pump, jets, new front and rear engine seals, oil pan and voila:
Final measurements are:
Main bearings
Standard (NEW)
0.0009"-0.0019"
1- 0.0015"
2- 0.0015"
3- 0.0015"
4- 0.0015"
Rod Bearings
Standard (NEW)
0.0016"-0.0024"
1- 0.0018"
2- 0.0019"
3- 0.0017"
4- 0.0019"
5- 0.0019"
6- 0.0018"
If I wanted to I could have mixed and match bearings the have all the rod bearings all be the same #. . .but I figure, good enough.
Should be finishing up shortly. Still waiting on some key parts to come in for the turbo setup. Stay tuned!
Great to see progress again. Can't wait to see the outcome!
Got A LOT done the past couple of weeks. Just got everything finished up with the engine. Assembly went nice and easy and she runs smoooooth. Here are the pics from the final assembly / install:
Got the engine off the stand and bolted on the new clutch assembly:

Bolted the trans up and setup on the engine jack:

Strapped her down, and raised it up into the car:


After all this was done, I could then drop the entire suspension / short block out as a unit for final assembly:

Heads:

Heads bolted on, time for cylinder leakage tests:

Shes healthy! All cylinders less than 10psi leakage rates. This is excellent for an engine with brand new internals that has never been run.
Heads and valvetrain all back together:


Timing belt install, some new seals gaskets and hoses, and a valve adjustment later, She fires up (running pig rich, but running none the less):

Prior to start up, I performed a compression test and the readings were as follows:
Cyl1: 185Psi
Cyl2: 185Psi
Cyl3: 185Psi
Cyl4: 185Psi
Cyl5: 185Psi
Cyl6: 185Psi
These numbers are outstanding, and will only get better with time. Right now I am doing an engine / new clutch break in procedure. Also waiting on some parts for the turbo to come in. Then it's time for tuning.
Turbo upgrades / mods:
Picked up a TiAL V44 wastegate with 10lb spring:

Wrapped my comptechs with DEi Header wrap. This is a great mod that really does work!


I also wrapped the turbo Y-Pipe and turbine outlet pipe. Also going to run a DEi Turbo blanket.
For anyone running an angus kit, I would recommend swapping out the wastegate. The one that comes with the kit is a cheap POS chinese made knock off a TiAL F46. This was the FIRST time I took the cap off the unit ever (it's only 10 months old) and this is what the diaphragm looks like:

It seems to be dryrotting or splitting apart. Who knows how long this would have lasted. The diaphragm material is some sort of cheap rubber/plastic. Ghetto. Though the Angus setup is a great kit, I find that once I'm done with everything, What I will have will be far from an angus kit. With everything I am swapping out, the only parts that will be original Angus is the Y-Pipe Muffler, and bracing. Note to all who plan to go to turbo their NSX- Piece your own kit together.
Finally, upon tearing down my engine, I found this:


This is my waterpump. I removed it and found globs of hondabond applied to it. Whoever worked on my car prior to me owning it went a little overboard with this stuff. Using liquid gasket on a component that already has a rubber seal / O-ring is like wearing two condoms- stupid and not recommended. It will only cause more leaks in the future. Good thing I was able to get JUST the waterpump seal and not have to buy a new pump. Cleaned her up and installed new seal for a proper install.
Getting closer to the end of the 2013 build. Stay tuned!
Got the engine off the stand and bolted on the new clutch assembly:
Bolted the trans up and setup on the engine jack:
Strapped her down, and raised it up into the car:
After all this was done, I could then drop the entire suspension / short block out as a unit for final assembly:
Heads:
Heads bolted on, time for cylinder leakage tests:
Shes healthy! All cylinders less than 10psi leakage rates. This is excellent for an engine with brand new internals that has never been run.
Heads and valvetrain all back together:
Timing belt install, some new seals gaskets and hoses, and a valve adjustment later, She fires up (running pig rich, but running none the less):
Prior to start up, I performed a compression test and the readings were as follows:
Cyl1: 185Psi
Cyl2: 185Psi
Cyl3: 185Psi
Cyl4: 185Psi
Cyl5: 185Psi
Cyl6: 185Psi
These numbers are outstanding, and will only get better with time. Right now I am doing an engine / new clutch break in procedure. Also waiting on some parts for the turbo to come in. Then it's time for tuning.
Turbo upgrades / mods:
Picked up a TiAL V44 wastegate with 10lb spring:
Wrapped my comptechs with DEi Header wrap. This is a great mod that really does work!
I also wrapped the turbo Y-Pipe and turbine outlet pipe. Also going to run a DEi Turbo blanket.
For anyone running an angus kit, I would recommend swapping out the wastegate. The one that comes with the kit is a cheap POS chinese made knock off a TiAL F46. This was the FIRST time I took the cap off the unit ever (it's only 10 months old) and this is what the diaphragm looks like:
It seems to be dryrotting or splitting apart. Who knows how long this would have lasted. The diaphragm material is some sort of cheap rubber/plastic. Ghetto. Though the Angus setup is a great kit, I find that once I'm done with everything, What I will have will be far from an angus kit. With everything I am swapping out, the only parts that will be original Angus is the Y-Pipe Muffler, and bracing. Note to all who plan to go to turbo their NSX- Piece your own kit together.
Finally, upon tearing down my engine, I found this:
This is my waterpump. I removed it and found globs of hondabond applied to it. Whoever worked on my car prior to me owning it went a little overboard with this stuff. Using liquid gasket on a component that already has a rubber seal / O-ring is like wearing two condoms- stupid and not recommended. It will only cause more leaks in the future. Good thing I was able to get JUST the waterpump seal and not have to buy a new pump. Cleaned her up and installed new seal for a proper install.
Getting closer to the end of the 2013 build. Stay tuned!
That's awesome... I'm jealous how quickly you work, yet pay attention to the details!
Now that things have settled down a bit for me with a move and new job, I'd like to get started back on my engine build. At this point, I've completely forgotten how it all goes back together.
Dave
Now that things have settled down a bit for me with a move and new job, I'd like to get started back on my engine build. At this point, I've completely forgotten how it all goes back together.
Dave
That's awesome... I'm jealous how quickly you work, yet pay attention to the details!
Now that things have settled down a bit for me with a move and new job, I'd like to get started back on my engine build. At this point, I've completely forgotten how it all goes back together.
Dave
Thanks man! I've seen your engine build and it is NICE. Hurry up and put that bad boy together.
So awesome!
Amazing build with great attention to detail!!!
I'd love to have you turbo/build my Lime Green at some point!!
For sure man! Send it my way when you're ready!

What a great thread. Love the pics and to see how a NSX powertrain goes together!
What a great thread. Love the pics and to see how a NSX powertrain goes together!
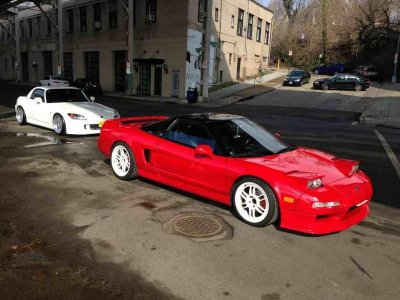
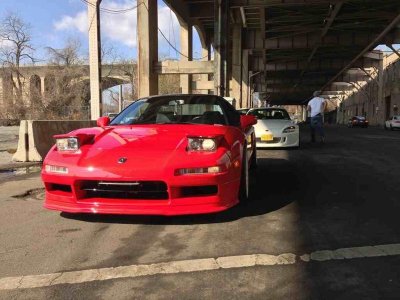
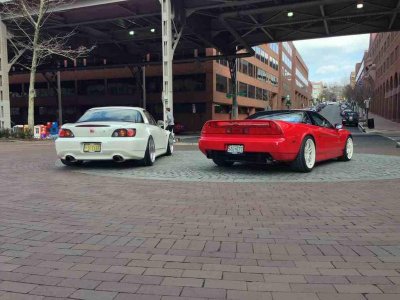
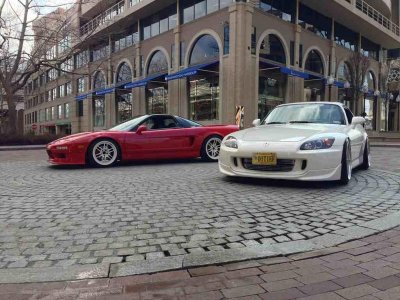
Thanks man. Still breaking in the new engine. Put about 125 miles on it so far. Engine is running smoooth with no hiccups, leaks, misfires, or issues of any kind. This morning a friend and I cruised around to downtown Washington DC and snapped some pics:


My intercooler parts are going to start trickling in this week. I'm scheduled for tuning on the 16th. Stay tuned for updates!!
Attachments
-
 ImageUploadedByTapatalk1361754814.103779.jpg73.6 KB · Views: 161
 -
 ImageUploadedByTapatalk1361754839.919765.jpg69.6 KB · Views: 151
 -
 ImageUploadedByTapatalk1361754859.537459.jpg72.2 KB · Views: 156
 -
 ImageUploadedByTapatalk1361754880.837068.jpg71.8 KB · Views: 162
 -
 ImageUploadedByTapatalk1361754918.437233.jpg85.4 KB · Views: 150
 -
 ImageUploadedByTapatalk1361754930.586981.jpg60.5 KB · Views: 158
 -
 ImageUploadedByTapatalk1361754945.737152.jpg94.7 KB · Views: 151
Last edited:
so sexy. I'm jealous you get to all the nsx owners that get to drive their cars at this time of the year.
so sexy. I'm jealous you get to all the nsx owners that get to drive their cars at this time of the year.
Thanks man.
I spent some time on the car the past week. I finally got the parts for the cold side of the turbo system and finished up install. I got the heat exchanger from driving ambition, and the fast acting iAT sensor from T1 Race Development. The electric waterpump I picked up from summit racing, along with 50' of heater hose, clamps and mounts:

Heat exchanger mounted up:

You have to cut the radiator ducting to make it fit in front of the heat exchanger. After a bit of trimming, it fit perfect.
And the water to air intercooler and charge pipes from SOS:

This kit fit perfect, and was a nice and tidy install.
This is how I have the waterpump mounted. I used a mounting clamp for the NSX AC receiver dryer as a mount. The reservoir is from a 2008 Shelby Mustang Cobra:

Onto the wiring:

This is a sub harness I made for the pump. It uses a 4 Pin relay to provide voltage to the pump. The pump is grounded to the pump mount:

And this is where voltage for the relay and pump come from. The under hood fuse box made for a convenient and clean install:

Test for voltage at the pump 2Pin connector and we're good to go:

After it was all set up, I added about a gallon and a half of water to the reservoir while the pump primed and filled the lines, exchanger and core. This W/A setup should definitely help in cooling. The air to air intercooler and stainless steel pipes in the AP-X kit are inefficient and don't work. There is simply not enough air flow to cool the charge, and the stainless steel piping contributes more to high iAT. I still need to install the 3 bar map sensor, fast acting iAT and also complete the charge piping between the turbo and intercooler, but it is nearly done. Can't wait for tuning on the 16th! Stay tuned!
Last edited:
- Joined
- 19 March 2003
- Messages
- 3,442
Excellent engine build. What is your HP goal?
I know dude, I'm gettin antsy!!!!!Is it March 16 yet?! damn
Thanks man, My goal was 550whp on E85, but since I ran out of time to do the E85 conversion, I'll see what I can make on pump gas. E85, along with some other cool projects is still in the plans, but not for this season.Excellent engine build. What is your HP goal?
Spent a bit more time on the car this week just tweaking some things here and there.
Here is the t1 fast acting iat sensor installed on the charge pipe:

I made a custom subharness for the iat sensor that makes for a nice plug and play stealth install that appears factory.
Got my charge pipes and couplers, and installed them the backyard way:

And here is the final product. Completed customized angus kit with aluminum charge pipes, TiAL components, and W/A intercooler:

My apologies for the extremely filtered photo- it was the only way I could get all the details under the car. Stay tuned! next update, I'll be tuned!