• Protip: Profile posts are public! Use Conversations to message other members privately. Everyone can see the content of a profile post.

Accessing engine block coolant drains and thermostat removal

Joined
3 November 2011
Messages
3,391
Location
Saskatchewan, Canada
I am in the midst of my coolant and coolant hose replacement project. I have opened all the drains except for the engine block drains and have started removing hoses. I have had no trouble finding the engine block drains. Because of all the stuff in the way, as far as I can figure out, the only way to open the drains is going to be using a deep socket on a long extension. I don't think there is any way that I can get a box or open end wrench along with my hand up there to access the drain. On the front drain I am thinking that even getting a deep socket on a long extension up there is going to be a challenge. The interesting part is that the service manual says to attach a hose to the drain to facilitate collection. That is not possible when using a deep socket unless I do the initial release with the deep socket, lightly close the valve and attach the hose and then open the drain. Attaching the hose and then opening the valve with the hose attached is going to be interesting.

Do I have some kind of mental block and I am missing something obvious about how to do this or do most people just skip the hoses, open the drains and let 'er go? Is there some other tool than a deep socket on an extension that is the ideal tool for opening the drains? I am doing this with the car up on jack stands so there is not a huge amount of room to allow quick movement out of the way if the coolant comes out in a rush. I anticipate getting wet. The hoses would have been a nice touch if I could actually get them on the drains and open the drains with them attached. When I look at the drains they look factory new, not a nick or scratch which makes me think that on my previous coolant changes the dealership mechanics might have figured 'not happening' and just used the bottom hose drains and the rad drain to get 'most of the coolant out'.

While on the coolant system topic, how have owners replaced their thermostats? On my 2000 I can see the big hose that goes to the thermostat housing and its attachment point; but, I can only spot the edge of something that might be the bleed valve. I can barely see the actual thermostat housing. The service manual does not indicate that anything has to be removed to do a replacement of the thermostat; but, right now I am thinking something has to move because I can barely see the housing. Some of the stuff will get cleared away as I remove some of the little coolant hoses; but, right now the thermostat housing is looking like an impossible to see and access item. Removing the throttle body - filter box hose may help. Does the throttle body have to come off? Some wisdom / prior experience would be appreciated!
 
I took one look at the block drains, contemplated removing the plugs, cleaning the threads, and replacing the drains and decided that an R&R of them was a fool’s errand so they remain as the factory installed them 29 years ago . I do, however, change my garage queen‘s coolant every 5 years and so far so good.
 
I took one look at the block drains, contemplated removing the plugs, cleaning the threads, and replacing the drains and decided that an R&R of them was a fool’s errand so they remain as the factory installed them 29 years ago .

Ditto.

You are going to get drenched doing the rubber in the middle of under tray anyways, assuming 'coolant hose project' means replacing them all. No need to do it twice.

I did not remove the throttle body on my 94, but did remove the coolant tank and the upper and lower air box.

This may be helpful for you.
 
Last edited:
I do the block drains with a small crescent wrench. I sort of have to snake my arm up there and then get the wrench on the drain. You can also get a deep socket on them with a long extension.

For the thermostat, you should remove the airbox and throttle bellows for better access. The thermo cover is just two bolts and it comes right off- no need to disconnect the hose. It's tucked right under the throttle body, so it's kind of hidden. I use a 6" or 12" extension with a deep socket to get to the bolts and ratchet away from the throttle body for easier clearance. Be prepared for a small flood of coolant. I put a ton of plastic wrap on top of the transmission and it usually keeps most of it off the housing.

When installing the new theromstat, make sure to use a very thin layer of silicone grease on the gasket. (LarryB taught me to use the "Pool Lube" stuff they sell at pool supply stores). Also make sure to clock the bleeder pin at 12:00 when installing the thermostat. Finally, with the thermo cover off, it's a good opportunity to replace the radiator fan switch thermistor. The sensor is cheap and controls your radiator fan, which is a critical part of the NSX cooling system. Just make sure to break it loose before you remove the thermo cover. :)
 
Ditto.

You are going to get drenched doing the rubber in the middle of under tray anyways, assuming 'coolant hose project' means replacing them all. No need to do it twice.

I did not remove the throttle body on my 94, but did remove the coolant tank and the upper and lower air box.

This may be helpful for you.

The under tray tubes are drained so I guess I get to see how much coolant is still in the tubes when I pull the hoses. There was an awful lot left in the upper rad hose because of the elevation change it goes through. Based upon your comments and @tucsonsx's comments I may give a quick try on the drains and if they don't open easily pass on draining the block.

My 2000 has the DBW throttle body so I don't no whether that makes it worse or no different in terms of access. I was already thinking that coolant tank removal is definitely in the cards to make it easier to get at those 3 big hoses coming up the firewall. Based upon your comments I will plan for removal of the airbox and attached tube to the throttle body to access the thermostat.

Thanks for the comments.
 
This ^^. Thermostat comes out easily with the airbox & bellows out. I think the SM recommends replacing the 2 bolts, which seemed odd since mine looked pristine, but for $2...

I just followed the SM for the thermostat and it was fairly easy.

I think the main advice is not to use the OEM thermostat which is overly complex and prone to sticking open but to use a Stant. (Some guy named Honcho recommended it to me back in 2021.) It works perfectly with the OEM gasket. Mine was stuck open on my '95 so it took a long time to come up to temp. Switched to the Standt 14128 & it's perfect now.

I don't know if you have a 3D printer, but I recognised the getting wet problem so I 3D printed a long hollow socket that I could unscrew the valve with and then have it direct the fluid into a container. It worked perfectly for one of the valves, but the other had been over tightened on a previous service. (might have been some SM's with incorrect or unclear torque spec's if I recall) It was so tight, the whole valve unscrewed en bloc & did make a fair mess. It took a LOT of torque to loosen the valve on my workbench for reinstallation to the correct torque.

PM me & I'll send you the stl if you want to print it.
 
Last edited:
I do the block drains with a small crescent wrench. I sort of have to snake my arm up there and then get the wrench on the drain. You can also get a deep socket on them with a long extension.

For the thermostat, you should remove the airbox and throttle bellows for better access. The thermo cover is just two bolts and it comes right off- no need to disconnect the hose. It's tucked right under the throttle body, so it's kind of hidden. I use a 6" or 12" extension with a deep socket to get to the bolts and ratchet away from the throttle body for easier clearance. Be prepared for a small flood of coolant. I put a ton of plastic wrap on top of the transmission and it usually keeps most of it off the housing.

When installing the new theromstat, make sure to use a very thin layer of silicone grease on the gasket. (LarryB taught me to use the "Pool Lube" stuff they sell at pool supply stores). Also make sure to clock the bleeder pin at 12:00 when installing the thermostat. Finally, with the thermo cover off, it's a good opportunity to replace the radiator fan switch thermistor. The sensor is cheap and controls your radiator fan, which is a critical part of the NSX cooling system. Just make sure to break it loose before you remove the thermo cover. :)

I must have fat fore arms. The back drain was not as bad; but the front I could sort of get my hand in there up just passed my wrist; but, them my arm muscle started to cramp up and I got it out of their quickly. I didn't want to have my wife ending up calling the fire department to have them come and extricate me from underneath the car.

If its not an easy job to open the drains with an extension on a ratchet its not happening. I will follow the advice on the airbox and bellows.
In truth, I almost never get anything out of the front drain. I suspect it is because the engine is tilted backwards in the car. You should be ok.
 
The thermostat bolts have sealant on them if I recall, hence the recommended replacement. Good luck, take your time. A hose pick, long reach 45 degree needle noses, a pair of ring nose pliers and knipex clamp pliers make the job pretty easy.

Plenty of new tools!
 
More advise request #1.

The hoses under the car are done. I am mostly done the front end; but, I am holding off finishing up the heater hoses. The hoses are off except for the long one that attaches to the front of the heater valve and goes down and disappears somewhere behind the battery box. I can't find anything in the SM which indicates where the end of that hose is. I have not removed the battery box; but, I have reached in behind with my hands to feel the hose and it appears to be above and perhaps dropping down behind the steering rack. I can't get my fingers in all the way to feel the clamp; but, I can tell it is really getting tight where ever the hose is going. I have the power steering rack which does take up a lot of space. Am I going to have to remove or loosen the rack to get access or will just removing the battery box provide reasonable access?

The heater hoses have been a bit of a nightmare because they do not want to release from the pipes even when I have scored the outer hose and then jammed a blunt instrument in between the hose and the pipe to squirt silicone lube to help with the release. Given the general location of the lower end of that hose I know it is going to be awkward. If access to the clamp is a pain I might leave the replacement hose in its original bag in the parts box for some future, younger owner.

I will move on to the engine end for now.
 
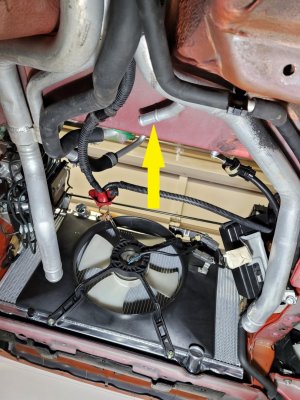
Here is the hose end you're looking for. Keep in mind, this is with the entire front subframe removed, including the steering rack.

20211127_203528.jpg
 
Yeah, that is about where it seemed like it was going. It felt like and from your photo is a T tap in the lower rad line. From my finger inspection and getting under the car to have a look, it appears to be pretty much buried between the mungo steering rack and the body panel. Given that none of these hoses have come off without a fight I think I am going to pass on this particular hose.

Thanks for the picture.

As per your comment I did give the rear engine drain a try and it was fairly easy to open and I collected quite a bit of coolant - perhaps 3 l plus what ended up on the floor and down my sleeve. A lot drained into the shield around the front exhaust pipe so I expect there is going to be a fair amount of steam generated when I fire the engine up for the first time. Given the ease of opening the rear drain I thought I would try the front drain; but, that was a no-go because my ratchet extension was only about 10" and with that shield in front of the oil pan in place I could not reach the drain. I wasn't up for removing stuff to get at the drain.
 
More request for advice #2

I think I have everything changed in the engine compartment with the exception to the two hoses at the oil cooler. I had an initial panic when I looked at 19522 PR7 J021 - by-pass hose A and 19524 PR7 A01 by-pass hose C. The hoses in the packages were nothing like the hoses shown in the 2000 parts diagram. These two hoses are specific to the 1997+ cars and a little internet internet trolling indicates that Honda never bothered to update the parts diagram for the later cars, just changed the parts numbers in the diagram so the parts do not match the pictures or go where the parts pictures show they go. That would be OK if the 97+ service manual provided a diagram for the cooling system; but, it doesn't (Oops - did find the diagram after I had everything together). Fortunately, I physically checked each hose before cutting and yanking it off to make sure I had the correct replacement and the correct orientation. I eventually found the A and C by-pass hoses after I had eliminated everything else.

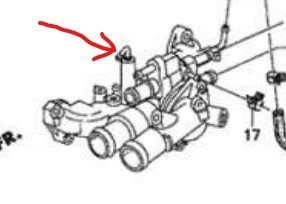
The current question is the correct location for the top hose to the coolant expansion tank. It was the last hose that I added back in and the only remaining port was a curved barbed fitting on the top of the thermostat housing (red arrow)

coolant tank line.jpg

Most of the lines I retained a good mental picture of the correct locations. However, in order to make access to get at the deeper buried stuff this was one of the first lines I removed and I was drawing a complete blank on what it had been connected to. Based upon the fact that its an easy fit for the molded hose and the last available port I am pretty sure that it is correct location; but, confirmation would be nice.

The 2000+ cars have a cross pipe at the back of the engine which I am pretty sure is for the air injection system for fast start up of the catalytic converters. I am pretty confident that they installed that pipe at the factory after they installed the thermostat housing. Getting the thermostat cover off was not too bad. Getting the lower mounting bolt on the thermostat cover back in place (the bolt that they forgot to show in the 97+ service manual) with that pipe in place was a treat.
 
Last edited:
The current question is the correct location for the top hose to the coolant expansion tank. It was the last hose that I added back in and the only remaining port was a curved barbed fitting on the top of the thermostat housing (red arrow)

View attachment 184284
Correct- this is the coolant bottle upper hose. It is designed with the metal riser to let air bubbles rise and enter the bottle where they are separated out from the coolant.
 
Little update.

I used my inspection camera to take a closer look at the connection of the heater inlet hose to the main water pipe. If I removed the battery I think I could have gotten access to the end. However, the camera showed that the release tangs on the hose clamp were rotated toward the back between the hose and the floor pan so completely inaccessible from the front and no room to come in from the side. At the factory I think the hose must have been installed and then the steering rack installed. Net result is that the heater inlet hose remains unchanged.

I ran into the same problem on the little short hose that connects to the oil cooler. I got the oil cooler end of that hose off without issue; but, I when looked in at the far end of the hose I could see the clamp; but, the release tangs were rotated towards the back of the car and there was some kind of boss on the body which was blocking access to the release tangs from the right side of the car. Neither my articulated hose clamp pliers or long needle nose pliers could access the clamp from the right wheel well. I slid under the car to see if I could access the clamp tangs from the front; but, the inner tripod joint housing was solidly in the way. I would have had to drop the driveshaft to access the hose clamp from the front so that wasn't happening.

I measured how much coolant I collected and it came to just a nudge under 15 l. With the amount I spilled when pulling off the rad hoses and some of the other hoses where coolant was trapped I am guessing that was about .5 - .7 l so just using the back drain on the engine block was pretty effective at getting most of the coolant out of the cooling system.

I replaced the thermostat and was disappointed to find that the inner rubber flap was not bulged out, so the old thermostat was just fine. My long warm up period is not due to a leaking thermostat - its just the way it is.

There is no way that you are getting access to the hoses or even seeing the bleed valve on the thermostat housing with the top of the air box and the rubber bellows to the throttle body in place so just take them off right from the start.

I used one of those Uview vacuum refill tools to fill the system. I have a mungo big 2 stage air compressor; but, as Kaz described, the single stage venturi was not capable of evacuating the system sufficiently to eliminate trapped air. On refill it sucked in about 14 - 14.5 l of the pre mix even though I pulled a vacuum twice (it is hard to tell exactly how much is left in those black plastic Honda jugs). So, potentially 1.5 - 2 l of air left in the system. So, the single stage vacuum refill tool is a bit of a bust in terms of eliminating trapped air in the system. It was semi useful as I could pull a vacuum on the system and then let it sit for 5 minutes to make sure that I did not lose vacuum indicating an obvious leak. A useful feature following a hose change.

I initially did the bleed as described in the service manual; however, after the first heat cycle of the engine the coolant rose up in the coolant bottle quickly once the thermostat opened up so it was really apparent that bleed was incomplete. I then used the method Kaz described attaching a long clear hose to the bleed ports and letting it drain down to a container at floor level to get a siphon effect which is not so easy for the thermostat housing bleeder. Opening and closing the bleeder with a hose attached is a hassle. Even with a clamp on the hose to hold it on to the little spigot on the bleeder it kept popping off and spilling coolant.

The amount of bubbles coming from the heater bleed port was amazing. I initially thought that the bleeder must be leaking and allowing air to siphon in so I shut the process down after draining about a litre through the port. I heat cycled the engine and sure enough the level in the expansion tank came up quickly as soon as the thermostat opened indicating there was still air in the system. Checking the rad bleeder gave a pfft of escaping air showing that air had moved back into the top of the rad so it was back to the heater bleeder. I think I probably drained and recycled back into the expansion tank about 6 - 7 l of coolant through the heater bleeder before I got a solid stream of coolant. As Kaz described, I tried to keep the coolant level in the expansion tank as high as possible to maximize the hydraulic head for the bleeding process. I did a final quick check at the water pipe and thermostat bleeders to check for no bubbles and then went back to the heater bleeder to lower the coolant level to MAX in the expansion tank. This time when I heat cycled the engine the coolant level only rose about 12 mm in the expansion tank. Air temperatures were fairly cool when I did this, about 10 - 15 C and I bet it took about 20 - 25 minutes of idling before the rad fan finally switched on and then it was only on for about 30 seconds before it shut off. With the interior heater valve full open and air cool temperatures it takes forever for the coolant to get hot enough to operate the rad fan. After this successful heat cycle I let the car sit over night, topped the tank to MAX the next day and went for a test drive. Let it cool off and then topped the tank to MAX again and the coolant level has remained steady.

Short story, do as Kaz says and bleed using a long hose into a container at floor level. No need to raise the back end of the car to do the bleeding. Considering that most of my air came out through the heater bleeder and radiator bleeder, raising the back end would seem counter productive. After an initial bleed at the water pipe and thermostat housing all of my bleeding was done from the heater bleeder with a quick check of the radiator bleed port. Based upon my experience, be prepared to bleed a lot of coolant through the heater bleeder until the coolant stream is free of air bubbles.

With the hose replacement and me spilling stuff during the bleeding process I needed approximately 4.5 jugs of the Honda Type 2 pre mix coolant to fill the system to the MAX level.
 
Last edited:
Back
Top