• Protip: Profile posts are public! Use Conversations to message other members privately. Everyone can see the content of a profile post.

A List of Coolant Hoses and Associated Parts

Joined
3 November 2011
Messages
3,391
Location
Saskatchewan, Canada
About a month or so ago, somebody was looking for a list of the coolant hoses. I was going to post my list, could not find it on my laptop and then forgot about it. I recently discovered the list on one of my other laptops so I have attached it.

The list is for a 2000 Left Hand Drive car. Earlier car hose arrangements are slightly different. I think the change might be with the DBW throttle body. I also believe that the earlier cars had a bleed bolt arrangement that required a replacement washer and the later cars revised the bleed bolt to a no washer arrangement so my list definitely does not have those. The list includes the hoses and some supplementary parts which includes one of each of the spring clamps in case I snapped one. The list includes parts manual diagrams showing the location of each of the hoses.
 

Attachments

  • List of All Coolant Hoses.pdf
    169.9 KB · Views: 28
Last edited:
Here is the updated price list from OEMAcuraParts as of DEC 5, 2023 (first price column is from MexiRicer a few years back):
79728-SL0-A00Acura HOSE, WATER INLET (ENGINE)
Unshipped
20.9329.48
79725-SL0-A00Acura HOSE, WATER OUTLET (HEATER)
Unshipped
8.9912.64
79722-SL0-A00Acura HOSE, WATER INLET (HEATER)
Unshipped
6.799.56
79721-SL0-A00Acura HOSE, WATER INLET (WATER VALVE)
Unshipped
20.5928.98
19518-PR7-A00Acura HOSE, WATER MIDDLE (UPPER)
Unshipped
31.5445.88
19522-PR7-J02Acura HOSE A, BYPASS
Unshipped
9.4913.82
19424-PR7-A00Acura HOSE B, OIL COOLER OUTLET
Unshipped
12.3817.94
19423-PR7-A00Acura HOSE A, OIL COOLER OUTLET
Unshipped
7.8811.57
19422-PR7-A01Acura HOSE, OIL COOLER IN.
Unshipped
4.886
19506-PR7-A01Acura HOSE, RR. WATER (LOWER) (WHITE PAINTED)
Unshipped
25.3132.37
19501-PR7-A01Acura HOSE, WATER (UPPER) (WHITE PAINTED)
Unshipped
17.5324.66
19507-PR7-A01Acura HOSE, RR. WATER (UPPER) (YELLOW PAINTED)
Unshipped
25.3132.37
19526-PR7-A00Acura HOSE E, BYPASS
Unshipped
6.008.95
19519-PR7-A00Acura HOSE, WATER MIDDLE (LOWER)
Unshipped
35.4751.54
79727-SL0-A00Acura HOSE B, WATER JOINT
Unshipped
17.9025.16
79726-SL0-A00Acura HOSE A, WATER JOINT
Unshipped
11.1715.72
19524-PR7-A01Acura HOSE B, BYPASS
Unshipped
7.1610.46
19103-PR7-A00Acura HOSE, EXPANSION (UPPER)
Unshipped
6.068.98
19104-PR7-A00Acura HOSE, EXPANSION (LOWER)
Unshipped
6.8210.12
19107-PR7-A00Acura TUBE, OVERFLOW
Unshipped
6.9010.12
19502-PR7-A01Acura HOSE, WATER (LOWER) (WHITE PAINTED)
Unshipped
33.7247.43
 
About a month or so ago, somebody was looking for a list of the coolant hoses. I was going to post my list, could not find it on my laptop and then forgot about it. I recently discovered the list on one of my other laptops so I have attached it.

The list is for a 2000 Left Hand Drive car. Earlier car hose arrangements are slightly different. I think the change might be with the DBW throttle body. I also believe that the earlier cars had a bleed bolt arrangement that required a replacement washer and the later cars revised the bleed bolt to a no washer arrangement so my list definitely does not have those. The list includes the hoses and some supplementary parts which includes one of each of the spring clamps in case I snapped one. The list includes parts manual diagrams showing the location of each of the hoses.
Hi Old Guy. I'm having the major service done on my car soon and was thinking of having the oil cooler hoses done at the same time (the main coolant hoses were done some time ago). I had saved some old posts about the oil cooler hoses and had a look at some more recent ones and they all seem to refer to them as the 'two hoses' with one being a short section and the other a U-shaped one. But in all the lists of hoses, there are 3 that have the label 'oil cooler hose' with one (19422-PR7-A01) being labelled the 'inlet' and the other two (19423-PR7-A00,19424-PR7-A00) labelled as 'outlet' hose A and B. There's an engine build thread (JonMonkeys) on here where they actually show pictures of two of them during replacement .. seemingly the ones that physically attach to the oil cooler itself. I've seen a parts diagram online where it seems the third one is a bit more remote from the oil cooler itself but maybe an interconnect between other metal tubing pieces. Do you have any thoughts on this? Maybe it's just a case of 'do all 3' while they're being done. I know that in older threads, Larry B had recommended temporarily disconnecting the oil cooler/filter pedestal and also removing the CV boot heat shield ato make access slightly easier but I haven't seen any mention of 2 vs 3 hoses ... or whether the third one is also a PITA. And, yes, I know about the 'figure 8' gasket for the pedestal and the need to use Hondabond on the two upper pedestal bolts if not replacing.
Tks ... Ian
 
Ian

There are three 'oil cooler hoses'. If you look at the last diagram I included in that .pdf that I attached in the first post, you will see the two outlet hoses, #2 and #3. #2 connects between the oil cooler and a metal tube which snakes behind the engine block and hose #3 connects between the other end of that tube and the thermostat housing. Hose #3 actually took me a little bit to find on the engine. It was a bit hidden by other stuff.

The short little inlet hose was the one that I gave up on trying to replace. As I recall it is squeezed in between the 1/2 shaft and the body and the hose clamp tangs at the far end of the hose were rotated so that they were between the hose and the body sheet metal and I could not get my articulated clamp pliers or the cable release pliers in there to release the clamp. I might have been able to cut it out; but, I was not certain that I could get the clamp back on the far end of the hose It looked like I was going to have to drop the 1/2 shaft to get access. I was unaware of Larry's comments about removing the heat shield. I admit that I was working up side down squeezed under the car on jack stands so I might have missed the obvious bit about removing the heat shield.

Once you know where to look, replacing hose B (#3) is relatively easy. It was the inlet hose that was the problem for me.

If you are doing this yourself, I recommend that you replace each hose as you remove it or at least carefully mark them with a sharpy as to position (inlet versus outlet) and location. It is easy to mix up some of the hoses - particularly the big three at the firewall. Most of the OEM hoses have paint marks on them that designate the inlet or outlet (can't remember). Take note of those paint marks because you can rub them off during installation.
Tks very much for the comments and recommendations. I think I'll have all three done. I'm having an oil change done at the same time and a new oil pressure switch so it's a good time to be doing the hoses as well. On a related question, the thermostat has never been replaced in slightly over 200k miles. As part of the major engine service, I believe the water pump gets replaced and I believe the thermostat is nearby .. so does it make sense to have it replaced now as well?
Tks ... Ian
I would definitely replace the thermostat. The OEM design tends to fail due to the rubber seal on the plunger mushrooming. They all eventually do and many owners just live with the car heating up slowly since they fail open.

The oil cooler hoses near the pedestal are the worst ones to change on the car, unless the engine is out for service. Many owners elect to leave them alone while replacing the other hoses. However, they should be changed at least once in the car's life, since they do (and have) burst, especially if the car has been tracked or has experienced an overheating event.

They are possible to change in the car and you will struggle and curse for the better part of an hour. Long-reach, 90Deg needle nose pliers can help. Removing the CV heat shield improves access, as noted. You will not be able to pull the hoses off the barbs- they need to be carefully split with a razor and peeled away with a pick. Use Shin-Etsu or another clear silicone grease (I use "Pool Lube") to place the new hoses. I try to place the hose clamps in an orientation where they will be more easily accessible the next time- I hate it when techs hide the clamp ears behind the hose.
 
Ian

The thermostat is in the housing under the throttle body, so opposite side of the engine from the water pump. Water pump replacement is a ' do it at the same time as the timing belt' because the timing belt has to come off to do the water pump. If you are doing the timing belt and water pump then I would trough in the idler pulley thing for the timing belt 'if you are in there'.

I replaced my thermostat just because I was the neighborhood to access the three big hoses that pass to the pipes on the firewall. My old thermostat was just fine; but, I only have about 80k miles on my car. Accessing the thermostat does require that you remove the air filter box and the attached hose which I think you will have to do anyway to access the far end of that oil filter outlet hose B.

In your previous post you mentioned Honda Bond. I don't recall using any Honda Bond. I think two of the bolts on the oil filter pedestal use special bolts with a sealant on them. I purchased new bolts. Were you talking about using Honda Bond to re seal the existing bolts as opposed to buying new bolts with sealant on them?

Heed Honcho's advice about silicone grease for the assembly of the hoses. Makes life so much easier on assembly. Silicone spray oil helps; but, the grease works much better because it does not run off. I just used silicone dielectric grease that I sourced from Canadian Tire. I used close to a complete tube when I did my hoses last fall - if some is good more has to be better.

Your comment about replacing the oil pressure switch reminds me that I need to replace the rubber boot on mine. It is torn and I taped it up with silicone self amalgamating tape last fall. Another Prime member pointed out that the boot from a Honda Shadow V Twin is a direct fit so I have to get my butt in gear to source that boot and do the replacement.
 
I would definitely replace the thermostat. The OEM design tends to fail due to the rubber seal on the plunger mushrooming. They all eventually do and many owners just live with the car heating up slowly since they fail open.

The oil cooler hoses near the pedestal are the worst ones to change on the car, unless the engine is out for service. Many owners elect to leave them alone while replacing the other hoses. However, they should be changed at least once in the car's life, since they do (and have) burst, especially if the car has been tracked or has experienced an overheating event.

They are possible to change in the car and you will struggle and curse for the better part of an hour. Long-reach, 90Deg needle nose pliers can help. Removing the CV heat shield improves access, as noted. You will not be able to pull the hoses off the barbs- they need to be carefully split with a razor and peeled away with a pick. Use Shin-Etsu or another clear silicone grease (I use "Pool Lube") to place the new hoses. I try to place the hose clamps in an orientation where they will be more easily accessible the next time- I hate it when techs hide the clamp ears behind the hose.
Honcho .. tks very much for chiming in .. appreciate it
 
Ian

The thermostat is in the housing under the throttle body, so opposite side of the engine from the water pump. Water pump replacement is a ' do it at the same time as the timing belt' because the timing belt has to come off to do the water pump. If you are doing the timing belt and water pump then I would trough in the idler pulley thing for the timing belt 'if you are in there'.

I replaced my thermostat just because I was the neighborhood to access the three big hoses that pass to the pipes on the firewall. My old thermostat was just fine; but, I only have about 80k miles on my car. Accessing the thermostat does require that you remove the air filter box and the attached hose which I think you will have to do anyway to access the far end of that oil filter outlet hose B.

In your previous post you mentioned Honda Bond. I don't recall using any Honda Bond. I think two of the bolts on the oil filter pedestal use special bolts with a sealant on them. I purchased new bolts. Were you talking about using Honda Bond to re seal the existing bolts as opposed to buying new bolts with sealant on them?

Heed Honcho's advice about silicone grease for the assembly of the hoses. Makes life so much easier on assembly. Silicone spray oil helps; but, the grease works much better because it does not run off. I just used silicone dielectric grease that I sourced from Canadian Tire. I used close to a complete tube when I did my hoses last fall - if some is good more has to be better.

Your comment about replacing the oil pressure switch reminds me that I need to replace the rubber boot on mine. It is torn and I taped it up with silicone self amalgamating tape last fall. Another Prime member pointed out that the boot from a Honda Shadow V Twin is a direct fit so I have to get my butt in gear to source that boot and do the replacement.
Old Guy .. tks for the additional comments on the thermostat .. much appreciated. I have now ordered the three hoses, the figure 8 gasket, and thermostat .. and will pass along the tips from you, Honcho, and Larry B to Pat who will be doing the grunt work. I believe the idler was part of the original list of parts that were ordered (timing belt, water pump, plugs etc). FYI .. the comment to just put some Hondabond on the top two bolts (as opposed to replacing them) came from Larry B in a post from 31Dec2007 although he did acknowledge the factory recommendation to replace.
Tks for all your comments. Car goes in on May 6 so may have followup comments. Had the last major service at 163k miles in 2008 (now about 215k) so I've been nervous for a while about being well over the factory recommendation of 9 years for the belt. This will be the 3rd belt .. first two (2000 & 2008) were done by Mark Basch in Phoenix. In addition to the thermostat and oil cooler hoses, this will be the first replacement for master brake cylinder .. in spite of the car being lightly tracked by previous owner in Phoenix and myself at NSXPO in Vegas and locally autocross .. not to mention driven year round for the last 23 years in our frigid winter temps. Truly stunning parts quality!
Tks again .. .Ian
 
Ian:

In terms of risk, I think dealing with geriatric coolant hoses is more important than dealing with an ageing timing belt. Based upon the anecdotal reports on Prime, there have been reported non fatal timing belt slips (which might be a set up problem rather than an ageing problem); but, I have seen no reports of timing belt failures. People have botched the installation of new belts and bent their valves as a result which is a risk to think about. There have been a number of reports of hose ruptures with results varying from inconvenience to catastrophic engine failure. I would obsess more about ageing hoses than a TB failure.

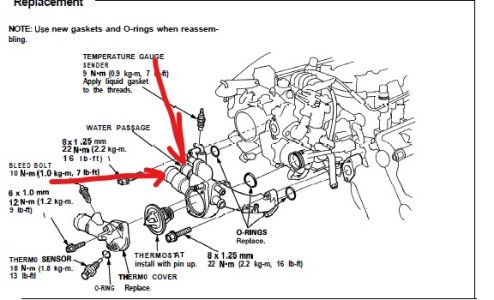
Since you mention the thermostat, give some consideration to the thermostat housing. The thermostat housing has barbed plated steel fittings to accept the hoses. When I did my hoses last fall, I noticed that there was some surface corrosion on the plating on those hose barbs for a couple of the large firewall hoses. I have marked the corrosion area with red arrows.

Thermostat housing.jpg

The corrosion wasn't bad and the aluminum part of the housing looked just fine. I can't remember whether the barbed fitting on the thermostat cover also had corrosion on the plating. I couldn't get a new housing before my car had to go into winter storage so I never dealt with it.. My car is a 2000. Since your car is a 1991 the corrosion might be worse. Unfortunately, you can't check ahead of time without dumping the coolant. Maybe some other members ( @Honcho ?) can advise on whether they have seen significant corrosion on those barbed fittings.

If you are not doing a complete hose replacement then replacing the thermostat housing will be a major 'add on' because you will likely have to cut the hoses to get them off the barbs which then forces replacement of at least two of the firewall hoses. Based upon what ever feedback you might get on how bad the corrosion gets, this might be a case of having a replacement housing (and all the attached hoses) on hand to be changed at your next coolant flush.

If you are getting the work done at the local dealership, PM me on how that goes. I have had all the parts for a timing belt / water pump change sitting in a sealed bag in my garage for about 3 years now. I thought I might do it myself; but, as Old Guy gets older my back muscles send out little spasm signals every time I think about doing the belt change. If the dealership still has a qualified tech I might just suck it up and have them do it.
 
I agree with Old Guy 100%. The hoses are a much more significant danger to the car than the timing belt. The NSX water pump moves about 2L of coolant per second at normal driving speeds, so it will empty the entire system in about 8 seconds if a big hose ruptures.

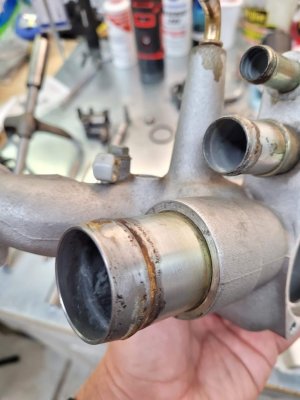
The hose barbs on the water jacket assembly are made out of steel and do corrode. Here are mine- I sanded off much of the corrosion, but if it's really bad (typically on cars that have never had their hoses replaced and sit for long periods), the only true fix is to replace the assembly. That said, the hoses can tolerate a large amount of corrosion before replacement becomes necessary.

20210913_203506.jpg

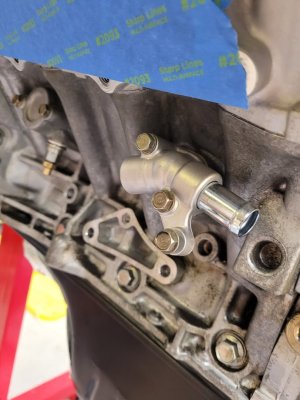
Here is what the barbs look like when they are new. Using silicone grease during install helps protect this surface from corrosion.

20210912_155332.jpg

The barb on the thermo cover is made from aluminum and does not corrode.
 
Back
Top