-
Protip: Profile posts are public! Use Conversations to message other members privately. Everyone can see the content of a profile post.
You are using an out of date browser. It may not display this or other websites correctly.
You should upgrade or use an alternative browser.
You should upgrade or use an alternative browser.
Cam Seal Install
- Thread starter Trilapino
- Start date
I think there is still an issue with manual hosting since the site changeover but I've got them on my google drive for now. You should be able to download with this link and do anything you want to the car just by following the shop manual.
Edit: Looks like the site was updated since I last checked. Link below pointing to the NSX Prime Library.
 www.nsxprime.com
Edit: Looks like the site was updated since I last checked. Link below pointing to the NSX Prime Library.
Factory Service Manuals
As our NSX continues to age, it will become more and more important for member to be able to service their cars. Most Acura dealers no longer employ technicians who are familiar with the NSX, as the original techs are long gone or retired. As...
This can be done with the engine in the car, but it will be a challenge. If you are talking about the black rubber cam caps, it's less effort. If you mean the actual cam oil seals on the timing belt side of the engine, you will have to remove the timing belt and the camshafts to replace these seals. That's a lot more work. Assuming it's just the caps:
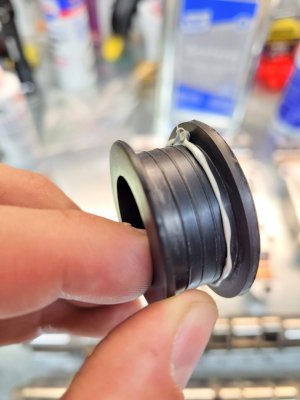
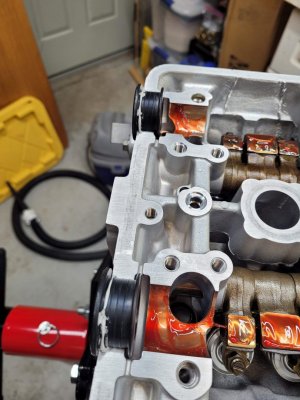
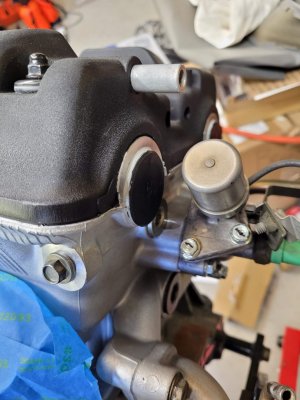
Cam holder torque pattern Rear head:
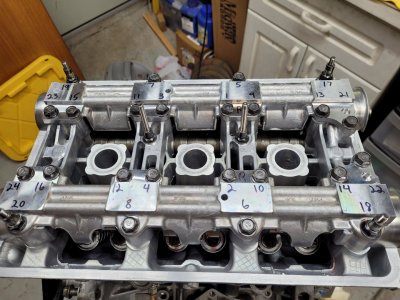
Front head:
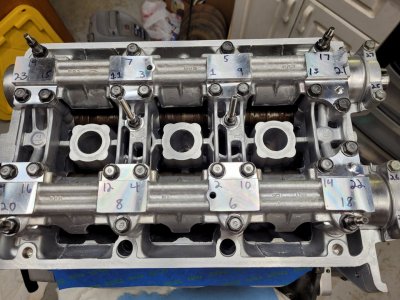
Hope this helps!
- Remove valve covers
- Remove cam holders
- Replace cam caps
- Re-torque cam holder bolts in the correct order
- Install valve covers
- Both the cam holders and valve covers require using Hondabond at certain places. Make sure both sides are surgically clean (wipe them with an acetone-soaked microfiber rag) before applying the Hondabond or you will have oil leaks after a few hundred miles.
- Use a new valve cover gasket or you will have oil leaks for sure.
- Don't over torque the valve cover nuts- so many people do this and cause oil leaks by squashing the gasket too much.
- Double or triple check the valve cover gasket behind the rear head when you reinstall it, it's so easy to pinch it or move it out of the slot. I use a few dots of Permatex Hi-Tack to hold the gasket onto the valve cover to help prevent this.
- Use Hondabond on the cam caps, but don't glop it on there. Honda started applying Hondabond at the factory around 1997 and it seems to help the caps last longer before leaking. You shoul apply it to the inner seal and on the outer lip as shown below on my engine:


Cam holder torque pattern Rear head:

Front head:

Hope this helps!
Wow thanks so much for the details, this really helps! I will be changing the cam caps and the oil seals so this will be no easy feat if the motor is in the car. Removing that valve cover is a mission from the very limited space. I had trouble just changing the spark plugs LOL. Looks like I will be taking this to the shop, I want to live happy and not cry hahaha! Thanks again!This can be done with the engine in the car, but it will be a challenge. If you are talking about the black rubber cam caps, it's less effort. If you mean the actual cam oil seals on the timing belt side of the engine, you will have to remove the timing belt and the camshafts to replace these seals. That's a lot more work. Assuming it's just the caps:
Some tips:
- Remove valve covers
- Remove cam holders
- Replace cam caps
- Re-torque cam holder bolts in the correct order
- Install valve covers
- Both the cam holders and valve covers require using Hondabond at certain places. Make sure both sides are surgically clean (wipe them with an acetone-soaked microfiber rag) before applying the Hondabond or you will have oil leaks after a few hundred miles.
- Use a new valve cover gasket or you will have oil leaks for sure.
- Don't over torque the valve cover nuts- so many people do this and cause oil leaks by squashing the gasket too much.
- Double or triple check the valve cover gasket behind the rear head when you reinstall it, it's so easy to pinch it or move it out of the slot. I use a few dots of Permatex Hi-Tack to hold the gasket onto the valve cover to help prevent this.
- Use Hondabond on the cam caps, but don't glop it on there. Honda started applying Hondabond at the factory around 1997 and it seems to help the caps last longer before leaking. You shoul apply it to the inner seal and on the outer lip as shown below on my engine:
View attachment 178352View attachment 178351View attachment 178350
Cam holder torque pattern Rear head:
View attachment 178353
Front head:
View attachment 178354
Hope this helps!
Honcho wrote: "Both the cam holders and valve covers require using Hondabond at certain places". Just what we needed for those cam plugs. Great write up, thank you. Can you elaborate on the use of hondabond on the valve covers "certain places"? When i did my valves a few years ago and am certain i got the new cover gaskets on perfectly, i had a leak from one of the covers right off the bat, replaced it and now see oil either from that cover again or the cam plug in close proximity. Since those plugs appear to such a pain, i may do the cover first, thus my question. Thanks!
The service manual shows you the spots to put the Hondabond for the valve covers. Always use a new gasket.Honcho wrote: "Both the cam holders and valve covers require using Hondabond at certain places". Just what we needed for those cam plugs. Great write up, thank you. Can you elaborate on the use of hondabond on the valve covers "certain places"? When i did my valves a few years ago and am certain i got the new cover gaskets on perfectly, i had a leak from one of the covers right off the bat, replaced it and now see oil either from that cover again or the cam plug in close proximity. Since those plugs appear to such a pain, i may do the cover first, thus my question. Thanks!
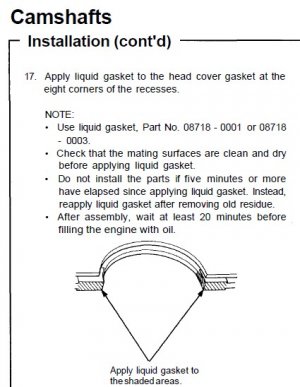
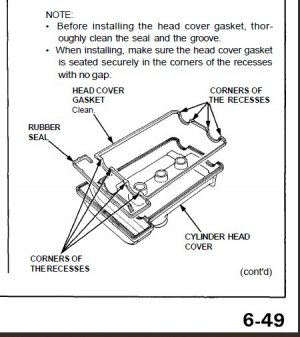
Some techs put a pea-sized bead in each corner on the head surface and then squish the gasket down on top of it, but I find that this is too much and it can create beads of dry HB that can break off and get into the head. My method is to spread a thin coat in each shaded area after fixing the gasket to the valve cover with a couple dots of Permatex Hi-Tack. Remember, the reason there is HB used here is that the corner seals might not be perfect and it's there to fill in the tiny gaps that might be present. You don't need to glob it on.
I will re-iterate again that the main way to prevent leaks before the next service interval is CLEAN, CLEAN, CLEAN. Modern synthetic oil is extremely viscous and will find any path that is open. Dirt, grit, rubber residue, old sealant or even a tiny film of old oil will provide an easy pathway for hot engine oil to seep out. Therefore, it's critical to have a surgically clean surface on BOTH the head and gasket before installation. Microfiber and acetone are your friend. I will say it's VERY difficult to obtain this level of cleanliness with the engine still in the car. Access on the rear head is so tight that it's nearly impossible to inspect the entire surface area of the head for contamination. But, it can be done. Spend the extra time.
Hope this helps.
Honcho
Thank you Hondo, i now do remember this manual directive that i likely did follow. I also remember this valve adjustment as surprisingly tough, the mid engines we love come take some work I set up a MaxJax years ago assuming i would need it for potential syncro/clutch/engine changes. As a former mechanic i did the close gears and the R gear and diff myself. Now obviously i need to get a cradle worked out so i can drop this engine easily. After being away from this list for a couple of decades, i'm so glad that dedicated folks like yourself are still contributing to our list!
Just pulled my front head cover and noticed that i did not use any hondabond. Looked in my 92 SM and the images that Honcho thankfully posted above are not there, no wonder i didn't do it. On page 6-51 it says "apply a thin layer of liquid gasket to the mating surface...to prevent them from falling off" and no images. I'll do exactly as posted above this time. Thanks again. instructions
The service manual language is a little confusing. What they mean is that you put a few dots of HB on the top of the gasket to keep it from falling out of the valve cover when you install it. You're basically lightly gluing the gasket to the cover. I use Permatex Hi Tack for this purpose. The shaded areas shown above are on the bottom of the gasket and are for sealing against splash oil.
Got you. In my 92 manual page 6-49 or any other page does not have that nice diagram you posted of where to apply, I assume that diagram must have been added after 92. I also couldn't find it in my service bulletins but i may not have them all. Don't need to know now anyway. Just didn't want anyone to waste their time doing a valve adjust without the sealer like i did. That hondabond is required! I think there is a thread out there about SM additions that i need to check out. I originally thought my cam seals were likely leaking, but i'm now hoping it was just the cover gaskets. I was a pro mechanic at one time and FWIW there is no way i would do cam seals without pulling the cams themselves. Back in the 80's i had a pumped X19 that had a huge panel that removed from the trunk to access the back of the engine. That tiny little panel the nsx has is not much help. I grew up with permatex and did use a half dozen small dabs tonight only on the top of the gasket to hold. These honda gaskets fit so well that we probably don't need anything to hold them during install. I understand that there is an aftermarket vendor now. Personally i would likely hondabond a larger area with an aftermarket product. Just my thoughts from a home wrencher. Thanks again Honcho and all.
Similar threads
- Replies
- 1
- Views
- 132
- Replies
- 1
- Views
- 274
- Replies
- 19
- Views
- 829


