I might note that anyone who decides to just bypass this switch, this may be an opportunity to install a remote small toggle switch and run these 2 wires to it. It is a great anti-theft idea.
-
Protip: Profile posts are public! Use Conversations to message other members privately. Everyone can see the content of a profile post.
You are using an out of date browser. It may not display this or other websites correctly.
You should upgrade or use an alternative browser.
You should upgrade or use an alternative browser.
Clutch safety switch. Take my advice!
- Thread starter davidf
- Start date

Well that doesn't look that hard to do, R13 just drew a red line right to it. Easy!
:tongue:
Actually, thanks for the reminder that I have a new one in a bag on my workbench...
Good idea!
:tongue:
Actually, thanks for the reminder that I have a new one in a bag on my workbench...
I might note that anyone who decides to just bypass this switch, this may be an opportunity to install a remote small toggle switch and run these 2 wires to it. It is a great anti-theft idea.
Good idea!
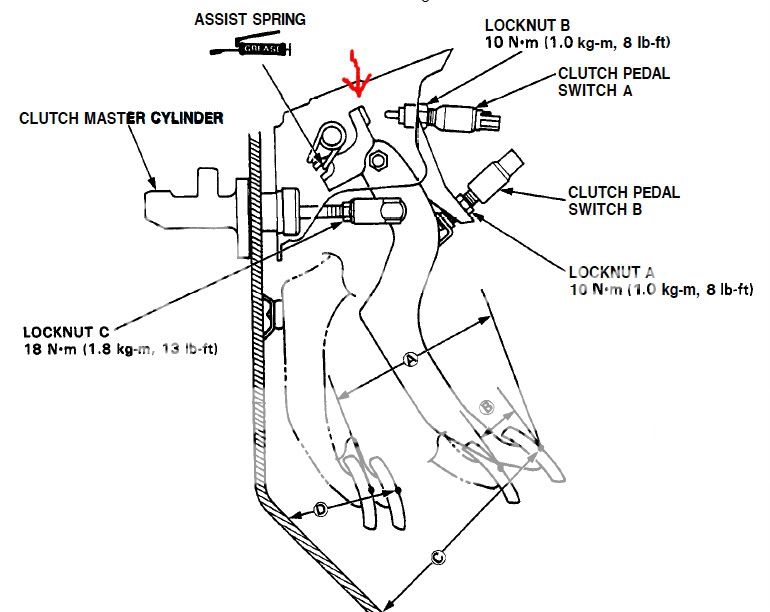
So, you replace the lever where the red arrow is pointing? or the spring? What part is this so that I can order one?
It's not really a "grommet" per se. The switch is actuated by a plunger. On the pedal, there is a plastic plug that fills a hole where the pedal would come in contact with the plunger on the switch.
If the plastic plug breaks, there's now a hole in the pedal which the plunger goes straight through (thus not depressing it and not triggering the switch).
instead of splicing into the stock wiring. I would feel more comfortable sticking a paper clip in it.. reversible.. no cutting, no splicing, no taping. trim the paper clip short if you want to.. lots easier then cutting wires.
Same here, but I never thought to check the other grommets. I have since lost all 3, cruise, stop, clutch safety grommets. Once the 1st one goes, the other will follow soon.This happened to me too but brake switch not clutch switch. Lucky my battery still under warranty
So, you replace the lever where the red arrow is pointing? or the spring? What part is this so that I can order one?
They are talking about the pedal stopper pad #32 below.
Mike
32. 46505-SA5-000 (also available from honda dealers)

Got stuck just yesterday. Luckily I was at a turnpike service plaza filling up and a Road Ranger was getting gas, he and a plaza worker helped push my car for a bump start. Got the car home. Stopped at a Honda dealer this morning, dreading getting up under the dash and trying to install the new plug.
So, tell me, is there a strategy that works to install this bugger, besides "fiddle with it, fiddle with it, curse, fiddle with it some more, curse and swear, get out to give your back a break, rinse, repeat as necessary"?
On my back I can see the hole where the tab goes but only if the pedal is depressed a couple inches. And of course lying under the dash leaves no room for arms to push in the pedal and also have room to get another arm/hand up in there to install the tab. Gonna try it in a few hours. I'm hoping I can do it by feel with one hand. Wish me luck.
Unless one has unusually small hands, it's no fun.
You know what they say about men with small hands, right?
Small gloves. :biggrin:
That's the ticket, that's why I can't fix it. My hands are WAY too big.
Yeah, I'm gonna need another set of hands, maybe a stick and a needlenose pliers: the second set of hands to push in the clutch a little bit with the stick, the needlenose to put the tab up in between the steering column and the pedal.
In the meantime, it's operable; I jumped the switch with a paperclip. Not planning to leave it that way, though, just until I can get some help.
This happened to me, after rebuilding my starter, cleaning my ignition switch, check no 7 fuse, checking starter connections again and again, checking clutch switch b, then battery I found this thread... Damn plastic cap at top of clutch switch A broke in half...! Bypassed the connection to see if it will fire up and it sure did. will replace the plastic cap this weekend...glad I found this thread thanks guys!
This "safety" switch is best disabled for safety. In driver's ed we were taught how to drive a stalled vehicle off railroad tracks on the starter. Can't do that if the clutch switch is working. OK...that driver's ed class was a while ago. As I recall the training car had 3 on the tree...and no floor...you just used your feet while yelling "Yabba, Dabba, Do!!!"
Ordered two of these at $2.68 a piece this morning. $11.48 for shipping. Big spender.
After hearing about everyone else's pleasant experience with the install, I'm really looking forward to spending a few hours wrestling with a $2.68 part.")
After hearing about everyone else's pleasant experience with the install, I'm really looking forward to spending a few hours wrestling with a $2.68 part.


A little tip that may help.
Drill a small hole in the center of the stopper. Nothing bigger than 1/16". A numbered bit around 65 would be best. Run some fishing line through the hole and put a knot on the fat side of the stopper. Have a second person sit in the passenger seat and using something like a broom stick handle press down on the brake pedal a bit to give you some working room at the stopper location. Fish the fishing line up through the mounting hole (small hands or really long needle nose pliers or whatever creative thing you can come up with) and pull the line from the other end of the mounting hole to pull the stopper into place. You will need a long flat blade screwdriver or something like that to seat the stopper in its mounting hole.
Not easy; but, easier than trying to get your hands up there to install it. It can probably be done without the second person holding the pedal down during the initial insertion process; but, it is easier with the switch backed off from the hole.
For the eventuality that the stopper fails again, I carry about 2 m of #12 wire rolled up in the trunk. It can serve as a remote start switch to connect the jump start terminal to the starter solenoid which will get the engine started with the key in the run position. A lot of savvy tow truck drivers who have experience with Honda products will haul out their remote start switch to get the car started - if they are principled and want to save the client a tow cost.
Thanks for the advice. By using the method of install you outlined, would the plunger tip conflict with that hole now drilled in the replacement part and negate the reason for its replacement?
I'm also wondering if a thin metal cover, glued in place, will help in prolonging part life. I don't really want to mess it more than what's necessary.
I'm also wondering if a thin metal cover, glued in place, will help in prolonging part life. I don't really want to mess it more than what's necessary.
Thanks for the advice. By using the method of install you outlined, would the plunger tip conflict with that hole now drilled in the replacement part and negate the reason for its replacement?
I'm also wondering if a thin metal cover, glued in place, will help in prolonging part life. I don't really want to mess it more than what's necessary.
Not if you use a suitably small drill. A 1/16" hole is significantly smaller than the plunger tip; but, the 65 'ish' drill is a lot smaller. I used the smallest drill that would fit the roll of mono filament fishing line that I found sitting in my son's tackle box. The tight fit of the line in the hole reduced the slide back and forth on the fishing line factor which simplified installation.
I would not do the metal cover. It is not a surface wear issue. It seems to be that the plastic gets brittle with age and then the stopper just fractures and falls out. If you want to eliminate the problem completely, you could do the 'Shawn' thing of installing a round headed bolt in place of the stopper and bolt it in place. However, then my fishing line trick will definitely not work and installation will involve more 'adverb / adjective deleted' language.
Gotcha...it's more of a material degradation that happens over time instead of a point of contact failure with the plunger and pad. A metal cover would exactly be ideal.
Toyed with bolt idea but I don't know how I can get it installed without the 'adverb/adjective deleted' language (which is why, in large part, I gave up golf). We shall see...
Toyed with bolt idea but I don't know how I can get it installed without the 'adverb/adjective deleted' language (which is why, in large part, I gave up golf). We shall see...
Does anyone just remove it and jump the switch?
Does anyone just remove it and jump the switch?
Yes. The level of sophistication varies from jamming a paper clip into the plug, jamming a paper clip into the plug and then wrapping with tape, cutting the wires and crimping together (difficult to do because its hard to get your hands / tools up there) and finding the matching male plug and wiring it up as a shunt (the most elegant alternative).
I was interested in by-passing the switch so out of curiosity I looked at the wiring arrangement in the service manual to see if there was a more easily accessible location in the car to access the wires to install a jumper. I never found one so I still remain jumperless because I am oldish and don't like the idea of trying to jam myself up under the dash to install the jumper.
A couple of months ago I replaced my brake light and cruise control stopper pads after finding remnants of them on my floorboard. Knowing that my clutch switch pad/grommet was not far behind, I decided to tackle it the other day before it left me stranded. It took me a couple of tries, but I was able to get the job done in about 45 minutes of trial and error. What I decided to do was get a long flat blade screwdriver and super glue the pad to the end and have a friend push the clutch pedal in about 2" with a long and sturdy stick so I could see the hole and had enough room to get the screwdriver up in there without touching the clutch switch plunger. After lightly feeling around for the hole I was able to pop the stopper pad in place and gently twist the screwdriver to break it free. I made due with a small LED flashlight, but if I were to do it again, a small headlamp would've been much more ideal. Another thing to note is if you try this method, be sure to make some kind of lining out of a rag or cardboard to keep the plastic stopper from falling down and getting lost behind the carpeting if you happen to accidentally pop the stopper off before it's in the hole. This happened on my first attempt and I was fortunately able to easily recover it, but it definitely could have been worse had it not landed where it did. All in all, not too bad of an ordeal and with only minimal swearing! I guess all that practice playing Operation years ago finally paid dividends!:wink:

Sorry to bring this back.
I tried to see where this grommet is and got a terrible headache from stuck under the dash looking for it. I agree with all that it is nearly impossible reaching it, let alone replacing it. I'd much prefer just jump the yellowish plug for the switch.
I couldn't see the yellowish plug well. Do I just pull it off or there's locking clip on the plug I need to press before pull it off?
I'm also having difficulty remove the plastic panel under the dash to reach the plug. Any suggestion how to pull it off without breaking the old plastic cover?
Many thanks.
I was interested in by-passing the switch so out of curiosity I looked at the wiring arrangement in the service manual to see if there was a more easily accessible location in the car to access the wires to install a jumper. I never found one so I still remain jumperless because I am oldish and don't like the idea of trying to jam myself up under the dash to install the jumper.
Sorry to bring this back.
I tried to see where this grommet is and got a terrible headache from stuck under the dash looking for it. I agree with all that it is nearly impossible reaching it, let alone replacing it. I'd much prefer just jump the yellowish plug for the switch.
I couldn't see the yellowish plug well. Do I just pull it off or there's locking clip on the plug I need to press before pull it off?
I'm also having difficulty remove the plastic panel under the dash to reach the plug. Any suggestion how to pull it off without breaking the old plastic cover?
Many thanks.
The panel under the dash (Honda calls it a knee bolster) is a pain to get off because it is hard to get a grip on it. To make removal easier, pull the steering wheel all the way back and then raise it. This makes a larger gap between the left side of the steering column cover and the left portion of the bolster pad. As long as you don't have Andre the Giant hands, you should be able to get your fingers into that gap which will allow you to get a much better grip on the bolster pad. Pull the pad straight back towards you and it should release - does take a little force. Straight back is important. If you pull up or down you risk braking mounting tabs. Once you have completely released the pad on the left side if you gently lever the loose side of the pad back a bit you will create a larger gap between the pad and the right side of the steering column and you can fit your fingers in there to repeat the process on the right side.
What you want to avoid is pulling back so hard on the left side that all the retainers release at once resulting in the pad bending and snapping in the center.
As I recall, the clutch switch connector has a guide slot and there may be a retaining nub on the slot; but, I don't recall an actual release clip. I replaced the actuating plug so I didn't actually disconnect the switch to examine it.
Picture of switch here:
More Information for WVE 1S5720 (rockauto.com)
Last edited:
You could try to jumper the wires at the other end of the circuit. I don't have my ETM handy, but surely those wires terminate at a connector that may be easier to reach then the clutch switch?
You could try to jumper the wires at the other end of the circuit. I don't have my ETM handy, but surely those wires terminate at a connector that may be easier to reach then the clutch switch?
Been there, tried that, didn't get the Tee shirt!
One wire from the clutch switch goes to the starter cut relay. The other wire from the clutch switch goes to the security control unit. So, the wires end up on different plugs. I had a plan that I was just going to back probe the plug at the starter cut relay and wire out to a switch that was connected to ground to act as an emergency by-pass. A little checking will show that the starter cut relay is not exactly 'convenient'. Fairly well buried on the right side of the center console area. Not a exactly easier to get to than the clutch switch.
My clutch switch back up plan now consists of a coil of #14 or #16 jumper wire in the trunk. Switch the ignition switch to run and a brief touch with the jumper from the jump start terminal in the engine compartment to the contact on the starter solenoid gets you going. Not as convenient as a pre installed by pass switch; but, a lot less work and you don't mess with the OEM wiring.
I googled the knee bolster and that is the padded piece with the round cut out for the ignition switch. I was actually trying to remove the flat panel that was below the knee bolster - that one that you see when lying down on the floor mat looking up the clutch switch. It has just a few screws, but difficult to come off.
Would you please elaborate about your work-around to start the car with #14 and #16 ? I assume that would start the car in case of clutch switch failed or the grommet is missing.
Thanks.
Would you please elaborate about your work-around to start the car with #14 and #16 ? I assume that would start the car in case of clutch switch failed or the grommet is missing.
Thanks.
The panel under the dash (Honda calls it a knee bolster) is a pain to get off because it is hard to get a grip on it.
Similar threads
- Replies
- 6
- Views
- 14K
- Replies
- 97
- Views
- 43K