• Protip: Profile posts are public! Use Conversations to message other members privately. Everyone can see the content of a profile post.

Engine cover going 'bald'

Joined
3 November 2011
Messages
3,411
Location
Saskatchewan, Canada
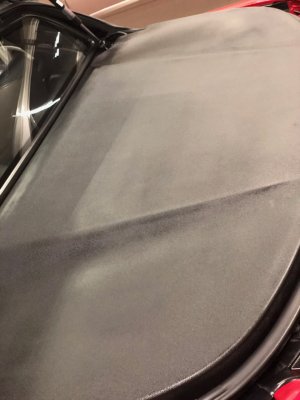
The clamshell cover for the targa storage area on my 2000 has a distinct case of male pattern baldness at the raised portion of the cover right in the center in front of the latch on the hatch. It almost looks like the lower portion of the glass hatch had been pressing on the cover wearing off the flock or whatever Honda uses to cover the clamshell. I have checked the glass and there is a good 5 mm or more of clearance between the top of the clamshell and the bottom of the glass, so I don't know how this would happen. Perhaps a previous owner stored the targa incorrectly on a long trip resulting in the cover rubbing on the glass and developing the wear area.

The cover has been like this since I got the car. However, for whatever reason the bald spot is starting to irritate me. I think I must be lacking for other things to distract me. I did a search on Prime and I found one thread with someone talking about recovering the clamshell with a felt like material (after sanding off the existing 'flock') and someone else discussing re flocking; but, there were no details or conclusions about the results. In general, the only flocks that I have seem have much less profile / depth to them than the fairly fuzzy stiff stuff that is on the Targa clamshell.

Has anybody dealt with restoring the clamshell cover and if so, how? My objective would be to restore the clamshell to an OEM finish. If possible, I would like to get away with just touching up the bald area; but, I expect that might be unrealistic.
 
Last edited:
I hope this helps you Old Guy, as you have been a wealth of information on Prime. If you do a search for engine cover refurb, there should be an option that would work for you on this thread. The first quotes involve removing the existing flock and then reapplying adhesive and new packets of flock material. Sounds like this worked out for some folks, but further down the thread is an option that I would try instead.
You can get flocking material by the yard on amazon. The Fabric Exchange sells some that is 58" wide, by the yard. There is one that looks similar to what is on our covers. It is the velvet solid flocking (black). I haven't actually ordered this myself, just made note in case I need to down the road.
 
Interesting suggestions.

The Amazon search displayed some the typical Martha Stuarts craft stuff along with some flocked sex 'apparatus' - I guess Amazon does sell everything from A to Z! Some of the fabrics on the Fabric Exchange looked like they had potential, so out of curiosity I headed over to a local upholstery / fabric supplier that has a lot of automotive and boat upholstery. I described the Fabric Exchange material and she showed me some samples that lined up with their fabrics; but, she described it as mainly clothing / light residential upholstery use. She recommended against automotive use, particularly anything that had a lot of exposure to the sun. I looked at the material and it might work for the non Targa engine cover if that cover is fairly flat. The Targa clamshell has some pretty significant compound curves and the fabric that she showed me really had zip for stretch, so you would have to cut it to fit the contours of the clamshell. That could be pretty difficult and it might be pretty hard to hide the seams. I was also concerned about the durability given the salespersons comments. So, it looks like I might be trying the Martha Stewart type flock with a little spray glue.

I had reflocked the interior of a glovebox on a car that I did a resto mod on. Turned out OK; but, that flock is much finer in texture than the clamshell cover which is quite 'hairy' in comparison. The clamshell cover reminds me a bit of an old wool Hudson Bay Company pointe 'hair shirt' blanket that we have. It might be a challenge to find something that matches the texture of the existing clamshell as I really don't want to do the complete sand down and recover. I would just like to be able to do a touch-up.

Out of curiosity, which of the Fabric Exchange fabrics were you thinking of using? Maybe I was looking at the wrong material>
 
Last edited:
The stuff I saw on the Fabric Exchange that looked similar to what's on our covers is the velvet solid black flocking. It's like $6.66 a yard. If you magnify it with your mouse, it looks to me to be somewhat like what is on our clamshells. Getting it to fit the contours of your cover could definitely be a problem. I didn't really properly consider how well it would stand up. The original owner of my car had fairly dark tint applied to the rear window. The car is only out in the sun for an occasional drive for the most part.
I don't expect you want to attempt to source another clamshell just for this issue. I thought about getting a second one, and try to modify it, so I could install my Stmpo bar and still be able to store the roof in the holder.
 
NSaneXr gave me a source for some nylon flocking fibers which are claimed to be suitable for exterior use so might be a better choice for the clamshell cover. The primary problem is that all the retail sources for the nylon flock that I could find either did not list the length of the flock or listed it at 0.02" or 0.03". I did not measure the fuzz on my clam shell with a caliper; but, from visual inspection I am fairly certain that it is longer than 0.03". Searching for nylon flock I did find one company, Claremont Flock that can provide flocks in different thickness and lengths (up to 0.25 "). However, these guys appear to be an OEM supplier, not a retail supplier and are probably not interested in talking to me unless I want to order a 218 l barrel of the stuff.

I will continue to look for some suitable materials. I will probably pull the clamshell off before the car goes into storage this winter and experiment with refinishing during the down time. I think the $6.66 (or $6.99?) material you mentioned is what I was looking at. I printed off the description and the salesperson at the upholstery store showed me what she thought matched the printed description from the web site.
 
Last edited:
Of course since Photobucket screwed everyone who used to host pictures there and shared images here, I can't show the results of what I did but I used a wire brush to remove all the flock, then sanded the cover down, and painted it with wrinkle paint. Not OEM but turned out OK. Depends on how much you want it exactly like OEM or not.
 
Of course since Photobucket screwed everyone who used to host pictures there and shared images here, I can't show the results of what I did but I used a wire brush to remove all the flock, then sanded the cover down, and painted it with wrinkle paint. Not OEM but turned out OK. Depends on how much you want it exactly like OEM or not.

Defuzzing is a fair amount of work - I like to avoid work. I am guessing you have a coupe with a 1 piece cover? The Targa clamshell is a two piece affair. The flock on the base portion of the clamshell with the release for the clamshell cover is in really good condition. In fact, 90% of the clamshell cover is in really good condition, its just at the center back of the cover where there is the bald spot. Because of the small area, I was really hoping to get away with a touch-up type repair. If the touch up type repair looks bad, or I really bollox it, I may end up using your approach.
 
...........rogane.............
 
I am having mine done right now. I have a great car interior guy who wrapped my console in carbon fiber. I was going to get mine redone stock and at the last minute opted to have it wrapped in carbon fiber. Here is his info if you want to take it to him.

Romeo
Romeo's Window Tinting & custom Upholstery
8632 State Road
Unit G
Phila, PA 19136
215-338-9749

He did the clear expel film and my window tinting as well. He is an artist. On my Accord he recarpeted and put in a new headliner. He also did the leather seats in our Volvo C70.

Ken
 
Flocking

I have a 68 Corvette coupe. The back window comes out and is stored inside a dropdown panel that has almost the same flocking. All 68 to 72 coupes had the same panel. That said, there was a guy that had an ad in the NCRS Driveline that would reflock the panels. Check with the Corvette Forum C-3 section and do a search or post a question. Jerry
 
I have a 68 Corvette coupe. The back window comes out and is stored inside a dropdown panel that has almost the same flocking. All 68 to 72 coupes had the same panel. That said, there was a guy that had an ad in the NCRS Driveline that would reflock the panels. Check with the Corvette Forum C-3 section and do a search or post a question. Jerry

I found some flocking kits for the C3 Corvettes; but, they were all kits for redoing the glove box / console area and were in a silver color. Does that drop down panel have another name as I didn't get any hits on 'Corvette drop down panel'.
 
It was not much. I think around $200<script type="text/javascript" src="safari-extension://com.ebay.safari.myebaymanager-QYHMMGCMJR/299219b3/background/helpers/prefilterHelper.js"></script><script type="text/javascript" src="safari-extension://com.ebay.safari.myebaymanager-QYHMMGCMJR/299219b3/background/helpers/prefilterHelper.js"></script>
 
I went the diy remove flocking with sanding block and painting with textured paint route, looks pretty good.
 

Attachments

  • IMG_4869.jpg
    IMG_4869.jpg
    270.1 KB · Views: 527
It does look good. I had to take mine back because the carbon fiber was coming up. Had same problem initially with console. Should have mine back soon.

I'm also going to be painting the underside with high heat silicone paint. I will post some pics when done.<script type="text/javascript" src="safari-extension://com.ebay.safari.myebaymanager-QYHMMGCMJR/c2f29a39/background/helpers/prefilterHelper.js"></script><script type="text/javascript" src="safari-extension://com.ebay.safari.myebaymanager-QYHMMGCMJR/c2f29a39/background/helpers/prefilterHelper.js"></script>
 
Are you using cf wrap material or cf weave/resin. I would be worried the heat would cause lifting for the wrap (you use heat to remove from paint). I’ve made my own cf pieces, a layer or two of actual cf would probably be ok but would be a bit of work and at least for me would be hard to get a nice smooth surface with the contour of the stock lid.
 
I went the diy remove flocking with sanding block and painting with textured paint route, looks pretty good.

Nice! I had done something similar but rather than textured paint I used wrinkle paint. I have since been donated a perfect flocked cover (Thanks, [MENTION=3821]DocL[/MENTION]!). When I did the wrinkle paint there were a few spots that looked "striped" since I was applying it with rattle cans. Some day I will sand it and do it over but use a spray gun so I can apply it more evenly and thicker. But I have had trouble finding bulk wrinkle paint; I have only found rattle cans.

But I did have the covers side-by-side, and from two feet away the wrinkle paint looked remarkably like the flock. And it is a whole bunch more durable.

(Photobucket pictures no longer available from the thread on my cover refurb I had posted many years ago.)
 
Just got it back. They had to strip the cover and reapply the carbon fiber. I also painted the bottom with hi-temp silicone paint. Looks better than the faded insulation.

View attachment 150900View attachment 150901<script type="text/javascript" src="safari-extension://com.ebay.safari.myebaymanager-QYHMMGCMJR/39a86fe8/background/helpers/prefilterHelper.js"></script><script type="text/javascript" src="safari-extension://com.ebay.safari.myebaymanager-QYHMMGCMJR/39a86fe8/background/helpers/prefilterHelper.js"></script>
 
Just got it back. They had to strip the cover and reapply the carbon fiber. I also painted the bottom with hi-temp silicone paint. Looks better than the faded insulation.

looking good, did you paint the insulation? Or underneath? Pic seems to show just the original insulation?
 
I painted it. It was more brown before. It looks a lot better than it did before on the bottom side.<script type="text/javascript" src="safari-extension://com.ebay.safari.myebaymanager-QYHMMGCMJR/16f908af/background/helpers/prefilterHelper.js"></script><script type="text/javascript" src="safari-extension://com.ebay.safari.myebaymanager-QYHMMGCMJR/16f908af/background/helpers/prefilterHelper.js"></script>
 
I thought I would follow up on my exploration of options for the engine hatch baldness problem, primarily to let people know what not to try. Here is a photo of my hatch cover before I started the restoration.

attachment.php


I really wanted to try and maintain the original appearance of the engine hatch and my thought was to try and find some flock that matched the original Honda material and blend the repair into the existing covering. The biggest problem was finding flock that was long enough and heavy enough to come close to the Honda flock. I finally found a source in England that would sell long nylon (rayon and polyester flock is not durable enough) flock in less than 200 l quantities. My preliminary estimates of the Honda flock were that it was a little over 2mm long so I ordered some 2mm and 4mm flock. The photo below shows the Honda flock on the right, the 2 mm flock in the middle and the 4 mm flock on the left. You will note that the Honda flock is curled and fairly heavy making matching more difficult.
attachment.php


I could drag this out; but, the short story is that the results were not satisfactory. The primary problem is that the replacement fibers are straight and tend to lay flat when applied. The net effect is that even though the repair flock has about the same thickness the appearance is much different, looking much blacker than the original areas. If you are going to reflock, you will have to reflock the whole cover in order to get a consistent appearance. The other reason that you will have to do a complete reflock is that while handling the cover to do the repair, I discovered that the flock was coming off everywhere. Trying to blend in a patch is useless because the non patched areas are going to be gone in a little while. Just rub your hand across your original cover and see how much fiber is coming off.

The complete cover needs re finishing and I have decided that I am not going to reflock it. The long fibers are very difficult to work with and won't work with the home puffer things that they sell for goose decoy and auto refinishing with the typical short fibers. I am going to take the approach of Basal Skull and dquarasr2 and paint it with a flat black textured finish of some kind. Right now I am searching for a suitable paint as a lot of what I see does not have enough texture in it.

I have one useful piece of information for anybody contemplating refinishing their cover - the easy way to remove the existing flock from the cover is to take a new OLFA LB style blade and just drag the edge of the blade across the flock surface. The flock just rolls up in front of the blade. If you have a vacuum handy you can suck up the pile from in front of the blade making very little mess. Probably took me 10 - 15 minutes to scrape all the flock off with no mess and then I followed up with a hand held sander with vacuum attachment with a heavy grit to remove any nubs and then a finer grits to give a nice uniform tooth to the surface for painting.
 

Attachments

  • Hatch cover.jpg
    Hatch cover.jpg
    85 KB · Views: 511
Last edited:
You gave it a great effort! Don't they sell the short and curly flock in England?:chargrined: What about getting the longer flock and a very small curling iron! I was hoping you would find the solution to this, as I expect I'll have the balding problem at some point. And on the NSX too!
 
Back
Top