• Protip: Profile posts are public! Use Conversations to message other members privately. Everyone can see the content of a profile post.

SRS Unit Capacitor Replacement

Your observation about the epoxy seal on the large cap is interesting. A while back I stumbled across an MSc thesis paper on the web. The subject of the thesis was extending the life of electrolytic capacitors by sealing the base of the cap in potting compound. The author had observed that the common failure point was either ejection of or leaking around the rubber plug on the base of the capacitor. The author had observed that failure rates on equivalent potted electronic devices was lower than on non potted devices and theorized that the sealing of the capacitors was responsible for this. He sealed up a bunch of capacitors and subjected matching sets of sealed and un sealed caps to accelerated loss of life tests with the results supporting his theory.

An interesting paper. Unfortunately, sealing the base of all the electrolytics by potting them on to the surface of the board would pretty much preclude any future repairs if they were required.

Did you find a suitable replacement for the large cap or just re install the existing one?
 
Last edited:
An interesting paper. Unfortunately, sealing the base of all the electrolytics by potting them on to the surface of the board would pretty much preclude any future repairs if they were required.

Did you find a suitable replacement for the large cap or just re install the existing one?

Interesting info! I would expect that only by potting the bottom of every cap the life could be extended - The large cap in the head unit that was leaking was potted down, which forced the electrolyte out the top of the cap and onto the bottom of the board (the top of the board immediately under the cap was dry). I would imagine if all the caps were potted like the big orange one, we wouldn't be having these issues.

I wasn't able to find a drop in replacement for the big orange cap, so my plan is to use a commercially available one and pot it down on it's side. Once the leads are bent and it's soldered I'm going to pot the leads as well to prevent any fatigue failures in the future.
 
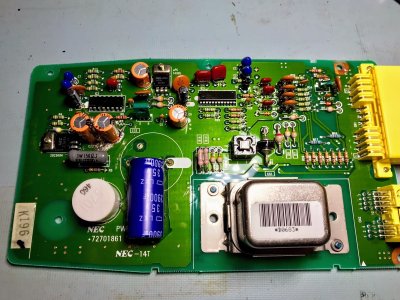
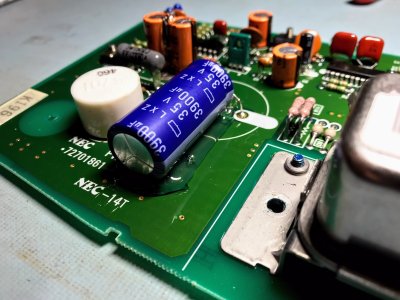
The new capacitors have been installed, as well as the 2 resistors that were soaking in electrolyte. To be honest I lost them, but it was also probably a good idea to replace them anyways. I put a nice thick bead of hot glue around the base of the new large capacitor, and it seems to be held in very well. Doesn't move at all, even if I were to try and move it. I'm going to conformal coat the board over the weekend, then hopefully reinstall the next. Fingers crossed everything works!

IMG_5696_small.jpg

IMG_5697_small.jpg
 
I'm wondering how and hope that the big 3900 is working fine. I guess you're the first one to try that route. Keep us updated on that.
 
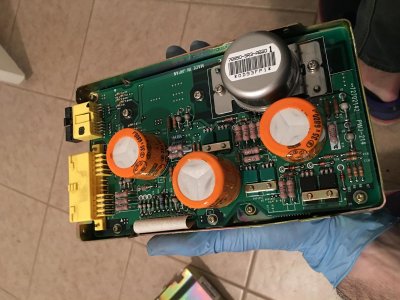
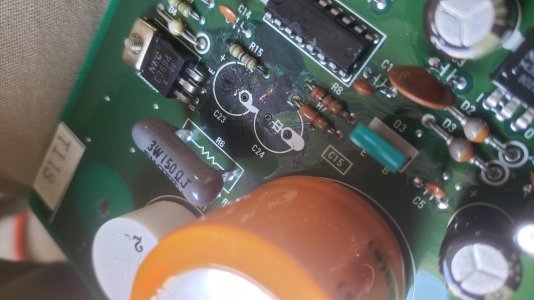
After spending an hour or so digging the SRS unit out of the dash, I opened it up and found this. Apparently there are different designs, this one has two separate PCBs, I haven't bothered to remove the top one yet so I can't tell whats underneath (and I probably won't since I don't trust that ribbon cable not to snap), but the only electrolytic caps on the top one are 3 massive ones. Starting on the left, you have a 35V/6800uF, a 25V/10000uF, and a 35V/6800uF.

IMG_0604.jpg
 
Last edited:
Yours is a 1994? If so, the NSX received a passenger air bag in 1993 which might explain the addition of a second capacitor. The NSX also received pyrotechnic pre tensioners somewhere along the production run which are controlled by the SRS system, that might explain the third capacitor. So, not necessarily a surprise that the SRS controller changed during the production run.

The large capacitors are used as energy storage devices to act as a back-up to fire the air bags (and I am guessing the pre tensioners) in the event of loss of normal 12v power during a collision.
 
I had a few minutes to install the SRS unit in today, and unfortunately it's still blowing the 10A fuse every time the car is put in run. I didn't have time to troubleshoot, and seeing as how I'd like to put the car back together and drive it I'll likely just leave the airbag shorted with the provided safety connector and pull the bulb from the gauge cluster. A little disappointing, but I'm not sure how much I trust a 27 year old, first generation airbag anyways.

The cruise control and horn still work, so it's probably something I missed inside the unit. I glanced through the service manual (p 1310, 23-326) troubleshooting guide, and I'll run through that when I get some time. It will be easy enough to unplug the unit and see if the fuse still blows. Also, I'm going to check fuses 1, 2, and 5, I've only been checking 1. I wonder if fuse 2 (15A) is blown in addition to fuse 1, causing fuse 1 to draw more current and blow.
 
Last edited:
Does anybody know what test/signal the cluster is looking for so I can pacify my SRS light while I have my PCB removed?
 
Last edited:
Does anybody know what test/signal the cluster is looking for so I can pacify my SRS light while I have my PCB removed?

Based on what the service manual gives us, it looks like the cluster is looking for less than 4V for 6 seconds after the ignition is turned on, (SM page 23-328, p1312), then >9V after that (23-329). The blue wire is the feedback to the cluster from the SRS unit (23-322). I wonder if the delay is necessary, maybe try jumpering it to battery voltage and see if it takes care of it? Otherwise it wouldn't be difficult to protoboard up a small delay circuit.

I checked fuses 1, 2, and 5, replaced the blown #1 , disconnected the SRS unit, and turned the ignition on. The fuse didn't blow, meaning there is still something shorted in the SRS unit. I remember a post from [MENTION=25737]Kaz-kzukNA1[/MENTION] (found it, this one) where he said a transistor also gets shorted when the caps go out. I'm assuming that's what happened in my case. Given that the part is no longer made and I don't have a stockpile like he does, I'm going to throw in the towel and pull the bulb. This should be motivation for those with good SRS units to replace the caps before they fail and take out that transistor!

Speaking of the cluster, replacing those capacitors will be my project for next winter. I intend on doing another DIY for that, including calibrating it with the new caps. I've actually messed with the calibration on a legend cluster in the past (I turned it into a weather station), so it shouldn't be too difficult. If I remember correctly, one pot is a DC offset and the other is a slope adjustment.
 
Is it probable that the 6 second delay is for burn-in for the warning lights?

I suspect you can rob cousin SRS PCBs for parts...
 
I checked fuses 1, 2, and 5, replaced the blown #1 , disconnected the SRS unit, and turned the ignition on. The fuse didn't blow, meaning there is still something shorted in the SRS unit. I remember a post from @Kaz-kzukNA1 (found it, this one) where he said a transistor also gets shorted when the caps go out. I'm assuming that's what happened in my case. Given that the part is no longer made and I don't have a stockpile like he does, I'm going to throw in the towel and pull the bulb. This should be motivation for those with good SRS units to replace the caps before they fail and take out that transistor!

You have comes so far, don't throw in the towel just yet. In his post, Kaz did not specify the NPN transistor that had failed. However, from your photos of the board, I am only spotting 2 transistors and 1 voltage regulator. The NEC 2sc3694 is an NPN transistor that does appear to be out of production; however, if you search you can find vendors on Ebay that list them starting at $1.99. Newegg lists a package of 10 refurbished for $8.99 (refurbish seems like the incorrect word - perhaps they mean reclaimed). Most of these vendors appear to from China / Hong Kong. This vendor is US based

http://www.bdent.com/2sc3694-nec-transistor.html

So, replacements for that NPN transistor appear to be available. The NEC 14305 is a 5 volt voltage regulator that also appears to be out of production; but, direct replacements are available. The unknown is that green power tab device (looks like a TO 126 case style) next to the 3900 UF cap. I couldn't spot any part numbers. If you can pull the part number, then it should be easy to determine whether it is an NPN transistor and whether replacements are available.

If you remove the transistors from the board, it is a snap to check them if you have access to a transistor checker. In the absence of access to a checker, it is relatively easy to do a basic functional check of the transistor on the bench. Either process could confirm that the transistor is dead before you got to order a replacement. The 14305 voltage regulator would also be very easy to test on the bench; but, based upon Kaz's comments that does not seem to be the likely candidate for failure.
 
Capacitors in Parallel

All,

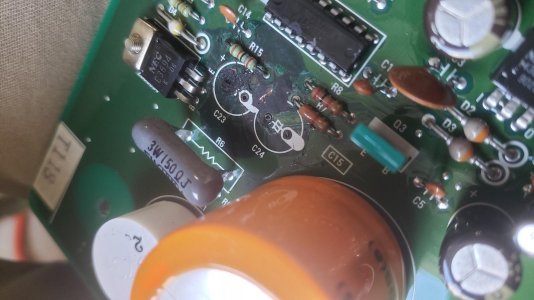
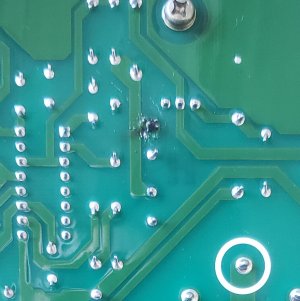
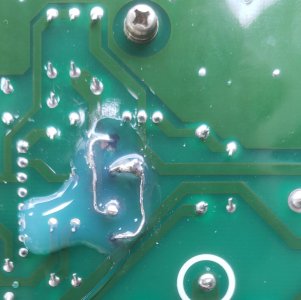
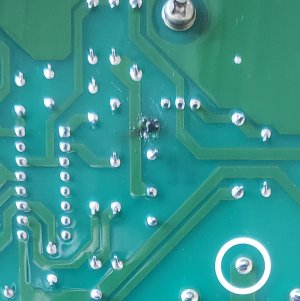
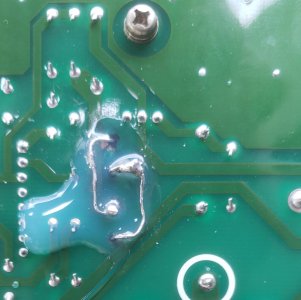
If your capacitors charred the circuit board, it is likely that the pad is lifted. Reinstalling them to the board would not result in reconnecting the capacitors. In my specific case, the trouble capacitors burned a hole in my board and ruined two of the board connections. So, after looking at the board and following traces, it looked like C23 & C24 were connected in parallel. Since my board would not support a classic and clean solder connection, I soldered the leads together and used the two serviceable pads to get the same effect.

Once I reinstalled the unit and replaced the fuse, the SRS light turned off and has been off since.

Disclaimer: I don't know how the factory actually wired them and I don't know if my SRS unit is functioning correctly, but this fixed my SRS warning light. It isn't the cleanest job, but the conformal coating should help the longevity/safety. See pictures below for the replacement job.

20200410_145010.jpg

SRS board back.jpg

SRS Janky Repair.jpg
 
I removed my SRS module and ordered the capacitors to replace C23 & C24. My capacitors burned a hole in the board and rendered some board connection points unserviceable.

20200410_145010.jpg
SRS board back.jpg

After looking at the board, the capacitors appear to be mounted in parallel. I bypassed the non-functioning pads and soldered the capacitors in parallel directly to one another.

SRS Janky Repair.jpg

If you were to just throw the replacement caps on the board, it might not have created a viable connection. This could be a route you want to try, if you haven't pulled the dash bulb. I don't know if anyone has any insight on a circuit board diagram for this module?
 
For those looking at trying to repair their SRS, I replaced all that caps and the fuse 1 was still blowing but I suspected the Transistors were bad, and sure enough, the c3694 was bad and after replacing it the SRS light went off finally, I got NEC replacements from ebay from china.
 
Back
Top