
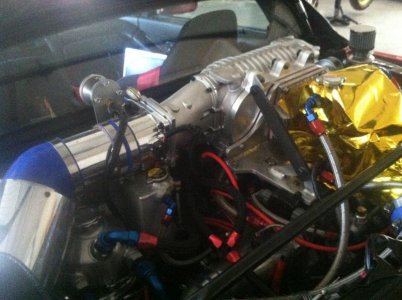
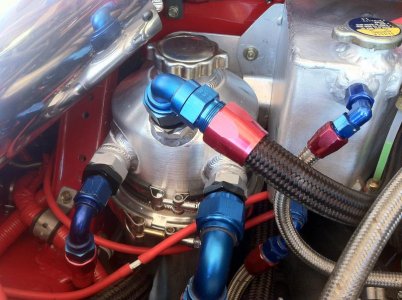
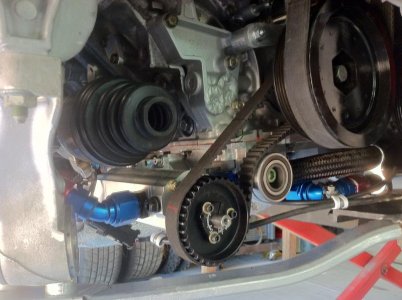
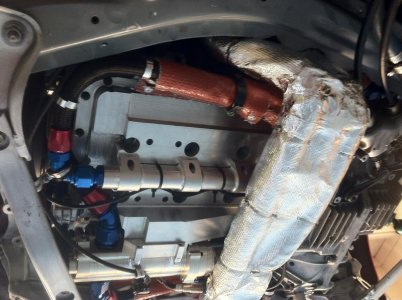
Just wondering how many cars have been converted to dry sump and what issues/problems might have occured? Here's some pictures of my drysump system.
Attachments
Last edited:
Might be able to ask Cody what his thoughts were with this setup:
http://www.nsxprime.com/forum/showthread.php/176996-NSX-Dry-Sump-System?highlight=dry+sump
Love the approach you take to redesigning systems for your car. Always a pleasure to see and read your insights.
Just wondering how many cars have been converted to dry sump and what issues/problems might have occured? Here's some pictures of my drysump system.
That is EXACTLY the dry sump that I envisioned for the NSX. Who designed it/what pump/etc...?Just wondering how many cars have been converted to dry sump and what issues/problems might have occured? Here's some pictures of my drysump system.
That is EXACTLY the dry sump that I envisioned for the NSX. Who designed it/what pump/etc...?
I've seen many dry sumps out there for the NSX, but pretty much all of them have the pump in the location for the A/C, and did not have a flat CNC machined oil pan. I have seen a CNC pan before but IIRC, the pump was not on the back half of the pan like yours (and where I wanted to put one).
FXMD's time attack car has a dry sump but the pan is almost as large as Cody's.
I'm eager to hear more about your setup because if you have a functional A/C, i'd love to follow in your footsteps.
Billy
After looking at your photos longer, can you take one with the car on the ground? How close is the pump's gear and belt to the ground? It looks like it could be open to debris or rocks if the car drops a tire or goes off the track.
Wow. That looks great. What brand pump do you use? Can you add another stage for a turbo scavenge and are you selling them?
it looks like the Cup car you drove.Wow. That looks great. What brand pump do you use? Can you add another stage for a turbo scavenge and are you selling them?
Wow. That looks great. What brand pump do you use? Can you add another stage for a turbo scavenge and are you selling them?
What part of your pan to block needs that kind of tolerance?
The 6 bolt mains are already pretty stout, do you really feel the block needs to have the pan add to its structural rigidity? Is there a way to modify your design so its not astructural member as a compromise for fitting more blocks?


