• Protip: Profile posts are public! Use Conversations to message other members privately. Everyone can see the content of a profile post.

Down Under Trackday NSX

Hi Dale, No serious competition yet. We're just taking the last of the molds so we can make some new light weight panels. We've got approx. 100KG to save by remaking everything. Don't want to put it in front of the racing public till it's perfect....... well maybe nearly perfect or else it'll never get in front of people !! :)
 
LOL I've got to be honest as I typed that I thought of you !!! But at the end of the day, no one who hasn't built any kind of car from scratch can appreciate just how much time and effort needs to go into making even the smallest things happen........

A build of your scale takes even more of everything........... but damn man, get it finished !!! :)
 
Well it's been a bloody long time between updates but Zac and I have finally managed to get some time to get the rear bumper mould taken so we can make it all in a single lightweight part.

We've already got moulds for the front bumper and front guards so with the rear bumper done that only leaves us the rear guards to make a mould of and we can get onto re-making the new panels......... I thought the days of panel beating, sanding, more sanding and yet more sanding and painting was behind us, but the end result will be well worth it as we know what the current panels weigh and we also have a pretty good idea of what the new panels will weigh so we will be saving approx. 100KG off the kerb weight of the car.

20130402_161627_zpsf89e26d8.jpg


20130402_161643_zpsf600b4f8.jpg


More updates soon hopefully as my work has started to calm down a bit so we will get some more progress soon, but Zac's work is ramping up so he's got less time to help us with this stuff so fingers crossed ...
 
They will quite possibly be a mix. To be honest, technically there is no difference weight wise between carbon and fibreglass when making this kinda stuff if you do it right. The issue of weight comes down to the amount of resin that most people leave in the composite when making parts. We're just going to use scrap carbon and stuff that Zac has left laying around at work so it will look a little patchwork from behind but since we're going to panel and paint the thing anyhow we really don't care as long as it's light and strong.

We're only able to save so much weight as we made the original items for look and fit instead of weight. As I've mentioned earlier the original items were more about getting the look, shape and fitment right so we could make sure they not only looked right, but that we were getting a good airflow in the right areas as well and we didn't see the point in making a lot of effort making super light and vacuumed parts till we knew they were going to be right as we thought we'd have a lot of development on the shape to do, but seems like we got it fairly right for what we need now so we can just go ahead and take all the weight out. A good chunk of the weight from the rear comes from the mounting hardware behind the bumper and panels to hold them in place so we are going to drop that and make our own setup which saves a fair bit for front and rear bumpers alone.
 
Thanks for explaining Fraser, like your approach.

As an aside for many years I've thought of deleting the bumper extension. By this I mean the car becomes shorter and in the side view / profile the rear of the car is almost a vertical profile, a bit like a Corvette C5R is you like. It may only save a little weight and is mainly an aesthetic idea, but if I was doing what you're doing I would try for this shape. I'm certainly not suggesting you start again :)

BTW since you will have molds, will they be re-usable for making similar parts for others who may want to do the same?
 
Got some more time last night with Zac and removed the bumper from the car with the first part of the mould so we could complete the second part and then we'll be ready to make some new parts !!

20130409_221204_zpsf061588e.jpg


20130409_221213_zps84dbadb2.jpg


We're likely to make some modifications to how the old bumper was but they're probably not noticeable to most people, but one thing you will notice is how we're going to reposition the exhaust outlets but I'll leave that surprise for another day !!

Sparky, we've thought about selling parts, but we've decided that we'd rather keep it for our own use.......
 
Well Zac has been working in the background over the last week and yesterday he gave me a call to come and see another bumper he was working on to give me an idea of the weight savings and I was massively impressed with the results ! It was heavier than Zac had ideally wanted at 2.5KG ! but he weighed our old rear bumper and it came out just over 16KG ! The front was close to that also, so all things being equal, just with front and rear bumper we're looking to save close to 30KG !

I will make sure I take some pics as we go, but Zac has once again impressed with his composites work and it was so rigid also......... we're definitely going to be able to make our 100KG weight saving target as we've still got front and rear guard, bonnet (hood), side skirts and interior door skins plus a couple of other parts that aren't even fibreglass at the moment (pillar covers by the door handles for example).

Haven't been able to get time to even think about the racecar recently thanks to work, but feeling how light the parts can be and what it means for the overall performance of the NSX has got me fizzing !! :D
 
The car is just over 1200KG dry (no fuel, but with oil and water) so it should put us close to 1100KG (2425lb).

I have no idea how that compares to others vehicles. We could lose about 25-30KG if we removed the passenger seat and secondary fire extinguishers etc and also take more out if we removed the impact beams and other stuff from the doors, but I want to keep the passenger seat as the car is made primarily for having fun and taking passengers is a good laugh for me and they love it too........ we might take some more weight out somewhere, but I suspect once these panels are done that will be it, but then more weight will come back in once we've got the twin turbos on it....... so it's a moving target !! :D
 
Last edited:
Well we finally have got some time to make some more upgrades / adjustments !

We've been re-wiring some stuff inside the cabin which wasn't exciting enough to take photo's of, but when we initially wired everything up we didn't have enough inputs into the Racepak Smartwire and so we had to have some stuff wired up traditionally. I finally got my A into G and purchased a small input module from Racepak and Bam (He's been around the project for ages - see more of his work here at Bams facebook page https://www.facebook.com/BamsNZ?fref=ts) undid all of the old wiring and re-did everything behind the switchpanel on the dash so it was working through the new smartwire input module. Next step is to cut the loom and install some bulkhead connectors so we can easily remove the engine without having to unplug everything..... we can just undo the mechanical stuff and undo 2 plugs from the bulkhead and drop it out....... like this....

Temp_monitor_cables_at_warm_bulkhead.jpg


Anyhow...... we've also decided to make some changes whilst we were remaking the panels on the car also as I've always wanted to do something cool with the exhaust on the car and this was the time to do it so we can make the new rear bumper and not have to modify it later. We've also designed what we're doing to be able to be used once we put the turbo's onto the car also so it will handle what we need for now and later.

First step was to cut out the boot to make space for what I wanted....... the plan is to flip it upside down so the bump will come up instead of down.


The ingredients !


I have other pics but I don't really want to post them till we're done or closer to being done...........

Bam has done some amazing work so far and I'm sure he'll continue his good work till it's done which will hopefully be tomorrow........... so you won't have to wait long....
 
Last edited:
As promised here are the pictures of the completed exhaust and I think its "SEX" ..............

Bam has really outdone himself in my eyes and given the timeframe and the awkward space to work in I couldn't be happier............... no idea if it's really going to be much quieter than before, but the main aim was to relocate the exhaust outlets to the higher bumper centre position and we tried to work on the noise level as it's over 100db at the moment and ideally needs to be 95db. We weren't overly concerned with the noise level as that will drop quite a bit once the turbos go on in the next stage of development.......


Zac still has to work his magic on the new rear bumper before it looks completely finished, but that will hopefully be done in the next few weeks and then I can take some pics with it in place........ now we have more space down low we can run a steeper diffuser angle also which was a factor in the new design also........
 
Looks awesome as usual. Can't wait to see the bumper.

Fraser how many psi are the air jacks?
 
Thanks Turbo2Go...........

Airjacks are 350PSI........could really do with being closer to 400, but unfortunately the electronic valvegear I have to open isn't meant to work over 300 so even running them at 350 is a push, but it works......... any more and the valves can't open as there's too much pressure. But the car goes up and down reasonably easily with 350...... certainly 50 times faster (literally I think) than it takes to get a jack under it and get all 4 off the ground......

Video of some early testing.....
http://s87.photobucket.com/user/f1racrnz/media/Racecar/VID_20120327_213316.mp4.html
 
Thanks fraser cam I ask a few more questions. Is your air supply on board or separate? That seems aweful high for pressure. Where did you mount your 4 jacks are they outside the cabin or inside? And last why did you use 4 and not 3?
 
Air supply is on board........ it's easily removable....... you can see here. Has to be easily removable as full motorsport events don't allow it in the car during events, but testing days a

SDC11064.jpg


SDC11061.jpg


That pressure is actually low for airjacks......... cylinder sizes of the airjacks themselves means that for the weight we have we need that kinda pressure, but usually people run an external nitrogen tank and run higher pressures than that.......500-600psi.... so the cars pretty much jump off the ground as time is important for them.....

We mounted 4 as it was easiest for packaging reasons as you'll see from the top photo...... also makes it easier when you need to get under to put safety stands on as the jacks are closer to the outside of the car.....
 
As always just 'WOW'
nice work looking forward to seeing it out again
 
Fraser thanks so much for the picture. I have a few questions if you don't mind:

1. What brand are those jacks
2. Why did you decide to fab up an on board tank
3. Looks like the air goes to a valve first. What brand is that?
4. What does it go to after the valve and where did you get that item
5. Any photo of where they are mounted in the rear?
 
Fraser thanks so much for the picture. I have a few questions if you don't mind:

1. What brand are those jacks - Palestini Racing - http://www.palestini.com.ar/web/index.php
2. Why did you decide to fab up an on board tank - Because when you're testing or doing trackdays I don't want to be carrying around a separate tank. This way I can just get flip a switch and the car goes up..... nice and easy. Bottle is aluminium and mount it very simple half tube welded to the factory battery brace so very little extra weight.
3. Looks like the air goes to a valve first. What brand is that? You mean the regulator ??? That gets it down from 3000 PSI down to 350 so I can use it, then that goes into http://www.ebay.com/itm/3-8-Asco-4-Valve-Manifold-BLUE-Air-Ride-Suspension-/220734319360 . I don't know the brand I just hunted for a regulator that would do 3000 - 300-400PSI and got one from some place in China..... they're not cheap, it's billet machined, but I don't think you should scrimp when you're dealing with 3000PSI !
4. What does it go to after the valve and where did you get that item
5. Any photo of where they are mounted in the rear?
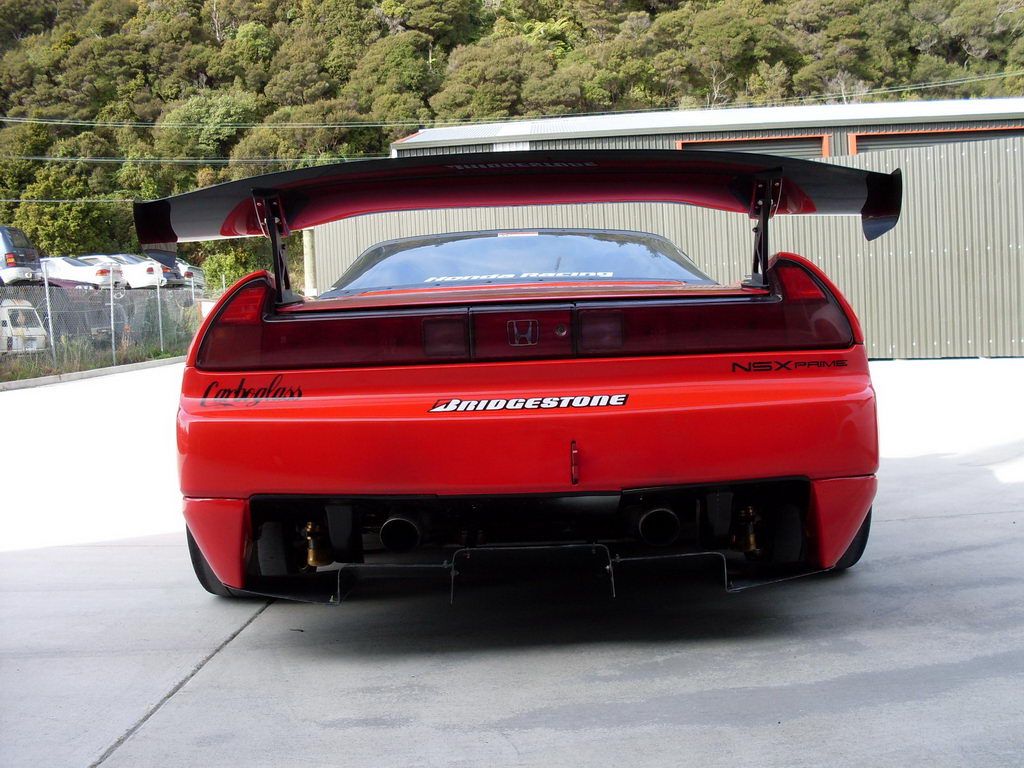
If you look in the last picture you can see the gold lower parts sticking down. I think I've got some pics somewhere, but I made up a cage for each and then they bolt straight to the main rear chassis rails where there was some kind of tow hook on each side and then they're tied together at the bottom with a bar from side to side....


did you really spend $2500 a jack? wow these are expensive. Thanks so much for the photos.
 
Spent more than that. The rest of the stuff to go with it was at least another $ 1000 USD but for us it's worth it. The car is way too low when run on the track to be able to easily get it off the ground....... having the airjacks means we can have the car off the ground in 10 seconds which makes a big difference with the amount of gear we need to take too and from the track, but also time wise it means we can get the car off the ground, make and change and get back out in a few minutes........ otherwise it would take at least 4 small ramps to drive the car up on first and 2 trolley jacks and even then you'd have to go side by side....... this way it's a no brainer.

The Palestini jacks are really well priced relative to others.......... doesn't make sense for road cars, but for a track car it's already paid itself back in time saved.
 
yep, that exhaust is definitely pure SEX :biggrin:

fast and rather loud I expect !
 
Last edited:
Back
Top