Love the white, my next set will definitely be white
-
Protip: Profile posts are public! Use Conversations to message other members privately. Everyone can see the content of a profile post.
You are using an out of date browser. It may not display this or other websites correctly.
You should upgrade or use an alternative browser.
You should upgrade or use an alternative browser.
New owner. Mini fix it / build thread
- Thread starter Tech7042
- Start date
- Joined
- 2 October 2007
- Messages
- 29
Beautiful.
If you'd consider trading up to a 2006 S2000, feel free to PM me.
If you'd consider trading up to a 2006 S2000, feel free to PM me.

Re: New owner. Mini fix it / build thread. UPDATE 02/2012
UPDATE 02/2012
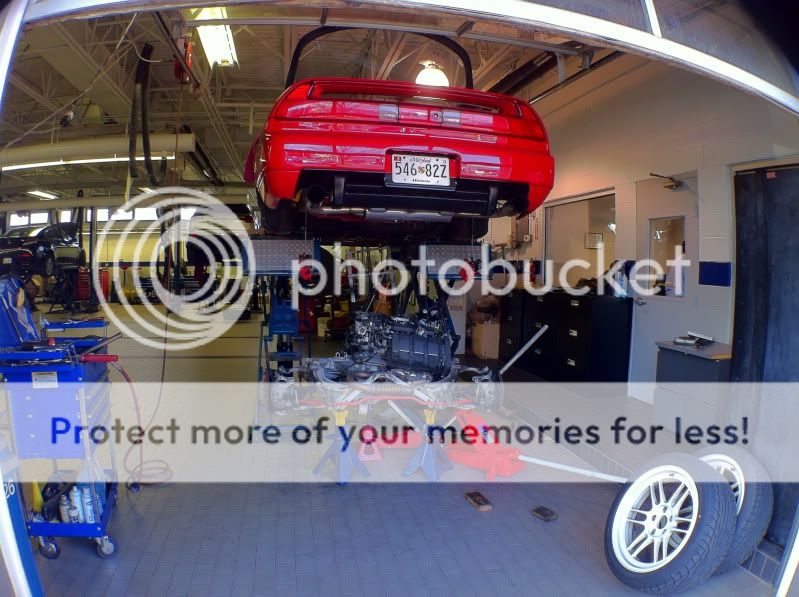
So the NSX was due for some much needed maintenance and TLC. I started noticing a valve tap along with some minor oil leaks. I figured the easiest way to doing the major service was to pull the engine. And I figured while I had the engine out I might as well upgrade my graphite head gaskets with some MLS ones. And I figured if I had the heads off I might as well upgrade to some ARP studs. So here are some pics from my 4 Day project.
start undoing things up top:


Undo some stuff on the bottom and she's out:

Start the tear down:


This says it all:

Inspected the cylinder heads and block decks for warping with a machinist straightedge and feeler gauge- completely straight and true!


Studs installed:

Cometic MLS gasket:

Repeat on other side:

Cylinder Leakage test for shits and giggles. Engine is super healthy with less than 5% leakage rates in all cylinders!

Random valvetrain components:

All bolted back together:

New timing belt and reset timing:

My boy Tae came through with these wrinkle finish valve covers!

Tae (FD3SNSX) came to help me out with the install. Thanks bro!

All ready to go back in:

All buttoned up and ready for coolant and startup!

All the shit I replaced:

-Timing belt
-Vtec Solenoid Gaskets
-Crossoverpipe O-Rings
-Intake Manifold Gaskets
-Rocker Shaft Orifice O-Rings
-Cam Seals
-Cam Plugs
-Valve Cover Gaskets and Tube Seals
-Valve Adjustment
-Head Gaskets
-Head Bolts for ARP studs
Results: fired right up with no leaks, no check engine lights, and idled strong and smoooooooth. Feels like a totally different car! valve tap is gone and and runs strong!
stay tuned for more, as I have much planned in the coming months!
UPDATE 02/2012
So the NSX was due for some much needed maintenance and TLC. I started noticing a valve tap along with some minor oil leaks. I figured the easiest way to doing the major service was to pull the engine. And I figured while I had the engine out I might as well upgrade my graphite head gaskets with some MLS ones. And I figured if I had the heads off I might as well upgrade to some ARP studs. So here are some pics from my 4 Day project.
start undoing things up top:
Undo some stuff on the bottom and she's out:
Start the tear down:
This says it all:
Inspected the cylinder heads and block decks for warping with a machinist straightedge and feeler gauge- completely straight and true!
Studs installed:
Cometic MLS gasket:
Repeat on other side:
Cylinder Leakage test for shits and giggles. Engine is super healthy with less than 5% leakage rates in all cylinders!
Random valvetrain components:
All bolted back together:
New timing belt and reset timing:
My boy Tae came through with these wrinkle finish valve covers!
Tae (FD3SNSX) came to help me out with the install. Thanks bro!
All ready to go back in:
All buttoned up and ready for coolant and startup!
All the shit I replaced:
-Timing belt
-Vtec Solenoid Gaskets
-Crossoverpipe O-Rings
-Intake Manifold Gaskets
-Rocker Shaft Orifice O-Rings
-Cam Seals
-Cam Plugs
-Valve Cover Gaskets and Tube Seals
-Valve Adjustment
-Head Gaskets
-Head Bolts for ARP studs
Results: fired right up with no leaks, no check engine lights, and idled strong and smoooooooth. Feels like a totally different car! valve tap is gone and and runs strong!
stay tuned for more, as I have much planned in the coming months!
Last edited:
I love the red covers. Nice work!
Re: New owner. Mini fix it / build thread. UPDATE 02/2012
Nice car - like the white wheels.
Sorry, but would you mind elaborating please how this picture says it all :redface:
Thanks!
Dave
UPDATE 02/2012
This says it all:
Nice car - like the white wheels.
Sorry, but would you mind elaborating please how this picture says it all :redface:
Thanks!
Dave
Re: New owner. Mini fix it / build thread. UPDATE 02/2012
Lol- just pointing out the flimsy 20 year old head gasket. It literally came apart when I lifted it off the block. I had no problems with oil or coolant burning, but it was only a matter of time. I've done head gaskets on 91-95 Legends and they are made of the same material. Those are notorious for blowing/leaking.
Nice car - like the white wheels.
Sorry, but would you mind elaborating please how this picture says it all :redface:
Thanks!
Dave
Lol- just pointing out the flimsy 20 year old head gasket. It literally came apart when I lifted it off the block. I had no problems with oil or coolant burning, but it was only a matter of time. I've done head gaskets on 91-95 Legends and they are made of the same material. Those are notorious for blowing/leaking.
Oh, OK, thanks. Thought maybe I was missing something!
This was one of my gaskets at 130k miles on the engine that I'm rebuilding now.

This was one of my gaskets at 130k miles on the engine that I'm rebuilding now.
great work, make me wanna start to do the same on my too. I need more boost lol. Tell me that u change out all coolant hoses also. One of my coolant hose busted last summer, luckily its in a day time so i didn't hurt the motor.
Thanks man. Sucks about your coolant hose- good thing you caught it in time. As for mine, all of them were recently replace, so I should be good in that area.
- Joined
- 19 March 2003
- Messages
- 3,442
MikeC is selling factory 02+ side skirts. Go with an updated OEM rear valence and your exterior would be nicer.
I also agree on those side skirt clips, I accidentally order enough for two cars. Now I have 18 extra of the super expensive plastic clips.
I also agree on those side skirt clips, I accidentally order enough for two cars. Now I have 18 extra of the super expensive plastic clips.
MikeC is selling factory 02+ side skirts. Go with an updated OEM rear valence and your exterior would be nicer.
I also agree on those side skirt clips, I accidentally order enough for two cars. Now I have 18 extra of the super expensive plastic clips.
Thanks for the input but I am perfectly content with the way the car looks. I can't justify spending thousands of dollars on parts and paint to alter an exterior that to me, already looks Badass. Not trying to hide the "oldness" of my '92 with updated body panels... Old and proud Lol. I rock historic tags and a cassette player and couldn't be happier.
NIce fixes.
Looking foward to seeing more.
Looking foward to seeing more.
looks great!
Good choice going back to oem:wink:
Now all you need are some comptech headers
...Picked these up last week.


They're out getting Jet-Hot right now. :smile:
Any new updates?
you didn't replace the LMAs..... They will tick eventually.
Otherwise awesome job, not many of these teardown DIYs around... love it, good work.
Otherwise awesome job, not many of these teardown DIYs around... love it, good work.
Last edited:
you didn't replace the LMAs..... They will tick eventually.
Otherwise awesome job, not many of these teardown DIYs around... love it, good work.
Thank you. Inspection of the LMAs did not warrant their replacement. All had a VERY smooth action with no indications of sticking or binding.
Any new updates?
I have recently done the following:
-Installed the Comptech Headers (opted against the jet hot)
-Made custom plug and play o2 Sensor wire extensions using OEM pins and connectors.
-Rebuilt all axles with new boots, bands and packed with grease.
-Performed 4 Wheel Alignment.
-Installed Walbro 255 fuel pump.
-I also got some stuff in the mail.
axles out:

Final alignment readings: (Caster is actually in factory spec according to Acura ISIS alignment specification. Dunno why the Hunter Machine is saying +8.5 is out.)

Walbro 255:

Fuel Tank out:

Old sending unit:

What I got in the mail:

Random shot taken by a local at a car meet:

I have much planned coming up so stay tuned!
sweet, awesome work man.
This is probably one of the better thread reads for me. Nice when you have the capability and connections to work on your car. Make your car for you. As for the wheels, if you love 'em, good for you but for me they scream at me and detract from the lines of the car. Just me mate, but $hit it now looks like a car from the "pimp my ride" TV show. Guess you get the picture...I'm so much of an NSX purist as others know. Lose the rims for something more classy. Got to go now and put on my flame suit....siD
Last edited:
This is probably one of the better thread reads for me. Nice when you have the capability and connections to work on your car. Make your car for you. As for the wheels, if you love 'em, good for you but for me they scream at me and detract from the lines of the car. Just me mate, but $hit it now looks like a car from the "pimp my ride" TV show. Guess you get the picture...I'm so much of an NSX purist as others know. Lose the rims for something more classy. Got to go now and put on my flame suit....siD
Don't get how a completely stock exterior NSX reminds you of a car built by the boys at WCC for MTV's pimp my ride. Appreciate the input though. The tv's and PS2 for the glovebox are on order.
04/06 Update:
Last weekend I spent some time installing parts I had laying around. All in prep for what I have planned for the car.
the Box 'O Shit:

Two NSX's one Driveway:

Interior Apart:

SOS catch can being installed by FD3SNSX. thanks bro.

Wiring my gauges:

(dont mind the spaghetti. The wires are now tucked, clean, ran neatly under the console to ECU and are going to be connected to my EMS for datalogging)
I used the pigtail off the cigarette lighter for the voltage, ground, and switched 12V source needed to power the gauges. This makes for a clean and direct "plug and play" setup.

Test run for operation:

Installed and interior back together:

Catch can done:

Stay tuned folks. Getting close to finishing up this '12 build.
Last weekend I spent some time installing parts I had laying around. All in prep for what I have planned for the car.
the Box 'O Shit:
Two NSX's one Driveway:
Interior Apart:
SOS catch can being installed by FD3SNSX. thanks bro.
Wiring my gauges:
(dont mind the spaghetti. The wires are now tucked, clean, ran neatly under the console to ECU and are going to be connected to my EMS for datalogging)
I used the pigtail off the cigarette lighter for the voltage, ground, and switched 12V source needed to power the gauges. This makes for a clean and direct "plug and play" setup.
Test run for operation:
Installed and interior back together:
Catch can done:
Stay tuned folks. Getting close to finishing up this '12 build.
Looking good