• Protip: Profile posts are public! Use Conversations to message other members privately. Everyone can see the content of a profile post.

Battery Tender Jr. installation (with pics)

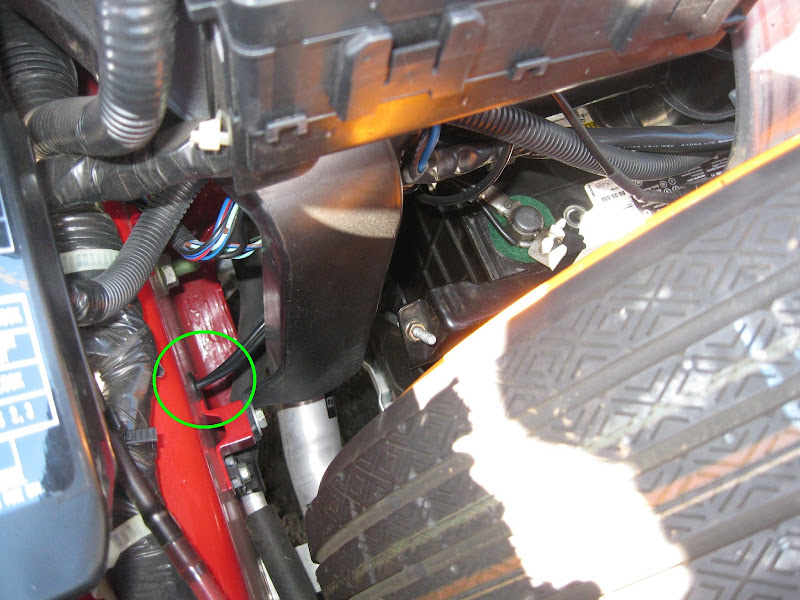
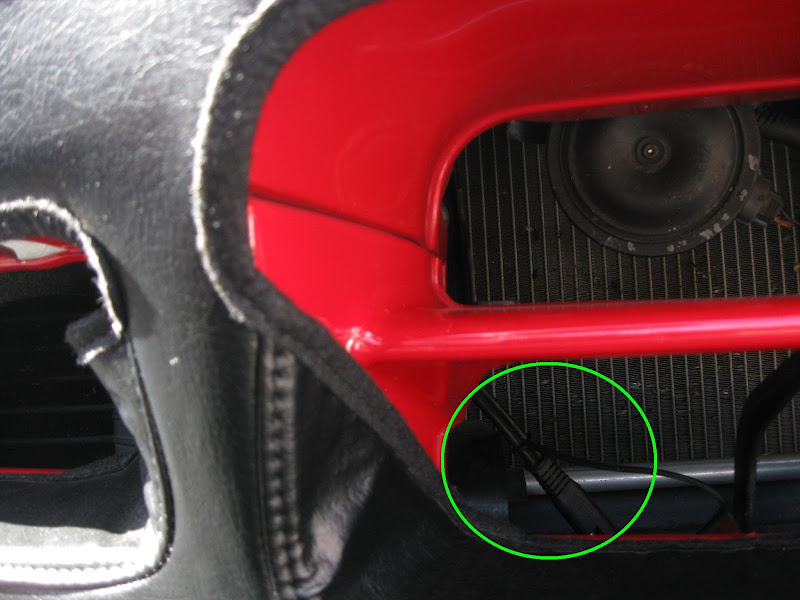
For some of us in the geriatric group who don't care to lay down on the garage floor searching for the end terminal inside the front lower bumper, thees are all alternative options.

As for the potential of scratching the paint with a wire going over the bumper or a fender, I am not even going to bother responding to that ....... to each his own solution :rolleyes:
 
Hrant, you're right - to each his own. If I were to use one of your awesome custom NSX car covers though, I'd think the bumper location might work better for those that don't have battery terminal issues. Anyway, hopefully this will be a moot issue for the next NSX, and it will offer some form of inductive charging. :wink:
 
Hrant, you're right - to each his own. If I were to use one of your awesome custom NSX car covers though, I'd think the bumper location might work better for those that don't have battery terminal issues. Anyway, hopefully this will be a moot issue for the next NSX, and it will offer some form of inductive charging. :wink:


:biggrin: Thanks for the plug there.

But just as an FYI, the manual that comes with the battery tender states to have enough air/ventilation just in case the battery gets ...... I am sure that was written by some attorney :wink:
 
To be honest this is not as elegant of a solution as the install set up by the OP.

This requires you to constantly open / close the hatch / engine cover, plus if you close the hatch / engine cover it places pressure on the cord. Aesthetically it also may cause the rubber cable to scratch the painted area in a very visible spot if the car is dirty. And if you accidentally move the car with it attached who knows what kind of damage may happen to the paint / cover / fuse box.

The OP's method of install is much cleaner and less visible. Plus it's a great opportunity to place corrosion protection pads and corrosion protection grease on the battery terminals while doing the install so there's no battery corrosion (I see too much of this in many cars, including some NSXs).

- I like opening my engine bay
- No pressure on the cord by closing anything
- No scratches yet
- Less visible = more likely to accidentally move car with it attached
- Whatever -
 
HF simplicity...

I've been using this for years (for when I'm away for weeks) and/or the weather & temp's are low for an extended time period. It seems to have no downside as to maintaining an already functioning/working battery.
 
I lost the other plug which connect to the battery. Can you please tell me which part is the +/- I need to modify the other part which connect to the battery terminal.

TIA

Tia,
Like tooltime said, it is best to check with a VOM.


Per the install instructions

The cable on the tender, the exposed pin is +positive.

The cable from the battery, the covered socket is +positive and the wire must have a fuse in it.


Mike
 
Why Acura recommends jumping the car from the engine bay fuse block, I'm not sure :confused:.

Probably because of the distance from the battery to the fuse relay box. When you are jump starting you have two batteries connected which could conceivably max out the current capacity of the battery cable. DC power cables are sized based on the the current they will carry and the length of the run. When you add two batteries, the size of the cable should be increased to account for it.


Be advised that hooking up from the engine bay will put more stress on the battery tender. Now you are lengthing the run from charger to battery and also using a over sized cable (battery cable). Both of these things will cause more resistance which in turn will either reduce the amount of charge (take longer) or if the tender is smart enough it will increase the current output which causes more stress on the tender's small cable. Under full charge just make sure the tender's cable doesn't become too hot. Shouldn't be too much of a problem with a small output charger like this.


Mike
 
Last edited:
Ive been using the battery tender jr. for around 2 years. I connect with clamps directly to the front batter since I use my quick disconnect on my Jetskis. I really like the rear charging method that you are using though. It will make my run much better as I am using a plug directly next to my engine bay. Right now it runs up the side length of the car.
 
I wanted to mention this since I saw tucsonsx over the weekend. He has a pretty slick setup:

Your Battery Tender has wiring running through the right side longitudinal with a discreet plug in the radiator opening so you don't have to open the hood to unplug it either time each year you actually drive the car.:redface:

I saw his setup and took a couple of photos. He said he didn't have to drill any holes, remove the wheel, or do anything other than thread the wire through the existing hole and put a grommet on it. Extremely clean and OEM look, as you can see for yourself.

IMG_8944.JPG


IMG_8945.JPG
 
Quick question ... I was moving mine to the rear compartment and noticed that in the picture the positive was connected to the starter motor terminal and not to the battery terminal in the rear fuse box.

Shouldn't it be to the battery terminal?
 
Quick question ... I was moving mine to the rear compartment and noticed that in the picture the positive was connected to the starter motor terminal and not to the battery terminal in the rear fuse box.

Shouldn't it be to the battery terminal?

If you're referring to my pictures, the positive terminal connection is where you would jump start the car. I have had this setup for over a year and it works well.
 
Just to be clear you have it connected to the terminal to the right of the positive jump metal post which is marked "starter motor terminal" NOT to the terminal to the left of the positive jump post marked "battery terminal".

Why did you chose the starter motor over the battery terminal screws?
 
I wanted to mention this since I saw tucsonsx over the weekend. He has a pretty slick setup:


I saw his setup and took a couple of photos. He said he didn't have to drill any holes, remove the wheel, or do anything other than thread the wire through the existing hole and put a grommet on it. Extremely clean and OEM look, as you can see for yourself.

IMG_8944.JPG


IMG_8945.JPG

This is a winner! I like the clean install. I'm going to do mine this way. Thanks for posting!
 
Just to be clear you have it connected to the terminal to the right of the positive jump metal post which is marked "starter motor terminal" NOT to the terminal to the left of the positive jump post marked "battery terminal".

Why did you chose the starter motor over the battery terminal screws?

I see what you're saying. The terminals are common to each other. I probably had a long screwdriver or just decided that terminal was more visible. The function is the same :wink:.
 
I was motivated to adopt the setup of the OP, including using the link for the cable extension. I found that threading the cable end through a two inch piece of pipe insulation foam makes wedging the cable securely in place much easier. And I can take the cable end out and tuck it back in without getting down on the floor. As a 73 year old, that would be a deal breaker!
 
I just want to say I had this thing sitting in my garage for probably 2 years. It was I think one of the easiest things to install. I connected it via the engine bay method.

Took less than 5 minutes and now I don't have to worry about my battery dying!
 
I just bought this and a new battery for my car. (one of the small yellow top optimas) I ran the car for nearly an hour or so out for fun and plugged it in when i got back and it immediately said it was charging not even the 80% green flash it was steady red and after a good 1/2 hour or so when i came back out it was still steady red not even the 80% green flash. My volt gauge reads 13-14 volts while the engine is running and i have no battery light so i imagine my alternator is good.
 
I just bought this and a new battery for my car. (one of the small yellow top optimas) I ran the car for nearly an hour or so out for fun and plugged it in when i got back and it immediately said it was charging not even the 80% green flash it was steady red and after a good 1/2 hour or so when i came back out it was still steady red not even the 80% green flash. My volt gauge reads 13-14 volts while the engine is running and i have no battery light so i imagine my alternator is good.

It takes a while. Check it in the morning.
 
My Thanksgiving day project (besides raking leaves :mad: ) was to install my Battery Tender Jr - and set it up like Phoen$x showed earlier in the thread. Ordered the two parts from Amazon and did the install today - took about 15 - 20 minutes. Works great! Thanks Phoen$x for the pics and description.
 
Well for those who think the installation in the rear is less efficient than the front, B.S.. The amount of trickle charge given out of the Battery Tender is very minor in comparison the the potential amperage given from the battery to the starter motor over that long thick cable. The reason for the thick starter motor cable is that it has to carry that large amperage load during the starting process. Now this equates to the bigger cable having greater amperage capacity and thus less potential resistance to that amperage load needed for the start. Which also means that any current/voltage delivered by the Battery Tender is much less than the designed capacity of the battery starter cable and thus will give little to no resistance to the battery over this cable. So the controlling factor here is really the battery and not the cable or it's length. Please try to remember, that electrically, positive connections and/or negative connections when tested are the same as if it was located on the appropriate battery terminals as long as there are no devices, switches and the like interfering with the circuit. Remember I said electrically not physically. So connecting the tender at the rear is no different electrically than directly on the battery like Phoeni$x's setup and thus just as efficient.

Secondly, even though a discharged battery may be hungry as hell for all the electrons it can get from any source, ie., alternator, another battery (slightly dangerous if done wrong) or even a battery charger, it's up to the charger and it's circuitry design to control that electron flow to both protect itself, and the batteries lead plates/mats. Charge a battery too quickly and you can damage it's plates and sulfate them which reduces their life span. Charge a battery incorrectly and it will also reduce it's life span. The beauty of the Battery Tender is that it has been designed to sense what the battery needs and it's also it's state of charge and then controls the charge rate and method which best suits the battery type it's connected to in hopes of maintaining the batteries maximum battery charge state without overcharging or damaging the battery in the process. That's also why you don't see a nickel size thick cable coming out of the Battery Tender connected to the battery. It doesn't need it.

Now some of you think that you don't need a battery charger and let it sit for months slowly loosing charge. That's why the car has an alternator to help recharge it right! An alternator unlike a battery charger is designed to run at it's max rate to charge the battery as quickly as it can given it's capacity which means it can be working real hard to get that battery charged up for a long time if it's really low. Do that a lot and eventually it overheats the circuits in the alternator and you've cooked it. Cheaper to buy a Battery Tender than an alternator. JM2C

Al
 
Last edited:
FYI - defective Battery Tenders

So I had two Battery Tender Jr's go bad on me in the course of less than a year. :frown: The symptom was that the LEDs were rapidly flashing green, even when not connected to a battery. Unfortunately, I did not notice this until the battery in the blue sled was dead, and I thought it was the battery rather than the charger, so I possibly needlessly replaced the expensive Optima battery with a less expensive run-of-the-mill one. The manual for the Battery Tender Jr doesn't state what the flashing green LED (when not connected to a battery) means, but I called Battery Tender Corp and they confirmed it's defective and to send it for warranty replacement.

Periodically check your Battery Tenders people.
 
Thanks for the update and "heads up" Phoen$x - good to know and will be watching for same. So far so good on mine (almost a year now), but will watch for the flashing green LED just in case.
 
Back
Top