I recently completed a console rework for a 'Prime member & decided to photo-document the process for the benefit of those who might be considering similar project.
(all thumbnails are clickable links to larger pics)
Start with the material list-
you'll need a thin sheet of plastic for initial backing - something soft, machinable like an ABS style compound is best, nothing too brittle. I got an off-cut from Tap Plastics.
Two kinds of Bondo - I prefer the chopped glass reinforced Bondo-Glass for the main structural integrity with Bondo Ultimate for the fine surface finish.
A good sanding block & various grades of production paper for sanding to a fine finish.
Primer - I like the high-build Filler Primer formula as it will fill minor (I stress minor!) surface imperfections nicely after cut back with sanding. You can also fill pin-holes with Bondo Glazing & Spot putty.


For tools, a Dremel is useful for the initial cutting and I suppose could be used to cut the slot, but I prefer to use my router table for a perfect replica of the required cut-out.
Remove the console from the vehicle & dis-assemble all the attached parts - ash-tray, shift boot, aspirator fan & coin tray.
First step in prepping the console is to strip off the metal foil cladding over the top half of the console, stopping at the sides of the ash-tray. This is achieved by just picking at the edge with an exacto or Stanley knife & peeling off in strips. Just be careful not to gouge into the surface of the plastic, although you can repair anything you damage in the refinishing process.
This image shows the console with the foil stripped off the top section - don;t worry about the cassette area, that will be getting cut off anyway.

Next, cut out the section that was previously between the cassette & radio apertures and trim the aperture to beyond where your new slot will be. You will want to be cutting your new slot into the bondo, not original plastic so ensure you cut enough of original material away. In this case it was a single din head - if you are going full double din, you can also remove the lower plastic tabs to leave a full square slot if desired.


Now flip the console over so the back side is up.
Cut the backing plastic to size to fit between the two horizontal bars at the ashtray and the A/C module references. Test fit for size. I found an angle of 5 deg on my mitre saw was perfect to match the angle of the sides.
Mix up your Bondo-glass with the correct amount of hardener and spread it liberally like peanut butter onto the face of your backing plate. Now press it onto the back side of your console & squeeze out the excess around the sides & the top side. You can use a plastic spatula to give a rough surface maybe slightly below the top surface originally.
Tip - You will find it easy to trim off large excess with your Stanley knife before it's set really hard, at a rubbery intermediate stage.


Then you can sand off any seriously high spots and fill the top side with the Bondo ultimate. Repeat the sand/fill process till you are happy with finish. You'll want to use a sanding block to give a really smooth planar surface. Start with the rougher grits & get progressively finer. The Bondo Ultimate is so fine, you can use it as a fine-surface filler and achieve a perfect finish even without use of the spot/glazing putty. You will want to feather the edge of your foil section on the sides of the ash-tray to give a nice smooth transition.


Finish up with several coats of the Filler-Primer & sand with your block again - you'll be using the finer grits of paper now. Your aim is to end up with a nice flat solid surface into which you'll cut your slot to match your head-unit.

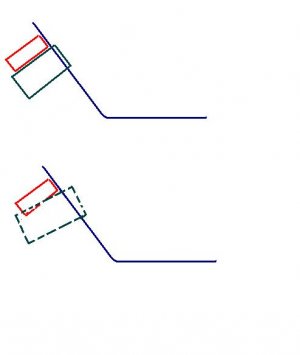
I prepared a template by gluing the trim-ring for the head-unit onto a piece of MDF; then I use a pattern bit to cut out the shape of the trim-ring onto the MDF below. Finally I remedy any minor imperfections in that template & transfer to a new stand-alone template, again using the bearing-following pattern bit to perfectly replicate the trim-ring cut-out.


You need to build up a frame to allow the console to move perfectly parallel to the table. I stick the pattern to the console with double sided tape.


Drill a couple of large holes in the centre where the slot will go & then use the cutter to follow the template & cut your slot. I then invert the console & cut a radius on the edge with a round-over bit.
Then another light sanding & finish up with another few coats of the filler-primer and associated sandings around the cut-edge and then finish the whole thing with a regular sanding primer.


Back side:

Of course you get the best look by matching the ash-tray cover & the grille surround to match. It's a relatively easy process to remove the grille to separate from the surround to get a neat contrasting finish.
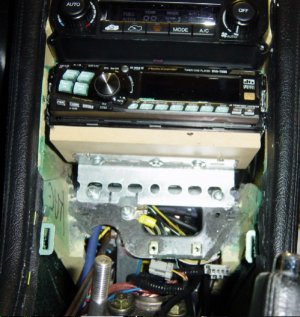
And the final article, after finish paint & installation, looks like this:

(all thumbnails are clickable links to larger pics)
Start with the material list-
you'll need a thin sheet of plastic for initial backing - something soft, machinable like an ABS style compound is best, nothing too brittle. I got an off-cut from Tap Plastics.
Two kinds of Bondo - I prefer the chopped glass reinforced Bondo-Glass for the main structural integrity with Bondo Ultimate for the fine surface finish.
A good sanding block & various grades of production paper for sanding to a fine finish.
Primer - I like the high-build Filler Primer formula as it will fill minor (I stress minor!) surface imperfections nicely after cut back with sanding. You can also fill pin-holes with Bondo Glazing & Spot putty.


For tools, a Dremel is useful for the initial cutting and I suppose could be used to cut the slot, but I prefer to use my router table for a perfect replica of the required cut-out.
Remove the console from the vehicle & dis-assemble all the attached parts - ash-tray, shift boot, aspirator fan & coin tray.
First step in prepping the console is to strip off the metal foil cladding over the top half of the console, stopping at the sides of the ash-tray. This is achieved by just picking at the edge with an exacto or Stanley knife & peeling off in strips. Just be careful not to gouge into the surface of the plastic, although you can repair anything you damage in the refinishing process.
This image shows the console with the foil stripped off the top section - don;t worry about the cassette area, that will be getting cut off anyway.

Next, cut out the section that was previously between the cassette & radio apertures and trim the aperture to beyond where your new slot will be. You will want to be cutting your new slot into the bondo, not original plastic so ensure you cut enough of original material away. In this case it was a single din head - if you are going full double din, you can also remove the lower plastic tabs to leave a full square slot if desired.


Now flip the console over so the back side is up.
Cut the backing plastic to size to fit between the two horizontal bars at the ashtray and the A/C module references. Test fit for size. I found an angle of 5 deg on my mitre saw was perfect to match the angle of the sides.
Mix up your Bondo-glass with the correct amount of hardener and spread it liberally like peanut butter onto the face of your backing plate. Now press it onto the back side of your console & squeeze out the excess around the sides & the top side. You can use a plastic spatula to give a rough surface maybe slightly below the top surface originally.
Tip - You will find it easy to trim off large excess with your Stanley knife before it's set really hard, at a rubbery intermediate stage.


Then you can sand off any seriously high spots and fill the top side with the Bondo ultimate. Repeat the sand/fill process till you are happy with finish. You'll want to use a sanding block to give a really smooth planar surface. Start with the rougher grits & get progressively finer. The Bondo Ultimate is so fine, you can use it as a fine-surface filler and achieve a perfect finish even without use of the spot/glazing putty. You will want to feather the edge of your foil section on the sides of the ash-tray to give a nice smooth transition.


Finish up with several coats of the Filler-Primer & sand with your block again - you'll be using the finer grits of paper now. Your aim is to end up with a nice flat solid surface into which you'll cut your slot to match your head-unit.

I prepared a template by gluing the trim-ring for the head-unit onto a piece of MDF; then I use a pattern bit to cut out the shape of the trim-ring onto the MDF below. Finally I remedy any minor imperfections in that template & transfer to a new stand-alone template, again using the bearing-following pattern bit to perfectly replicate the trim-ring cut-out.


You need to build up a frame to allow the console to move perfectly parallel to the table. I stick the pattern to the console with double sided tape.


Drill a couple of large holes in the centre where the slot will go & then use the cutter to follow the template & cut your slot. I then invert the console & cut a radius on the edge with a round-over bit.
Then another light sanding & finish up with another few coats of the filler-primer and associated sandings around the cut-edge and then finish the whole thing with a regular sanding primer.


Back side:

Of course you get the best look by matching the ash-tray cover & the grille surround to match. It's a relatively easy process to remove the grille to separate from the surround to get a neat contrasting finish.
And the final article, after finish paint & installation, looks like this:

Last edited: