-
Protip: Profile posts are public! Use Conversations to message other members privately. Everyone can see the content of a profile post.
You are using an out of date browser. It may not display this or other websites correctly.
You should upgrade or use an alternative browser.
You should upgrade or use an alternative browser.
Engine cover going 'bald'
- Thread starter Old Guy
- Start date


how did we get into a manscape DIY
Well ... I tried your Rogaine suggestion and that went absolutely nowhere except creating a big mess and that stuff isn't particularly cheap. I think I will have to eschew your advice in the future:smile:.
Never quit, or maybe I don't know when to quit!
I think I have arrived at a satisfactory solution for my balding engine / T roof cover. After my initial failed flocking patch attempt, I went the route of removing the flock patches and all the existing flock. The initial plan was to paint it with a textured flat black paint after removal of the flock. I did a few test samples with various paints and the most textured spray bomb that I could find was Duplicolor trunk paint. You can buy black trunk paint; but, it has white 'lumps' in it. This was easy to correct with a top coat of flat black. The trunk paint seemed moderately abrasion resistant; however, although textured, it wasn't really a very good match for the flocked pieces on either side of the roof hatch cover. In addition, flat black paint still reflects light and resulted in significant reflections off the inside of the glass hatch under the right conditions. I suspect that the reason Honda used the flock finish is that it is very good at eliminating reflections.
I decided to try the suggestion to use a fabric cover. After touring the upholstery supply shops, I found some suitable black material. It is sold for relining automobile trunks (aptly enough called trunk liner) when doing classic car restorations. It was about $16 Cdn per yard for a 40" wide piece so not particularly expensive. At first blush it looks a bit like a felt; however, it is slightly more 'porous', definitely not as dense as felt and not nearly as stiff as felt. It has no backing and when you hold it up to bright sunlight you can see light through the material. The thickness of the material is about 3-4 mm; but, compresses easily. The material is quite stretchy. This is good because it allows the fabric to match the contours of the cover easily including the little lip around the outside edge. The fabric has enough stretch that if you are careful, you can mold it to the outside corners and get a perfect fit without having to cut darts in the fabric to wrap around the corners. The downside to the stretch in the fabric is that it is not elastic, so if you stretch it, the stretch becomes pretty permanent. When you are applying the fabric to the cover with fast setting glue, you can put a permanent distortions into the fabric which results in bulges if you pull it hard so you have to be careful working the fabric out when applying it over the glue.
The sales person at the fabric store recommended JEFbond 99 trim adhesive to glue the fabric onto the cover. She said the local auto interior guys like it, particularly for working with headliners. The glue has guidelines for bonding absorbent material together (like the fabric) or non absorbent materials together (the cover). Nothing specific about absorbent materials onto a non absorbent substrate. In line with the recommendations on the can for absorbent materials, I did a test patch letting the glue tack up for about 4 minutes before applying the fabric. That resulted in a poor bond which was easy to pull off the substrate. What worked for me was to spray glue onto the fabric and the cover and let it tack up for about 45 - 60 seconds before joining up. Once joined up, you might have about 15 seconds to do a bit of repositioning. Any longer and I think it would be best to try and carefully pull the fabric off rather than try to reposition it. Because of the stretch in the fabric chances are that you will put a permanent stretch into it when removing it in which case treat it as garbage. Planning the work with this adhesive is critical. I did this work outside on a very sunny day; but, the temperatures were only around 18 C. If you try this with hotter temperatures, you may want to do this in a shaded area and do a test to find out how much your tack up time is shortened. You will likely get some overspray with the JEFbond. You can wipe the adhesive off of hard surfaces with a rag and acetone if you do this within about 20 seconds of applying the spray. Any longer and the adhesive just becomes too gooey. Planning the work with this adhesive is critical.
I found it best to cut the fabric with about 2 " of overlap all the way around the cover. I laid the fabric out on the cover and then folded it in half along the long dimension of the cover so that 1/2 half of the cover was exposed. I then sprayed a 4 " band of adhesive on the cover along the edge of the fabric and a matching 4 " band of adhesive on the fabric. I let this tack up and then folded the fabric over on to the area with the glue and carefully smoothed this out with my hands. I let this set up for about 5 minutes. I then worked from this center band of attached fabric, applying approx 4" bands of adhesive alternately on the front and back sides of the center attached band until I had reached the outside edges. Doing this in relatively small bands gives you the chance to smooth the fabric out with your hands and make sure that it follows the contour on the center raised section of the cover before the adhesive completely sets up. It also allows you to clean up any overspray (if you are quick). When it comes to the edges, let the cover hang over the edge of your work surface, spray glue onto the fabric and cover, allow tack up and then work down from the top allowing the fabric to hang over the edge making sure to push the fabric into the little lip around the base and then over the edges of the lip.
The trunk liner fabric is quite slippery. As a result, keeping it in place when you apply the first center band of adhesive can be tricky. Having someone hold the fabric in place while you spray and tack down that first center band can be helpful. The alternative would be a little double sided masking tape under the untacked section of the fabric to hold the fabric in place while you get that first band down.
With all the fabric attached, I let the glue set up for about 10 minutes, constantly checking the edges to make sure that the fabric was well bonded to the little lip where the gasket is located (on the targa cover). At a couple of spots along the edge I had to reapply some glue to ensure that the fabric is well bonded. Good bonding of the fabric at the edges is critical when it comes to trimming the fabric. If the fabric is not well attached it will pull apart during the trimming process making a mess.
For trimming, I used a brand new single edge razor blade. I flipped the cover up side down and then pulled up on the overhanging piece of fabric to be trimmed. With the fabric under a bit of tension, applying a little pressure to the razor blade I gradually stroked the razor along the fabric for about 2 " at the edge of the cover to start a cut. You can't push the razor through this material because of its stretch. Once you have a cut started, hold the fabric in slight tension and make small back and forth cuts with the razor using the edge of the cover as a guide. It took me about 20 minutes to work my way around the cover doing this. I suggest that you practise doing a cut with the razor on some scrap fabric before doing the actual trimming just to get a feel for what it is like to do a clean cut. Be careful with the razor and the edge of the cover. The cover is made from a resin that is fairly soft and if you are not careful with the blade you can actually shave chunks out of the cover with the razor. Like I said, use SMALL back and forth motions with the blade.
The trunk liner has a little more thickness to it than the original flock. As a result, on the T roof cars the cover is a bit of a press fit between the two outside pieces. So, you will have to be careful when closing the hatch until the fabric compresses along the sides after a little use. If you push the cover down too quickly before the fabric has compressed it may catch on the adjoining flocked pieces causing the fabric to tear off the cover at the edges. Non T roof cars won't have this issue.
The fabric is not flock; but, I have to say that it is a spectacular match to the flock both in color and in texture. It is not until you get close to the surface that you notice that there is a very slight pattern present in the material. Right now I am very pleased with the results. However, the unknown is durability. According to the data on the can, the JEFBond starts to soften at around 97 C, so I expect that it should be OK. The sales person thought the fabric was either polypropylene or nylon; but, wasn't sure. As such, the long term durability of the fabric and its fade resistance has yet to be determined. The sales person did not have a product name for the material other than trunk liner. I have some material left over. If anybody is interested in getting a little 50mm square that they can then take to a fabric shop to match up let me know. For the cost of a bubble envelope and postage its yours.
On a related note, I thought the cover for the T roof was made from ABS. It isn't. It is made from a resin of some sort reinforced with unwoven fibers. This is important because the material is actually quite fragile (compared to ABS). Particularly the channel around the edge of the cover that holds the gasket. Avoid storing the cover vertically on edge or setting the cover down on one of its edges. It is incredibly easy to crack and break off the outside edge of that channel. I discovered that I had about 5 or 6 spots along the outside edge where I had cracked the channel. I had to grind out the broken parts and then build them up again using QBond. I also discovered that I had about a 70 mm crack in the cover. Solvent style adhesives have no effect on the resin. I could have tried a polyester resin to repair the crack; but, in this case I ground out the crack using a Dremel with a fine bit and then filled the crack using Qbond. The downside to the Qbond (aside from being fussy to use) is that it is quite a bit harder than the resin that Honda used for the cover (which is actually quite soft) so you have to be careful when sanding it down to blend the surface. The best thing would be to be super careful when working with the cover so that you don't damage it like I did.
Last edited:
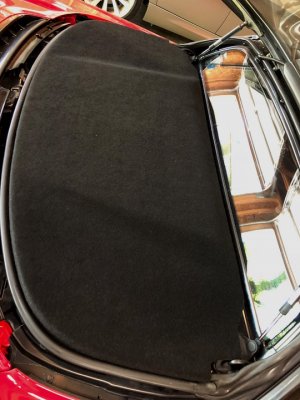
Some photos of the results. First off an update. Under the right lighting conditions, the slight pattern in the fabric is noticeable from more than 20" away, particularly if you are looking for it. In bright sunlight and with the glass hatch closed, the pattern was not visible to my 'old guy' eyes.
Picture of the completed cover. If you look carefully, under the light of the flash you can just pick up the slight pattern in the fabric.

Close up with the flash shows the slight texture difference between the original flock on the existing side panels and the refinished center panel. Again, you can see the slight pattern in the fabric.

A close up of the outside corner showing how well the fabric conforms to the corner and the edge profile without having to cut any darts in the fabric to avoid folds. The picture is close enough that it gives you a good idea of what the texture of the fabric is like. Looks like I have to go back and re attach my gasket since it appears to be hanging down a bit just to the side of the corner.

Picture of the completed cover. If you look carefully, under the light of the flash you can just pick up the slight pattern in the fabric.
Close up with the flash shows the slight texture difference between the original flock on the existing side panels and the refinished center panel. Again, you can see the slight pattern in the fabric.
A close up of the outside corner showing how well the fabric conforms to the corner and the edge profile without having to cut any darts in the fabric to avoid folds. The picture is close enough that it gives you a good idea of what the texture of the fabric is like. Looks like I have to go back and re attach my gasket since it appears to be hanging down a bit just to the side of the corner.
Last edited:

Looks like a great result. Thanks for the detailed report.
That looks good. Glad you found something that did the trick.
That looks great, Old Guy! Thanks for the write-up!
View attachment 154020
So much for my carbon fiber rap on my engine cover. Took the car out on Sunday. Boy does that engine compartment get hot!
We are back to the drawing board again. Buying another engine cover is not a good solution since any of them will eventually go bald!
My tinting guy is thinking of having the cover powder coated. That may be a solution since it would be indestructible.
Keep you posted!<script type="text/javascript" src="safari-extension://com.ebay.safari.myebaymanager-QYHMMGCMJR/18bd594b/background/helpers/prefilterHelper.js"></script><script type="text/javascript" src="safari-extension://com.ebay.safari.myebaymanager-QYHMMGCMJR/18bd594b/background/helpers/prefilterHelper.js"></script>
The cover for the targa top cars is a fiber reinforced resin of some sort. If the cover on the sedans is the same, I would be cautious about having it powder coated - it may suffer deformation when exposed to the cure temperature. Most powder coating requires a cure at temperatures above 200 C. I doubt that the cover normally sees temperatures much above 100 C. You likely had a problem because the adhesives on wraps are not meant for high temperatures.
I would talk directly to a good powder coater about whether they would guarantee no damage to your cover if it is powder coated. If the 'tint guy' is the one who steered you to using wrap on the engine cover, I might be inclined to go elsewhere for advice.
I would talk directly to a good powder coater about whether they would guarantee no damage to your cover if it is powder coated. If the 'tint guy' is the one who steered you to using wrap on the engine cover, I might be inclined to go elsewhere for advice.
Impressive. that looks great
Thanks.
In case anybody is interested, I happened to be back at the fabric shop picking up some material for another car project. When I originally bought the trunk liner, there was no identifying tag on the fabric bolt; however, while standing around waiting for them to cut the material for my latest repair, I noticed a bunch of vendor sample cards on the wall including a sample card for trunk liners. Based upon the sample on the card, I am pretty confident that this is the material that I used for redoing the engine cover:
https://www.ennisfabrics.com/en/home-decor/fabrics/trunk9009v-trunk-liner-54-9009-black
I always thought about cutting my cover with a jigsaw into the NSX-R pattern and buying some aluminum mesh. That way, I would never have to worry about the flock again... Of course, that would require some sort of stiffening frame. That fabric is a much nicer solution!
Just got mine back. It is now covered in a headliner material. Hope it holds up this time!
View attachment 154325
View attachment 154325
I just recovered my lid too. I think the material is identical (or almost) to what Old Guy used. Couldn't be happier with the result. It's not a perfect match for the original flocking, but it will never scuff or wear off like the flocking does. Nice and black and non-reflective too. I actually had a custom car shop do it, Classic Car Studio in St. Louis (they've been in a number of episodes on Jay Leno) Pulled the lid and dropped it off while I was out of town. $200 M&L.
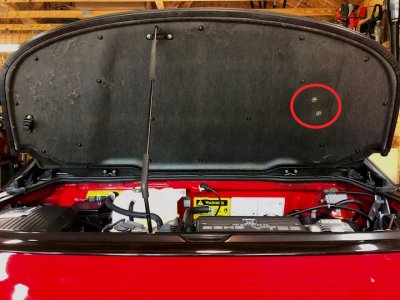
When I was pulling the hardware off the inside, I noticed two unused screws on the other side; what are those for?
When I was pulling the hardware off the inside, I noticed two unused screws on the other side; what are those for?
Attachments
If $200 included the work of de-fuzzing in preparation for installing the new finish, that seems like a bargain. Can't help you with the screw issue as I have a T roof and the construction is quite a bit different.
Yes he hit it with a palm sander to get it down to the base. Really happy with it.
Found out the screws are for the lid prop retainer, JDM application.
Similar threads
- Replies
- 8
- Views
- 571