
It’s a problem for me. Some days I want it loud, and some days I want it tame. Went to a few road trips recently and the drive to Vegas was not very comfortable, which made me drive it less and less. For the last two years, I raised my car up and dial my suspension to softer settings, quieter exhaust, Zanardi shifter, clear uv tint, and all the little creature comfort things that I would never think of doing. I enjoy the car more now, but I am sure I will go through phases of wanting raw or comfort.
-
Protip: Profile posts are public! Use Conversations to message other members privately. Everyone can see the content of a profile post.
You are using an out of date browser. It may not display this or other websites correctly.
You should upgrade or use an alternative browser.
You should upgrade or use an alternative browser.
Honcho's Long Road to Imola Type-S Zero
- Thread starter Honcho
- Start date
Of course the taillight install has a special procedure most people wouldn't think about  . I'll have to come back here for when I do mine soon. Make sure your bulbs are locked in their holes tightly, or they might fall out and melt the housing...
I changed to LED for the brake bulbs and didn't do any wiring work. Haven't touched the turn signals, but I looked for the signal flasher unit under the dash to modify it for the future and couldn't find it for the life of me.
. I'll have to come back here for when I do mine soon. Make sure your bulbs are locked in their holes tightly, or they might fall out and melt the housing...I changed to LED for the brake bulbs and didn't do any wiring work. Haven't touched the turn signals, but I looked for the signal flasher unit under the dash to modify it for the future and couldn't find it for the life of me.

Re-Assembly 17
Fenders, Quarter-Panels and Side Scoops
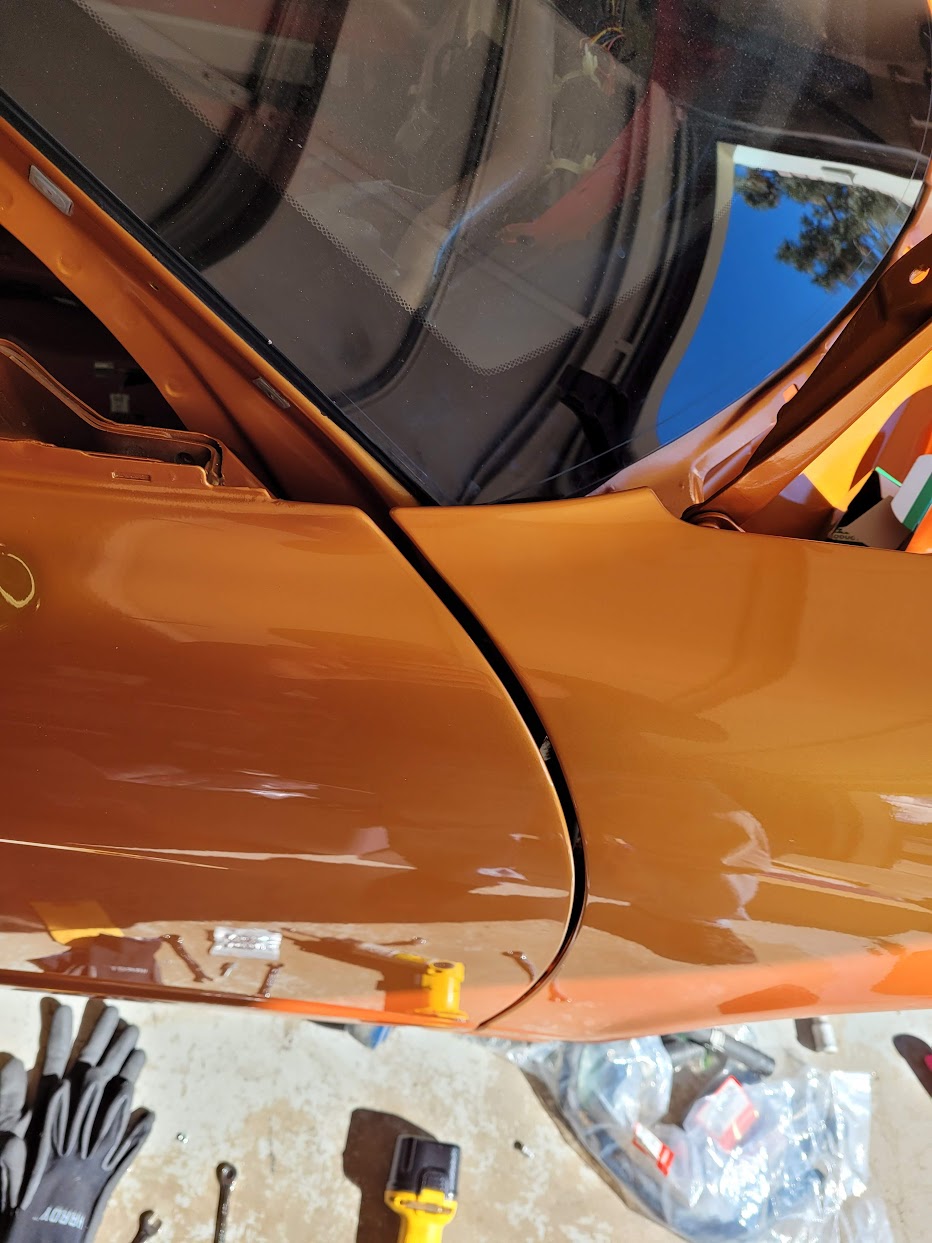
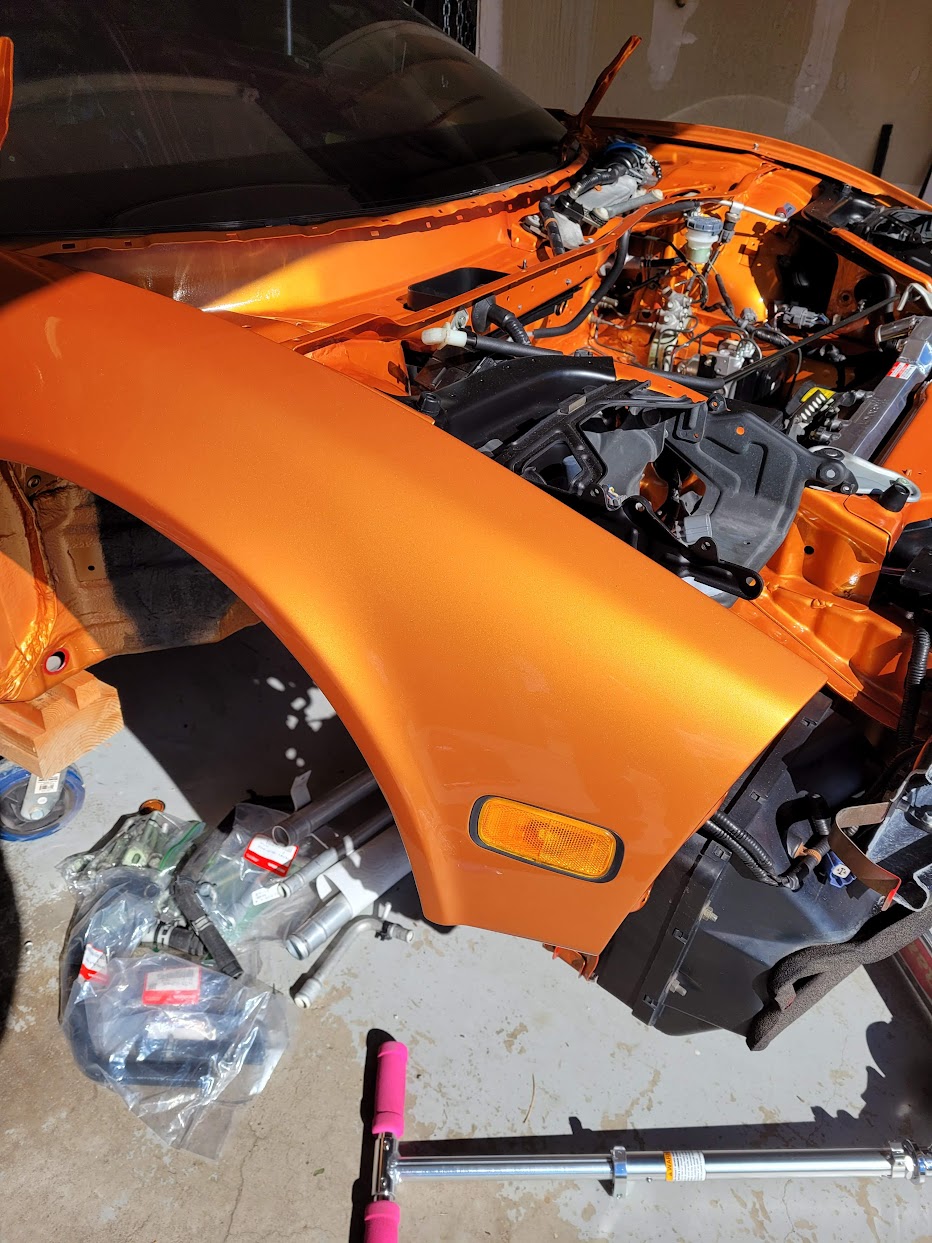
No time for photos while fitting the body panels. It's a real art form. Took several tries and test fits on each panel to get the gaps correct. The left fender required two spacers to sit flush with the door. It was also quite helpful to run all of the bolts through a wire brush on a bench grinder to clean out the threads- there is quite a bit of aluminum corrosion/powder on them. I suspect this played a role in breaking the rivnut on the right fender.
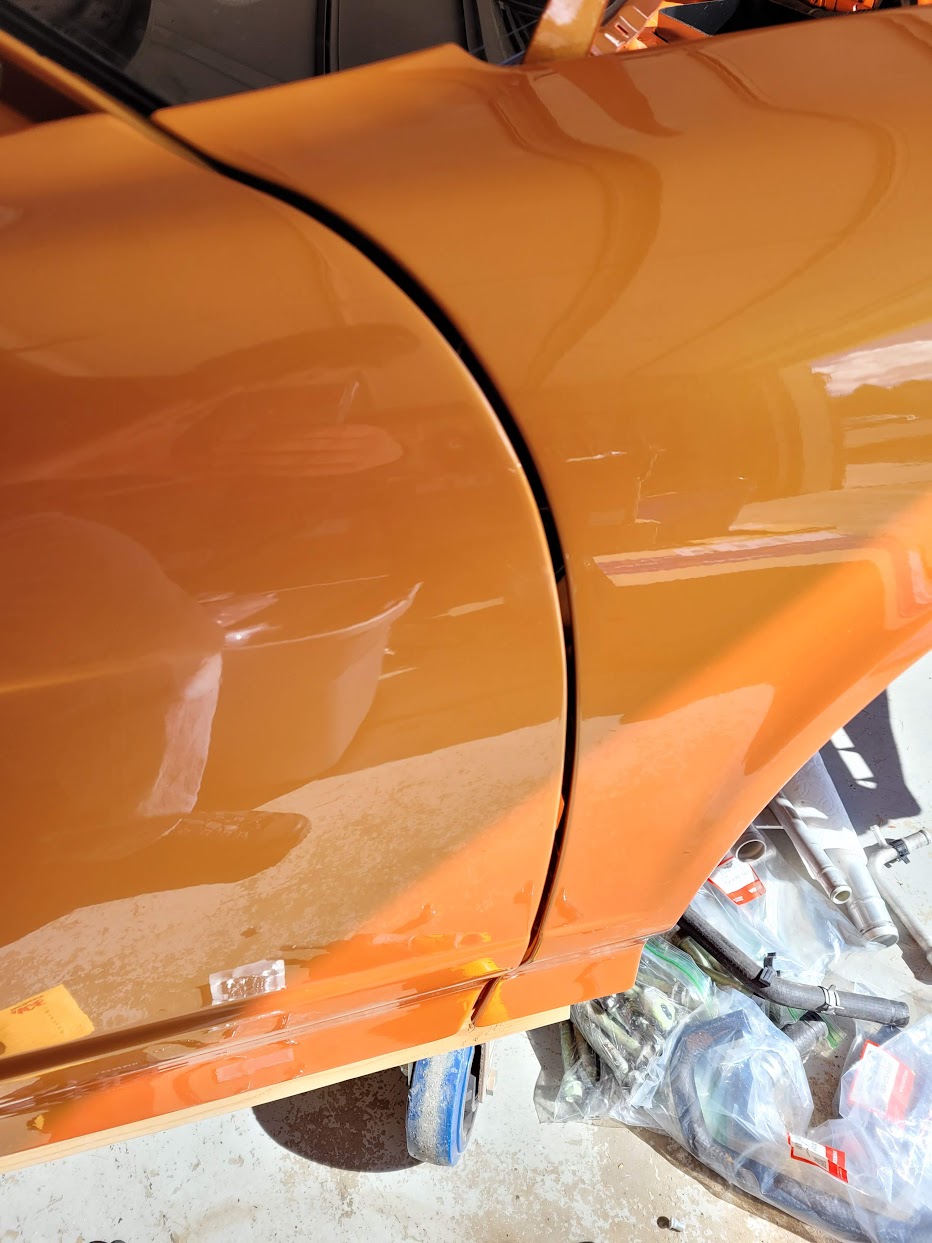
Final gaps at the door. It is critical to check the door opening through it's entire range to ensure the edge of the door does not contact the fender. I set the closest gap in this movement to approximately 0.75 mm.
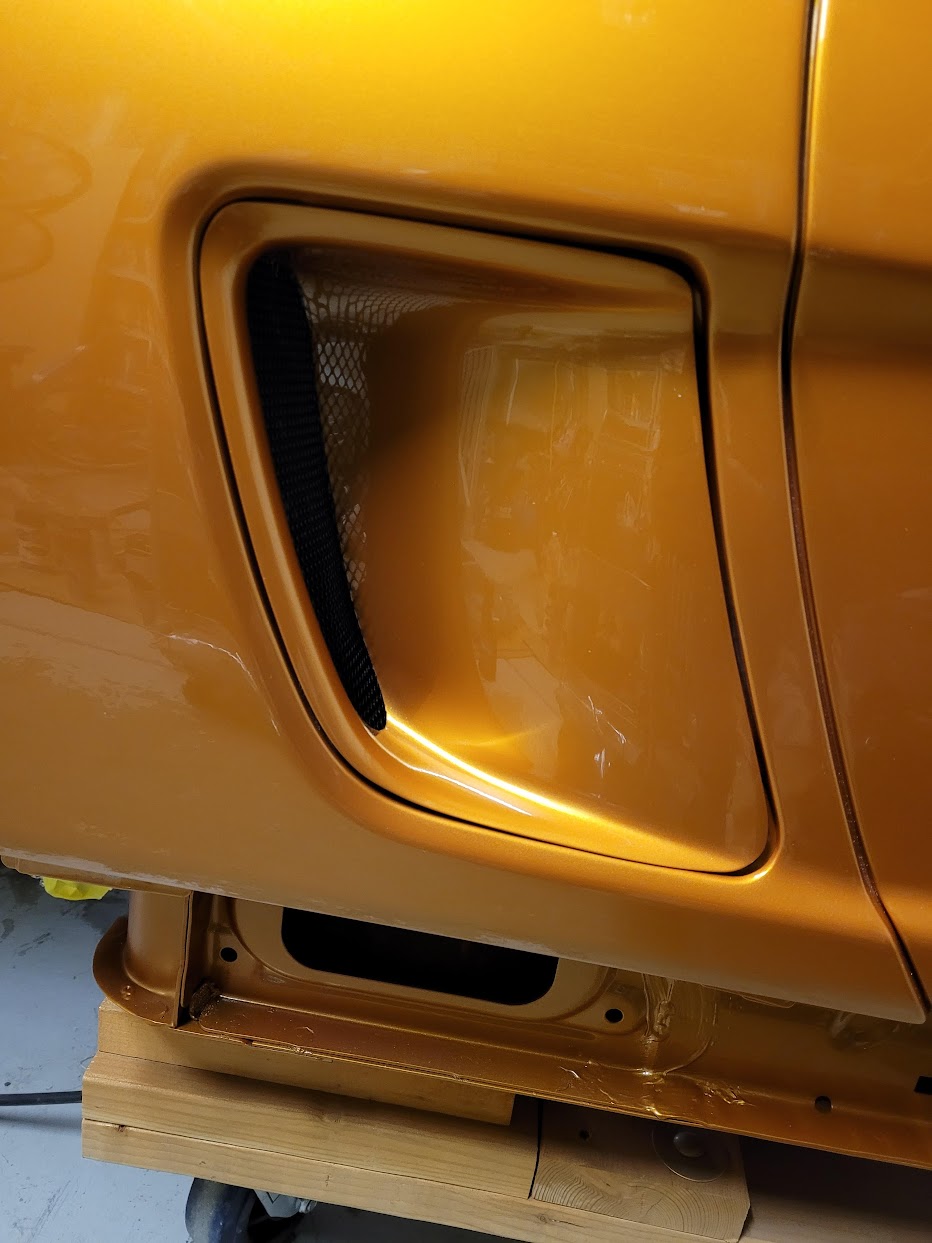
As for the side scoops, I'm very disappointed in the fitment of these Route KS side scoops. After several test fittings and using EPDM foam all over the back of the piece, I was able to get the right side to look OK. The left side requires more fitting. I'm double mad that my painter spent a lot of time and effort on these, which is essentially wasted. I'll run these for a while, but will replace with the [MENTION=5576]Procar Specials[/MENTION] versions eventually, since they will fit perfectly and my painter can always mix more Imola (he saved this formula in his computer in case I ever need more)
This is the initial fitment. I got these gaps slightly more even.
Fenders, Quarter-Panels and Side Scoops
No time for photos while fitting the body panels. It's a real art form. Took several tries and test fits on each panel to get the gaps correct. The left fender required two spacers to sit flush with the door. It was also quite helpful to run all of the bolts through a wire brush on a bench grinder to clean out the threads- there is quite a bit of aluminum corrosion/powder on them. I suspect this played a role in breaking the rivnut on the right fender.
Final gaps at the door. It is critical to check the door opening through it's entire range to ensure the edge of the door does not contact the fender. I set the closest gap in this movement to approximately 0.75 mm.
As for the side scoops, I'm very disappointed in the fitment of these Route KS side scoops. After several test fittings and using EPDM foam all over the back of the piece, I was able to get the right side to look OK. The left side requires more fitting. I'm double mad that my painter spent a lot of time and effort on these, which is essentially wasted. I'll run these for a while, but will replace with the [MENTION=5576]Procar Specials[/MENTION] versions eventually, since they will fit perfectly and my painter can always mix more Imola (he saved this formula in his computer in case I ever need more)
This is the initial fitment. I got these gaps slightly more even.
Last edited:
Re-Assembly 18
Rear Bumper
Again, not many pictures due to the effort. But, here is the rear bumper in its initial fit.
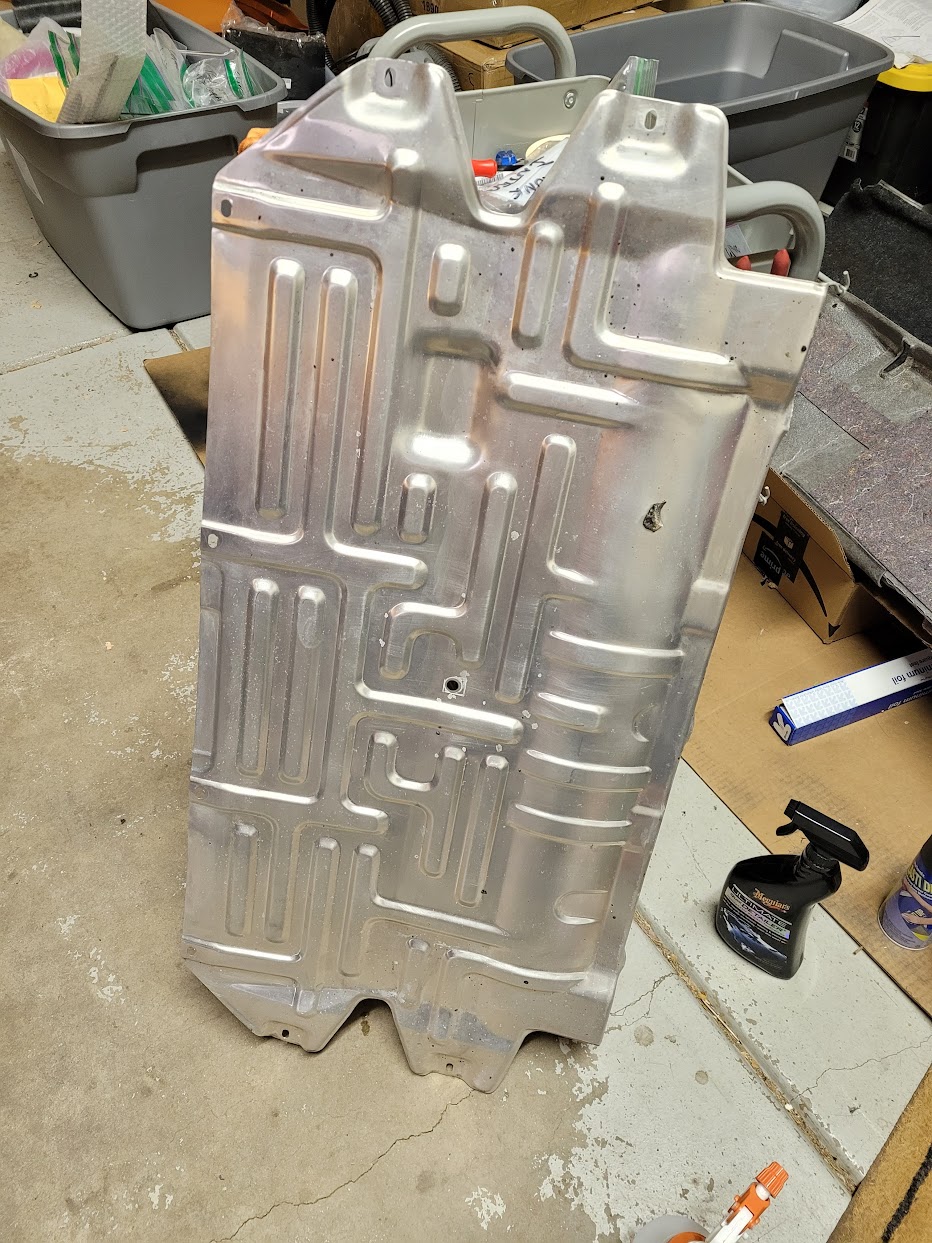
Also managed to get the exhaust heat shield cleaned up and re-installed.
Rear Bumper
Again, not many pictures due to the effort. But, here is the rear bumper in its initial fit.
Also managed to get the exhaust heat shield cleaned up and re-installed.
Last edited:
Re-Assembly 19
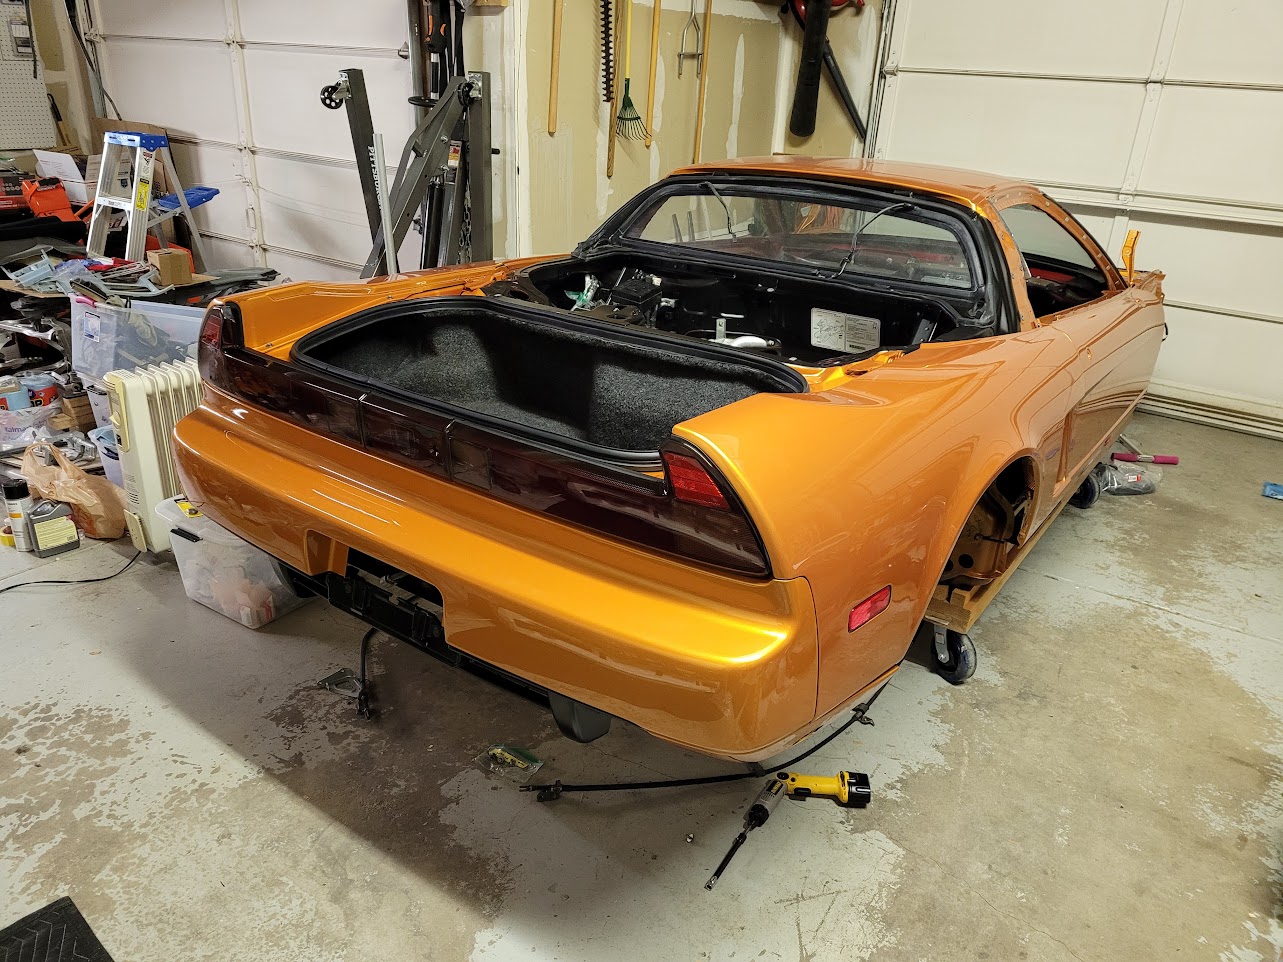
Trunk Carpet and Gasket
The last vestiges of the bumpin' sound system and the hack job install. To access the body under the carpet for the amp wiring, the audio installer just ripped the carpet away from the plastic retainer. I had to spend an evening pushing the staples back through the holes. My fingertips hurt for a day.
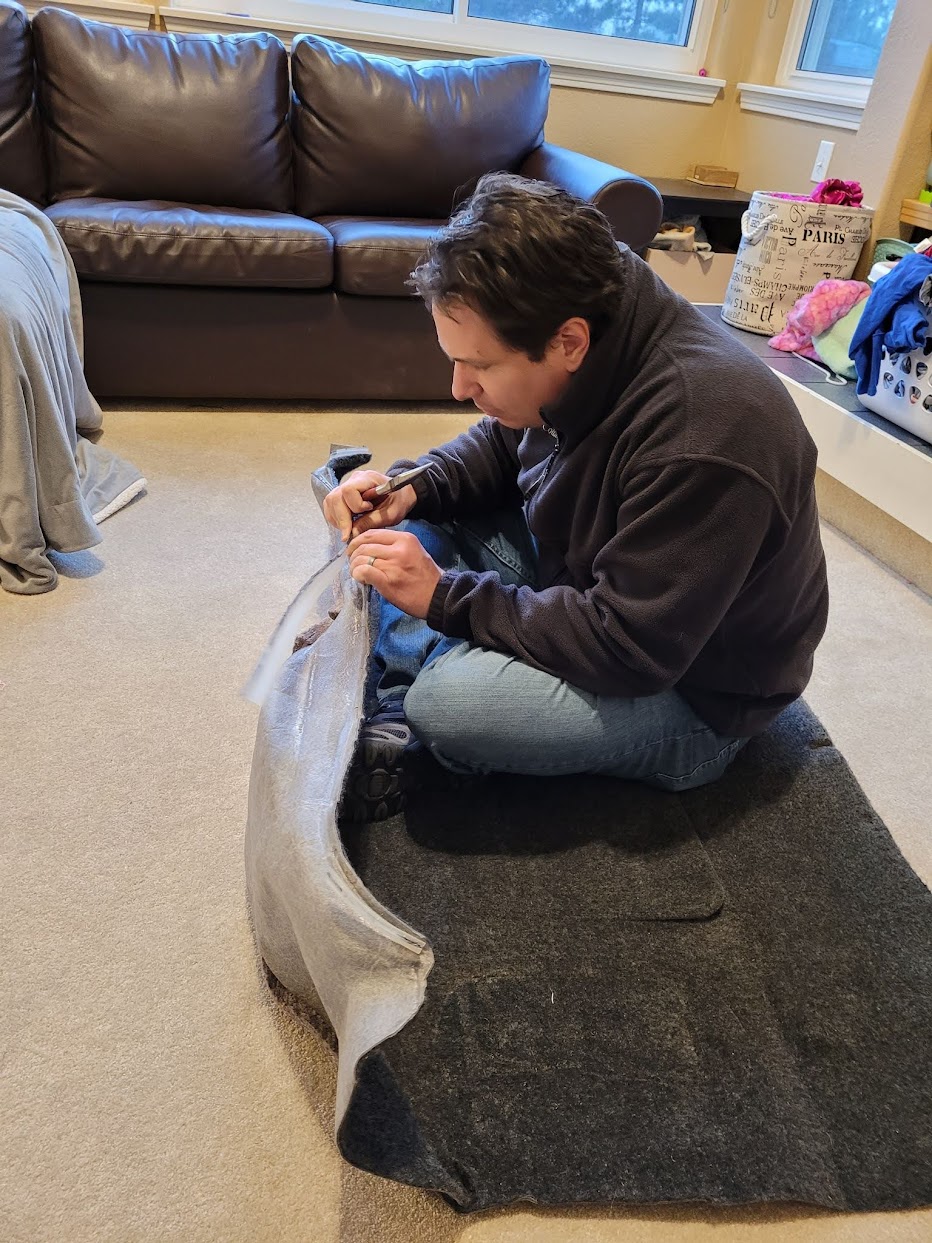
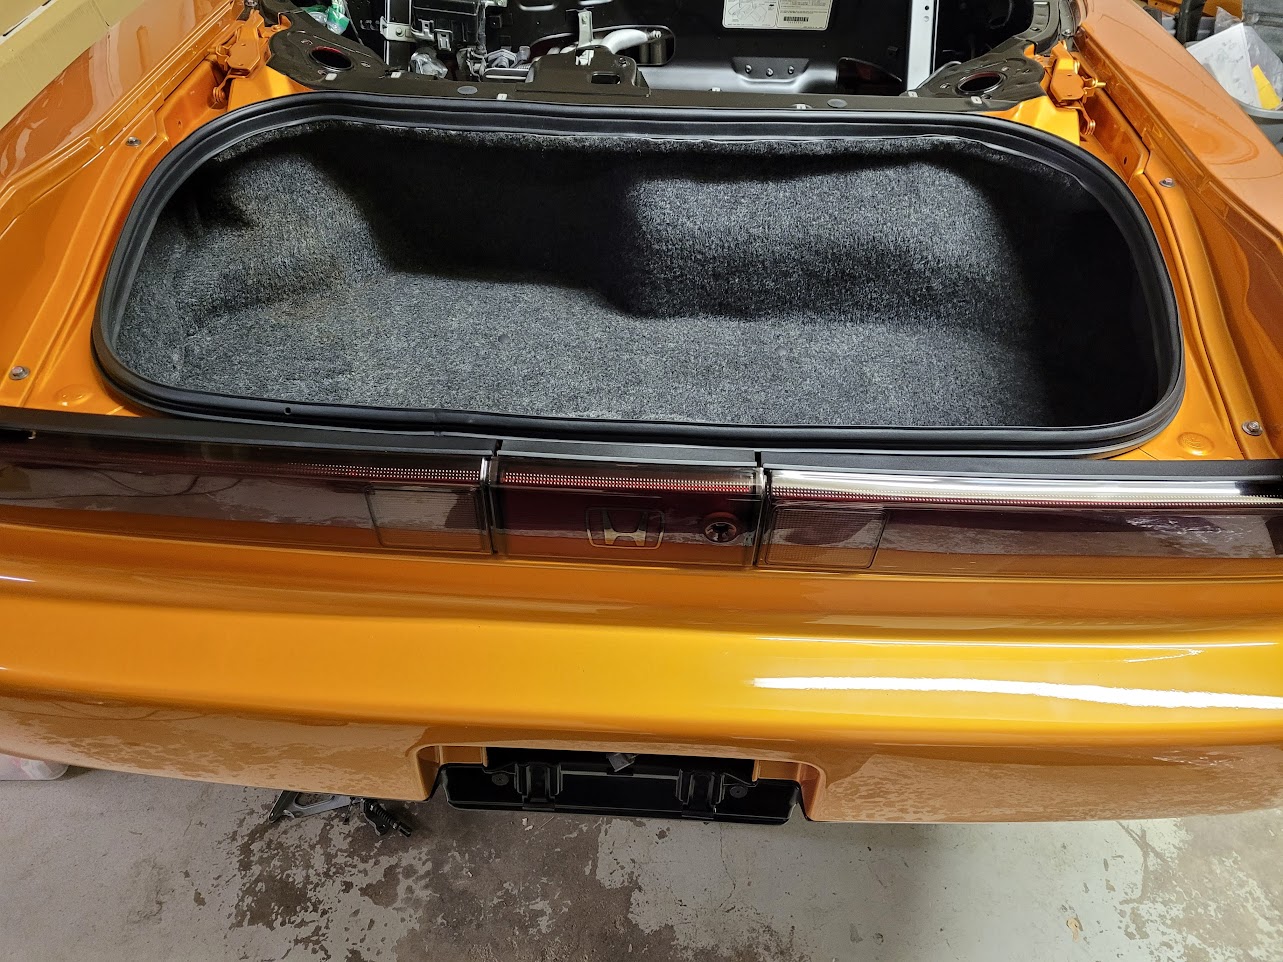
Freshly vacuumed and installed with a new trunk gasket. It was very challenging stuffing the plastic retainer in the channel inside the gasket. I treated the gasket with Shin-Etsu grease, since who knows how long it was sitting on the shelf. It felt pretty dry. I also replaced the burned trunk light bulb with an LED version.

Trunk Carpet and Gasket
The last vestiges of the bumpin' sound system and the hack job install. To access the body under the carpet for the amp wiring, the audio installer just ripped the carpet away from the plastic retainer. I had to spend an evening pushing the staples back through the holes. My fingertips hurt for a day.
Freshly vacuumed and installed with a new trunk gasket. It was very challenging stuffing the plastic retainer in the channel inside the gasket. I treated the gasket with Shin-Etsu grease, since who knows how long it was sitting on the shelf. It felt pretty dry. I also replaced the burned trunk light bulb with an LED version.
Last edited:
General
Just some gratuitous photos of the Imola fenders glowing in the warm sun this afternoon. There is now 4 inches of snow on the ground. Welcome to Colorado.
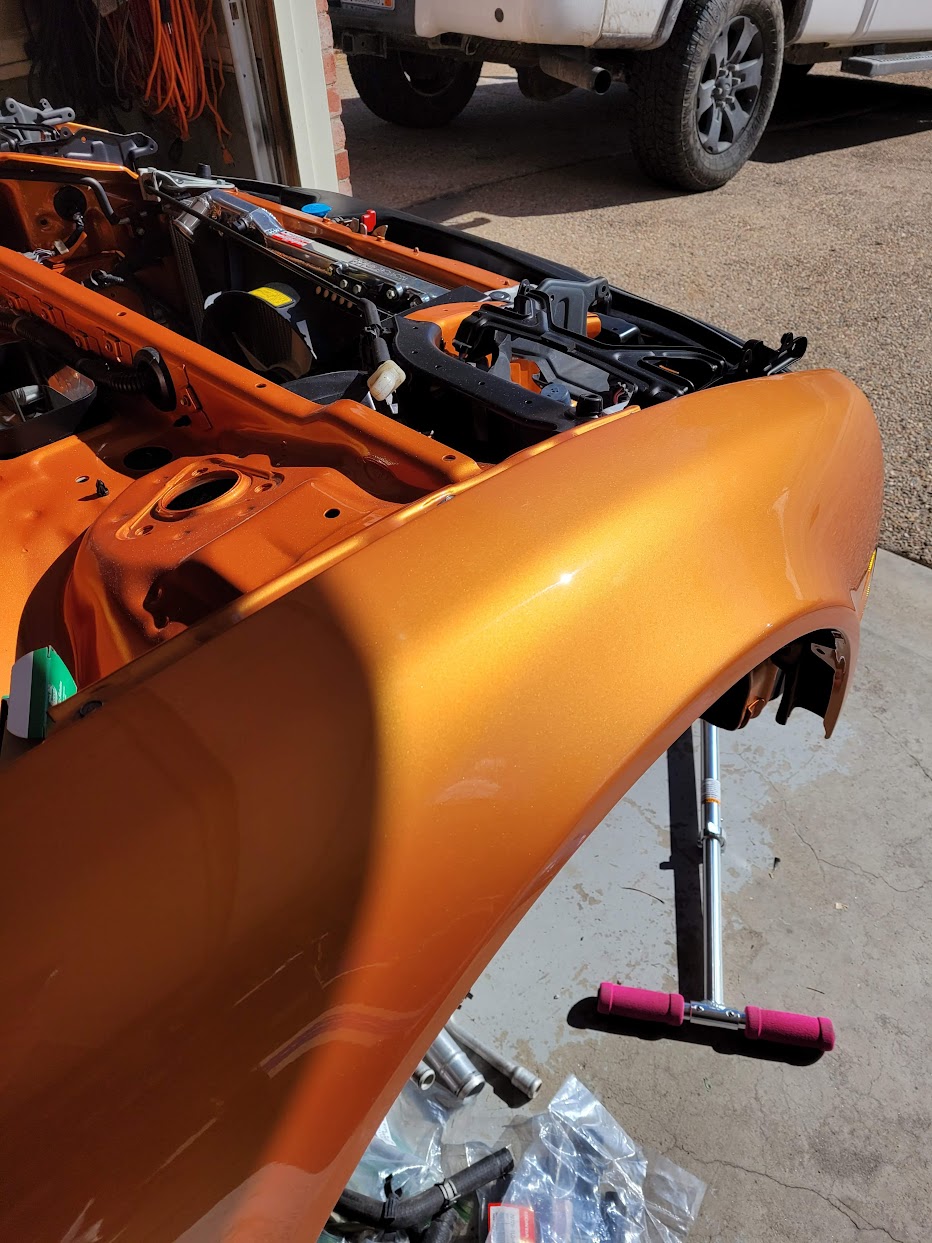
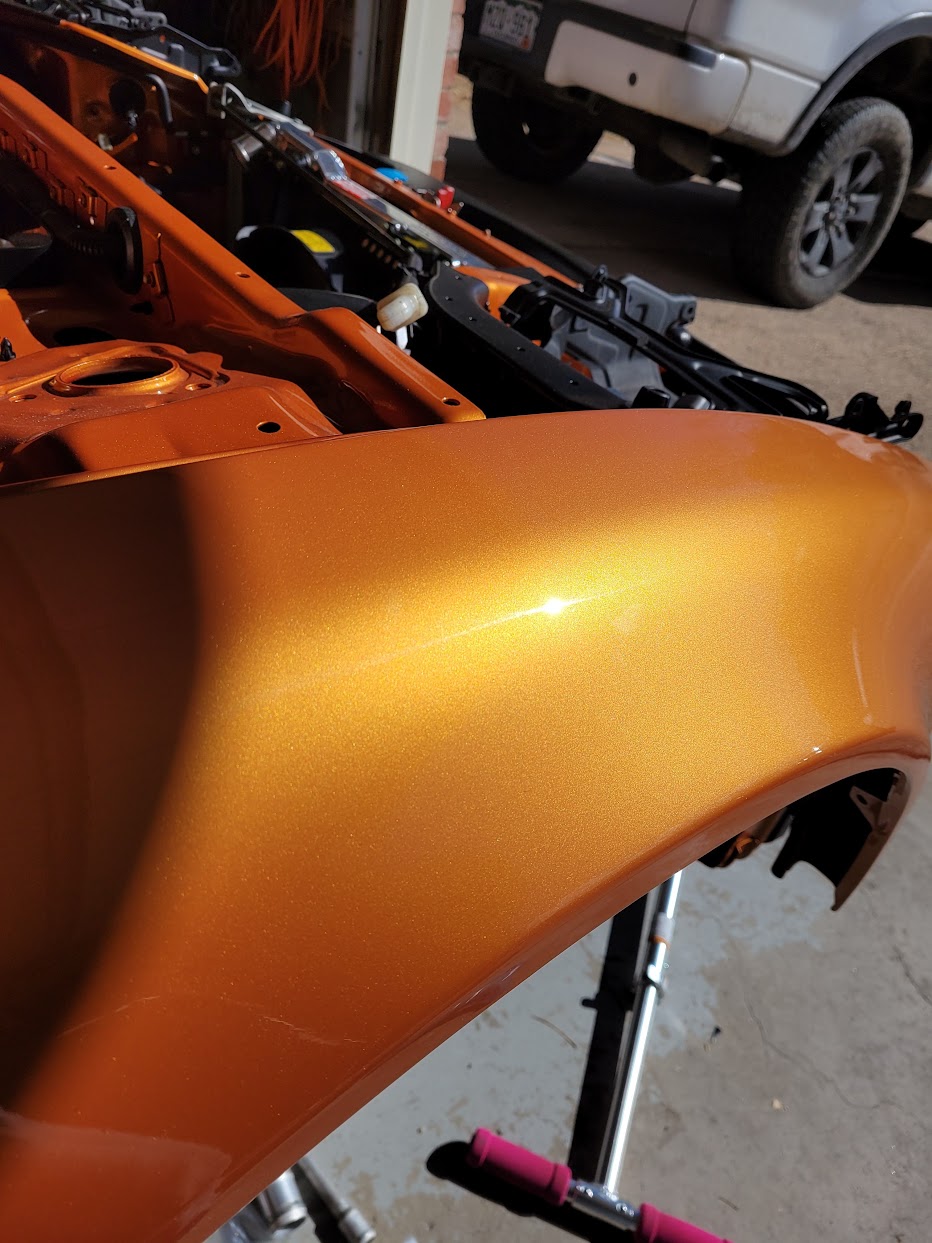
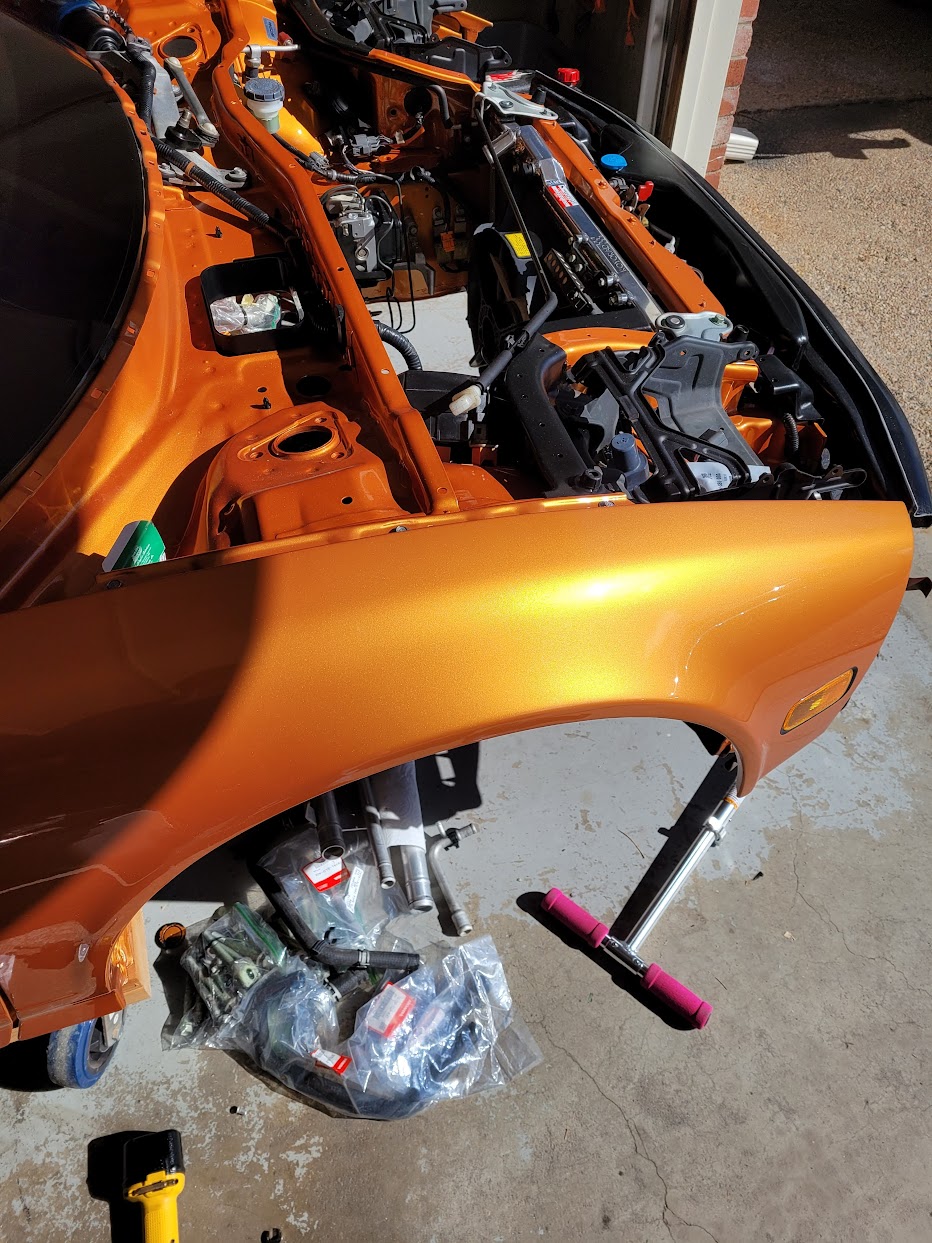
Just some gratuitous photos of the Imola fenders glowing in the warm sun this afternoon. There is now 4 inches of snow on the ground. Welcome to Colorado.
Last edited:
Looks great!!!
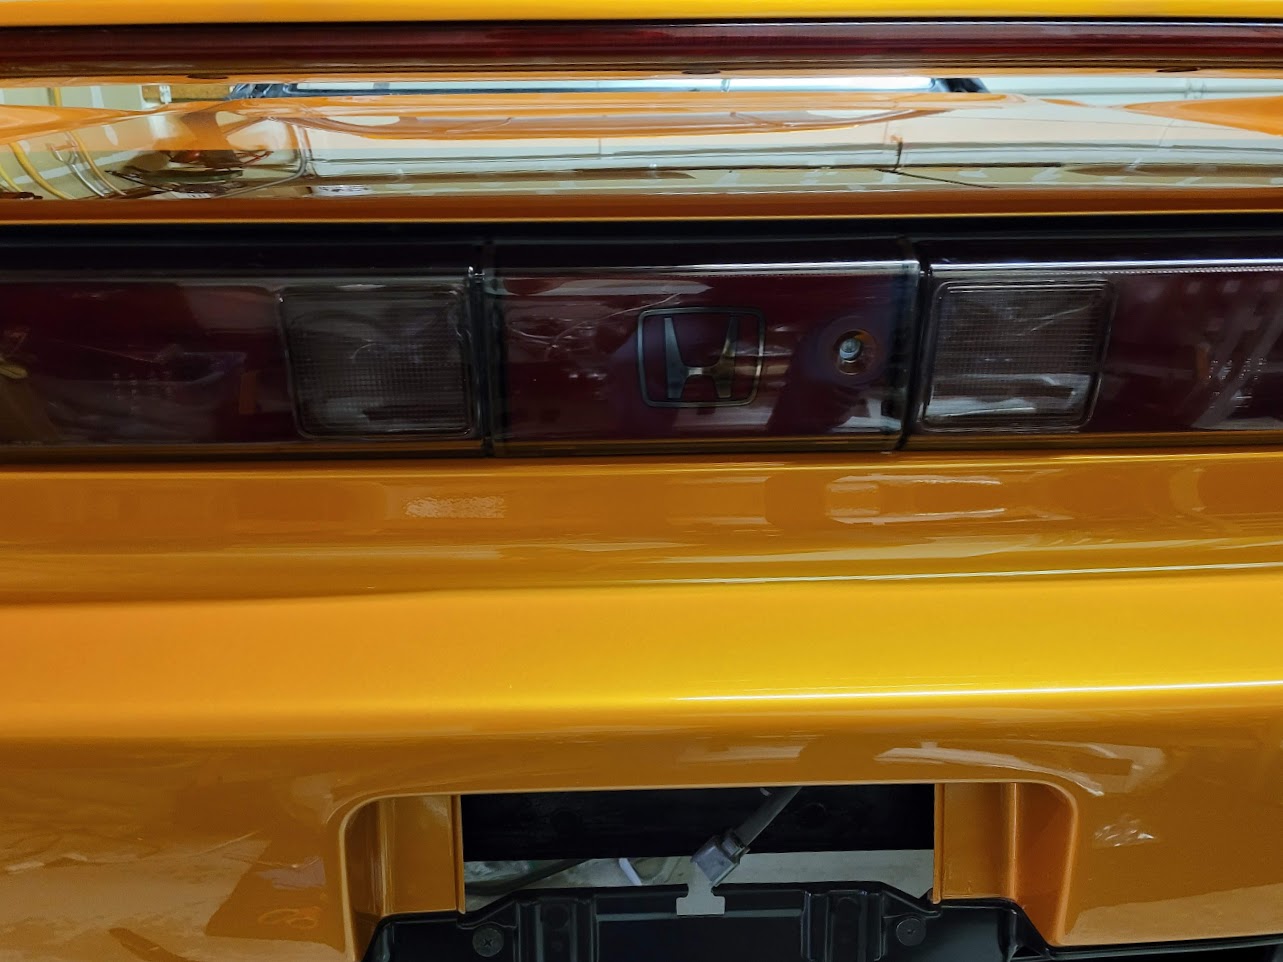
The orange looks fantastic! Are the tail lights stock JDM?
Weight Reduction – S Zero Conversion 39
Got some new shoes today. Continental Extreme Contact Sport. 205/45/16 and 245/40/17. I only installed the H center caps in the front wheels, since the rears will have to stay knocked out to torque the axle nuts. Getting close!
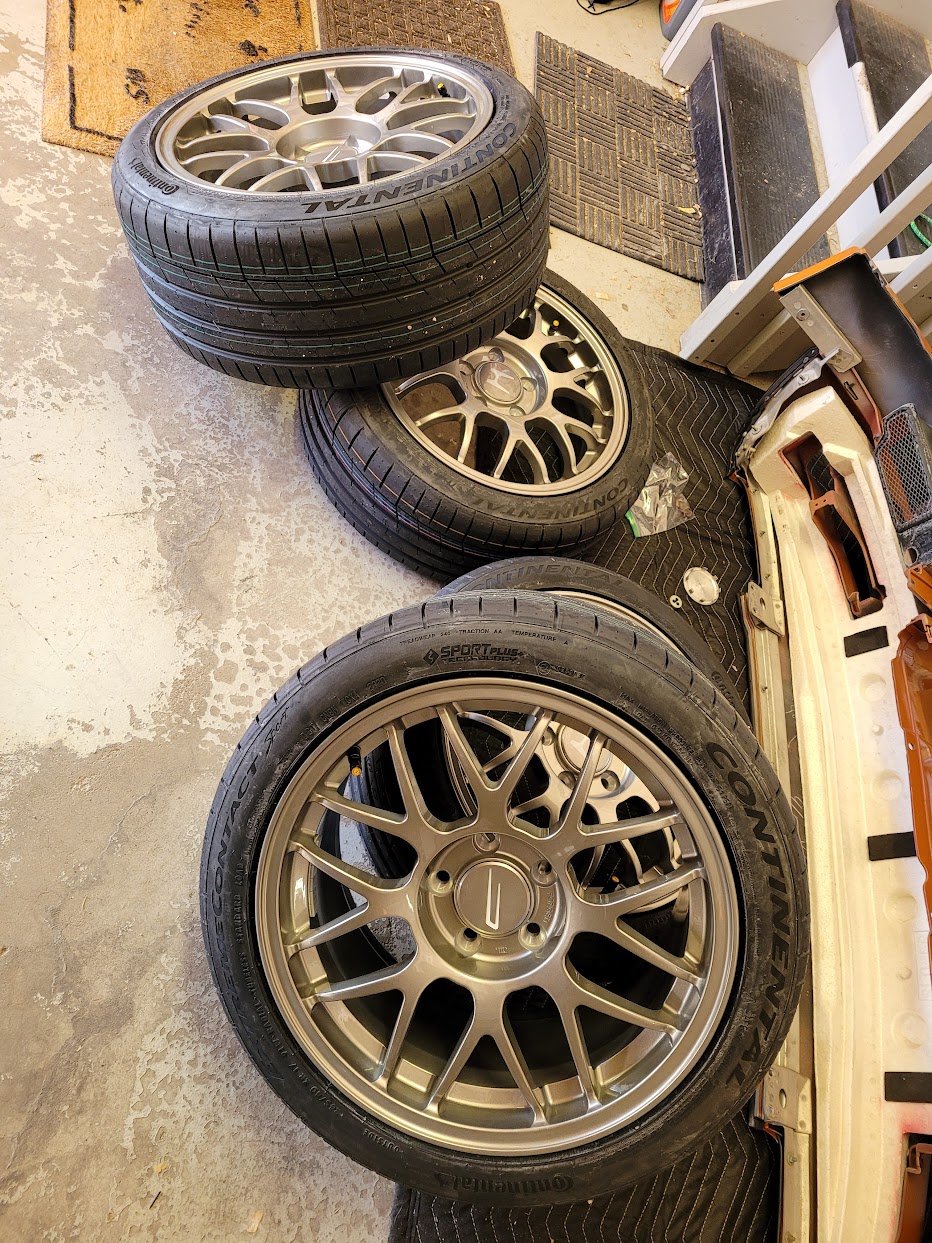
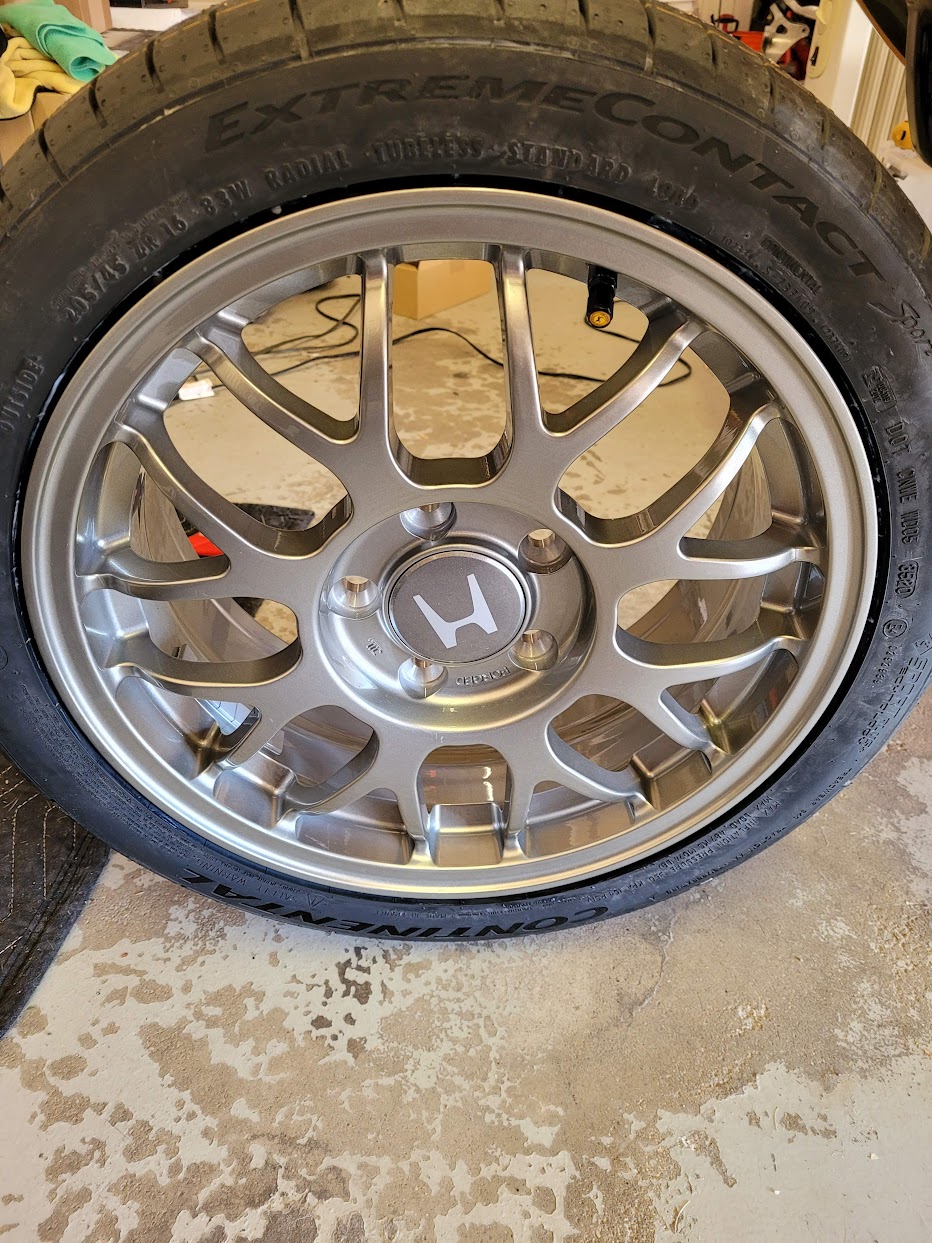
Got some new shoes today. Continental Extreme Contact Sport. 205/45/16 and 245/40/17. I only installed the H center caps in the front wheels, since the rears will have to stay knocked out to torque the axle nuts. Getting close!
Last edited:
Those MITA wheels will look great on the car. If only there were hubs to put them on and see..
What's the philosophy behind using the Conti's over the other brands? I guess the widths are a bit smaller than most people's traditional aftermarket 215/265's as well.
What's the philosophy behind using the Conti's over the other brands? I guess the widths are a bit smaller than most people's traditional aftermarket 215/265's as well.
The orange looks fantastic! Are the tail lights stock JDM?
Yes. The L/R tails are just the regular JDM ones. The center is the S-Zero specific "H". I think it might also be for the regular Type-S but not sure.
Those MITA wheels will look great on the car. If only there were hubs to put them on and see..
What's the philosophy behind using the Conti's over the other brands? I guess the widths are a bit smaller than most people's traditional aftermarket 215/265's as well.
I re-read [MENTION=16531]stuntman[/MENTION] 's review and he convinced me. I know he was driving a 4,000 lb mustang and not a 2,800 lb NSX, but it's Billy and it's a real track review. I had MPSS on my GT-R and loved them. The ECS is pretty much the same tire. Stiff sidewall, excellent dry grip, very good wet grip, somewhat decent tire wear and good durability on the racing circuit. Plus, Billy liked the intangibles of the tire's behavior at the limit: direct, controllable and communicative.
As for the sizes, I'm a proponent of using the smallest wheel/tire sizes on the NSX if possible. I've been fortunate to have driven many different NSXs on many different wheel/tire combinations. The difference between big aftermarket rims and the original wheels is night and day. The car feels livelier and more responsive. Acceleration improves too, since you are not lengthening your final drive ratio. I'll never understand the owners who invest $$$$ to get the 4.23 or 4.44 and then put huge 18' or 19" rears on the car. ???? A NSX on its original 15/16 wheels at speed is almost a religious experience in terms of feel. Once you've driven it, you get what Honda was trying to accomplish. If Conti made a 215/45/16, I'd get that, but the 205 is nearly identical and is even lighter. All of this really just applies to stock-powered cars, though. Turbo and Supercharged guys don't have to worry as much because horsepower cures everything.
Yes. The L/R tails are just the regular JDM ones. The center is the S-Zero specific "H". I think it might also be for the regular Type-S but not sure.
Yes, S-Zero centre is same part # as regular common-as-muck Type S - 75570 SLO N21
Last edited by a moderator:
Didn't know the stuntman/Billy combo, I've been seeing him around the FB groups and YT. Yours and his recommendations are more than enough for me to try them on my Advan RGIII's coming soon . I've also been considering getting a cheap set of original 91 wheels if I can find some locally just to see how they feel. I'm still on the last owner's 18/19s (and the short 4.23 setup hehe..) plus the cheapest all seasons they could get so I have no clue what a good setup feels like.
Glad the work is still progressing well.
. I've also been considering getting a cheap set of original 91 wheels if I can find some locally just to see how they feel. I'm still on the last owner's 18/19s (and the short 4.23 setup hehe..) plus the cheapest all seasons they could get so I have no clue what a good setup feels like. Glad the work is still progressing well.
Didn't know the stuntman/Billy combo, I've been seeing him around the FB groups and YT. Yours and his recommendations are more than enough for me to try them on my Advan RGIII's coming soon
Glad the work is still progressing well.
Billy might be a famous race car driver now, but he is also a NSX nut like the rest of us and a long time contributor to Prime. In the old days, NSX owners kept a set of 15/16 for their track tires and ran the bigger "magazine" rims on the street, which illustrated the performance advantages of going small. I had the privilege to drive the 15/16 on the original Yokohama AO22 tires and it was really eye-opening. Put some Re-71R or R888 on your cheap 15/16 and you'll be blown away at the grip and response once you get some heat in them. But, for an all-around sport tire the Contis are a great option.
- Joined
- 1 January 2021
- Messages
- 91
amazing job Honcho!! congratulations!!! when did you expect to finish it?
amazing job Honcho!! congratulations!!! when did you expect to finish it?
Late March...if my heads are finished in the next week or two. The car should be fully assembled by the end of next week except for the engine/rear subframe.
Is the transmission back together? The reassembly and shim things might take a long time.
Is the transmission back together? The reassembly and shim things might take a long time.
Body first, then trans, then engine.
Honcho your car is looking amazing so far. Love the Type-S Zero target your going for.
Re-Assembly 20
Deck Lid and Spoiler
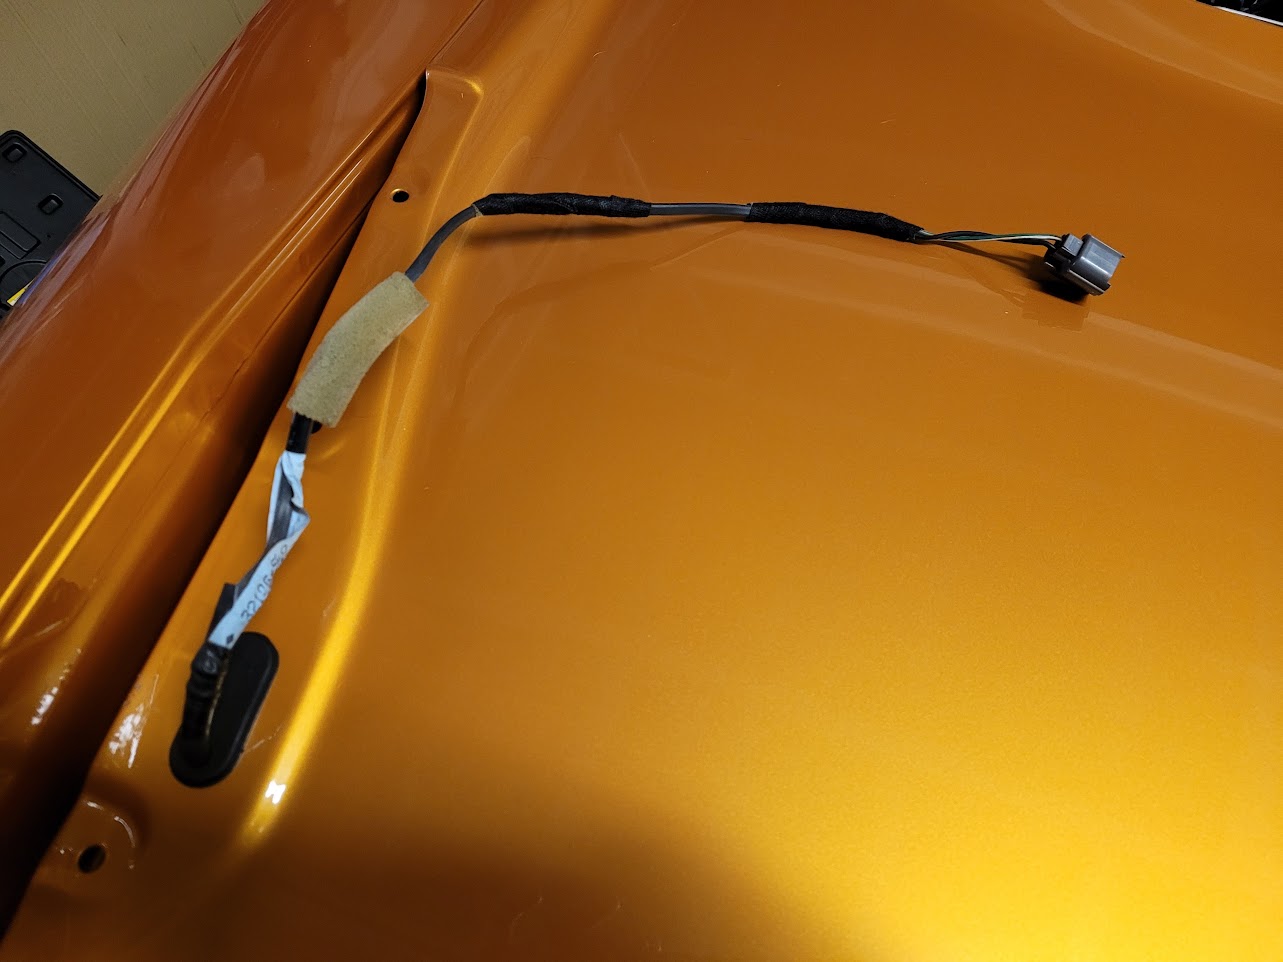
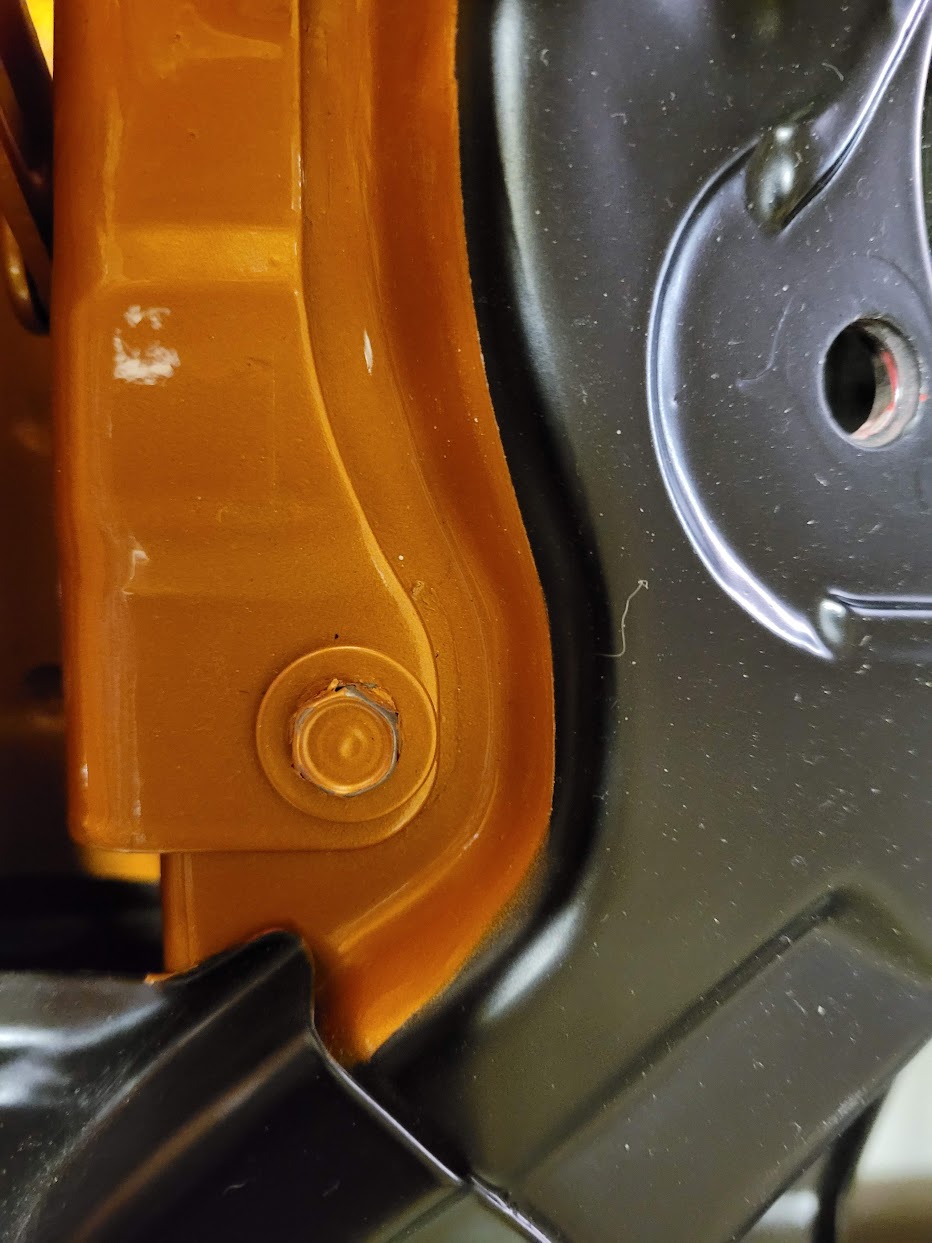
During removal of the deck lid, the spoiler wire harness gave up and split in half. This is a common failure on our NSX, as the continual flexing of the wire at that point can eventually break it. Thankfully, Japan has plenty on the shelf.
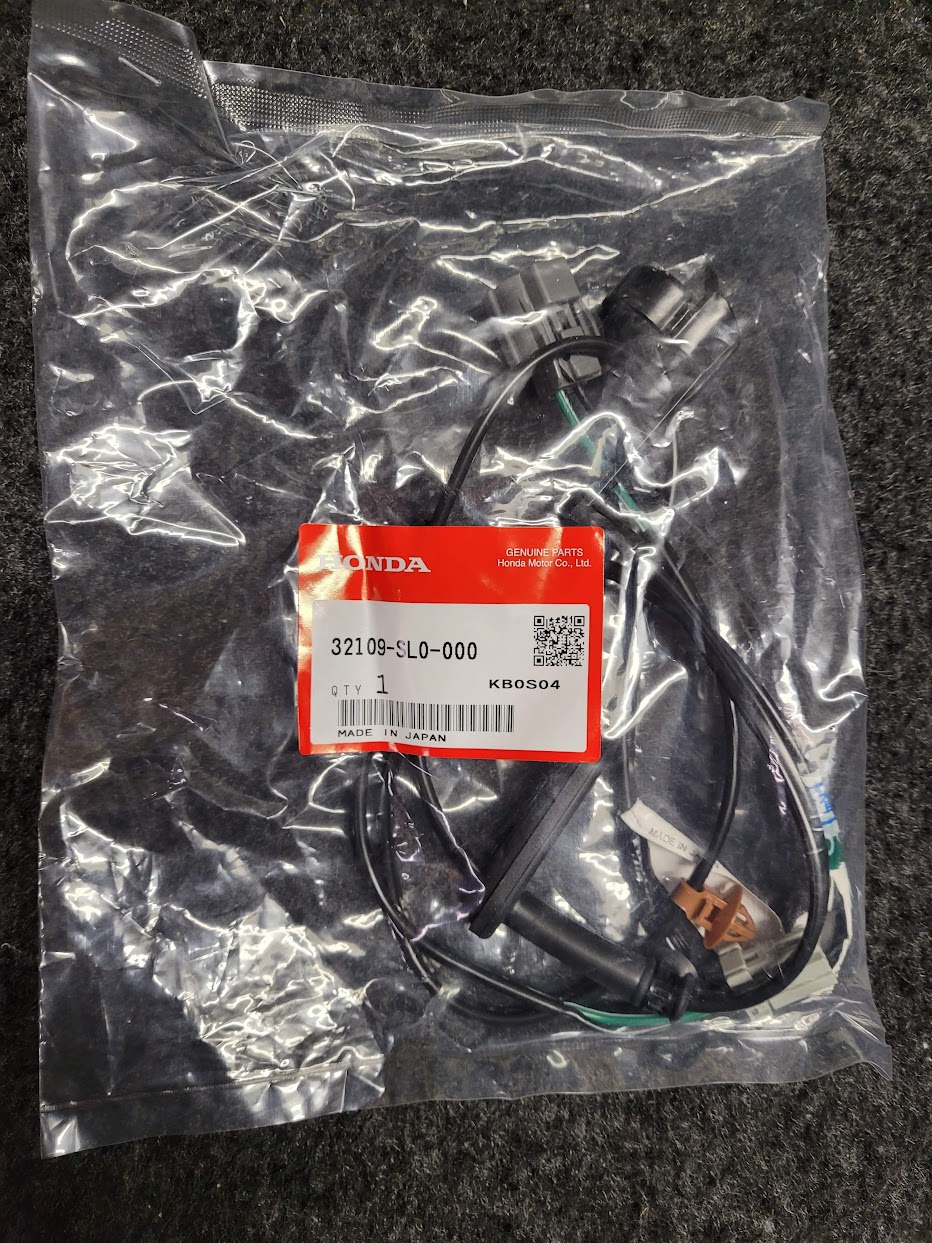
It's a bit tricky to run the wire through the interior of the deck lid, but not too bad. Here is the spoiler-side harness with some fresh 303 protectant on the grommet. Note- I actually broke the plastic connector when I plugged it back into the spoiler. Thankfully, I have a few spare 090 connectors, so will have to take the spoiler light back out to do this small repair.
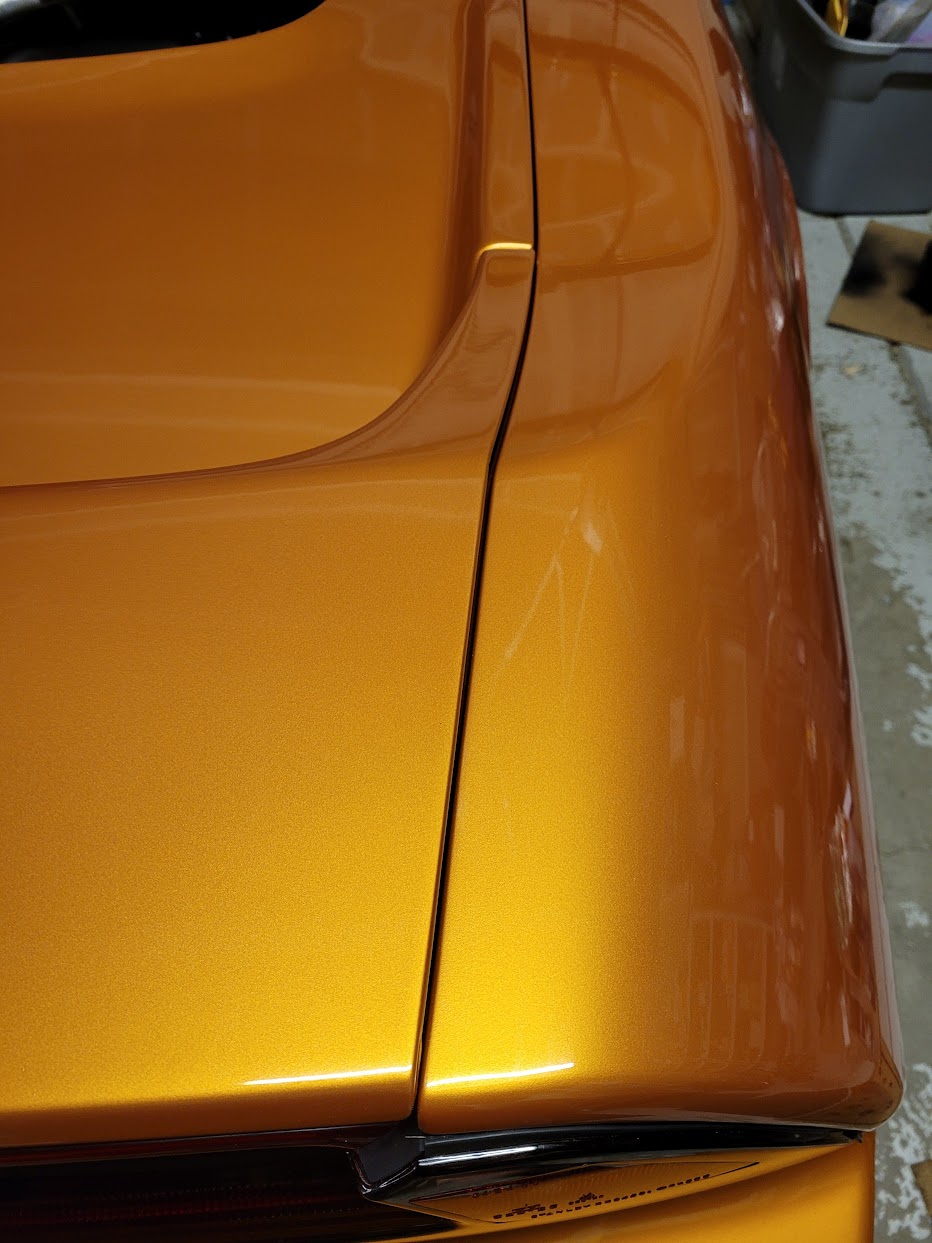
Initial gaps at the quarter panels. Much closer on the right side- it was almost touching at the spoiler.
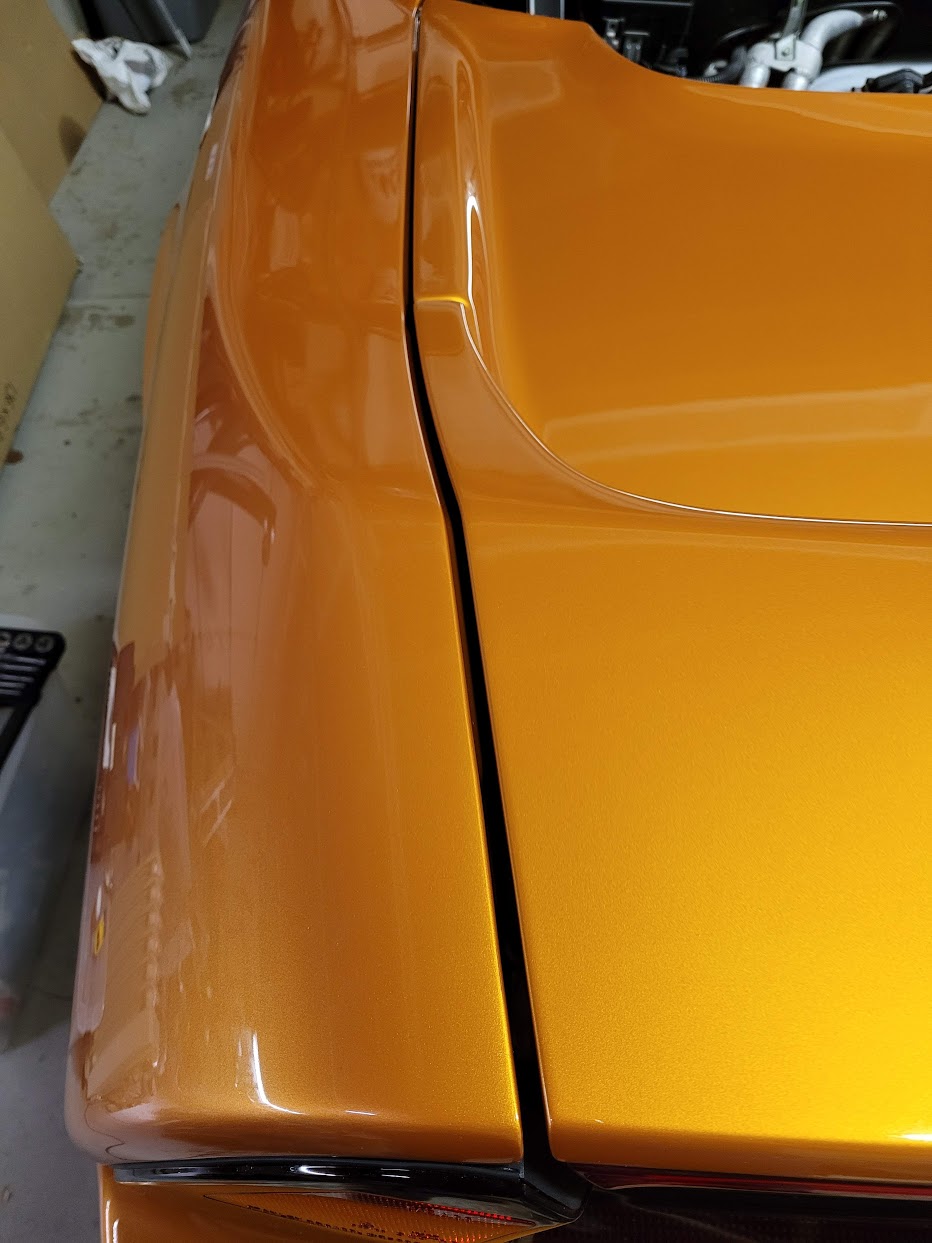
Inspecting the hinges, I noticed the body shop did not replace them in their original positions. This explains the gaps. I did some more adjustment after this.
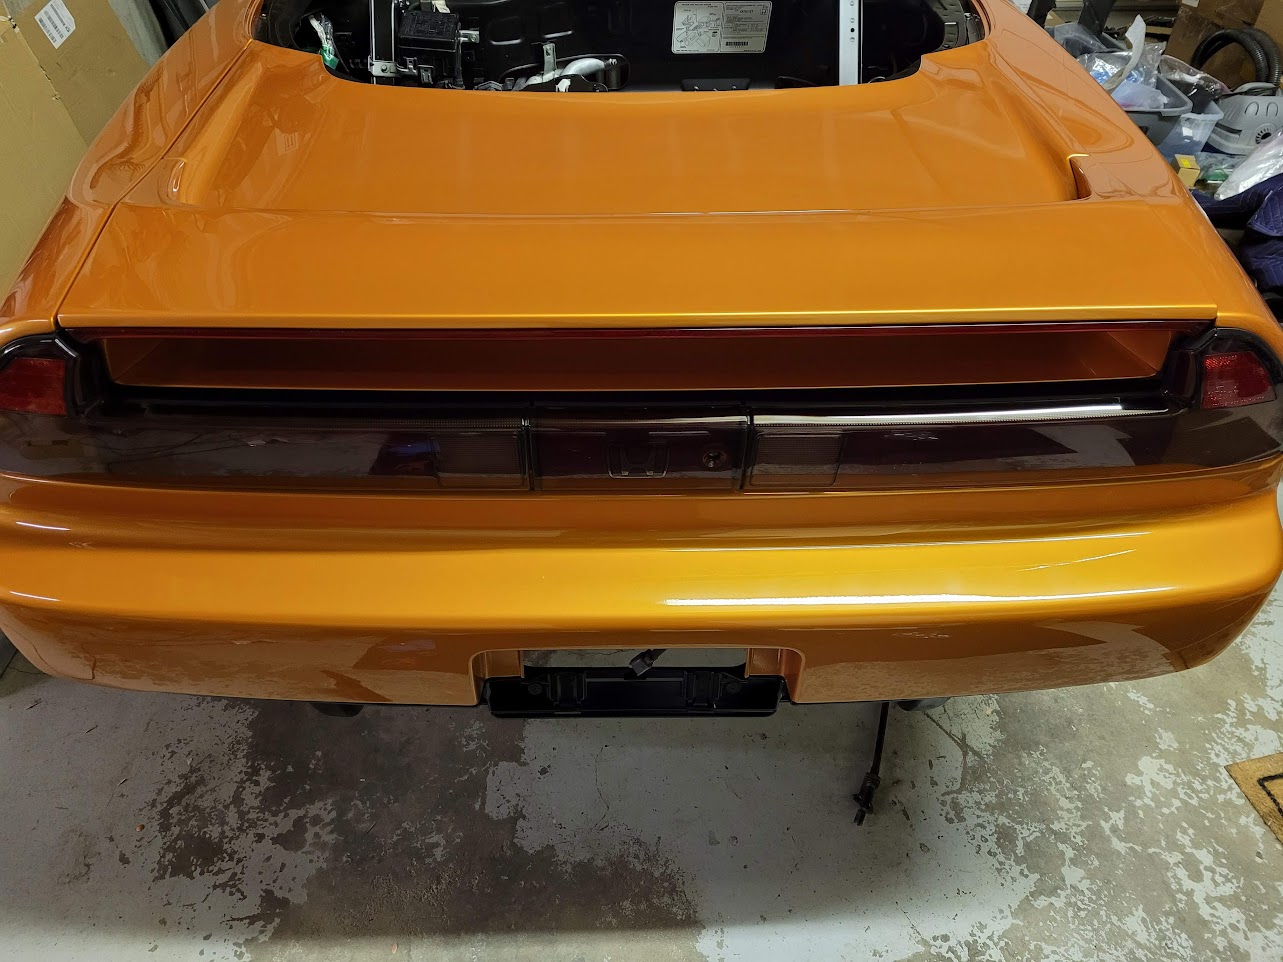
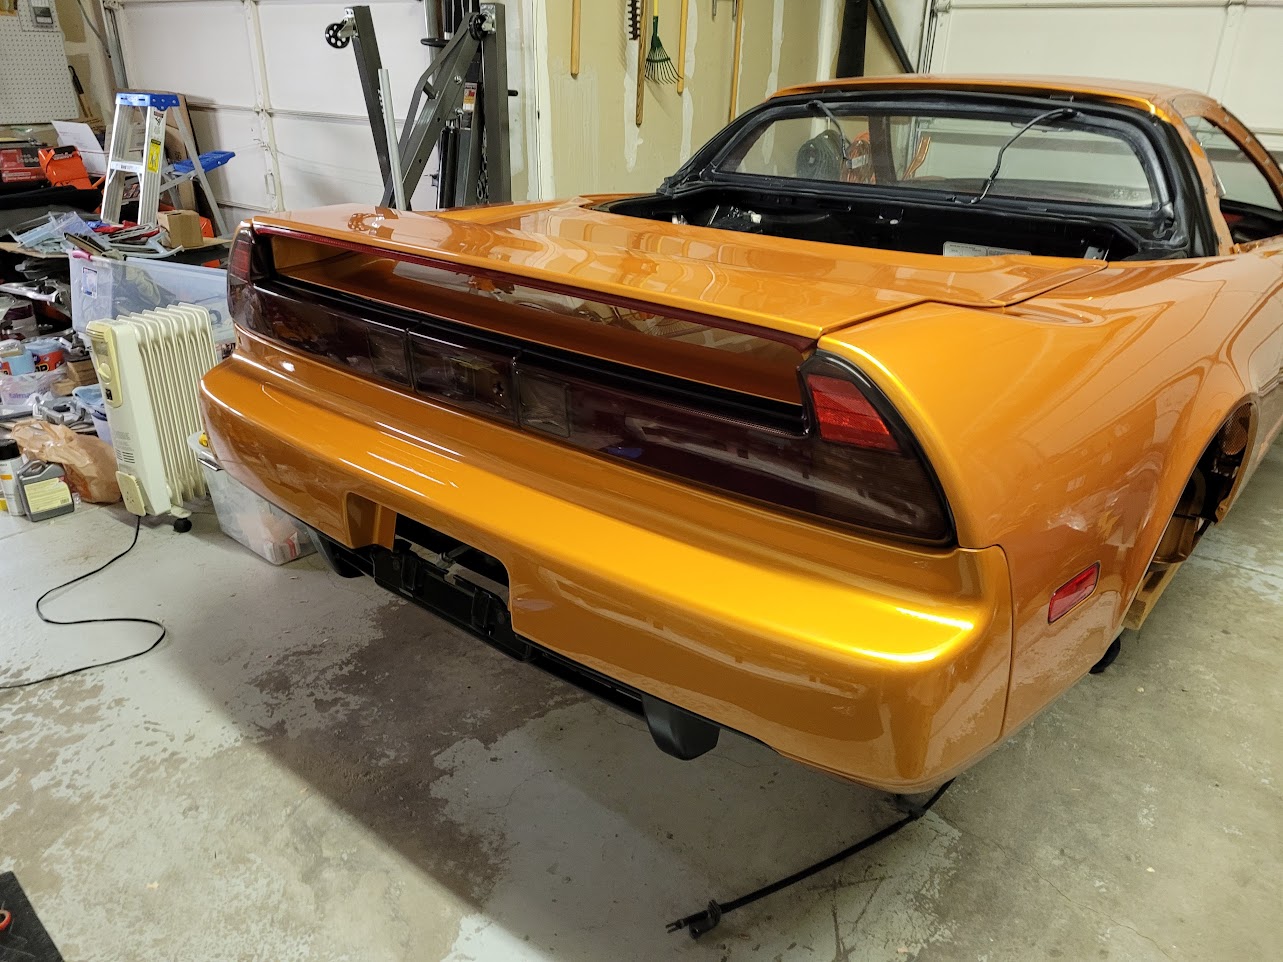
Some initial fitment pictures. I realize my tail lights need to come in about 7 mm more. I was probably too gentle on the gaskets.

Deck Lid and Spoiler
During removal of the deck lid, the spoiler wire harness gave up and split in half. This is a common failure on our NSX, as the continual flexing of the wire at that point can eventually break it. Thankfully, Japan has plenty on the shelf.
It's a bit tricky to run the wire through the interior of the deck lid, but not too bad. Here is the spoiler-side harness with some fresh 303 protectant on the grommet. Note- I actually broke the plastic connector when I plugged it back into the spoiler. Thankfully, I have a few spare 090 connectors, so will have to take the spoiler light back out to do this small repair.
Initial gaps at the quarter panels. Much closer on the right side- it was almost touching at the spoiler.
Inspecting the hinges, I noticed the body shop did not replace them in their original positions. This explains the gaps. I did some more adjustment after this.
Some initial fitment pictures. I realize my tail lights need to come in about 7 mm more. I was probably too gentle on the gaskets.
Last edited:
Looking like a car again. This car will always be more interesting at meets because of the documentation on Prime of the rebuild. If you had never done this folks would never know. I hope you will video the first time you light the fires ....
Similar threads
- Replies
- 4
- Views
- 474
- Locked
- Replies
- 2
- Views
- 428