• Protip: Profile posts are public! Use Conversations to message other members privately. Everyone can see the content of a profile post.

Kh3m’s 92 NA1 | Berlina Black

Joined
30 November 2021
Messages
15
As previously mentioned I’m in my introductory post (https://www.nsxprime.com/threads/new-owner-92-blk-blk-in-socal.220332/), I took delivery of this clean title, 1992 Berlina Black w/ 57,xxx original miles back in October 2023. At the time I wasn’t really looking into buying an NSX, but everything that the car came with was hard to pass up. Other than finding a GPW or Championship White car, this was the perfect platform for me to mod out. So with the wife’s approval, a deal was made.

As you all can relate, ownership has been amazing. The NSX is such a fun car to drive! Before I get into details of this build thread, I want to give a huge shout out to the previous (3rd) owner, OBX. From his original For Sale post here on prime, and even after taking delivery, he has been a pleasure to work with in sorting out the sale. OBX, Thank You for making my dreams a reality in allowing me to continue on with your old NSX.
IMG_4309.jpeg

IMG_4251.jpeg

Under OBX’s ownership, the car had a full 02+ exterior conversion utilizing OEM front bumper, headlights, taillights, JDM front and rear fenders, Downforce NSX-R style carbon vented hood, side skirts, door filler panels, and rear valence. The original NA1 hood was included in the sale. The exterior conversion was completed by Source 1 Automotive in Ohio. Also, huge shout out to the guys at Source 1. What a fantastic group of guys there. I flew out from SoCal to their shop in Ohio to inspect the car prior to shipping out. They were gracious enough with their busy day answering all my questions and concerns. They re even gave me a list of items that I should look into repairing/replacing. Thank You Source 1!

The car came with Volk gunmetal with polished lip Volk GT-V (18x7.5 +40 fr, 19x9.5 +40 rr) wrapped with Pilot Sports. A complete set of factory fat five wheels were also included in the sale. Suspension was handled by a brand new set of BC racing coilovers.
IMG_4830.jpeg
(1st fuel fill-up with my oldest. He smiled asking if he can take the car to prom. 🙄)

Edited: Being that I wanted to use as much OEM parts on this build. I set out looking to get a complete set of factory HIDs. A quick look at the ballast housing, it appeared the shape looked very similar to that of the AP2 specific S2000. Having been around Hondas my entire life, and seeing how many parts crossover between Hondas lineups and being a huge fan of the HID unit from the S2000, I figured this was a great way to have the reliability and quality of a factory unit. The ballast, ignitor harness, D2S bulbs and the 3 mount screw (per headlight) mounted perfectly into the NA2 headlight housing. Brand new NA2 HID kits were expensive. I was able to find a great deal on eBay that included all the major pieces. Additionally, the Science of Speed 02 conversion harness made this a plug n play install. I also took the time and ordered all new factory seals. As for the rest of the bulbs, I’ll be sticking with incandescent bulbs. Going LEDs will be something I’ll dive into once I finish the major installs.
IMG_6012.jpeg
(This was the exact listing I ordered. Sorry forgot to take pictures of the actual install)

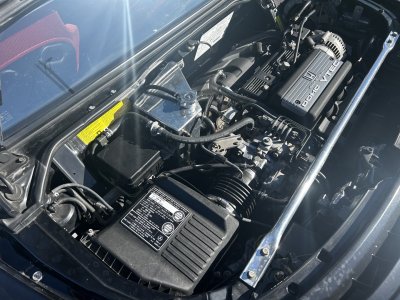
Source 1 performed a complete maintenance which was a huge relief. The engine is all stock with the exception of a brand new Pride V2 exhaust and hi-flow cats, and unknown polished tank reservoir.
IMG_4324.jpeg
(Pic taken before intake manifold cover was installed)

The OEM black/black interior was mostly stock. The audio system included a Kenwood double-din headunit, an Alpine amp and door speakers/tweeters and a sub in the glove box.
IMG_5259.jpeg
For the next couple of months I combed thru the entire car searching for any wear items that needed to be repaired, replaced and/or upgraded. My OCD wouldn’t let me leave any parts missing, incorrect parts or parts incorrectly installed. Man does this car add up fast!!! The current goal for this car would be to look, handle and feel as close to that of a NA2 NSX-R as possible. With only 57,xxx miles on the motor, I’m just going to enjoy NA as long as it’ll last.
 

Attachments

  • IMG_5399.jpeg
    IMG_5399.jpeg
    344.8 KB · Views: 9
Last edited:
The current goal for this car would be to look, handle and feel as close to that of a NA2 NSX-R as possible.
Welcome,it's a long and expensive journey :) I followed a similar path with mine, with some adaptations of course and some additions (like CF bumper beams, CF side vents, aluminum alternator bracket, billet engine mounts, etc.) - idea is to go lightweight as much as possible without sacrificing too much comfort. The Ohlins shocks are also part of the lightweight package and they are worth the price.
Good luck with your build :)
Thank you Zoom! I’d love to get the CF bumper beams. Heard great things about them. I’ve always been more of a suspension and brakes kind of guy, not so much HP. I’ve driven an S2000 with Ohlins and really enjoyed them. So much so, I was looking to buy a set for my S2000. But the NSX sale came and I had to divert my attention and wallet 😬.

After reading Hancho’s detailed review on the BC coilovers with upgraded springs, being similar to that of the NSX-R. I’m going to stick with that setup for now until other mods have been completed.
 
October 2023 -
The first month of ownership was exciting, busy and expensive. As much as I wanted to get in and drive the car, there were items I wanted to address first. With Honda discontinuing parts for our beloved cars (i.e. NSX, DC2 Integra Type R, S2000) I wanted to get ahead of the game and buy what I could. Lots of time was spent on Honda/Acura, Prime, Mita, SOS, Procar, Amayama, eBay, Pride, EuroBoutique, Kuya’s websites and Instagram.
IMG_4788.jpeg
IMG_4986.jpeg

IMG_4823.jpeg
IMG_4732.jpegIMG_4844.jpeg
 
Good man and well done. You're doing it right. There is a technique for the tail light gaskets. See here:

 
Congrats on the purchase.

Whoa..that's a nice box of goodies. Your car is going to be fresh and new after those parts are installed.

Don't forget to support the community and sell your used parts. ;)
 
Congrats on the purchase.

Whoa..that's a nice box of goodies. Your car is going to be fresh and new after those parts are installed.

Don't forget to support the community and sell your used parts. ;)
Thank You!

That is the plan. As of this posting, I have installed quite a bit of parts. But with the recent holidays, and lack of self control on wanting to install new parts, it’s been difficult starting this build thread. I’ll be posting up any items that I’ve removed and don’t plan on ever re-installing.
A key decision for you will be to go with the champ white wheels and headlights or not. Those are such a huge piece of the R look. I believe you could also get the R wheels in Washi Gray, which looks much better on the black.
 
A key decision for you will be to go with the champ white wheels and headlights or not. Those are such a huge piece of the R look. I believe you could also get the R wheels in Washi Gray, which looks much better on the black.
The CW headlights are currently in the works.

I couldn’t agree more with the Washi Gray on black
 
November 2024 -
This was an exciting month. Lots of installs and more spirited driving.

First install was a Pride carbon NSX-R style rear wing. As much as I wanted to go with Downforce to continue on with my other DF parts, I decided on Pride because of no-over lap of the front mount and the trunk.
IMG_6008.jpeg
What I also liked was the hardware the wing came with. The included foam pieces made the piece feel OEM. The OEM connector itself was also a nice touch. It’s the small little details that counts for me. I also used the rubber grommet from the factory wing and installed it to ensure no water would leak into the trunk.IMG_4875.jpeg

The one thing that really stood above the rest was the consistent flow of the carbon weaves through the whole wing. If that isn’t even to sell anyone reading this post, know that their customer support was also top notch. I thought I had an issue with the LEDs in the 3rd brake light. I was able to get in contact with them and they did not hesitate to fix the problem. Well, to my embarrassment, the problem wasn’t within any part of the wing. I had a very minor electrical issue elsewhere. With the issue fixed, I’ve had zero issues with Pride’s wing. The wing mounted on perfectly, without any fitment issues. I highly recommend going with Pride for anyone looking to go with a similar wing.
IMG_4879.jpeg

On 11.7.2023, instead of spending my anniversary with the wife, I spent it with the NSX. Next install piece was a set of new shoes. A set of Volk TE37’s (17.7.5 +30 fr, 18x10 +29). Big shoutout to MexiRicer (IG: mexiricer) for size recommendation and for putting my all time favorite wheels together. MexiRicer had the wheels powder coated in Championship White per my request. Remember with I said it’s the small little details that counts? Well, I replaced the blue Volk stickers and valve stems for a black set. I didn’t want the blue to clash with my black and red theme I imagined for this build.
IMG_4894.jpeg

Additionally, I was able to get reproduction barrel stickers from IG: mrmdecals. When ordering, you have the option of having the wheel color and wheel production dates of your choice printed. Me being the classy and very thoughtful husband that I am, I requested to have our anniversary as the production date. Mounting the wheels and tires on the car on our anniversary was not planned at all. It just happened to work out that day. Trust me. But by chance, if my wife ever finds this post, I’m always thinking of you first Babe 😜!
IMG_4896.jpeg
Yes those are lasers you’re seeing! I wanted to make sure all the reproduction stickers were placed in the exact same spot on all 4 wheels. The lasers helped me located a center point from one of the lug holes, and the orange tape helped line up the stickers.

Being that this car wont see any track days, I went with Falken Azenis RT615k+ (215/40/17 fr, 275/35/18 rr) as my tire of choice. I read lots of great reviews on these and I like the look of the side walls and tread pattern they provide. Still need to order some Type A flat center caps and have them PC in championship white.

With the new wheels installed, I had to adjust the height. Unfortunately I lowered the car a little too much and ended up pulling the perfectly mint JDM fenders when I went up my driveway. So a trip to my local PDR was needed. Manny (mannyspdr.com) did an excellent job at fixing my screw up. And to eliminate any future rubbing/fending pulling I hit up Mr. Sexy (IG: mrsexys2k) to work his magic. Huge shout out to the both of them.


IMG_4988.jpegIMG_4915.jpeg

There were a few small parts that were also taken care of this month. Both bumper plugs and tow hook was sent out to my painter Jack (IG: thebuklao) for paint. Side note, make sure you guys do the tow hock cover mod. I lost my freshly painted cover a week after install. So a new factory painted cover was ordered and installed the following week.

I also installed a factory intake box as the filter that came with the car wasn’t up to my standard. Unfortunately ordering a brand new OEM intake box wasn’t as easy as I thought. The base was no longer offered in the US. So I had to place an order thru Amayama. While I waited for those to arrive, a good friend of mine Rusty (IG: yelo_yelo_nsx) let me use his in the meantime.

I also replaced the unknown branded polished overflow tank to the factory one that was included with the car sale. With my NSX-R inspired build, I had to put on the rubber cover.
IMG_5404.jpeg
 
Last edited:
December 2024 -

With much of November was getting the exterior dialed in, it was time to give the interior the same attention. Was a deal was made to buy the car, I began sourcing parts. Other than the TE37’s that I got from MexiRicer, I was able to find a clean set of the jersey red Recaro Pole Position with the small logo. I’ve been after these particular seats for sometime. But being that they were discontinued, the only other option was the larger Recaro logo. Just too flashy for my liking. I liked the subtlety of the smaller Recaro logo. The seats came with Buddy Club sliding rails that came off of another NSX. Huge shout out to another great friend of mine Sam (IG: dr_dumay) for hooking me up with these. Hopefully a good detailing will clean these up nicely.
IMG_5040.jpeg

Interior upgrades didn’t stop there. Being a huge EK9 Type R fan, I’ve always loved the look of red carpets, floor mats with red seat combo. There was the option of get the factory red NSX-R carpet, but being that my car is LHD, I didn’t want to have any fitment issues or gaping holes. Thru some research I ran across the company NSXCarpet.com. After reading that these are the exact same fabric if not the closes match to the factory NSX-R carpet, I had to get them.

What I didn’t know about this company is that the owner actually calls you and confirms the order. Tom gave me more incite on the company and products they sell. What company does that?!!

The carpets came well packaged. And to my joy, the looped fabric felt and looked very high quality.

IMG_5279.jpeg
The 2 main molded sections you see above have this nice thick rubber blacking. They also come larger (more material on all 4 sides) than that of the original carpets. Which allows the installer enough material to trim and make them fit.
IMG_5306.jpeg

Tom did recommend going to a professional upholstery for the install, but as previous stated, I’ve been into Hondas since the 90’s. Having been able to work on many cars over these past 2 decades, both installing factory and aftermarket parts (to look factory) installing these carpets myself wasn’t a huge concern.
IMG_5307.jpeg

Below is a picture of the black rubber backing. As you can see there are visible creases that you can use as reference when trimming the carpet to fit. Take your time and trim a little bit at a time. And use as many new razor blades until you get the desired fitment!!!
IMG_5312.jpeg

There are no precut holes for the seat mount feet, steering column shaft, gas pedal stopper/cushion, dead pedal and seat sensor harness. I can only assume this was not done because of possible fitment issues. Tom, please chime in if I’m wrong.

When cutting holes, lay down the carpet in place and start from the center and work your way out. First hole I trimmed out was the steering column. Then the gas pedal stopper/cushion. Then the dead pedal.
IMG_5288.jpeg
(Note: my dead pedal is being used to get a custom matching aluminum piece made. I will be install the factory aluminum covers. Similar to the ones found on the S2000, JDM DC2 Rx, and various other Type R’s)

The install wasn’t difficult. More time consuming than anything else. Measure 5x cut once kind of deal. Make small cuts and trim to your liking
IMG_5285.jpeg
(note: The hard white plastic from the factory carpet closes to the door sill was not needed to transfer over. Once the sill cover was installed the carpet never moved out of place.)

The carpets that covers the tunnel came in 2 separate pieces and does not have the black rubber backing. Similar to the factory carpet. As you can see, there is more than enough material supplied to cut and trim to your liking. This job does require you to glue the red carpet onto the factory piece. With the thought of not wanting to ruin a good condition factory carpet, I eluded to just trimming the red carpet and sliding them into place. I did however swap the white plastic fastening piece over so that the carpet was secured in place. I also did not swap over the black foot venting duct. I looked online and it appears the duct and mounting clips could possibly be ordered separately. And possibly even in red!!! I will update if this is the case.
IMG_5290.jpeg

As you can see, my tunnel carpet overlaps the main carpet. I didn’t trim the red carpet nearly as small as the original. Reason being, I’m waiting for the foot venting ducts to arrive. Just in case the mounting of the ducts shift the tunnel carpet, I’ll have enough material to trim and make perfect.
IMG_5315.jpeg

Also, once you mount the seats and floor mats, you won’t even notice the overlap.
IMG_5380.jpeg

Before you throw any excess trimmed pieces away, you’ll want to find the biggest piece to wrap your driver side fuse box cover and passenger side cover. Here you’ll need to gently peel off the old fabric. Use it as a template to cut the red carpet.
IMG_5326.jpeg
IMG_5330.jpeg

IMG_5337.jpeg

You’ll want to buy professional grade upholstery glue. I used a spray glue from 3M. Spray the red carpet and the covers. Line up the red carpet and use heavy duty paper clips to hold them in place until the glue fully cures.
IMG_5341.jpeg

I’m still undecided on what floor mats to get. NSXCarpet.com does offer a set of red carpets. But I leaning towards the factory red carpet to keep the “OEM” quality theme going. But here is the final look of the red NSX-R style carpets with the jersey red Recaro Pole Positions.
IMG_5344.jpeg
 
Last edited:
Back
Top