-
Protip: Profile posts are public! Use Conversations to message other members privately. Everyone can see the content of a profile post.
You are using an out of date browser. It may not display this or other websites correctly.
You should upgrade or use an alternative browser.
You should upgrade or use an alternative browser.
MexiRicer's 97 MCB
- Thread starter MexiRicer
- Start date

- Joined
- 4 July 2011
- Messages
- 670
MBMexi
Finally got the steering rack back from Matt and re-installed it a few weeks ago. Everything works good as new!!! :biggrin: or so it feels. The difference is day and night and I dont even have an alignment yet! Just drove it around the block a few times, I couldnt resist! Cant wait til everything is dialed in.
Reason I have postponed the alignment immediately following the steering rack re-install is because I first need to make peace with this bad boy...


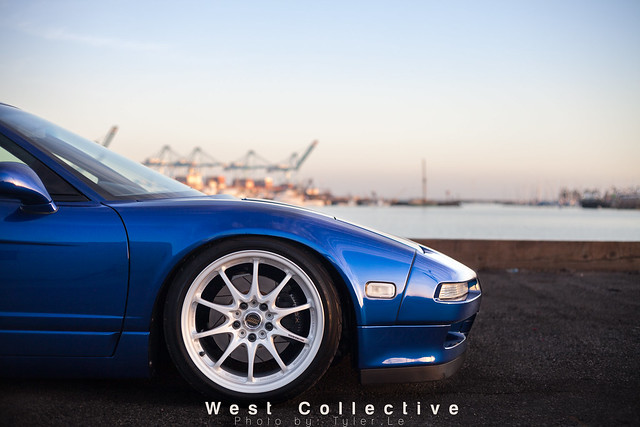
After a well spent beautiful Sunday afternoon, my fronts came off and went right back on with the cups installed. In case anyone is new to the thread, I purchased the RYU lift kit several months ago but am just now getting around to installing it.
I did need to modify the stock top hats to make room for proper clearance of the fittings. Also had to shave top and bottom rubber bushings. Thank goodness for power tools!!
Next thing on the to do list is run the air lines and wire everything up. Louis and I mounted the compressor and tank already under the hood so the rest shouldn't be too difficult. Super excited and will update when it is all up and working :biggrin:
Hope everyone had a wonderful New Years!
What do you mean you had to shave the top and bottom rubber bushings??? I'm about to install my VRH kit and instead of wasting $300-$400 dollar on new top mounts I decided to do the same thing you did and modified my OEM top mounts to work. I also have the KW's V3 :wink:
Thanks in Advances!
What do you mean you had to shave the top and bottom rubber bushings??? I'm about to install my VRH kit and instead of wasting $300-$400 dollar on new top mounts I decided to do the same thing you did and modified my OEM top mounts to work. I also have the KW's V3 :wink:
Thanks in Advances!
I basically chopped the top hat bushings in half and placed them as normal, but now they are half the size. I had to do this because otherwise, I wouldn't have been able to secure the two nuts at the top of the coil-over. Good luck on your install

I got it now. Thanks!:wink:
So I haven't really commented much about my experience with Matt @d1guy because as soon as my rack was shipped back to me and installed, I tackled the next project right away which was the installation of Regan's lift kit. Although my car was down for much longer than I had anticipated, I am BEYOND EXCITED to now share my experiences; this past weekend has been a very accomplishing one to say the least.
The steering rack was uninstalled by my mechanic late November, sent to Matt in Mississippi for rebuild, then re installed mid December. Matt is very knowledgeable, awesome at keeping me updated and letting me know about his discoveries in completely disassembling my rack. I learned a lot and it was awesome!! We chatted a few times back and forth of what it needed and why it was so badly worn. Apparently because my car was in raised in Florida and lived there for 8 years (1997-2005), the high humidity and bad weather causes things like the steering rack to fail quicker than it normally should.
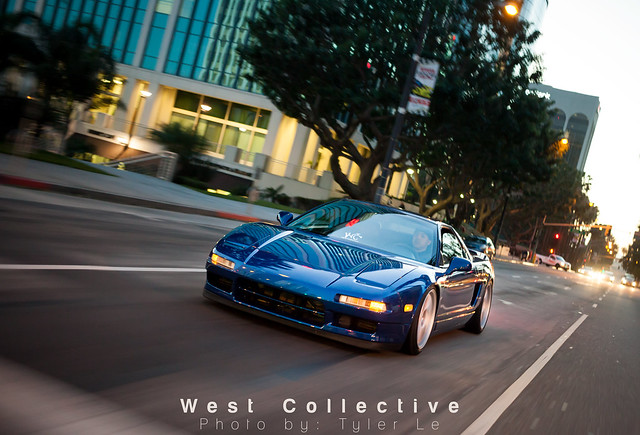
As soon as the rack was back in my car, I noticed the "tightness" right away; a feeling I hadn't felt in my nsx before. Even though I had sent it to Matt primarily because of a "clicking" when moving the steering wheel from left to right while stopped, the rebuild had the car feeling much more responsive and this is without an alignment yet. I needed to get the lift kit on my car ASAP! The very next day I drove to my good friend Louis' house and we got straight to work. We pulled my front coil-overs off but after realizing we would need to cut the stock top hats for proper mounting, we put them back in for now and mounted the compressor/ tank and assembled all the fittings. Over the course of the next 6-7 weeks during my free time, I finished the remainder of the installation. Louis came over a few times to give me a hand. He was the genius in wiring the kit properly because I had no clue what I was doing and he even wired up an OEM seat heater switch made for an Acura TL, to work for my up and down function- the cherry on top!! Last thing that had to be done was to figure out why the hell I only had about 1/2 - 3/4 inches of lift. Regan and I had texted back and forth, puzzled as to why my kit was not going up and down properly. Mike, a so cal local, had installed Regan's kit several weeks back with no problem and he was a huge help in diagnosing my issues as well. After some research, Louis and I decided it would be a good idea to trim the bottom of the KW bump stop and remove the helper springs, we figured something had to give. Sure enough, that was exactly the problem. Regan had no experience with his kit bring installed on a car as low as mine, so initially we thought I had bad cups. He went completely out of his way, to say the least, in helping me figure everything out and get the kit working properly. Thankfully, I got it to work!! No more bouncy suspension from driving on the bump stops and no more crappy 1/2 lift. It was FINALLY time for alignment....

I now have full lift capability, extra smooth ride quality and amazing handling.

Huge thank you to my good friend Louis @AdvansCPAP, Regan @RYU, Matt [MENTION=15998]d1 guy[/MENTION] and Mike @mike2la. Cant wait to finally put some miles on her that she so desperately deserves!
The steering rack was uninstalled by my mechanic late November, sent to Matt in Mississippi for rebuild, then re installed mid December. Matt is very knowledgeable, awesome at keeping me updated and letting me know about his discoveries in completely disassembling my rack. I learned a lot and it was awesome!! We chatted a few times back and forth of what it needed and why it was so badly worn. Apparently because my car was in raised in Florida and lived there for 8 years (1997-2005), the high humidity and bad weather causes things like the steering rack to fail quicker than it normally should.
As soon as the rack was back in my car, I noticed the "tightness" right away; a feeling I hadn't felt in my nsx before. Even though I had sent it to Matt primarily because of a "clicking" when moving the steering wheel from left to right while stopped, the rebuild had the car feeling much more responsive and this is without an alignment yet. I needed to get the lift kit on my car ASAP! The very next day I drove to my good friend Louis' house and we got straight to work. We pulled my front coil-overs off but after realizing we would need to cut the stock top hats for proper mounting, we put them back in for now and mounted the compressor/ tank and assembled all the fittings. Over the course of the next 6-7 weeks during my free time, I finished the remainder of the installation. Louis came over a few times to give me a hand. He was the genius in wiring the kit properly because I had no clue what I was doing and he even wired up an OEM seat heater switch made for an Acura TL, to work for my up and down function- the cherry on top!! Last thing that had to be done was to figure out why the hell I only had about 1/2 - 3/4 inches of lift. Regan and I had texted back and forth, puzzled as to why my kit was not going up and down properly. Mike, a so cal local, had installed Regan's kit several weeks back with no problem and he was a huge help in diagnosing my issues as well. After some research, Louis and I decided it would be a good idea to trim the bottom of the KW bump stop and remove the helper springs, we figured something had to give. Sure enough, that was exactly the problem. Regan had no experience with his kit bring installed on a car as low as mine, so initially we thought I had bad cups. He went completely out of his way, to say the least, in helping me figure everything out and get the kit working properly. Thankfully, I got it to work!! No more bouncy suspension from driving on the bump stops and no more crappy 1/2 lift. It was FINALLY time for alignment....
I now have full lift capability, extra smooth ride quality and amazing handling.
Huge thank you to my good friend Louis @AdvansCPAP, Regan @RYU, Matt [MENTION=15998]d1 guy[/MENTION] and Mike @mike2la. Cant wait to finally put some miles on her that she so desperately deserves!
Last edited:
Nice to see you back on the road. We'll have a drive coming soon.....
Nice to see you back on the road. We'll have a drive coming soon.....
Oh man I CANT WAIT!! The Malibu cruise hasnt happened yet, right?!
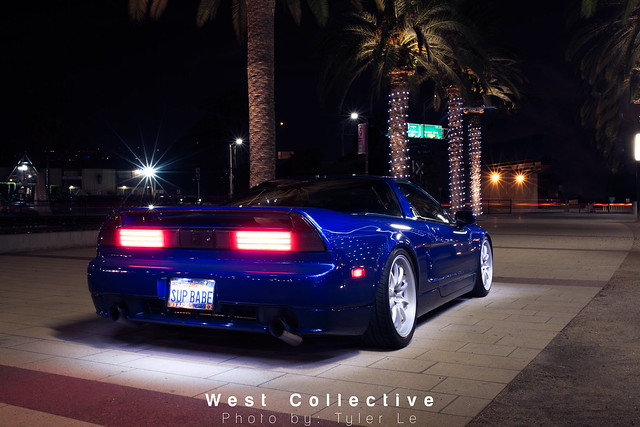
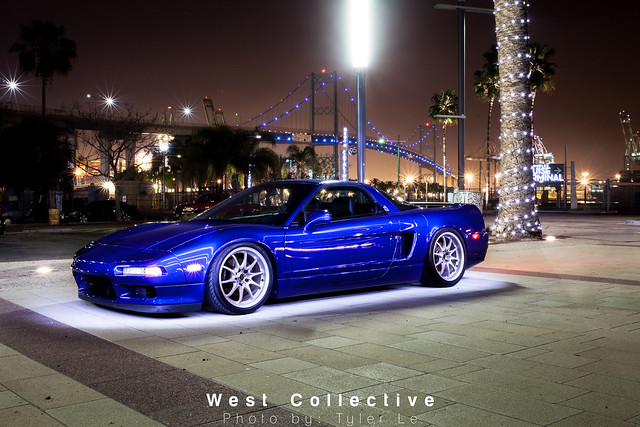
You get new wheels? They look nice.
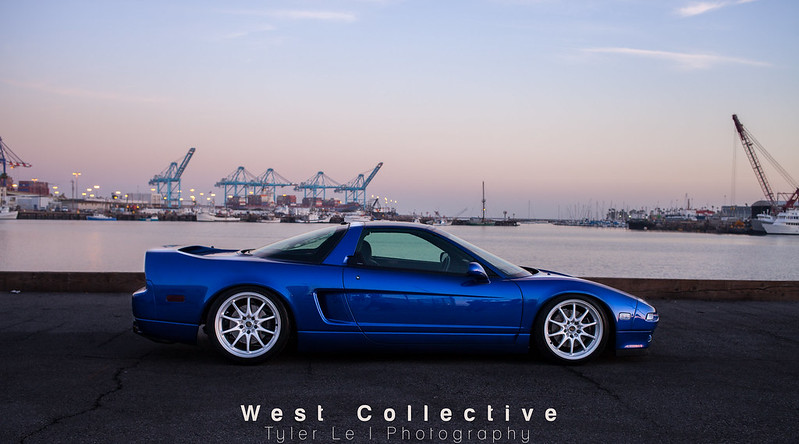
Sure did! Volk racing ce28n.. Thank you sir!!
No the Malibu drive has not happened yet. But it will be discussed at Thursday's meet up.
No the Malibu drive has not happened yet. But it will be discussed at Thursday's meet up.
Sweet!! Cant wait for it
too bad i cant make the sca meet tomorrow :-/- - - Updated - - -
Finally got around to filming a short clip of my lift kit
<embed width="440" height="420" type="application/x-shockwave-flash" src="http://v8.tinypic.com/player.swf?file=qot3ib&s=8">
Original Video - More videos at TinyPic
Last edited:
Nice...
Lookin good bro!
Real nice !
Taillights look familiar? :biggrin:
Taillights look familiar? :biggrin:
Last edited:
Lookin good bro!
Thanks dude!!
Real nice !
Taillights look familiar? :biggrin:
My tail lights??? Did you mean real *rice?? LOL oh wait i see clearcorners.com in your signature...
One day brah I will be on your level
Come to so cal so we can shoot hehe.
Come to so cal so we can shoot hehe.
That I will hold you to sooner or later!!!
Those new pics turned out great!
Thx Dennis! All I'm missing now is one of your sweet detail jobs
That I will hold you to sooner or later!!!
Hopefully sooner than later!!!!
Rims look sweet. Are you running different springs with the KW V3's? My Volks should be here next week.
Thx jmark! I am, I'm running swift springs but only up front. I stayed with the oe kw rates (6k). Cant wait man, I know you have been waiting for a really long time. Pix asap when you get them!!
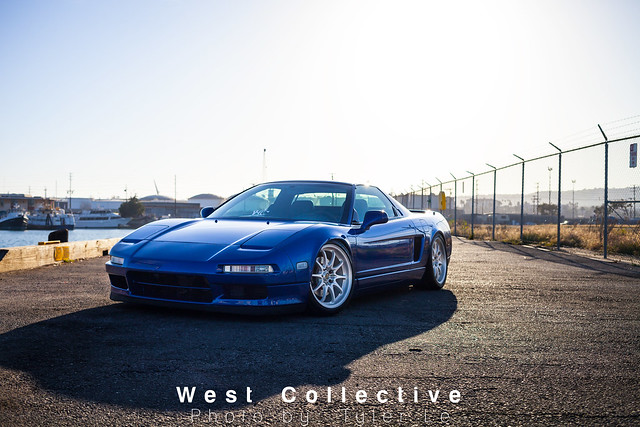
Little spring update on the blue beast...

Sourced a set of OEM JDM front fenders and OEM JDM rear quarters. I know, im nuts. Took me about 3 years to source front and rear. They are painted and on as of now. Just need pig tails for the jdm sidemarkers, extend the wiring and snap some good pics.

Also sourced a fog and half switch to make my jdm switch panel a bit more aesthetically pleasing. They are simply there for looks.

I had sourced some OEM JDM gauges (180km/h) and spray painted the needles yellow and combined it with an NA1 type-r gauge bezel- the faux carbon fiber one. Loved how it looked but then when I installed it I had a change of heart. It just didnt flow with my interior. My good pal Louis [MENTION=15357]AdvansCPAP[/MENTION] sourced me a complete set of 02+ OEM JDM gauges. They are direct replacements on my 1997 cluster so I assume will work on any NA2 97+

To calibrate the sweep on the US circuit board, simply grab a small flat head screw driver and twist this clockwise. I had to twist 180 degrees to match my new speedo in km/h. I will end up installing the JDM circuit board that my speedo came with eventually, but this will do for now.

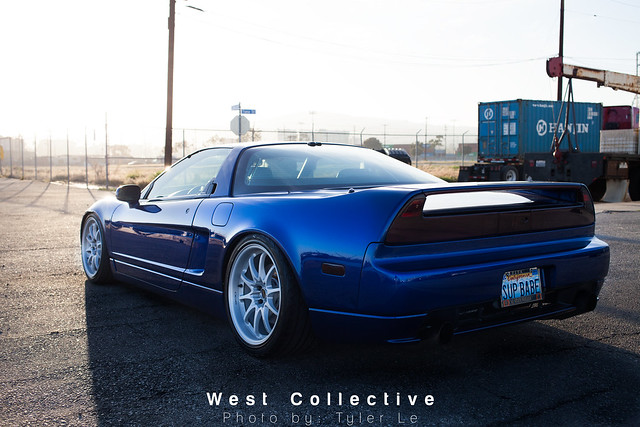
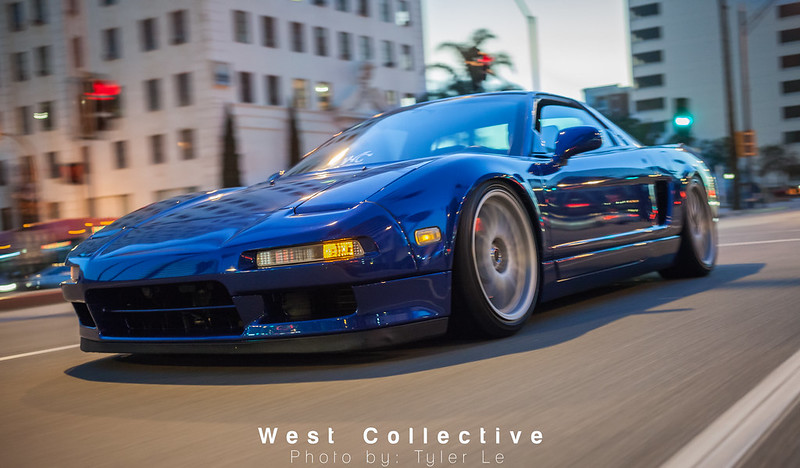
Awesome capture by Ameer [MENTION=22261]Aladdin9[/MENTION] on our first So Cal drive of the year. The last good shot of my car with oem us spec front fenders and rear quarter panels.

I was fortunate enough to get first dibs on the most pristine used ARC Titanium exhaust I have ever seen, ever. It was too good to pass up so I ended up snagging it off Louis' hands and sold my previous one to my good pal Andrew @1036NA2. His purchase included my labor, of course... and some experimentation of burning titanium tips!

Disgustingly rare. Two pristine condition ARC Ti exhausts in 97+ fitment side by side. This makes me happy

It was a fun day. For any of your titanium tip burning needs please contact master titanium burner Andrew @1036NA2 lol...

My last update is my OEM NSX Type-S door cards. I got super lucky that Long [MENTION=18615]sicarius82[/MENTION] was able to source these for me, thanks again dude!! These are the exact door cards in blue perforated suede found in the Monte Carlo Blue NSX Type-S. Later on down the line I plan to do some customization of Recaro Pole positions to match the oem type-s seat theme. Stay tuned!
Sourced a set of OEM JDM front fenders and OEM JDM rear quarters. I know, im nuts. Took me about 3 years to source front and rear. They are painted and on as of now. Just need pig tails for the jdm sidemarkers, extend the wiring and snap some good pics.
Also sourced a fog and half switch to make my jdm switch panel a bit more aesthetically pleasing. They are simply there for looks.
I had sourced some OEM JDM gauges (180km/h) and spray painted the needles yellow and combined it with an NA1 type-r gauge bezel- the faux carbon fiber one. Loved how it looked but then when I installed it I had a change of heart. It just didnt flow with my interior. My good pal Louis [MENTION=15357]AdvansCPAP[/MENTION] sourced me a complete set of 02+ OEM JDM gauges. They are direct replacements on my 1997 cluster so I assume will work on any NA2 97+
To calibrate the sweep on the US circuit board, simply grab a small flat head screw driver and twist this clockwise. I had to twist 180 degrees to match my new speedo in km/h. I will end up installing the JDM circuit board that my speedo came with eventually, but this will do for now.
Awesome capture by Ameer [MENTION=22261]Aladdin9[/MENTION] on our first So Cal drive of the year. The last good shot of my car with oem us spec front fenders and rear quarter panels.
I was fortunate enough to get first dibs on the most pristine used ARC Titanium exhaust I have ever seen, ever. It was too good to pass up so I ended up snagging it off Louis' hands and sold my previous one to my good pal Andrew @1036NA2. His purchase included my labor, of course... and some experimentation of burning titanium tips!
Disgustingly rare. Two pristine condition ARC Ti exhausts in 97+ fitment side by side. This makes me happy
It was a fun day. For any of your titanium tip burning needs please contact master titanium burner Andrew @1036NA2 lol...
My last update is my OEM NSX Type-S door cards. I got super lucky that Long [MENTION=18615]sicarius82[/MENTION] was able to source these for me, thanks again dude!! These are the exact door cards in blue perforated suede found in the Monte Carlo Blue NSX Type-S. Later on down the line I plan to do some customization of Recaro Pole positions to match the oem type-s seat theme. Stay tuned!
Last edited:
Type-S door cards are badassssssssssss
Similar threads
- Replies
- 8
- Views
- 529
- Replies
- 3
- Views
- 374
- Replies
- 25
- Views
- 2K