• Protip: Profile posts are public! Use Conversations to message other members privately. Everyone can see the content of a profile post.

Down Under Trackday NSX

Great progress!
My steering column doesn't attach to the NSX rack, but instead to a power servo via a short shaft & 4 universal joints....also, I've designed a tilt column configuration that doesn't tilt up, but swings to the right (towards center of car) quite exagerrated, to facilitate driver entrance/exit.
Glad you used a good column & removable wheel!
 
Yeah I could see from your thread that your setup is quite considerably different to mine......... in fact I thought about maybe considering replacing my original rack at some point as we had an issue with wear inside my factory rack which an engineer made some replacement parts for and it seems OK, but I've not had the time in the car to know for sure, so I think if I have any issues with it I'll just dump it and put something new in as the factory ones are rediculously expensive........
 
So we've finally managed to get a coat (well 2 now actually) of primer on the entire cage as well as the cabin and the front end of the car which we'll paint the same colour (silver) and then the rest outside of that will be painted the final orange with the rest of the outside of the car.

It looks soooo much more complete now it's all one colour. Plan is to have the final colour on sometime next week and then I can start assembling the inside of the car properly and also put the roof and supports back on and mount the rear hatch properly as well. Then once it's painted I'm going to transport it to a mates place in the centre of Wellington and we'll drop the engine and gearbox out and change all that stuff out as I've had the gearbox checked over and it was in perfect condition as suspected but we replaced a few seals to be on the safe side.......... then it'll be back to Zac for all of the bodywork stuff to be completed.

We may leave the front in primer as we still have to mount the radiator and few other bits in the front but will finish the paint inside and on the cage.......... I'll see what I can get done before we have a chance to paint it, but that's the plan right now and I suspect that's what we'll stick with.

P5040151.jpg


P5040148.jpg


P5040150.jpg


P5040152.jpg


P5040153.jpg
 
Just got these sent to me from the guy who used to work at Speedtech and did all of their gearboxes and other stuff, but Speedtech don't have anyone to replace him yet so they were OK with me getting him to check the box over to check it's all OK.....

At the moment I'll just stick with the stock LSD, but once we get the whole car together and everything else is working I'm going to invest in an OS Giken unit for it as it seems that's the best direction to go from what I've read and discussed with others.

imagejpeg_2.jpg


imagejpeg_2_2.jpg


imagejpeg_2_3.jpg


imagejpeg_2_4.jpg


The other crap news is that the wheels are finally sitting at the supplier in Auckland but in typical fashion I've had a couple of big tax bills this week so I've got no cash to pay the last part of the payment to get them sent out and they won't take credit cards so they'll have to wait where they are for the next 2-3 weeks !! :(
 
progress for today........ we had planned to paint the cage, but Steve realised we still had to do the gussets for the cage so we spent tonight making those and they're all made now and Steve welded in a couple too before he had to leave so tomorrow should see us get the others welded in and primered and then possibly final colour, but not sure as that's a Steve call......

P5090148.jpg


P5090149.jpg
 
Last edited:
Fraser is there any way you can post a picture of where the front damper cannisters are? I need some ideas on this.
 
So a major milestone today as I think we can now officially say the cage and interior finish is done !!

Final colour applied and now just got to get started getting everything put back in for what is hopefully the final assembly !! Once again Steve has morphed from cage builder to painter and I think he's done a great job....... as always he wasn't happy with it and thought it could be better, but as far as I'm concerned it's more than up to scratch for a race car and as previously stated most of it will be covered with seats and safety foam......

P5100151.jpg


P5100152.jpg


P5100153.jpg


P5100154.jpg


P5100155.jpg


P5100156.jpg


Turbo2Go, I'll take some pictures of what I've done, but you won't really want to do what I've done as you have to remove some of the support bracing from the front strut towers...... I've replaced them with the cage bar across between the struts so it was OK for me to remove them and still not lose anything, but if you don't have something similar then I wouldn't suggest it.......... what you will be able to do is something similar I think though.

I will post pics as I said, but I used a holesaw to drill a hole for the canister to go through from the front wheel arch to under the hood and then I've got a rubber bung that I cut to fit back in the hole to seal around the braided line........ same as I did on the rear....

P4120121.jpg


P4120122.jpg
 
Last edited:
LOL yeah ........ it's quite bright in person, but I like silver as it's quite tough as far as it doesn't show scratches and the like as easily as other colours and pretty much works with any other colours too so is a safe bet.

Dropping the engine and gearbox out today so that will be interesting to get started on another area of the build now that the cage is finished and it's also good to start emptying the shelves of all the parts you've helped me source or stuff you've made to actually get fitted up on the car too........ I'm like a kid on Xmas morning at the moment as my fiancee is away all weekend so I've got 48 hours to just have as little sleep as possible and make as much progress as possible on the car !

Both my seats are ready to be collected from Racetech today so that will be a good start ........ !
 
So the NSX has found a new home for a while whilst we get onto the engine and gearbox work........ my friend Peter's workshop in Wellington.....

P5120157.jpg


We rocked straight on with getting the engine and rear subframe out of the car....... wasn't too bad a job to do really.........

P5130158.jpg


P5130159.jpg


P5130160.jpg


Once the engine was out I just quickly took off the cam covers as I'm going to recoat them in the crinkle red finish like the later model Hondas have as I think it makes it look soooooo much better.......

P5130161.jpg


P5130162.jpg


More updates at the end of the weekend once we've got the engine bay all painted silver and hopefully a fair bit of other work done and all of the cams and other new parts fitted.
 
Last edited:
Made some useful progress today, some that I've shown and some that I haven't as they were maintenance style tasks just sanding and tidying up bits and peices that were in need of some love :)

But reasonable things achieved today were that I masked the entire engine bay ready for primer and colour tomorrow (not shown as I figured everyone has seen paint masking LOL) and getting the roof supports back in place ready for the roof to be reattached. Also spent last night and this morning (3.30am !) stripping the old finish, cleaning and masking the old cam covers and then painting them and baking them with the crinkle red finish we all know and love :)

I'm amazed at what difference a lick of paint makes to the look of the thing.......... can't wait to get it back in place with all of the extra lines and ugly stuff we don't need !

P5150163.jpg


P5150164.jpg


P5150165.jpg


We've already removed the aircon pump and associated bits as well as some, but not all of the emmissions and traction control stuff which we'll do in the next day or so. Progress on the engine is going to be held up by some seals which haven't arrived, but we're hoping no longer than a week to get them from Japan.

P5150166.jpg


P5150167.jpg


P5150168.jpg


Sorry about the blurry shot...
P5150169.jpg


Well that's it for today....... will have some more updates tomorrow or tuesday hopefully.
 
Not much action to show today, but yesterday Steve once again shot into a phone box and put his underwear on the outside and turned into "paintman" again and put some primer and paint on the engine bay to get that all looking bling ready for it's new look and feel engine once it's ready !! :)

P5170174.jpg


P5170175.jpg


P5170176.jpg


And finally got the auto gearbox detached from the engine and weighed and it was good news on the weight front you can see from the photos it was significantly heavier than the manual and clutch/flywheel combo so that puts us at about 2160lb or 980KG with only the petrol tank and radiator to go in so it's going to be well under our target 1050KG weight which is awesome....... On top of the gearbox weight, we also lost a fair bit with the removal of the emmissions and aircon pump and other bits (about 10KG I think), so I'll weigh the whole car again once we get it all back in, but I think the numbers stack up OK...... will have the tank in next time I weigh it as well so will be more accurate.

P5170170.jpg


P5170171.jpg


P5170172.jpg


P5170173.jpg
 
What a big set of sweaty, hairy nuts !!!! :(

Well I guess I knew that all of the current up's weren't going to last without some sort of down, but this one had the potential to be expensive in both time and money to the project..........

So we stripped down the VVIS system and intake setup to leave just the block and heads in place. What we found was 2 broken mounting holes out of 4 and the 3rd one isn't flash either, but should be salvagible. That bracket holds the alternator in place, as well as more importantly the engine mount on the right hand side (drivers side for us) bolts into so without getting these resolved to a strong standard it means I'm going to need to find a new block even though the engine runs sweet as a nut, it might be too close to the pistons to weld, so hoping we can find a "glue" style fix that won't require too much heat that we can rebuild them with.

We're pretty lucky as we dropped the engine onto the floor, but then used the engine jacking point (which is part of the bracket) to move the engine to strip it... !!! There was only 1 bolt holding it unknown to us so we were lucky it didn't break and rip other stuff out, or more importantly hurt someone !


This is picture with the bracket in place.
P5180177.jpg


Now with bracket removed
P5180178.jpg


Now close up of the 2 shagged holes....... Notice the liquid metal style crap that the Japanese bodge up artist tried to cover the nearest hole with !!! Dodgy buggers !
P5180179.jpg


Still onwards and upwards.......... hopefully we'll get an answer one way or the other in the next couple of days !!
 
Last edited:
I actually can't figure out what I'm looking at in those shots! Is that complex dark coloured cast piece actually a NSX part ??
 
Still no update on the engine block drama I'm afraid as the guy delivering the gas bottles got stuck on another delivery and didn't get it to the workshop before I had to leave, so it should be there tomorrow for us to either fix it or know that we've got to find another solution............

What I did get chance to do though was to remove the front and rear hubs and wire brush them back and paint them not because they particularly needed it, but I was replacing the studs anyway and didn't like them all rusty........... look a lot better now :)

P5250185.jpg


P5250186.jpg


Then I also put in the new polycarbonate rear window and sealed it up with sealant around the cage bars, then had to mask off the whole window and paint around the edge as I'd done with the rear hatch so it all matches.....

P5250189.jpg


So now the roof is all back on and the rear window done, I could mount the rear hatch........

P5250188.jpg


P5250187.jpg


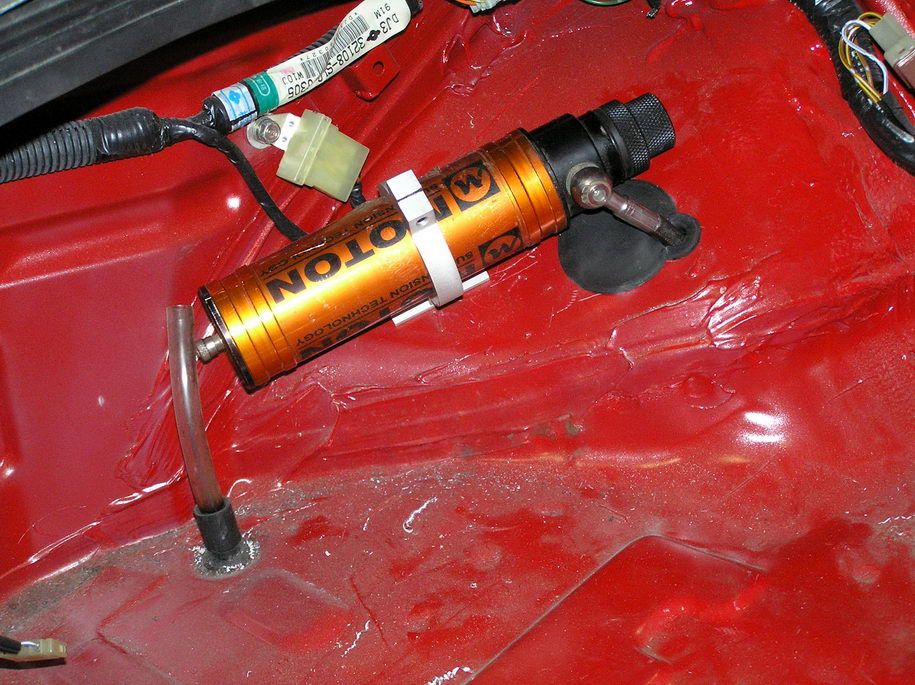
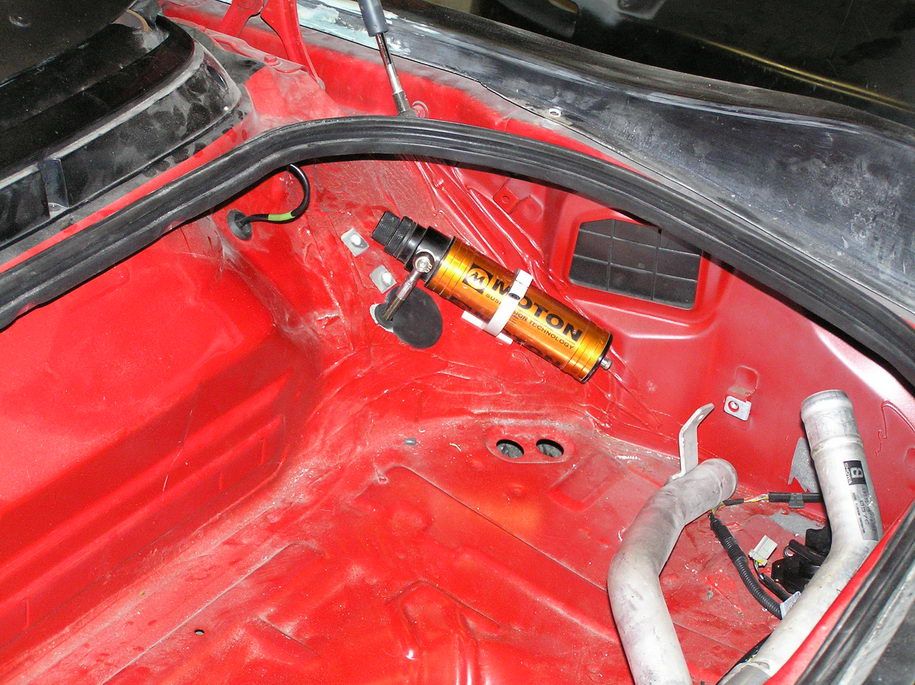
And also got time to mount the remote reservoirs for the brakes, but I think we're going to have to come up with a new location as I don't think we have enough drop to the master cylinders as the dash is quite low and the pedals are quite high......... we'll see.....

P5250190.jpg
 
Looks great! Sorry to see what happened to your block :mad: That's no good.

What series M/C are you running? Tilton's? Those reservoirs look like they're 74-series masters.
 
Yeah they are 74 series. 600 series pedal set.

I had a good long chat with Jason from Tilton and he talked me out of the 900 series pedals and master cylinders.

The reserviors are actually high enough where they are, but the feed from the bottom of the reservoir is so low that then the fluid would have to push itself up hill which isn't going to happen, but if the feed was off the side and not the bottom they'd be just fine where they are !!
 
The reserviors are actually high enough where they are, but the feed from the bottom of the reservoir is so low that then the fluid would have to push itself up hill which isn't going to happen ...

As long as the start of the sealed feed is higher than the end it really doesn't matter if the fluid goes "uphill" along part of the way ... a syphon hose proves this. Logically, for every millimetre going uphill there must be a matching millimetre going downhill and they balance each other out.
 
Last edited:
Ahhhh....... I'm clearly not an expert in this area mate !!!!

I just can't see that there is going to be enough pressure to force the fluid up the pipe as the bottom of the reservoir is about the same level as the MC, but then there's the mount which is about 15mm thick and then the feed off the bottom which is another say 10mm and it faces down not sideways so it's well below the MC before it gets chance to head back up.....

There is going to be about 90% of the pipe below the MC and only about 10% of pipe above the MC as the feed into the MC is basically a side feed so the pipe doesn't really need to be above the MC.........

It all sounds very confusing when I'm writing it..........

I think this picture shows it pretty well......... but my reservoirs are a little lower than his.
JerryRichards-MGBGTV8-CN.jpg
 
Back
Top