• Protip: Profile posts are public! Use Conversations to message other members privately. Everyone can see the content of a profile post.

Alternator Installation

Joined
26 July 2023
Messages
42
Did my first job on the NSX the other day, removed the alternator and it wasn't difficult. I just want to know if there's a way to make sure I tighten the belt right. Also when I took off the belt it looked like it was replaced recently and in good condition so would I need to buy another one?
 
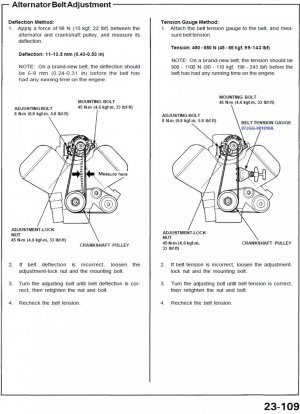
The service manual shows two methods. I know access is tight, so the tension gauge method might not be doable.
As long as the belt isn't frayed and doesn't have any cracks, you should be able to re-use it. Pay particular attention to the inside of the belt (the side that rides against the pulleys).

NSX Alternator Belt.jpg
 
The official Honda tool is $300 - $450 US$ depending on who you buy it from so you might want to look for alternatives. If you can get your hands down there to apply deflection pressure then you should be able to use a Krikit gauge. You can find these for less than $30 depending on where you shop
You will need the high tension version for the NSX alternator belt. The same tool seems to be marketed by Gates, Dayco and Continental.

There are push rod style tension measuring tools for less that are equivalent to a calibrated thumb. They require you to measure the deflection of the belt as described in the NSX service manual - good luck with that.
 
The tension is important. I had to rebuild a friends alternator due to over tightening of the belt. The front bearing in the alternator was shot. (so was the belt)
 
Without tools, it is better to under-tighten, the minimum tension required, and increase tension slightly a little bit at a time if the belt squeals. Shops cannot do this, but a DIY can increase a quarter turn at a time until happy.

Drive belts are incredibly strong and can easily ruin the bearings in the alternator AND the engine crankshaft in a short time.
 
Back
Top