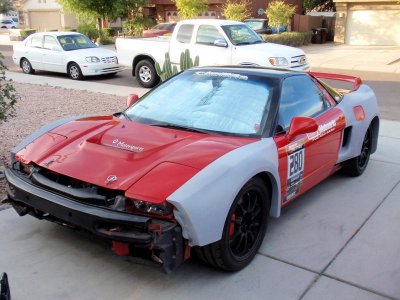
Is it me or the side vent is a little crooked......sort of leaning downward?
-
Protip: Profile posts are public! Use Conversations to message other members privately. Everyone can see the content of a profile post.
You are using an out of date browser. It may not display this or other websites correctly.
You should upgrade or use an alternative browser.
You should upgrade or use an alternative browser.
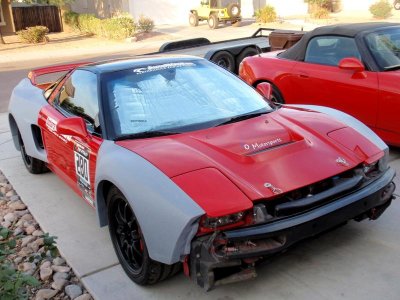
FXMD Widebody Kit
- Thread starter Coz
- Start date
Thanks Ken...
This is very true..I have never put a wide body kit on anything.
Pretty simple actually if you just take your time and be patient.
This is very true..I have never put a wide body kit on anything.
Pretty simple actually if you just take your time and be patient.
Jim is doing a great job installing the kit himself, especially considering he is not a body guy.
Last edited:
- Joined
- 19 March 2003
- Messages
- 3,442
Finally joining the fat boy club =) looking good so far.
Gil
Gil
Thanks Gil..
Always wanted too, was just waiting to find the WB I liked.
Now that my gearbox is done and is going back in the car in the next couple of days, I can get back to work on it and finish it.
Always wanted too, was just waiting to find the WB I liked.
Now that my gearbox is done and is going back in the car in the next couple of days, I can get back to work on it and finish it.
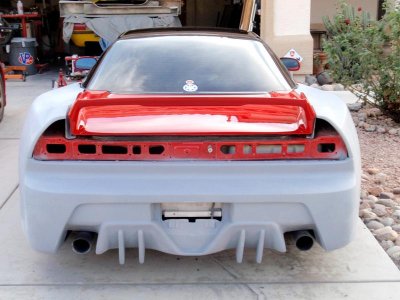
Today I'm proud to say. I tested fitted the new FXMD Widebody Kit for 2010 for my NSX.
I am very impressed on how great the filament is for the first wide body kit delivered by FXMD for 2010...
Everything was just taped in place today just to see :biggrin:
Actual fitting will begin shortly...Will post pictures as I go...
Man Coz its really starting to take shape, can't wait to see the finished Product

Man, I feel sorry for the guy who has to park next to you in the driveway. It looks like you got their car pretty dirty putting your kit on. If it was me I would probably wash their car for them. :biggrin:
Last edited:
No worries, iApex, I'll have my son Eric do it :biggrin:

- Joined
- 7 July 2009
- Messages
- 251
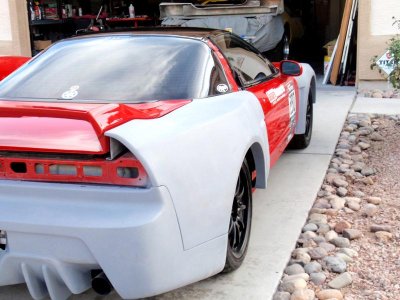
Is it me or the side vent is a little crooked......sort of leaning downward?
I think it is the perspective the pic is taken as the rear quarter panels do come out quite a bit.
- Joined
- 7 July 2009
- Messages
- 251
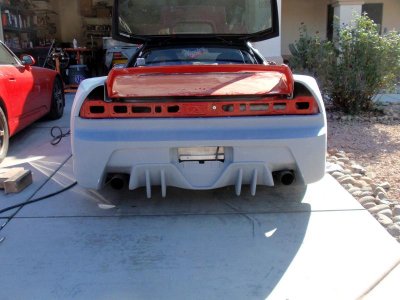
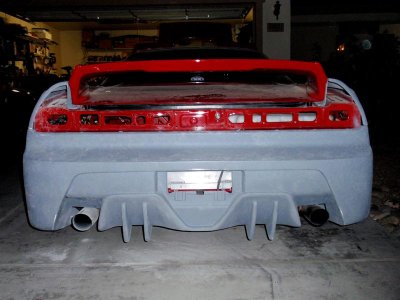
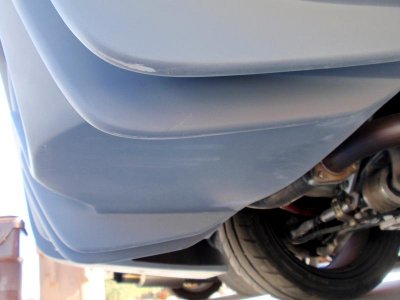
Rear bumper is on...
Looks like its getting there Coz!
Good morning Nami
Thanks....
Got to get a hold of Mori and Fes so I can get in and have them pin the front bumper
Thanks....
Got to get a hold of Mori and Fes so I can get in and have them pin the front bumper
Looks like its getting there Coz!
Yes, it is...The vents are straight.
I think it is the perspective the pic is taken as the rear quarter panels do come out quite a bit.
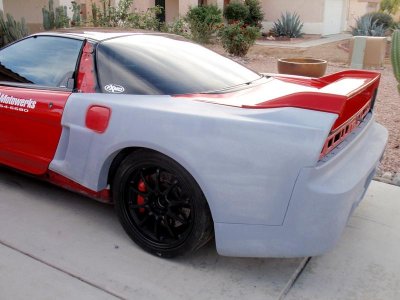
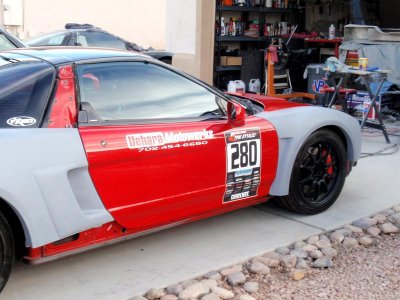
Front Fenders, Rear Quarters and Rear Bumper are done.
Next is the side skirts and front bumper...
It's getting there...
Next is the side skirts and front bumper...
It's getting there...
Attachments
-
 PB210002.jpg73.4 KB · Views: 484
 -
 PB210003.jpg56.8 KB · Views: 528
 -
 PB210004.jpg68.9 KB · Views: 575
 -
 PB210005.jpg63.3 KB · Views: 510
 -
 PB210006.jpg68.8 KB · Views: 490
 -
 PB210007.jpg69.8 KB · Views: 469
 -
 PB210008.jpg50.9 KB · Views: 463
 -
 PB210009.jpg54 KB · Views: 439
 -
 PB210011.jpg73.3 KB · Views: 514
Last edited:
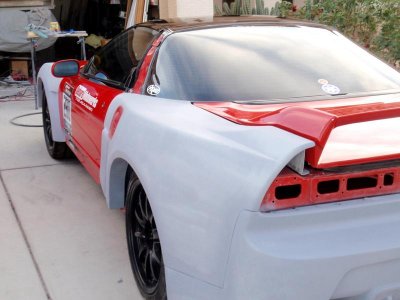
Are you spraying primer while the panels are fitted on the car? I can see the over spray.
While it's takes a lot of work and patience installing a wide body kit on a car, you get the satisfaction knowing that no corners were cut and everything was done right. I too install everything on my car so I was where you are at one point Good Job, the car is coming along nicely.
While it's takes a lot of work and patience installing a wide body kit on a car, you get the satisfaction knowing that no corners were cut and everything was done right. I too install everything on my car so I was where you are at one point
Good Job, the car is coming along nicely.It's actually just a sealer. The entire car will be sanded down and repainted when I'm done putting on the kit. The few over spray area's are touch ups after after getting the pieces on and fitted for the last time. I'll use a filling primer before the block sanding begins.
This is the first time I have ever tackled anything like this. I have worked with carbon fiber and fiberglass before making other parts so that experience has helped greatly.
You're right, it's not hard, you just have to go slow, think things out, take your time and have patience putting the pieces on, taking them off, making adjustments, putting them back on, etc.
I was going to have someone else do it, but I'm glad I didn't now. I am learning a lot doing it myself and this way I know how everything went together and that it was done without cutting any corners.
Thanks Richard, its nice to hear coming from someone that has done this themselves.
Post a picture of your car, I would like to see it.
Last edited:
- Joined
- 19 March 2003
- Messages
- 3,442
Shouldn't sealer go on prior to paint? Looking good so far =)
-g-
-g-
It's actually just a sealer. The entire car will be sanded down and repainted when I'm done putting on the kit. The few over spray area's are touch ups after after getting the pieces on and fitted for the last time. I'll use a filling primer before the block sanding begins.
This is the first time I have ever tackled anything like this. I have worked with carbon fiber and fiberglass before making other parts so that experience has helped greatly.
You're right, it's not hard, you just have to go slow, think things out, take your time and have patience putting the pieces on, taking them off, making adjustments, putting them back on, etc.
I was going to have someone else do it, but I'm glad I didn't now. I am learning a lot doing it myself and this way I know how everything went together and that it was done without cutting any corners.
Thanks Richard, its nice to hear coming from someone that has done this themselves.
Post a picture of your car, I would like to see it.
Yes, the car has not been painted yet.
Shouldn't sealer go on prior to paint? Looking good so far =)
-g-
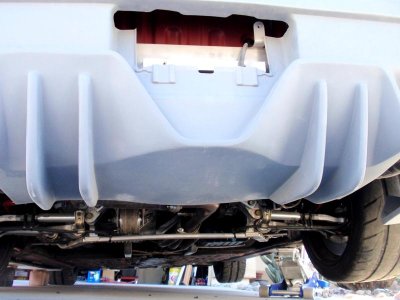
What you don't see in these pictures John is the veins on the diffuser go underneath the car on the bottom of a sealing tray.
Anymore than that I will have to let Ken explain the design....
Anymore than that I will have to let Ken explain the design....
I will take some from under this week when I have it up to figure out the putting the side skirts on next and post them. (Pictures)
I still have to fabricate some splash shields to protect my accusump and air cleaner which are tucked up under rear quarters.
The front end is being put on pinned and latched so it can be removed to put on a trailer easier.
All and all I have around 50 hours in it so far. Which I don't think is to bad for never having done one before. That includes taking everything off first.
Totally gives credence to the quality and simplicity of the kit. Ken/FXMD did a great job on constructing this kit.
I just want to get it done, the longer it sits, the longer since driving it last and that sucks.
I hate not being able to drive my car.
Last edited:
subscribing ... this MUST BE SEEN PAINTED!
... this MUST BE SEEN PAINTED!99% of 'diffusers' (OEM and especially aftermarket) are cosmetic.Looks interresting ie a little different.Now I'm no aerodynamicist but to my eye the rake and configuration of the rear diffuser looks not so functional and more cosmetic
The Prius' diffuser is an exception (reduce drag, not generate downforce).
Similar threads
- Locked
- Replies
- 25
- Views
- 2K
- Replies
- 10
- Views
- 813