-
Protip: Profile posts are public! Use Conversations to message other members privately. Everyone can see the content of a profile post.
You are using an out of date browser. It may not display this or other websites correctly.
You should upgrade or use an alternative browser.
You should upgrade or use an alternative browser.
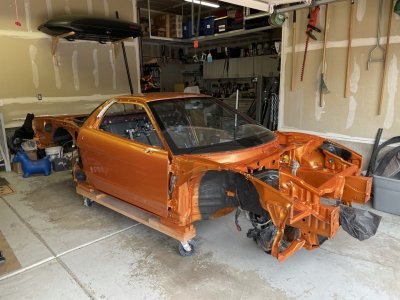
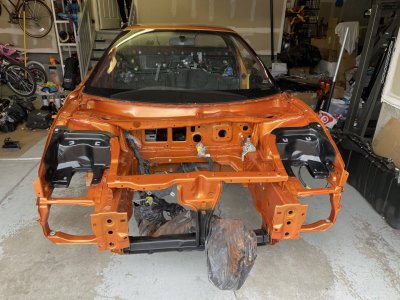
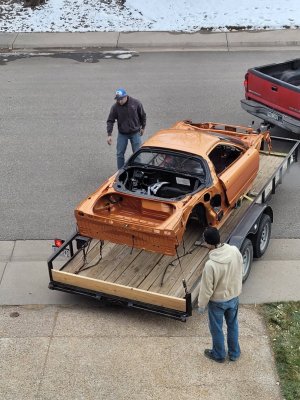
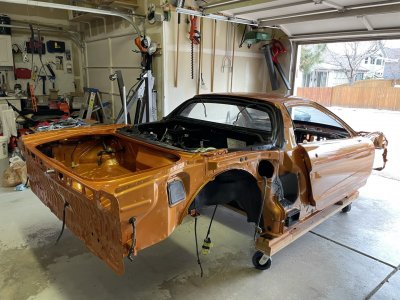
Honcho's Long Road to Imola Type-S Zero
- Thread starter Honcho
- Start date
That. Is. Awesome.
I keep meaning to ask. How are you keeping things organized to put the car back together? I can see having a system for one aspect of the car (engine, transmission, etc.) but other than a few ancillary harnesses, you quite literally have the ENTIRE car in pieces. You have a hidden batcave behind your house?
I keep meaning to ask. How are you keeping things organized to put the car back together? I can see having a system for one aspect of the car (engine, transmission, etc.) but other than a few ancillary harnesses, you quite literally have the ENTIRE car in pieces. You have a hidden batcave behind your house?
So excited! Literally the only complaint I have about my Zanardi was the color, I would have loved a project like this. And by "Love" I meant to buy it from someone without doing all that work, simply amazing!
Looks fantastic!
Getting the paint done has always been the longest and most stressful part of any projects I’ve done. It’s like waiting for Christmas, as a child, and then having it delayed to the point you almost give up. Thanks for taking the time to document this for all of us who enjoy living vicariously through your build.
Looking forward to seeing it come together!
If there was a +1 or LIKE-button I'd hit it 10x. Maybe the next gen forum has such a feature, so I don't have to write a post.
The next forum will have the ability to "up" vote posts :smile:
Big McLargeHuge said:Must be exciting, you're in the home stretch of the semifinals
Probably the most accurate statement about my project thus far.
That. Is. Awesome.
I keep meaning to ask. How are you keeping things organized to put the car back together? I can see having a system for one aspect of the car (engine, transmission, etc.) but other than a few ancillary harnesses, you quite literally have the ENTIRE car in pieces. You have a hidden batcave behind your house?
Two things: first, to quote [MENTION=33247]MotorMouth93[/MENTION], my garage is "fu#kin' huge" LOL. In seriousness, I have a 3-car with 18-foot ceilings, and I have banished my F-150 to the driveway. I am using a combination of a pile system and large plastic storage bins. Basically, I put stuff I don't need right now in bins and then up on shelves. Stuff I need right now, or anticipate needing to do soon goes in a pile on the floor. Now that I know the engine will not be ready until January, for example, items like the TB/WP parts, rear subframe, etc. will be moved out of the way. Interior and front end parts will come back down to the floor. It's a crazy ballet. Second, I have a MASSIVE excel sheet that tracks everything down to each bolt and washer. And lots of labeled ziploc bags.
So excited! Literally the only complaint I have about my Zanardi was the color, I would have loved a project like this. And by "Love" I meant to buy it from someone without doing all that work, simply amazing!
My wife asked me that, and I replied it would be cost prohibitive.
Looks fantastic!
Getting the paint done has always been the longest and most stressful part of any projects I’ve done. It’s like waiting for Christmas, as a child, and then having it delayed to the point you almost give up. Thanks for taking the time to document this for all of us who enjoy living vicariously through your build.
Looking forward to seeing it come together!
Your project was my main inspiration for this whole thing. Yes, the paint has been the hardest part by far both from a timing and patience standpoint. But seeing it in person yesterday...it was worth it.
If there was a +1 or LIKE-button I'd hit it 10x. Maybe the next gen forum has such a feature, so I don't have to write a post.
Thanks, my friend.
Last edited:
If you need the puller for the input shaft bearing, it's on super tight, took a lot of force with a press to put the new one back on. I used a length of PVC pipe to press on the inner race and it was almost enough force to break the pipe 
If you need the puller for the input shaft bearing, it's on super tight, took a lot of force with a press to put the new one back on. I used a length of PVC pipe to press on the inner race and it was almost enough force to break the pipe
I bought some 1 1/2 and 1 1/4 inch galvanized steel pipe for this because I had the same concern.
Just wondering: what have you planned for the wheel-wells?
I've removed the old junk of them and painted them black semi-gloss.
The painter and I discussed and we settled on a thin coat of pickup truck spray-on bed liner. It's much harder than the crappy rubber undercoat spray and more similar to what Honda put on the car originally.
Transmission Refresh 3
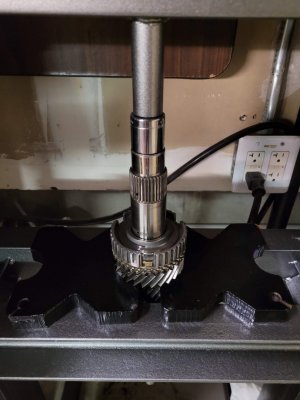
Special thanks to [MENTION=33247]MotorMouth93[/MENTION] for advice on taking down the mainshaft without the bearing separator. Turns out you can use a 3-jaw puller hooked onto 5th gear. Try to make sure the jaws are fully seated on the gear teeth and cover two teeth instead of one if possible. It pulled right off that way and I was able to use the press to remove the rest. @bigmclargehuge you were right. The clutch-side bearing was really tight. I used the press to separate it and when it released, it was a loud "BANG"!
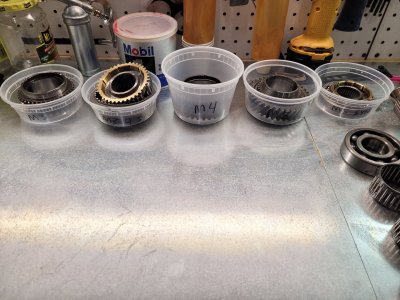
Take out containers work great to keep things organized.
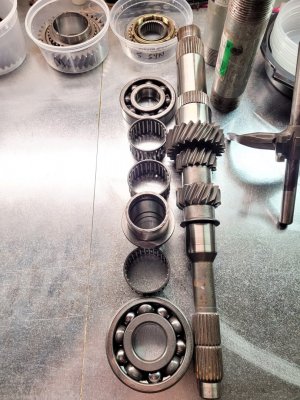
Special thanks to [MENTION=33247]MotorMouth93[/MENTION] for advice on taking down the mainshaft without the bearing separator. Turns out you can use a 3-jaw puller hooked onto 5th gear. Try to make sure the jaws are fully seated on the gear teeth and cover two teeth instead of one if possible. It pulled right off that way and I was able to use the press to remove the rest. @bigmclargehuge you were right. The clutch-side bearing was really tight. I used the press to separate it and when it released, it was a loud "BANG"!

Take out containers work great to keep things organized.


Last edited:
Transmission Refresh 4
Checking the mainshaft synchros. 5th measured at 0.94 mm and the 3-4 measured at 0.90 mm. This is well within the factory standard of 0.84 to 1.1 mm, and plenty above the service limit of 0.4 mm. These synchros will last a long time. Turns out I was completely wrong about 5th gear and its synchro- it looks nearly new. I still bought a complete new hub and synchro set, so I will install it, but at least I have a good spare now.
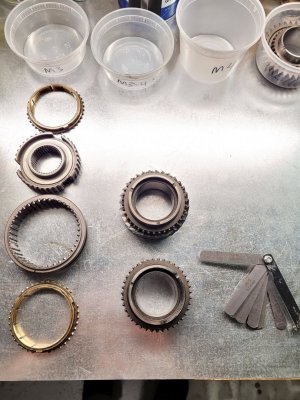
Checking the mainshaft synchros. 5th measured at 0.94 mm and the 3-4 measured at 0.90 mm. This is well within the factory standard of 0.84 to 1.1 mm, and plenty above the service limit of 0.4 mm. These synchros will last a long time. Turns out I was completely wrong about 5th gear and its synchro- it looks nearly new. I still bought a complete new hub and synchro set, so I will install it, but at least I have a good spare now.

Weight Reduction – S Zero Conversion 38
Seats are back. I've been teasing this project for a while now, but now that it's done, I can elaborate. OEM Type-S orange seats (YR-187L color code) are available from Honda for $8,800 per seat before shipping. There are two problems with this. First, that is almost as much as I paid for the entire car! Second, the OEM racing seats are little tight for me. I'm not a fat guy, but I'm just not a small man (6'1" 190 lbs). Even with my 34 inch waist, the Recaros are...tight. Anyway, that meant the DF replicas were also out of contention. This led me to the fantastic Recaro ABE that is available from AS Motorsport. Those seats are sized for large Europeans like me and Adnan can get them upholstered in the correct Alcantara. Except there is one problem- no carbon/kevlar. You can get pure carbon ($$$) or fiberglass, but you can't get the yellow/black aramid weave that is so distinctive on the NSX seats.
Back to square one. I enjoy a challenge and difficult tasks are fun for me (hence this project), so I got to work. First was finding a suitable shell. I needed something shaped like the OEM Recaro, but sized like the ABE. After a LOT of searching, I found them. NRG model FRP-300 racing seats. They are a fiberglass shell over a steel frame. (Note-- These seats are not FIA certified, but I have no plans to race this car competitively or in a FIA-sanctioned event.) Next, [MENTION=34522]NSX_n00b[/MENTION] found a vinyl wrapping place that could scan the real aramid weave on his DF seats and reproduce it in a wrap. They wrapped the NRG shells with this wrap and you cannot tell. Next was the upholstery. The NRG seats, being inexpensive seats, come with a fairly cheap jersey mesh cover. I sourced some real leather (#6 "Black Pebble" from leatherhidestore.com) and brought the seats to a local auto trim shop. They ripped up one of the NRG covers and replicated the pattern with the genuine leather. I sourced the genuine Toray UltraSuede HD in orange and had them re-do the NRG cushions. Here is the result (I'll add a few more pictures of the shells later):
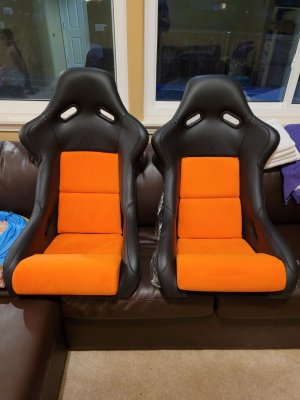
I am blown away. The trim shop added foam under the leather fabric since he felt the NRG foam was cheap and not very comfortable. The seat is now quite comfortable as a result. The finish is gorgeous and the seats are now in the basement soaking up a good coat of leather conditioner as the leather was fairly dry. This project exceeded my expectations and I can't wait to get them in the car! Plus, the cost was well below even what the ABE option would have been. The one remaining issue s the seat belt grommets. Now that I have thicker leather and foam backing, they don't quite clip and bulge out. Does anyone know where to get thicker belt grommets? These ones are about 10mm wide and I need more like 15 or 20 mm.
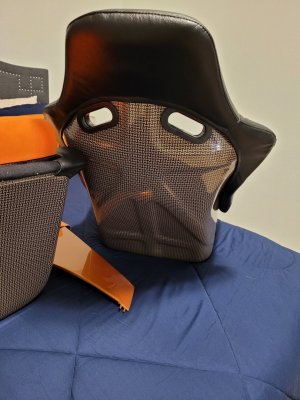
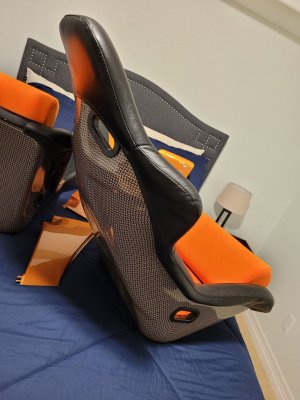
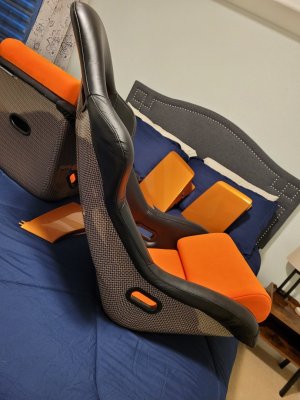
Seats are back. I've been teasing this project for a while now, but now that it's done, I can elaborate. OEM Type-S orange seats (YR-187L color code) are available from Honda for $8,800 per seat before shipping. There are two problems with this. First, that is almost as much as I paid for the entire car! Second, the OEM racing seats are little tight for me. I'm not a fat guy, but I'm just not a small man (6'1" 190 lbs). Even with my 34 inch waist, the Recaros are...tight. Anyway, that meant the DF replicas were also out of contention. This led me to the fantastic Recaro ABE that is available from AS Motorsport. Those seats are sized for large Europeans like me and Adnan can get them upholstered in the correct Alcantara. Except there is one problem- no carbon/kevlar. You can get pure carbon ($$$) or fiberglass, but you can't get the yellow/black aramid weave that is so distinctive on the NSX seats.
Back to square one. I enjoy a challenge and difficult tasks are fun for me (hence this project), so I got to work. First was finding a suitable shell. I needed something shaped like the OEM Recaro, but sized like the ABE. After a LOT of searching, I found them. NRG model FRP-300 racing seats. They are a fiberglass shell over a steel frame. (Note-- These seats are not FIA certified, but I have no plans to race this car competitively or in a FIA-sanctioned event.) Next, [MENTION=34522]NSX_n00b[/MENTION] found a vinyl wrapping place that could scan the real aramid weave on his DF seats and reproduce it in a wrap. They wrapped the NRG shells with this wrap and you cannot tell. Next was the upholstery. The NRG seats, being inexpensive seats, come with a fairly cheap jersey mesh cover. I sourced some real leather (#6 "Black Pebble" from leatherhidestore.com) and brought the seats to a local auto trim shop. They ripped up one of the NRG covers and replicated the pattern with the genuine leather. I sourced the genuine Toray UltraSuede HD in orange and had them re-do the NRG cushions. Here is the result (I'll add a few more pictures of the shells later):

I am blown away. The trim shop added foam under the leather fabric since he felt the NRG foam was cheap and not very comfortable. The seat is now quite comfortable as a result. The finish is gorgeous and the seats are now in the basement soaking up a good coat of leather conditioner as the leather was fairly dry. This project exceeded my expectations and I can't wait to get them in the car! Plus, the cost was well below even what the ABE option would have been. The one remaining issue s the seat belt grommets. Now that I have thicker leather and foam backing, they don't quite clip and bulge out. Does anyone know where to get thicker belt grommets? These ones are about 10mm wide and I need more like 15 or 20 mm.


Last edited:
Looking good - I can see why you went for the non-SLO seats. I fit mine just fine!
This is amazing. I don't think I'd be able to sleep knowing that everything needed to get the car back on the road is sitting in my house. I'd probably stay up 24/7 until I got the last bolt tightened down.
How long do you think it'll take to get it back on the road?
Nice job Paul.
How long do you think it'll take to get it back on the road?
Nice job Paul.
Awesome! 2021 is going to be a fun year...it's when you start to put things back on the car. So exciting!
Love the color.
I'm hoping it goes back together much faster than it came apart!
Halleluiah!!!!!!
Amen!!!
Looking good - I can see why you went for the non-SLO seats. I fit mine just fine!
Spencer has the DF replicas and while I do fit them, it's a bit tight. These seats are so much more comfortable, but still provide the bolster support needed for performance driving.
This is amazing. I don't think I'd be able to sleep knowing that everything needed to get the car back on the road is sitting in my house. I'd probably stay up 24/7 until I got the last bolt tightened down.
How long do you think it'll take to get it back on the road?
Nice job Paul.
Thanks Rob. Weather permitting, I'm looking at around February. I just dropped off the valve guides at the machine shop yesterday and they said my heads were up next- they were finishing a BMW M3 head, and had a set of 426 Hemi heads on the bench. That place is so cool.
Some assembly required.
Just a little bit.
Re-Assembly 1
[MENTION=34522]NSX_n00b[/MENTION] and I took last week off from work to devote all of our time to getting the car assembled. We treated it like a full time job and put in 14-16 hours per day. Here's where we stand now:
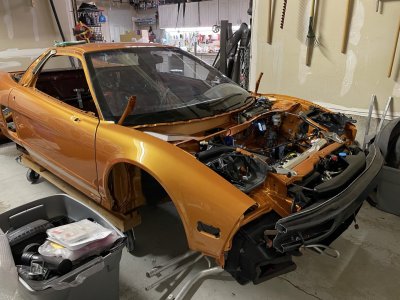
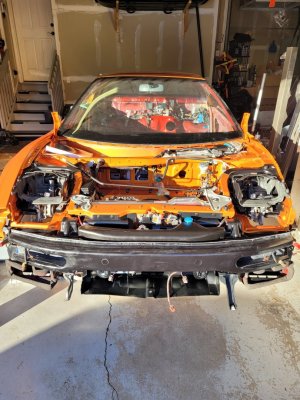
How did we get there? Read on to find out.
DAY 1 - Clutch Hard Line
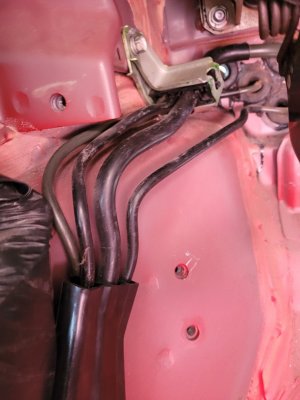
The first order of business was to get the car to have 3 pedals. This meant the difficult task of installing the factory hard line for the clutch hydraulics. It took most of the morning of the first day to accomplish. While it is possible to do this (and preferable to the flex line solutions in terms of durability), there are some key points. First, the clutch line was installed first on the assembly line. Here, it is installed last, so the other hard lines for the brakes obstruct fitment. While you can work the line around most of it, at the front firewall, the brake booster vacuum line almost completely obstructs placement of the clutch line through the grommet hole. Second, it helps to warm up the plastic retaining clips to separate them. Third, you want to pull the rubber grommets through the body holes before final fitment and tightening the threaded fittings. We forgot to do this and as a result, mangled and cut the grommets. After verifying rubber between the body and the hard line, we were forced to use silicone gasket maker to seal the openings, since with the hard lines in place, they would NOT move even 0.5mm and we were not going to rip it all out and start over!
Fourth, some bending will be required to get the fittings to line up for threading, but don't bend too much or the line will never fit correctly. We found it easier to thread the fittings together and then bolt the carrier to the body as a last step, allowing the bolt to "walk" the lines into place. Finally, the plastic clips do a pretty good job of aligning the hard line in the correct orientation, but we did have to use a plastic zip tie in places to keep the lines from touching each other.
The steps:
At the front firewall. You can see the larger brake booster line covering the clutch line.
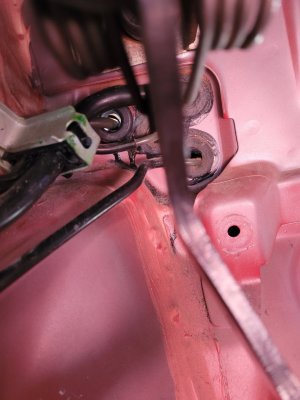
Line clipped back into the retainer.
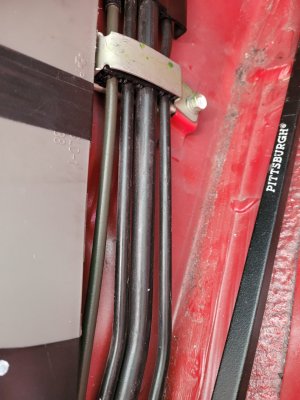
Into the rear firewall. Note zip tie used to separate lines.
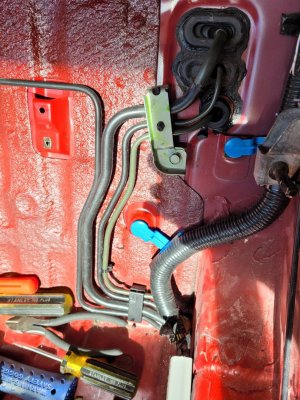
[MENTION=34522]NSX_n00b[/MENTION] and I took last week off from work to devote all of our time to getting the car assembled. We treated it like a full time job and put in 14-16 hours per day. Here's where we stand now:


How did we get there? Read on to find out.
DAY 1 - Clutch Hard Line
The first order of business was to get the car to have 3 pedals. This meant the difficult task of installing the factory hard line for the clutch hydraulics. It took most of the morning of the first day to accomplish. While it is possible to do this (and preferable to the flex line solutions in terms of durability), there are some key points. First, the clutch line was installed first on the assembly line. Here, it is installed last, so the other hard lines for the brakes obstruct fitment. While you can work the line around most of it, at the front firewall, the brake booster vacuum line almost completely obstructs placement of the clutch line through the grommet hole. Second, it helps to warm up the plastic retaining clips to separate them. Third, you want to pull the rubber grommets through the body holes before final fitment and tightening the threaded fittings. We forgot to do this and as a result, mangled and cut the grommets. After verifying rubber between the body and the hard line, we were forced to use silicone gasket maker to seal the openings, since with the hard lines in place, they would NOT move even 0.5mm and we were not going to rip it all out and start over!
Fourth, some bending will be required to get the fittings to line up for threading, but don't bend too much or the line will never fit correctly. We found it easier to thread the fittings together and then bolt the carrier to the body as a last step, allowing the bolt to "walk" the lines into place. Finally, the plastic clips do a pretty good job of aligning the hard line in the correct orientation, but we did have to use a plastic zip tie in places to keep the lines from touching each other.
The steps:
- Open all hard line retaining clips
- Place line inside the car (dash, seats, steering column and carpet must be removed)
- Insert line into the front firewall body hole while bending the booster line down and right for clearance. You will have to rotate the clutch line and creatively maneuver it.
- Insert the line into the rear firewall body hole
- Pull grommets into the body holes on both sides
- Thread fittings
- Snap line into place in clips and close the retaining clips
- Tighten fittings
- Check line clearances and add zip ties where lines are touching.
At the front firewall. You can see the larger brake booster line covering the clutch line.


Line clipped back into the retainer.

Into the rear firewall. Note zip tie used to separate lines.

Re-Assembly 2
DAY 1 - Clutch and Brake Pedals
A big part of re-assembly is thinking through which tasks should be performed while you have certain access. In this case, it made sense to attach the clutch pedal assembly, master cylinder and MT brake pedal next.
NSX-R clutch slave damper-less joint installed.
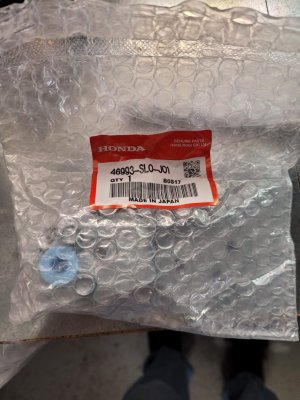
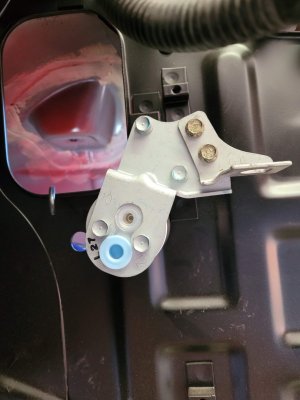
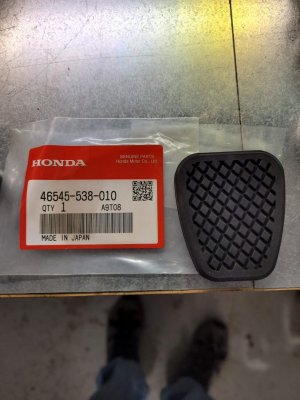
New pedal rubbers.
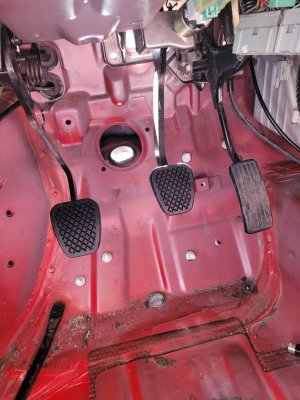
Installation complete. Automatic no more- this NSX now has three pedals. Still need to do the accelerator pedal rubber.
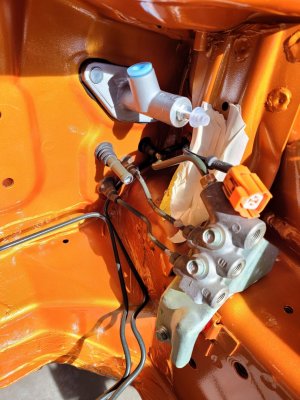
New clutch master cylinder installed. You can see the mangled grommet on the clutch line and tape we used to protect the paint when installing the hard line.
DAY 1 - Clutch and Brake Pedals
A big part of re-assembly is thinking through which tasks should be performed while you have certain access. In this case, it made sense to attach the clutch pedal assembly, master cylinder and MT brake pedal next.
NSX-R clutch slave damper-less joint installed.


New pedal rubbers.

Installation complete. Automatic no more- this NSX now has three pedals. Still need to do the accelerator pedal rubber.

New clutch master cylinder installed. You can see the mangled grommet on the clutch line and tape we used to protect the paint when installing the hard line.

Re-Assembly 3
DAY 1 - Hood Latch and Shift Cables
Following the pedal install, it was time to install the hood latch and shift cables. Gave the rusted, nasty hood latch a good cleanup and then sprayed it liberally with some silicone spray to hopefully stave off future corrosion. Soaked the plastic cover in 303 protectant. Also washed some other parts that will go in.
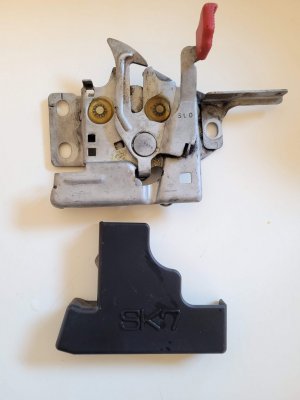
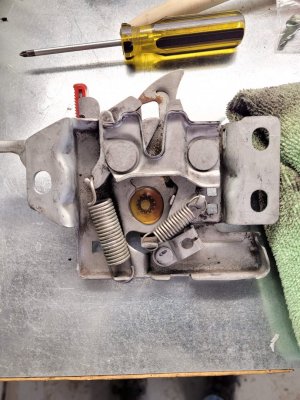
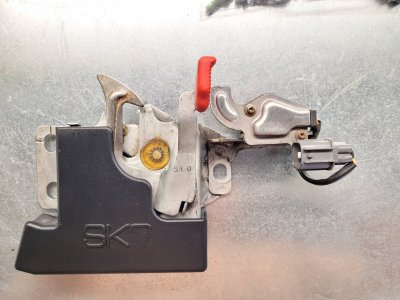
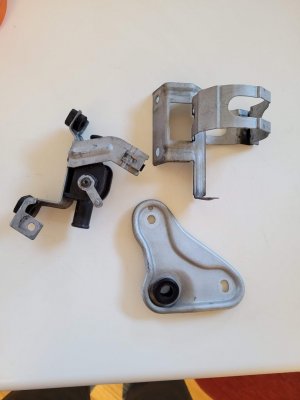
Hood Latch installed. **NOTE** please connect the cable lever prior to installing on the car. We forgot to do it at this stage and were forced to work around the A/C drier at a later stage.
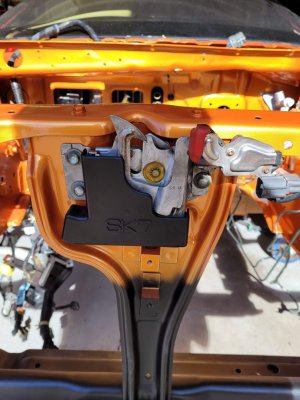
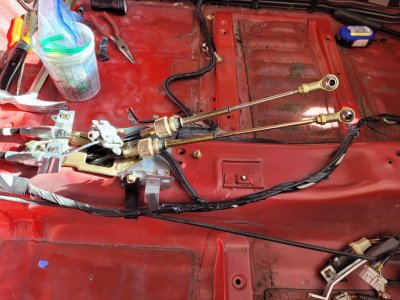
Shift cables installed. The rubber hanger for the cables under the center tunnel is pretty badly mangled. Any thoughts from the forum on how to reinforce it are welcome. Zip ties? I was thinking of molding some silicone gasket maker into the holes/cracks. Will add pics later.
DAY 1 - Hood Latch and Shift Cables
Following the pedal install, it was time to install the hood latch and shift cables. Gave the rusted, nasty hood latch a good cleanup and then sprayed it liberally with some silicone spray to hopefully stave off future corrosion. Soaked the plastic cover in 303 protectant. Also washed some other parts that will go in.


Hood Latch installed. **NOTE** please connect the cable lever prior to installing on the car. We forgot to do it at this stage and were forced to work around the A/C drier at a later stage.

Shift cables installed. The rubber hanger for the cables under the center tunnel is pretty badly mangled. Any thoughts from the forum on how to reinforce it are welcome. Zip ties? I was thinking of molding some silicone gasket maker into the holes/cracks. Will add pics later.

Last edited:
Re-Assembly 4
DAY 2 - HVAC and Painting...Lots of Painting!
Checking the weather for the week, we realized that Day 2 was going to be our last day of nice weather (60's and sunny) before a cold front and snow moved in. That meant we had to pivot and work on some projects that required paint (and hence, warmer weather). While it was cold in the morning, however, we reinstalled the freshly refurbished HVAC unit courtesy of Joe Gutterri in Florida. Great service by the way!
It took some creative tilting and maneuvering to get it back in place. Not having the SRS control unit in the way helped somewhat.

New evaporator and expansion valve.

New heater core grommet (treated with 303) and heater control cable threaded through. According to Joe, my 1992 original brass heater core was in good condition and did not need to be replaced.

Disassembled the junkyard 1997 shifter assembly for a soak in the Evapo-Rust. Thanks to [MENTION=33247]MotorMouth93[/MENTION] 's build thread, I have all the parts to completely rebuild the shift lever and convert to the Type-S knob.


Disassembled and cleaned the blower unit- something we all should do on our older NSXs. Soaked all the parts in 303 in the sunlight on the driveway. Now I can re-foam and re-assemble.


Disassembled the rear brake calipers. Lots of rusty brake fluid poured out, but surprised to see the good condition of the brake pistons. I can keep my new ones as spares for later. Special thanks to [MENTION=25737]Kaz-kzukNA1[/MENTION] for reminding me where each Honda lubricant should go.


Painted the rear calipers.
***HOLD FOR PICS***
Painted the rear brake shields with plasti-dip
***HOLD FOR PICS***
DAY 2 - HVAC and Painting...Lots of Painting!
Checking the weather for the week, we realized that Day 2 was going to be our last day of nice weather (60's and sunny) before a cold front and snow moved in. That meant we had to pivot and work on some projects that required paint (and hence, warmer weather). While it was cold in the morning, however, we reinstalled the freshly refurbished HVAC unit courtesy of Joe Gutterri in Florida. Great service by the way!
It took some creative tilting and maneuvering to get it back in place. Not having the SRS control unit in the way helped somewhat.
New evaporator and expansion valve.
New heater core grommet (treated with 303) and heater control cable threaded through. According to Joe, my 1992 original brass heater core was in good condition and did not need to be replaced.
Disassembled the junkyard 1997 shifter assembly for a soak in the Evapo-Rust. Thanks to [MENTION=33247]MotorMouth93[/MENTION] 's build thread, I have all the parts to completely rebuild the shift lever and convert to the Type-S knob.
Disassembled and cleaned the blower unit- something we all should do on our older NSXs. Soaked all the parts in 303 in the sunlight on the driveway. Now I can re-foam and re-assemble.
Disassembled the rear brake calipers. Lots of rusty brake fluid poured out, but surprised to see the good condition of the brake pistons. I can keep my new ones as spares for later. Special thanks to [MENTION=25737]Kaz-kzukNA1[/MENTION] for reminding me where each Honda lubricant should go.
Painted the rear calipers.
***HOLD FOR PICS***
Painted the rear brake shields with plasti-dip
***HOLD FOR PICS***
Last edited:
Similar threads
- Replies
- 4
- Views
- 511
- Locked
- Replies
- 2
- Views
- 445


