I'm trying to convince him to mount a "faux" rhd steering wheel and pedal set
Anyone who has read this thread knows I am crazy- but I'm not that crazy.

I'm trying to convince him to mount a "faux" rhd steering wheel and pedal set
I see. I suppose the steering wheel being on the wrong side would ultimately give the game away anyway!


I hath been summoned :ghost:
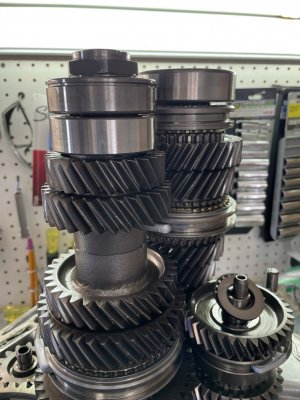
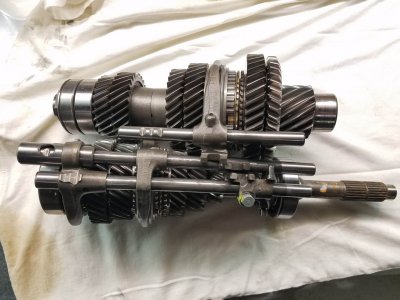
From your last pic it looks like you might still have the reverse shift arm bolted in, have you removed it yet? I was able to lift out all 3 shafts at once by using 2 big zip-ties to hold everything together. The spring pins on the fork and reverse gear sit in their grooves yes, but they will always be aligned and thus you should be able to pull everything straight up and out, no need to compress or pry anything. If you don't want to pull all 3 shafts at once, you can have someone (Spencer? ; )) lift the main & countershafts slightly while you pull out the reverse assy just like if you were reassembling it.
It looks like the case has been opened before, the case sealing bolts look like they've been used a few times already which is consistent with having to measure new thrust & preload shims. Everything looks good so far though, one tip I might add is to test if there's any stripped bolts on the cases by testing the front & rear engine mount bolts and others (like for the cable covers) to see if the threads are good. My case had one stripped front mount hole which I only realized after the trans was reinstalled, would have been nice to fix it on the bench. Make sure the sealing bolt threads are really clean too otherwise you might stretch a bolt over-torqueing it like I did, leftover MTF likes to seep into the threads.

Well said and I'll second that.With 5MT, if you struggled at this stage, you are going to have lots of fun when placing the trans case back in place....
You will be dreaming of having like 5 arms that you can control with your brain.....
6MT is much easier....
Kaz
Don't worry, we're here if questions come up... Putting the trans back together is far easier than taking it apart, you just have to figure out the trick for getting the shifter arm on the case properly seated. Like I said in my trans rebuild thread, do a few dry runs and once you get it down wipe with acetone one more time, apply Hondabond, and you're golden.
Going to try the zip tie trick tonight. Last night's attempt was thwarted by puppy.
With 5MT, if you struggled at this stage, you are going to have lots of fun when placing the trans case back in place....
You will be dreaming of having like 5 arms that you can control with your brain.....
6MT is much easier....
Kaz
You can always drop it off the back of a pickup truck and see if it separates.
The puppy??


.jpg")
.jpg")