• Protip: Profile posts are public! Use Conversations to message other members privately. Everyone can see the content of a profile post.

Honda NSX OEM battery charger connection

Joined
25 January 2006
Messages
800
Location
S/W Fla
A while ago I bought a Honda, NSX, 2019, OEM battery trickle charger, p/n 08E90-T6N-200 to install on my 1992 NSX. After fiddling for a bit and being not the sharpest electric knife in the drawer, I’ve not been able to figure out where to “properly” connect to my car without screwing up my ‘92 car electrical system.
Has anyone tried or succeeded in doing this or able to help me tp get this done?

Cheers
nigel
 
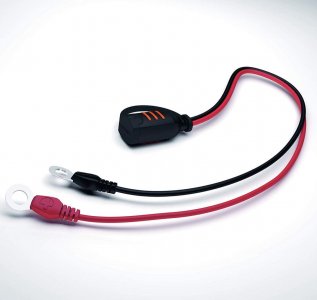
That is a CTEK. Just bolt the round hole connectors to the battery cables in the front of the car....should take about 10 minutes after you remove the spare tire.
 
OEM charger

Will that might be right but it seems not to be that easy. There is a pigtail that ties into the fuse panel for a quick connector to plug in for the charger under the glove box.

Cheers
nigel
 
Will that might be right but it seems not to be that easy. There is a pigtail that ties into the fuse panel for a quick connector to plug in for the charger under the glove box.

Cheers
nigel

Pics please...

Yes please! I'm also working out where to put the pigtail for my trickle charger. If there is a fuse box connection for this purpose, it would be good to know.
 
Charger

Thanks for the reply. I have the “Acura” Installation instructions for the charger but sadly I don’t know how to post pics. If I could figure that out I’d love to get you a copy. I’m almost sure more than us would like to install the “factory OEM” charger in our generation NSXs like us.

Cheers
nigel

Don't know if you have a Google account, but that is what I use for photos, since NSX Prime limits how many photos you can host on the site. You just need to make a new album in your Google Photos and set it to shared. Then just copy the photo link in your posts here using the insert picture button.
 
Instructions show a special connector around the glove box, the 1990-2005 NSX does not have such a connector.

You will have to patch in your own connector if you want to use this fashion of install...

It would be just easier to use the ring hooks attached to the front battery cables. The CTEK fits nicely in between the ALB and its guard.
 
The connection of this special connection is why I’m afraid I might short or something trying to wire around this connection to adapt it to the 1992 NSX system as it is designed for the new generation cars.

Cheers
nigel
 
It would be just easier to use the ring hooks attached to the front battery cables. The CTEK fits nicely in between the ALB and its guard.

This is probably the easiest way, with the eyelet connector from ctek. Not the fanciest but it works without issue.

FDB81091-E6F7-4027-A00D-3BE37076177D.jpeg
 
With NC1, there is a factory pre-wired connector inside the cabin behind the passenger side 'Under cover'.

The OEM conditioner comes with the 'Indicator harness' and one end would plug into this factory pre-wired connector (2pin).
The other end has panel mounted CTEK receptacle connector (with LED indicator, I think).

Similar to their aftermarket accessory cable product called 'Indicator Panel (1.5m, 3.3m)'.
You need to cut small square out of the Under cover to mount thia Indicator panel.

In order to finalise the electrical circuit, you will need to insert the 10A fuse (included in the OEM conditioner kit) at the specific position inside the subfuse box located just behind the same passenger Under cover.


So, from the functionality point of view and as many people mentioned above, it would be far easier to just get the ordinary CTEK conditioner and use the eyelet cable included in the kit directly at the battery or at the jump start terminal in the eng bay.
I installed eyelet cable at both locations on my NSX.


If you really-really want copying the NC1 method, I think you can do the followings.

If you can't understand what I mentioned or didn't bother reading to the end, you already made the choice.
Just go with the proven ordinary method.


Please double check the position of the connector and the fuse socket mentioned below.
It could be different depending on the year model and the country spec.

1. Locate the fuse box (panel) at the passenger footwell.

2. At the very top row, you will see 4 x 1pin 250 size terminals.
They are for the optional purpose so all or most of them should be empty.

3. Looking at the panel from left to right, they are Lighting SW, IG2, BAT and ACC.

4. You need to connect the battery conditioner to the +B BAT but unless you insert the appropriate fuse at the Main fuse box inside the eng bay (mentioned later), it won't be live.

5. You need to establish the connection between the 2pin end of the OEM indicator harness and the +B BAT terminal at the passenger fuse panel & nearby GND.

6. Create DIY adaptor loom if you don't want modifying the OEM indicator harness or just modify it.
The 1pin 250 size terminal is Sumitomo HD series non-WPC 250 1pin.

7. Mount the panel side of the OEM indicator harness somewhere at the passenger lower cover panel under the glove box.
It's plastic so should be able to cut it out in suitable size.

8. Insert the 10A fuse included in the OEM conditioner kit at the Main fuse box inside the eng bay.
Please check the position depending on the year model and the country spec.
On mine (94, JDM), it was next to the rear defogger relay.

9. Use multimeter to confirm that you can see battery voltage at the Indicator panel that you just installed.
Depending on the condition of your battery, the single LED at the panel may change the colour (sorry, I don't have access to the actual OEM indicator harness so can't confirm this).

10. Once you are happy with the reading of the multimeter, connect the conditioner.

11. If wired properly and the polarity at the correct orientation, the conditionor should start the diagnosis and conditioning process.

12. Don't forget to disconnect the battery conditionor before leaving the garage especially if you are running the cable under the passenger door.
I normally place caution plate on the steering wheel and the shift lever to remind me and also in case someone decides to move the car.


Good luck.

Kaz

 
Kaz...how is your tech knowledge of NC1 compared to NA1-2
 
Pics

Wanted to let you know I had my partner load the pics of the charger kit and instructions to the thread. You’ll have to click on the link and view or download the pics for the full poop on what I’ve been trying to do.
As you can see The Kaz installed instructions as well so hopefully this little task will be easy for myself and any others that may want to do it as I do.
I’m going to connect directly to the fuse block and see how that works as that is what Honda intended in the first place for the new generation cars.

Cheers
nigel
 
With NC1, there is a factory pre-wired connector inside the cabin behind the passenger side 'Under cover'.

The OEM conditioner comes with the 'Indicator harness' and one end would plug into this factory pre-wired connector (2pin).
The other end has panel mounted CTEK receptacle connector (with LED indicator, I think).

Similar to their aftermarket accessory cable product called 'Indicator Panel (1.5m, 3.3m)'.
You need to cut small square out of the Under cover to mount thia Indicator panel.

In order to finalise the electrical circuit, you will need to insert the 10A fuse (included in the OEM conditioner kit) at the specific position inside the subfuse box located just behind the same passenger Under cover.


So, from the functionality point of view and as many people mentioned above, it would be far easier to just get the ordinary CTEK conditioner and use the eyelet cable included in the kit directly at the battery or at the jump start terminal in the eng bay.
I installed eyelet cable at both locations on my NSX.


If you really-really want copying the NC1 method, I think you can do the followings.

If you can't understand what I mentioned or didn't bother reading to the end, you already made the choice.
Just go with the proven ordinary method.


Please double check the position of the connector and the fuse socket mentioned below.
It could be different depending on the year model and the country spec.

1. Locate the fuse box (panel) at the passenger footwell.

2. At the very top row, you will see 4 x 1pin 250 size terminals.
They are for the optional purpose so all or most of them should be empty.

3. Looking at the panel from left to right, they are Lighting SW, IG2, BAT and ACC.

4. You need to connect the battery conditioner to the +B BAT but unless you insert the appropriate fuse at the Main fuse box inside the eng bay (mentioned later), it won't be live.

5. You need to establish the connection between the 2pin end of the OEM indicator harness and the +B BAT terminal at the passenger fuse panel & nearby GND.

6. Create DIY adaptor loom if you don't want modifying the OEM indicator harness or just modify it.
The 1pin 250 size terminal is Sumitomo HD series non-WPC 250 1pin.

7. Mount the panel side of the OEM indicator harness somewhere at the passenger lower cover panel under the glove box.
It's plastic so should be able to cut it out in suitable size.

8. Insert the 10A fuse included in the OEM conditioner kit at the Main fuse box inside the eng bay.
Please check the position depending on the year model and the country spec.
On mine (94, JDM), it was next to the rear defogger relay.

9. Use multimeter to confirm that you can see battery voltage at the Indicator panel that you just installed.
Depending on the condition of your battery, the single LED at the panel may change the colour (sorry, I don't have access to the actual OEM indicator harness so can't confirm this).

10. Once you are happy with the reading of the multimeter, connect the conditioner.

11. If wired properly and the polarity at the correct orientation, the conditionor should start the diagnosis and conditioning process.

12. Don't forget to disconnect the battery conditionor before leaving the garage especially if you are running the cable under the passenger door.
I normally place caution plate on the steering wheel and the shift lever to remind me and also in case someone decides to move the car.


Good luck.

Kaz


That is a lot of work. I’m pretty OCD about stuff like this and I’d just go with some ring terminals.
 
>1. Locate the fuse box (panel) at the passenger footwell.

RHD.

On LHD the charger is going to hang outside the driver door. Which is better because it is would harder to drive off with it in place...

If this were my motor pool, I would put the charger wire through the steering wheel because impossible to drive off with it in place

Regardless, I wouldn't want a wire putting indentations in my weather stripping. Seems silly.
 
Wire

Drew, I agree with you about the wire leaving a mark in the rubber door trim so I’m going to come up with a way to feed it out somewhere else.
We always run the charger wire through the steering wheel of the golf cart at the airport we use to tow aircraft so the dumb asses
don’t drive off with it connected to the charger and it still happens.

Cheers
nigel
 
>1. Locate the fuse box (panel) at the passenger footwell.

RHD.

On LHD the charger is going to hang outside the driver door. Which is better because it is would harder to drive off with it in place...

If this were my motor pool, I would put the charger wire through the steering wheel because impossible to drive off with it in place

Regardless, I wouldn't want a wire putting indentations in my weather stripping. Seems silly.

Drew, I agree with you about the wire leaving a mark in the rubber door trim so I’m going to come up with a way to feed it out somewhere else.
We always run the charger wire through the steering wheel of the golf cart at the airport we use to tow aircraft so the dumb asses
don’t drive off with it connected to the charger and it still happens.

Cheers
nigel

I'm going to attempt the Kaz OEM install. Instead of running the wire through the door rubber (and causing an indentation), I'm going to use the old cruise control actuator hole (with grommet) in the firewall and run to the dash fuse box BAT+ way. Or, I might run it with the 2000+ ABS harness I'm building. I like the idea of using the OEM fused circuit, even if it means $10 in components and a more convoluted wiring run. I'm still trying to figure out where to put the connector under the lower front bumper where it will be easy to access, but not come loose. I'm thinking in the upper left corner (facing the front of the car) of the center air duct. I was thinking of getting one of those "REMOVE BERFORE FLIGHT" red aircraft tags and attaching it to the steering wheel with a velcro loop to remind me to unplug the tender before driving. :)

According to my 1991 factory workshop manual, the fuse for the BAT+ circuit (C912) is at position #17 in the engine bay fuse box.
 
Trickle charger

That sounds like the plan I’m following. When Kaz say things I try and listen.
You can get little key chain “Remove Before Flight” flags that are about 5 in. long so it won’t look so gaudy and I already have nicked one from one of our planes and using it myself.

Cheers
nigel
 
>Kaz
>So, from the functionality point of view and as many people mentioned above, it would be far easier to just get the ordinary CTEK conditioner and use the eyelet cable included in the kit directly at the battery or at the jump start terminal in the eng bay.
>I installed eyelet cable at both locations on my NSX.

>Honcho
>I'm going to attempt the Kaz OEM install.

>Nigel
>That sounds like the plan I’m following. ... When Kaz say things I try and listen.


???


The CTEK pays close attention to the battery. I would presume adding in extra complexity isn't helpful to CTEK's mission...

Someone in Honda lost their mind when making the CTEK hang out the door, let alone the passenger side door, and I seriously doubt history will be kind to this engineering decision.
 
Last edited:
>Kaz
>So, from the functionality point of view and as many people mentioned above, it would be far easier to just get the ordinary CTEK conditioner and use the eyelet cable included in the kit directly at the battery or at the jump start terminal in the eng bay.
>I installed eyelet cable at both locations on my NSX.

>Honcho
>I'm going to attempt the Kaz OEM install. I'm going to attempt the Kaz OEM install...

>Nigel
>That sounds like the plan I’m following. ... When Kaz say things I try and listen.


???


The CTEK pays close attention to the battery. I would presume adding in extra complexity isn't helpful to CTEK's mission...

Someone in Honda lost their mind when making the CTEK hang out the door, let alone the passenger side door, and I seriously doubt history will be kind to this engineering decision.

I am sure Kaz also installed a 10A fuse on his BAT+ wire. The OEM run goes through a factory wire and factory fuse block. However, I'm sure the eye loop on terminals with aftermarket in-line fuse will work just fine. I'm just an OEM crazy I suppose. If Honda set it up, why not use it? :D
 
Back
Top