• Protip: Profile posts are public! Use Conversations to message other members privately. Everyone can see the content of a profile post.

High Compression 3.2L Engine Build

Oh, my DLC-coated wrist pins are still going after nine years at 550 WHP and 9k RPMs in the OEM rods.

At the time, I had considered other items for DLC coating like you (cams, rocker pads), but decided not to as no one else back then had done much in street applications with these coatings.
 
Thanks for the helpful insights @Mac Attack! Nice to know there's a little more flexibility with material removal on the big ends than I thought.

I went back and forth with what I want to do with the wrist pins quite a bit but ultimately decided to stick to the original engineering and interference fit them, after all Honda used this approach up past 8500rpm in some of the Type R 4 cylinder engines, but with the DLC coating after talking to Calico about it. It also keeps me from having to guess at oil clearances and will make the engine a little more resistant to damage from pinging if I end up with a batch of bad gas with the high C/R I'm running, as that tends to beat the hell out of the small ends if they are floating since its such a small load bearing surface compared to the wrist pin bores in the pistons and rod bearings.
 
Last edited:
Yeah, you should be fine looking at your pics.

Interesting idea about the interference fit. I overlooked that possibility when doing mine although I did consider going to a larger diameter wrist pin for the reason you noted. Wiseco made two diameters you could have their pistons spec'd for but ultimately I just kept their standard diameter.

I understand what you're going through! You're doing great!
 
Was that the 23mm option for the C32 rods? I always found it odd that Honda went with a larger wrist pin for only a marginal change in piston weight and power output but they must have had some reason to justify it.

I remember seeing @BATMANs press fit his pistons in his build thread so that started me down that path. The main worry here is doing it without overheating the rods. Calico said that with the DLC pins the rods don't even have to be heated up as long as the pin bores are perfectly smooth, which they are thanks to the 1000 grit flex honing, they can just be pressed right in so I might try to make some sort of a fixture to do that without damaging the piston, then just heat the rod to 250 degrees or so in the oven to loosen it up a bit and press it in.

I got my block back from NB Finishing in Illinois with the main saddles built up with electroplating so now I'm shopping around for a shop to do the final line bore, deck surface, and cylinder honing. Mountune in CA seemed like a solid choice at first but they don't bother to answer the phone so I don't think I want to deal with that, so I might take it to a localish place that I've had recommended to me a few times and save the trouble and risk of shipping the block cross country again. So far, I haven't found any correlation between fame and quality of machine work so might as well go small and local to keep an eye on things.

The electroplating process involved some fairly caustic chemicals so this isn't something I'd want to do on a block that's already had final machining done. Lots of nasty corrosion to remove as well as some surface rust spots in the cylinder bores. This was not an engine shop though so I can't really blame them, its a shop that does repairs on specialized printing press components that did this job for me as an experiment. The nice thing about this is I can have the block vapor blasted without worrying too much since it still needs to go for final machining.

Also that's a brand new 6 speed transmission case.

IMG_5587.jpg

IMG_5603.jpg

IMG_5675.jpg
 
Last edited:
The electroplating is very interesting. Cleaning will be a pain but can be done. Besides having it hot tanked again at the local machine shop after they're done with the final machining, I recommend running a bunch of long nylon wire brushes with WD40 through all the oil galleys, and then I used my steam cleaner to blast everything with Dawn, followed by a bunch more WD40 and my air compressor running a long time to force everything out....

The standard Wiseco wrist pin for their NSX pistons is 22mm outer diameter with a 4.1mm thickness. As mentioned earlier, I debated whether or not to upgrade to their 22mm OD pin with a 5.7mm thickness. There is also a material upgrade between them. As I'd already been through multiple iterations with my build at this point due to others mistakes and then my own lack of knowledge/planning, I just decided to stick with what I had and get the standard pins DLC coated. I called Wiseco tech hotline to make sure what I had would work with my desired goals and they said it should (but near the limit). As I was near that limit on other things (like the OEM rods and main caps), I just decided to get 'er done and not mess with new pins and then rebalancing everything.

Honda probably went with 23mm diameter pins for the C32 rods and then reduced the wall thickness to keep the weight less than or equal to the smaller pin but marginally stronger. Their engineers seem to be nutty like that.
 
Yup I have a set of various sized nylon brushes to use for cleaning. I'm planning on putting the engine block in my guest shower which has one of those hand held sprayer things and using large quantities of soap and hot water for the final cleaning, followed by blowing dry with the air compressor and WD40 on the cylinder bores until assembly time.

The 7 rods are finally ready to go to the machine shop for big end resizing. Swapping the rod bolts for the ARP bolts threw the weights off a little bit and resizing might tweak them a bit too so the plan is to touch the weights up to hit my target 0.2g spread once I get them back, set up my rod bearing clearances, then send them off for WPC along with the rod bearings and a bunch of 6spd transmission internals and maybe the crankshaft. Then the rotating assembly goes to be balanced and the bottom end should hopefully be ready to assemble after that.

After installing the ARP bolts, the rods lost about 4g each compared to the stock bolts, putting them all right around 477g which is over 100g lighter than the Carrillo steel rods I was planning on running before, for a total savings of more than 600g. The factory 90mm 10.2:1cr piston, pin, and ring pack weighs about 533g, the Wiseco 93mm 10.2:1cr setup was 538g, and the Toda 93mm 12.1:1cr piston is 511g, resulting in a total weight savings of 162g compared to the Wiseco pistons and 130g compared to the factory 3.0L pistons.

IMG_5713.jpg

I just used my vice to install the new bolts in the rods. That's a copper crush washer there between the big socket and the rod to prevent the socket from denting the titanium rod, then its a little aluminum bit between the end of the bolt and the vice to prevent damage there as well. I used a little bit of ARP moly lube on the knurled part of the bolts and they slid in pretty easily.

IMG_5711.jpg

I also cleaned up my VTEC solenoids which were looking pretty crusty. I used hot glue to block off the oil pathways then blasted them with glass bead to remove the rust before painting the steel cap with some high temp gloss black paint.

IMG_5642.jpg

IMG_5645.jpg
 
So fun development, the plating on the block main tunnel is not adhered well at all, some of it flaked off at the slightest provocation, so now I'm trying to chemically strip off the remaining plating so I can explore other options. Concentrated nitric acid seems like it might be viable, it should attack the copper and form a hard oxide with aluminum.

Aaaaand then things got a little out of hand with the rods. I kept coming across rods and buying them.

IMG_5937.jpg


So now I have 3 full sets of good rods, and one full set of junk rods. I've decided the first set of rods I matched up is basically a test run to make sure my machinist can do a good job on the big ends (its hard to find someone willing to touch titanium rods) and make sure the WPC treatment doesn't strip the plating off the rod caps. They [WPC] claim plated parts are fine but I want to be sure. The first set will just be spares on my parts shelf, the 2nd set will go in this engine, the 3rd set will be up for sale, and the junk rods will end up on @RYU's wall.

The plating on the caps is something I haven't seen mentioned before. I think its to keep the rods from galling against the crankshaft as it turns, I'm not sure what kind of plating it is but its extremely hard and seems to hold up well for the most part as long as the bearings are intact.

Here's something interesting I found. This particular rod had a lot of oil burned onto the big end when I got it, so after pushing the bolts out I tossed it in the ultrasonic cleaner for a few hours to clean it up. On inspection after, I found the cap so warped from heat that its easily visible. I guess the bearing failed and the ID got really hot then shrank down and pulled the sides in.

IMG_5987.jpg


I also started experimenting with the process of installing press fit wrist pins using junk rods, OEM pistons, and OEM pins since I have a bunch of these things laying around now. The process is simple: create enough of a temperature differential between the rod and pin that the pin just slides in. Thing is, virtually nobody does this on TI rods, so there's almost no info online about doing this since it's all meant for steel rods which expand much more than TI when heated. A lot of shops don't even have rod heaters anymore, and I don't trust anyone not to overheat the hell out the rods on top of that.

I started by looking up the working temperature range for titanium - basically figuring out how hot I can go before damaging the rods. Pure titanium is good up to about 575F, whereas alloys tend to be in the 600-800F range. The NSX rods are supposedly a proprietary alloy, however pretty much all modern titanium connecting rods are 6AL4V titanium so I seriously doubt the C30 rods are too far off from that, and it has a safe service temp range up to 660F. For extreme safety though I would like to stay well under 575 if possible.

Then I looked at thermal expansion coefficients of titanium and took a conservative guess at how much temp change is needed to go from 0.0011" interference to about 0.0010" clearance with the wrist pins. I started by zeroing the bore gauge in the rod at room temp then putting it in the oven at 450F until it came up to temp. I measured a change of about 0.0018" so figured I'd try to get the pin in even though it was only 0.0007" clearance or so.

It worked great for the first 1/4" then seized up. That's how this goes even in the best case, you have maybe 1 second to get the pin in before the hot rod cools and the cool pin heats up and seizes in the bore, so I needed more heat. I pressed the pin out and tried again at 500F and the pin in a glass of ice water and it worked! I measured a clearance of about 0.0010" between the cold pin and the hot rod which was just barely enough to get the pin fully seated before it seized. I'm going to practice this a bit with the the junk rods and old pistons to see if I can do it consistently or if the process needs to be adjusted a bit, because any mistakes at final assembly risk ruining a piston or DLC wrist pin. Dry ice on the pins is something I want to try and I could also increase the heat to 525F or so if needed. I'm also going to build a little jig to help perfectly center the pins in the rod so everything fits together perfectly. I think the final assembly process will be a nerve wracking 5 minutes with the rods all in the oven and the pins in a bucket of dry ice. I could probably call around and find someone to do this for me, but if I can make this work using the oven I'll have a lot more peace of mind knowing that temp was tightly controlled and that I don't need to worry about anything.

IMG_6017.jpg
 
Last edited:
Sorry about the plating. Why can't you have it aluminum welded and then machine and line bore?

Also, with all of those rods, and especially considering the deformed big end cap, you should measure each rod for bend and twist. You want to be sure. My rods were machined with the latest Rottler system that bored both big and small ends at the same time.

FYI - Long story, but I'm 99% sure our rods are SP-700 alloy (basically added iron and molybdenum).

I think we've talked about peening, but the rod big end and cap thrust faces are nitrided. That's another reason why I didn't want to do any conventional peening after my rod machining. I wouldn't bother with WPC on your Ti rods. WPC won't hurt your hard coatings because it doesn't do much other than impart a small compressive stress just on the first few microns of material. For reducing friction, sure I've used WPC. But you don't need that for rods. The problem is that Motoiq/Kojima really hype it to the fast and furious crowd and then its effects get exaggerated. Is Kojima/Moto sponsored by WPC? Hmmm.

Honestly, my $0.02 after going through all this during my own rebuild ten years ago, is that I probably should have gone aftermarket rods. After spending all the time and money reconditioning my OEM Ti rods, the fact is they will most likely fail by fatigue at some point. My rods now have about 135k miles on them. 75k miles have been under my ownership for the past 20 years and of those, 65k miles were as a daily driver and the last 10k miles have been very heavily stressed.
 
I always appreciate your thoughtful responses @Mac Attack.

Welding the mains is kind of a last resort, it would impart a lot of residual stress into the block and potentially require the entire block to be machined again so is something I'd like to avoid. Boring the main tunnel oversize by a few thou and using precision shim stock under the bearing shells is seeming like the least invasive option with this block, there should be no real downsides with that approach as long as adequate bearing crush is maintained. It's definitely not a conventional method but used to be common a few decades before I was born.

To clarify, I'm not trying to use those warped rods, any rods with signs of damage or indications of a questionable past went into the junk pile, it just so happened that I ended up with exactly 6 junk rods. The only thing I’m using those for is practicing installing the interference fit wrist pins. I’ve done a few more and so far it’s seeming like putting the pins in the freezer and heating the rods to 500F in the oven is the magic number to get the pins in smoothly.

In my testing, I found that shot peening strips away the surface treatment on the cap thrust faces so is a no go. As far as I can tell, the surface treatment is only on the thrust faces of the caps, as the caps are wider than the big ends so they handle all of the thrust forces. I'm still on the fence about WPC, I don't expect it to work miracles but it seems to have some solid benefits as far as resisting cracking and it's not very expensive for rods. The MotoIQ articles/videos about it definitely seem like paid promotions lol.

If I had known what sort of rabbit hole these rods would turn into I probably would have just stuck with my Carrillo steel rods, but I'm enjoying the process so might as well see it through now that I have them. To take it a step further, I'm thinking I might switch from the standard 2.24" wrist pins to a longer 2.5" pin since I no longer have the circlips to keep the pin centered in the piston.

Very interesting info about SP700, it seems to have better fatigue strength than 6AL4V and not really any downsides so I wonder why it's not more popular.
I hear you on avoiding any more machining of the block. When I was working with King on custom bearings for my application, I was also concerned about the right crush. Dr. D typically specifies slightly higher crush for his applications than OEM in order to get a tighter press-fit AND to aid heat transfer. The OEM aluminum-silicon bearings are more sensitive to high oil temps than aftermarket (I researched this a long time ago and would have to look for specific numbers), and my concern with shimming them would be reduced heat transfer. Probably not a real issue unless you're endurance racing and limited with oil cooler capacity, but something to be aware of. When assembling the shims and bearings, definitely don't put any oil or lube on the non-bearing facing surfaces so you can maintain that conductive heat transfer. Of course, too much bearing crush will result in side-pinched bearing distortion so its a balancing act (as with everything).

I had assumed you weren't going to use the defective rods, but just wanted to point out for others that if re-using rods or buying them used, its a good thing to measure bend and twist. I skipped measuring bend because I didn't have a good way to check, but you can easily check twist.

As far as peening, that is exactly what I was getting at. Your own peening process had intensity (you were even measuring with Almen strips, right) such that the nitride coating was being stripped away. In the FAQ on the WPC site, they say its OK to apply over DLC and other nitride coatings applied via PVD or CVD (consistent with what they personally told you). Therefore, how is it going to impart sufficient surface compressive stress to enhance strength and fatigue life? The WPC process has its place for some applications, but I see zero benefit for our rods. Again, my $0.02!

Since I never considered a pressed wrist pin and therefore didn't think about the length, I'm curious what your reasoning is for a longer wrist pin please?
 
I've been researching potentially using copper shim stock to help with heat transfer, but I would need to be sure of what the alloy was to ensure it doesn't squish out over time - ideally I'd use something harder than the aluminum of the block. Brass is another option as well, that should transfer heat significantly better than steel but still not as good as aluminum or copper.

My own peening process was far higher in intensity than is considered ideal so I wouldn't be surprised if the surface treatment held up once it was reduced to a reasonable level. That said, after reading more research papers on shot peening 6AL4V and similar alloys, its seeming to be less useful than I had first expected so I'll probably just polish the rods in the areas where I've removed material and call it good.

My thinking on the longer wrist pins is that the lightweight forged Toda pistons have smaller pin bosses and are designed with the intent that the wrist pin will be held in place within the piston by the circlips. I'm not using the circlips since the wrist pin will be held by the rod, but as the rod moves around a bit while the engine is running (in theory it shouldn't move much) the load bearing surface would be reduced on one side of the piston as the rod moves away from it. That said, this is probably overthinking it, as running pistons designed for full floating pins on fixed pin rods is pretty common and I've never heard of anyone using a longer pin to do it. But on the other hand, longer pins aren't that expensive and would add maybe 10-12 grams to each piston assembly so may be worth it for peace of mind.
 
I ended up buying another core block from @acuhon and starting over. I talked to several machinists and what it boiled down to was the old block was too far gone, and that the best use for it is as the basis for a stroker engine that uses larger cylinder bores and main bearings. I'm not sure if that will be my project or if someone else will get a screaming deal on a core block for a stroker that already has sleeves in it. With all these C30 parts I've got though, anything is possible.

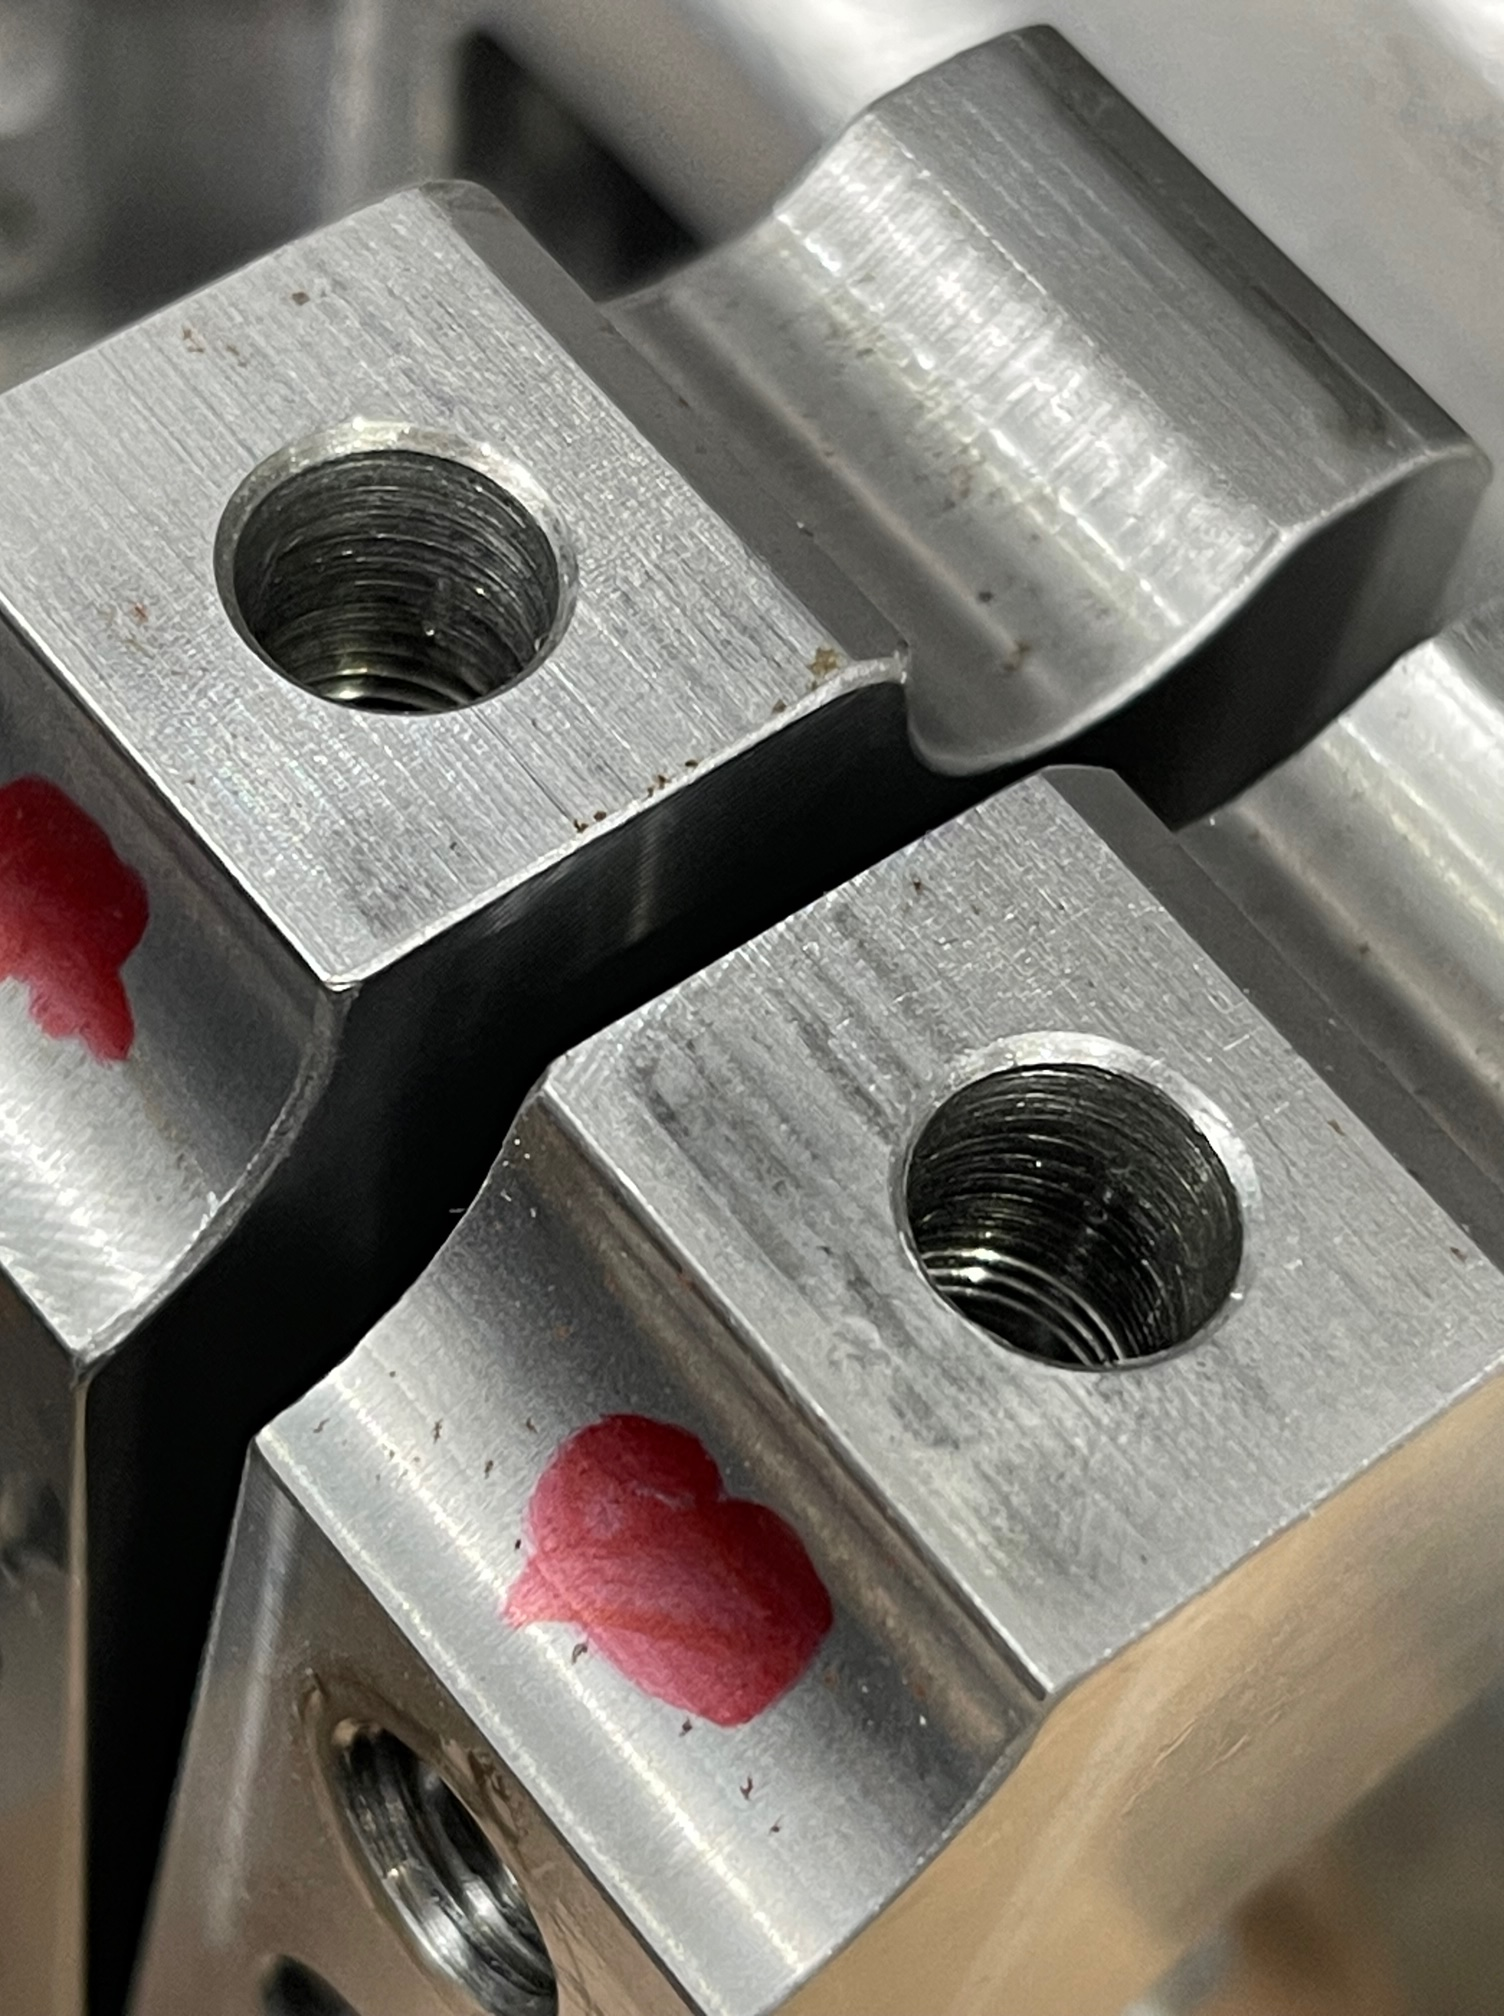
Unfortunately, I don't really have any recourse for that old block, as I'm not sure if it was messed up before it ended up at the shop or if the machine shop screwed up the line hone operation. But either way, I will never send any work to Darton East/Howards Hotrods again, I waited over a year to have sleeves installed and I got back a very, very expensive paperweight. One of the bores was damaged when I got it back the first time, and then when I got it back the 2nd time a corner of the block was smashed in and the packaging was not damaged, meaning it happened in their shop.

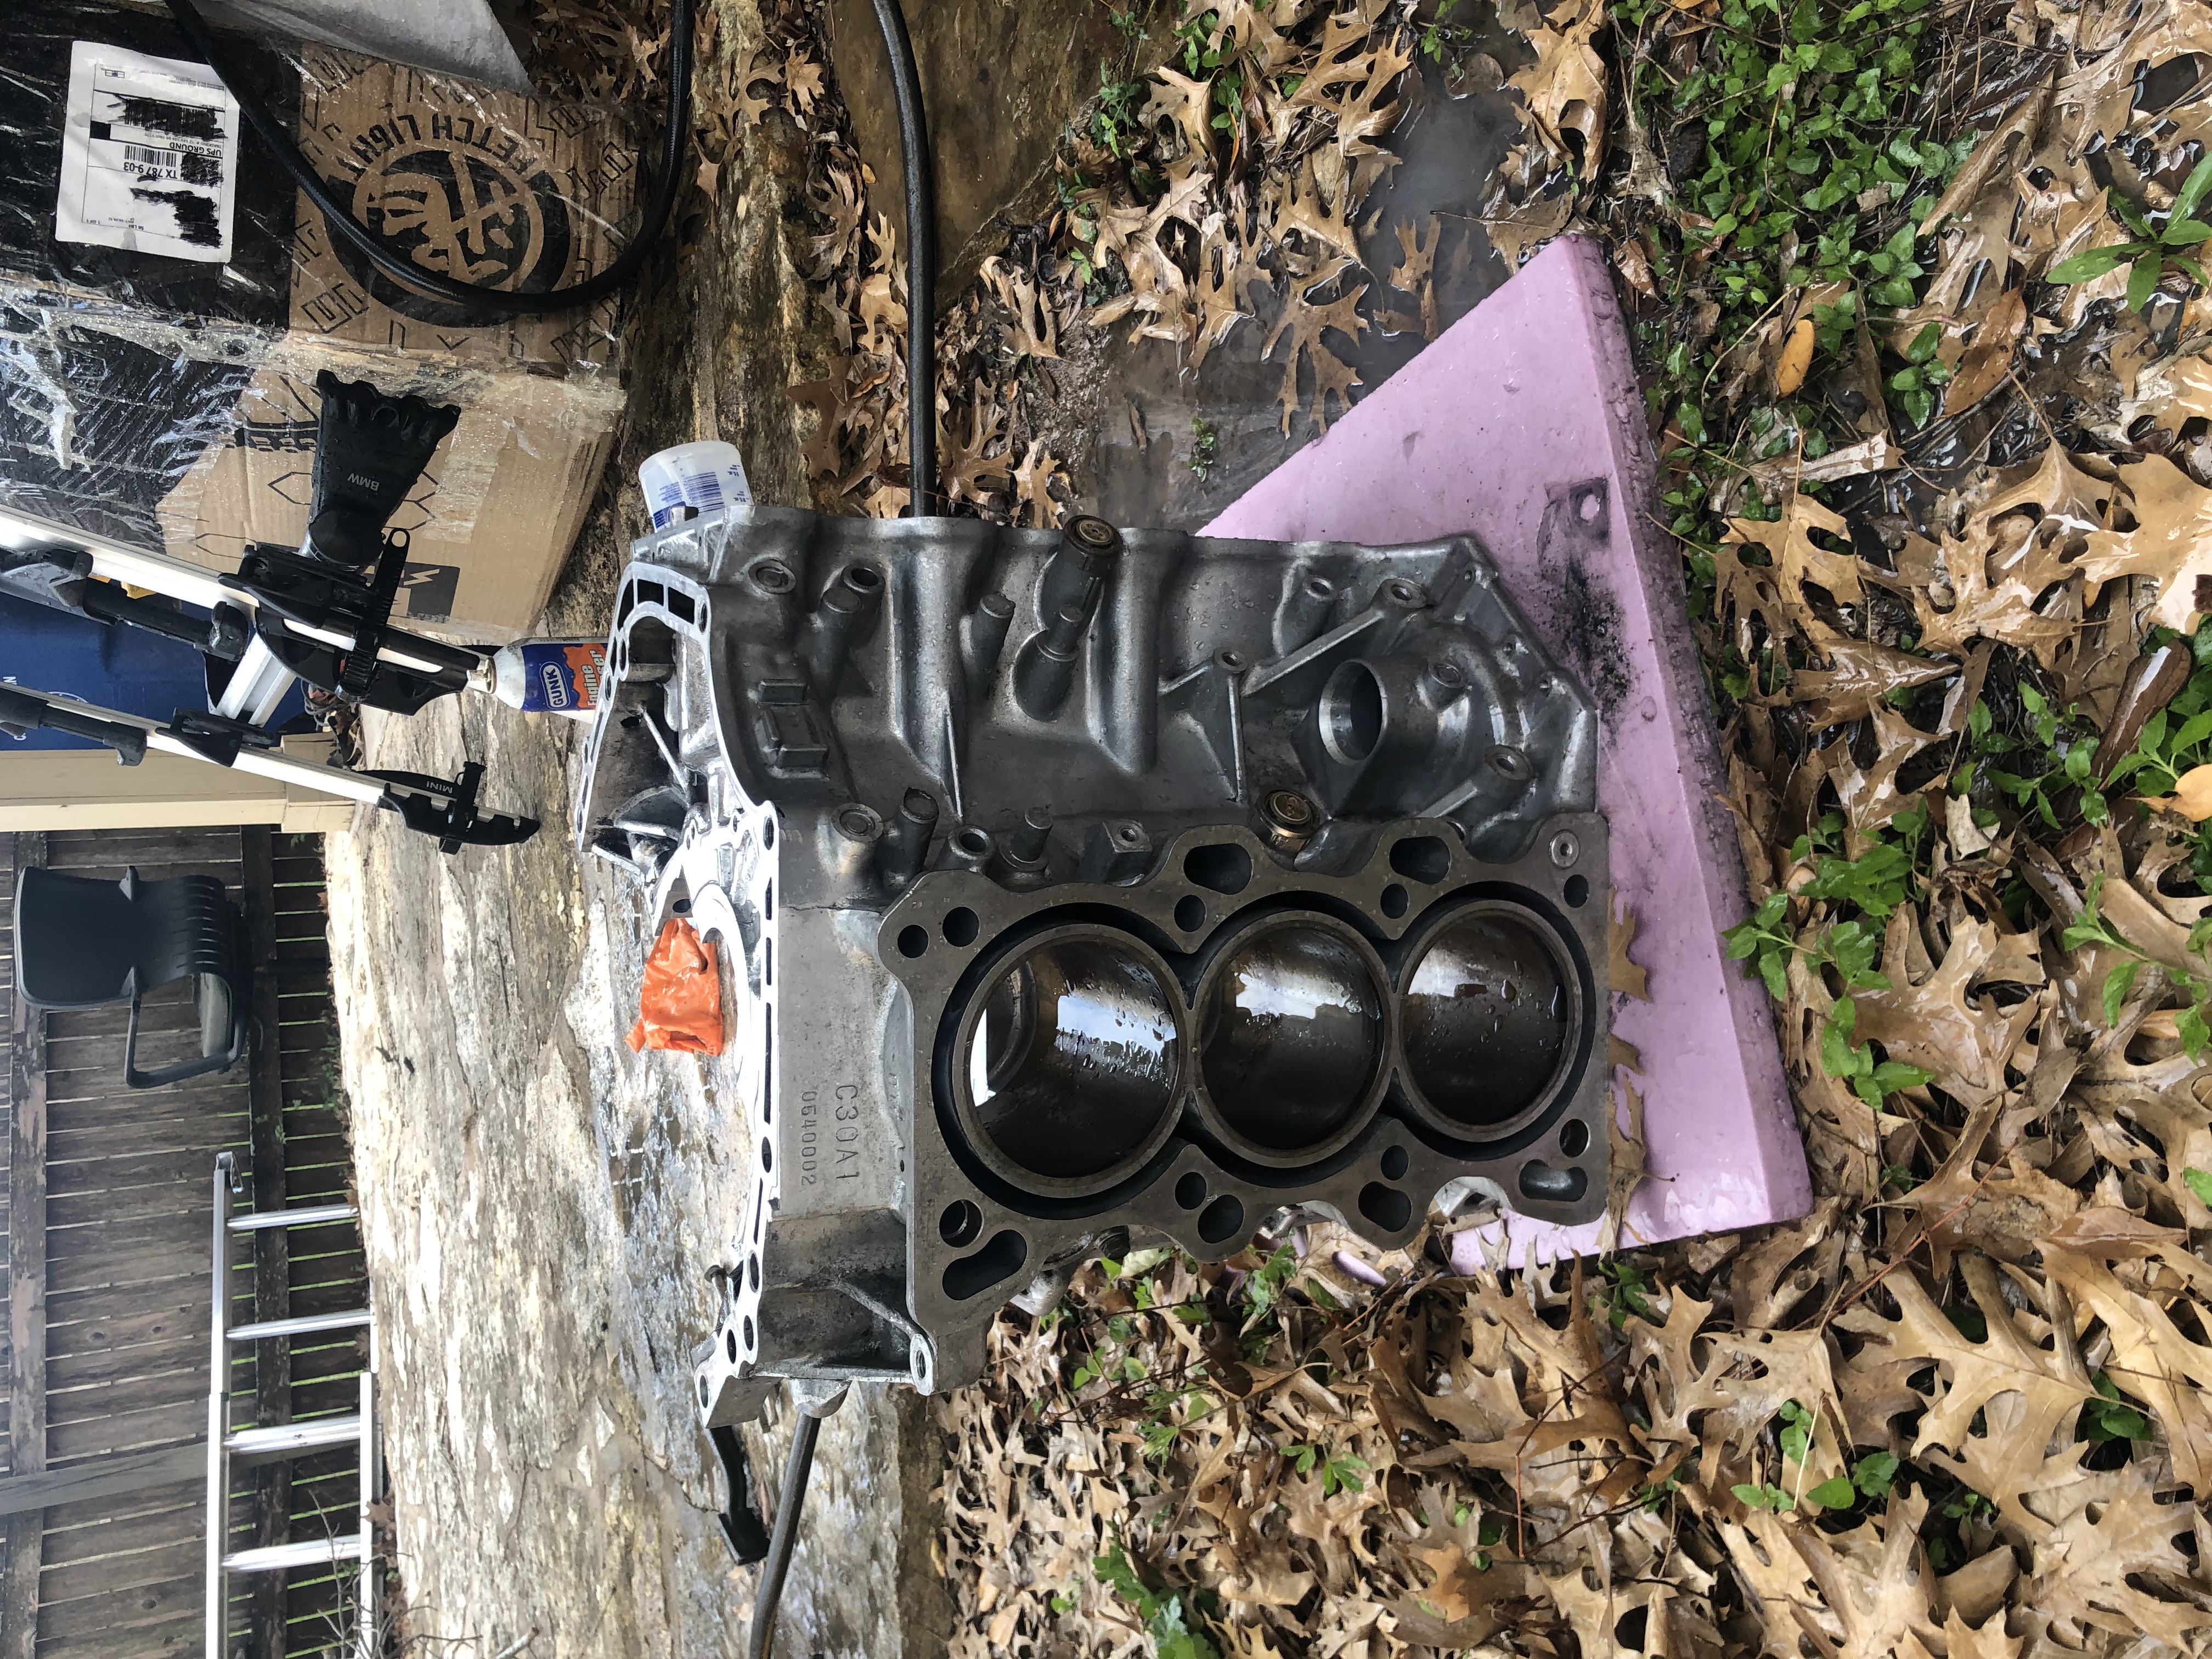
The new core is in MUCH better shape than the other one, the mains are all true to within 0.0005" which is great for used parts, the threads are all in good shape too. The other one had some stripped threads and poorly done thread repairs. Here it is in my back yard for cleaning, after that I shipped it to Mountune in California to have the main tunnel rebored with billet main caps, then from there its going to Benson for sleeves and final bore/hone.

IMG_6538.jpg


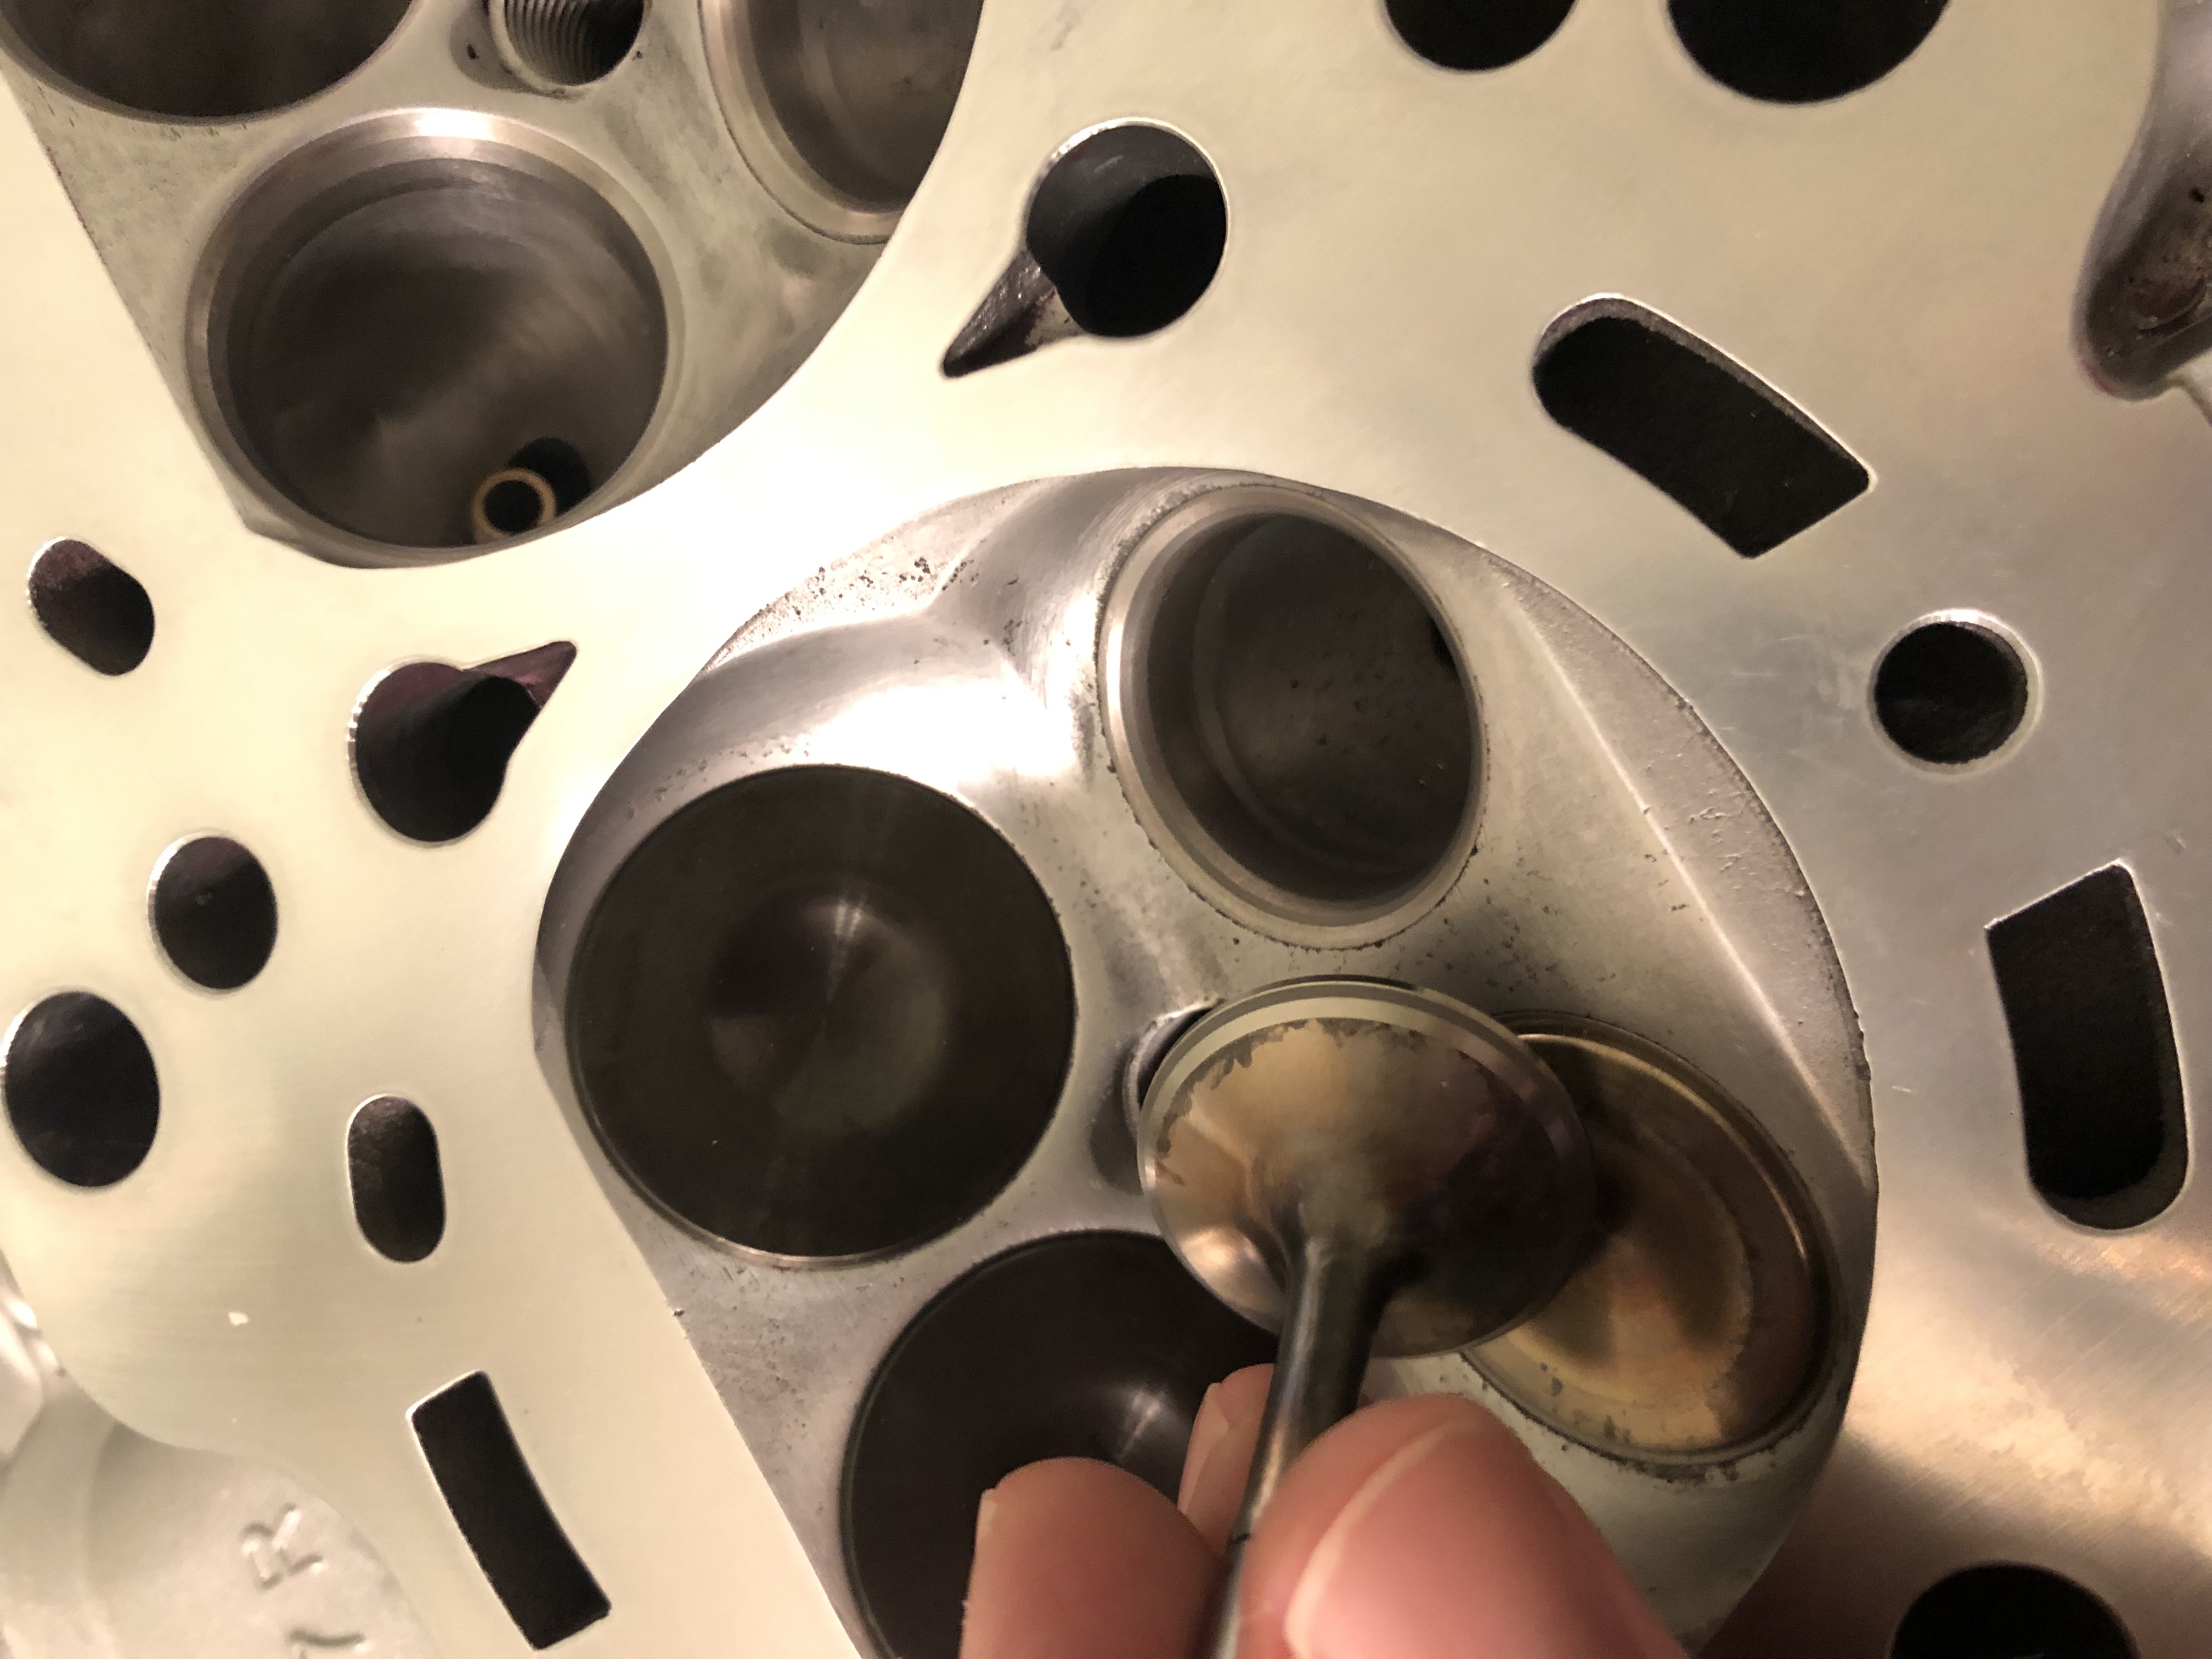
I got the Endyn heads back from the machinist as well. The valves and seats were in great shape so he didn't do a full valve job, instead he touched up the 45 degree angle in the seats (maintains the angles used in the valve job by Endyn) and cut the valves and everything sealed up perfectly, then surfaced the heads on a proper fly cutter instead of the belt sander type surface job these heads had when I got them.

IMG_6146.jpg


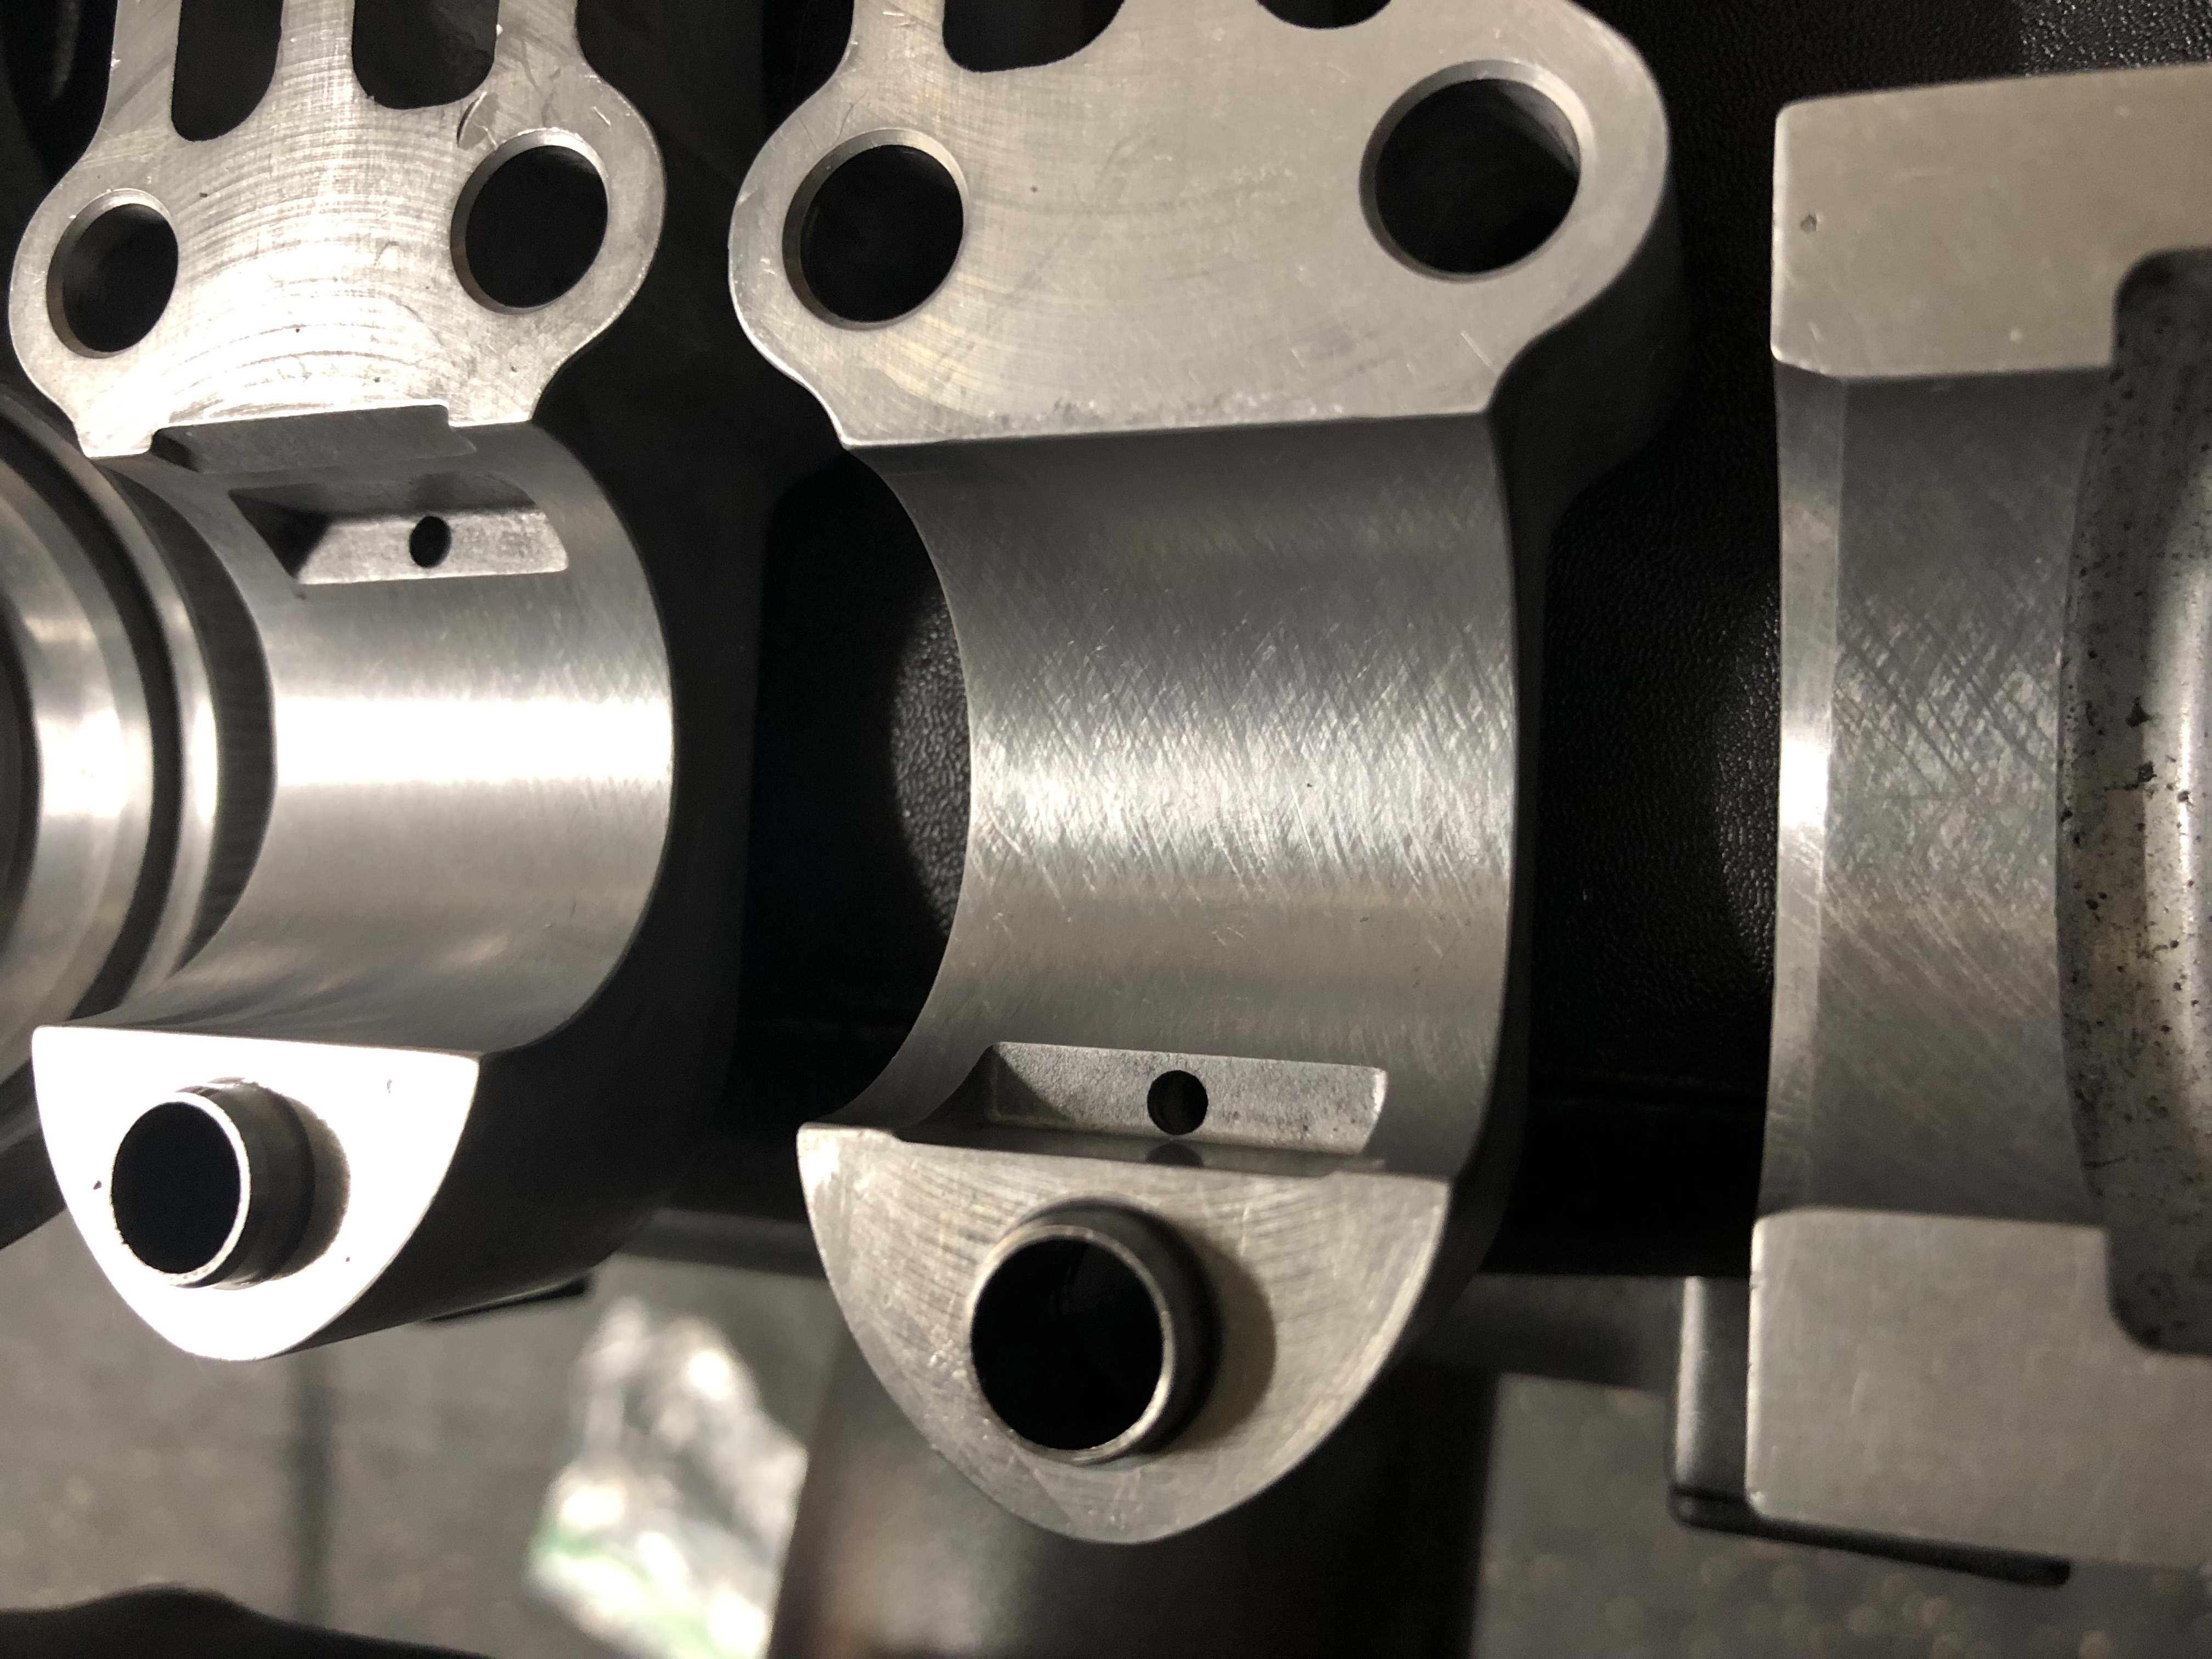
NSX heads (and other Hondas in general) tend to score up the cam caps and even wipe them out in the worst case, so I bolted the cam cap assemblies on and lightly honed the cam tunnels using an 800 grit flex hone (dingleberry hone) to add some light crosshatching to improve oil retention and make sure all of the edges are nicely deburred around the cams.

IMG_6133.jpg


IMG_6134.jpg


Oil clearances changed by maybe 0.0002" from before and after the honing process, showing that this is more of a surface finishing operation rather than really removing any material, 0.0030" is still at the low end of the new spec.

IMG_6131.jpg


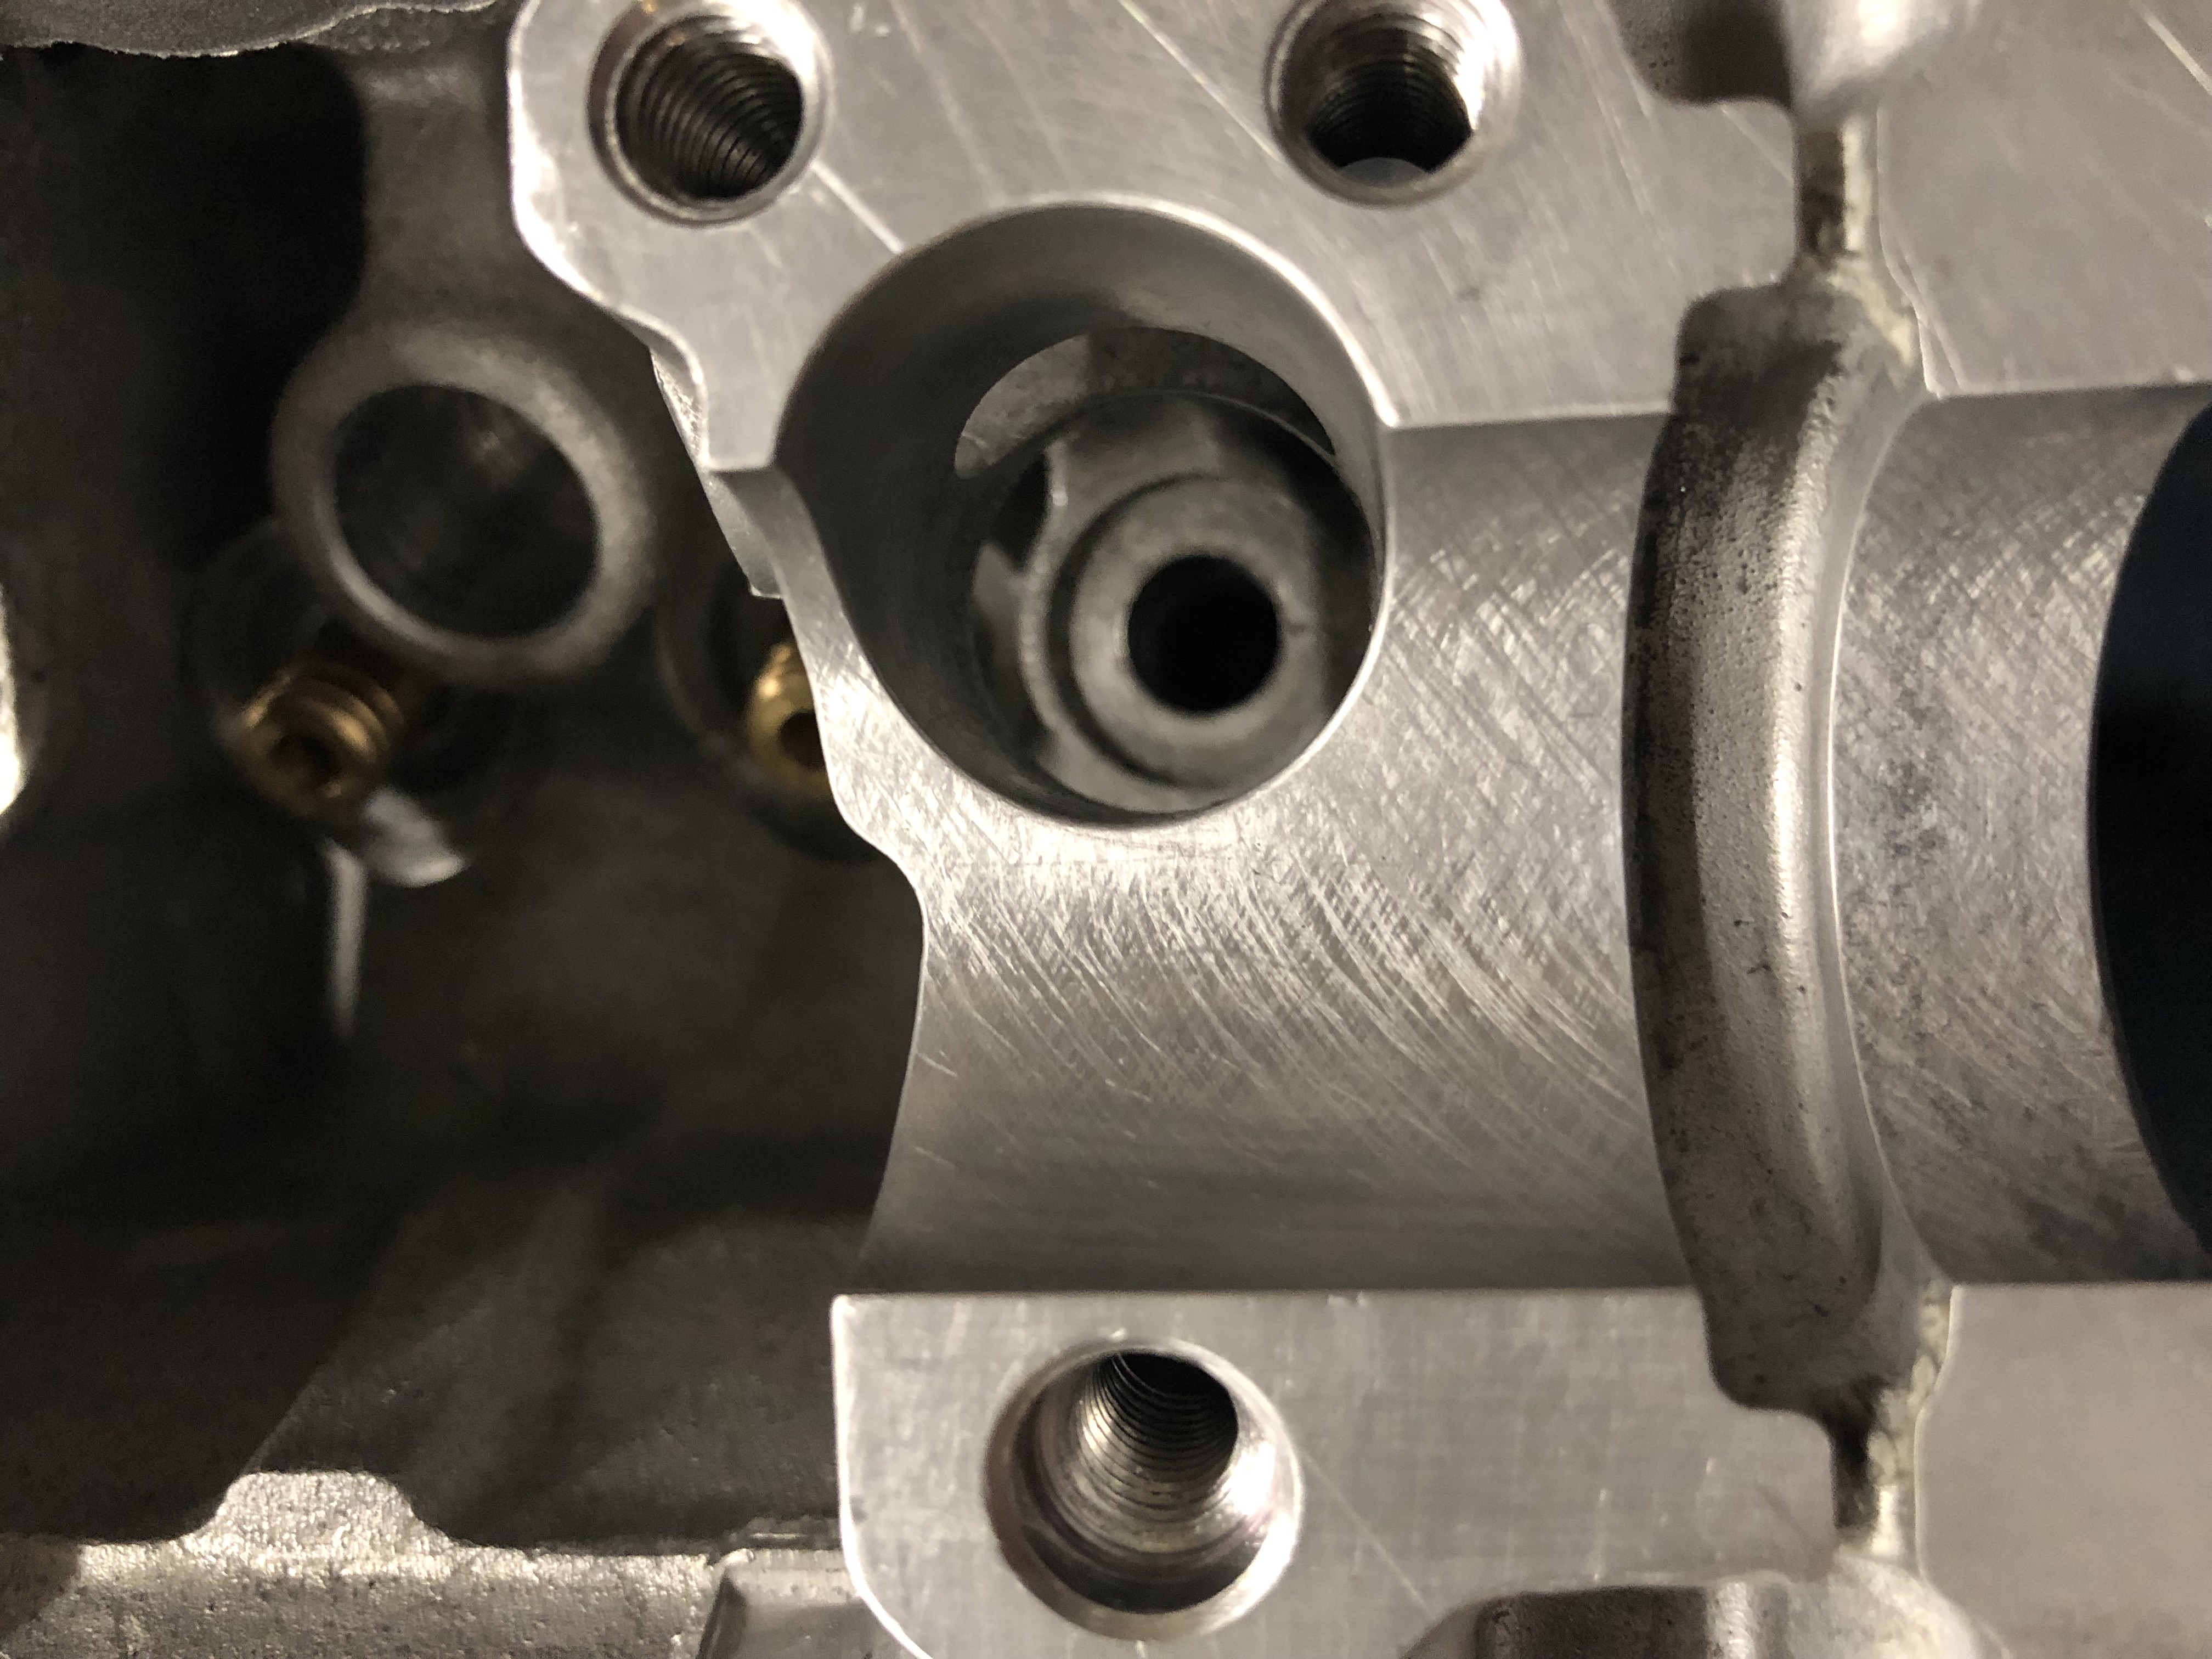
I also deburred all of the holes in the head surfaces. This is by no means required but those sharp edges tend to catch on whatever you use to wipe the heads down so this prevents that and makes clean assembly easier. Theres some small scuffs and what not on the head surface but those cannot even be felt with a fingernail, aluminum heads are very soft to the point that even cardboard will visibly mar them.

IMG_6773.jpg


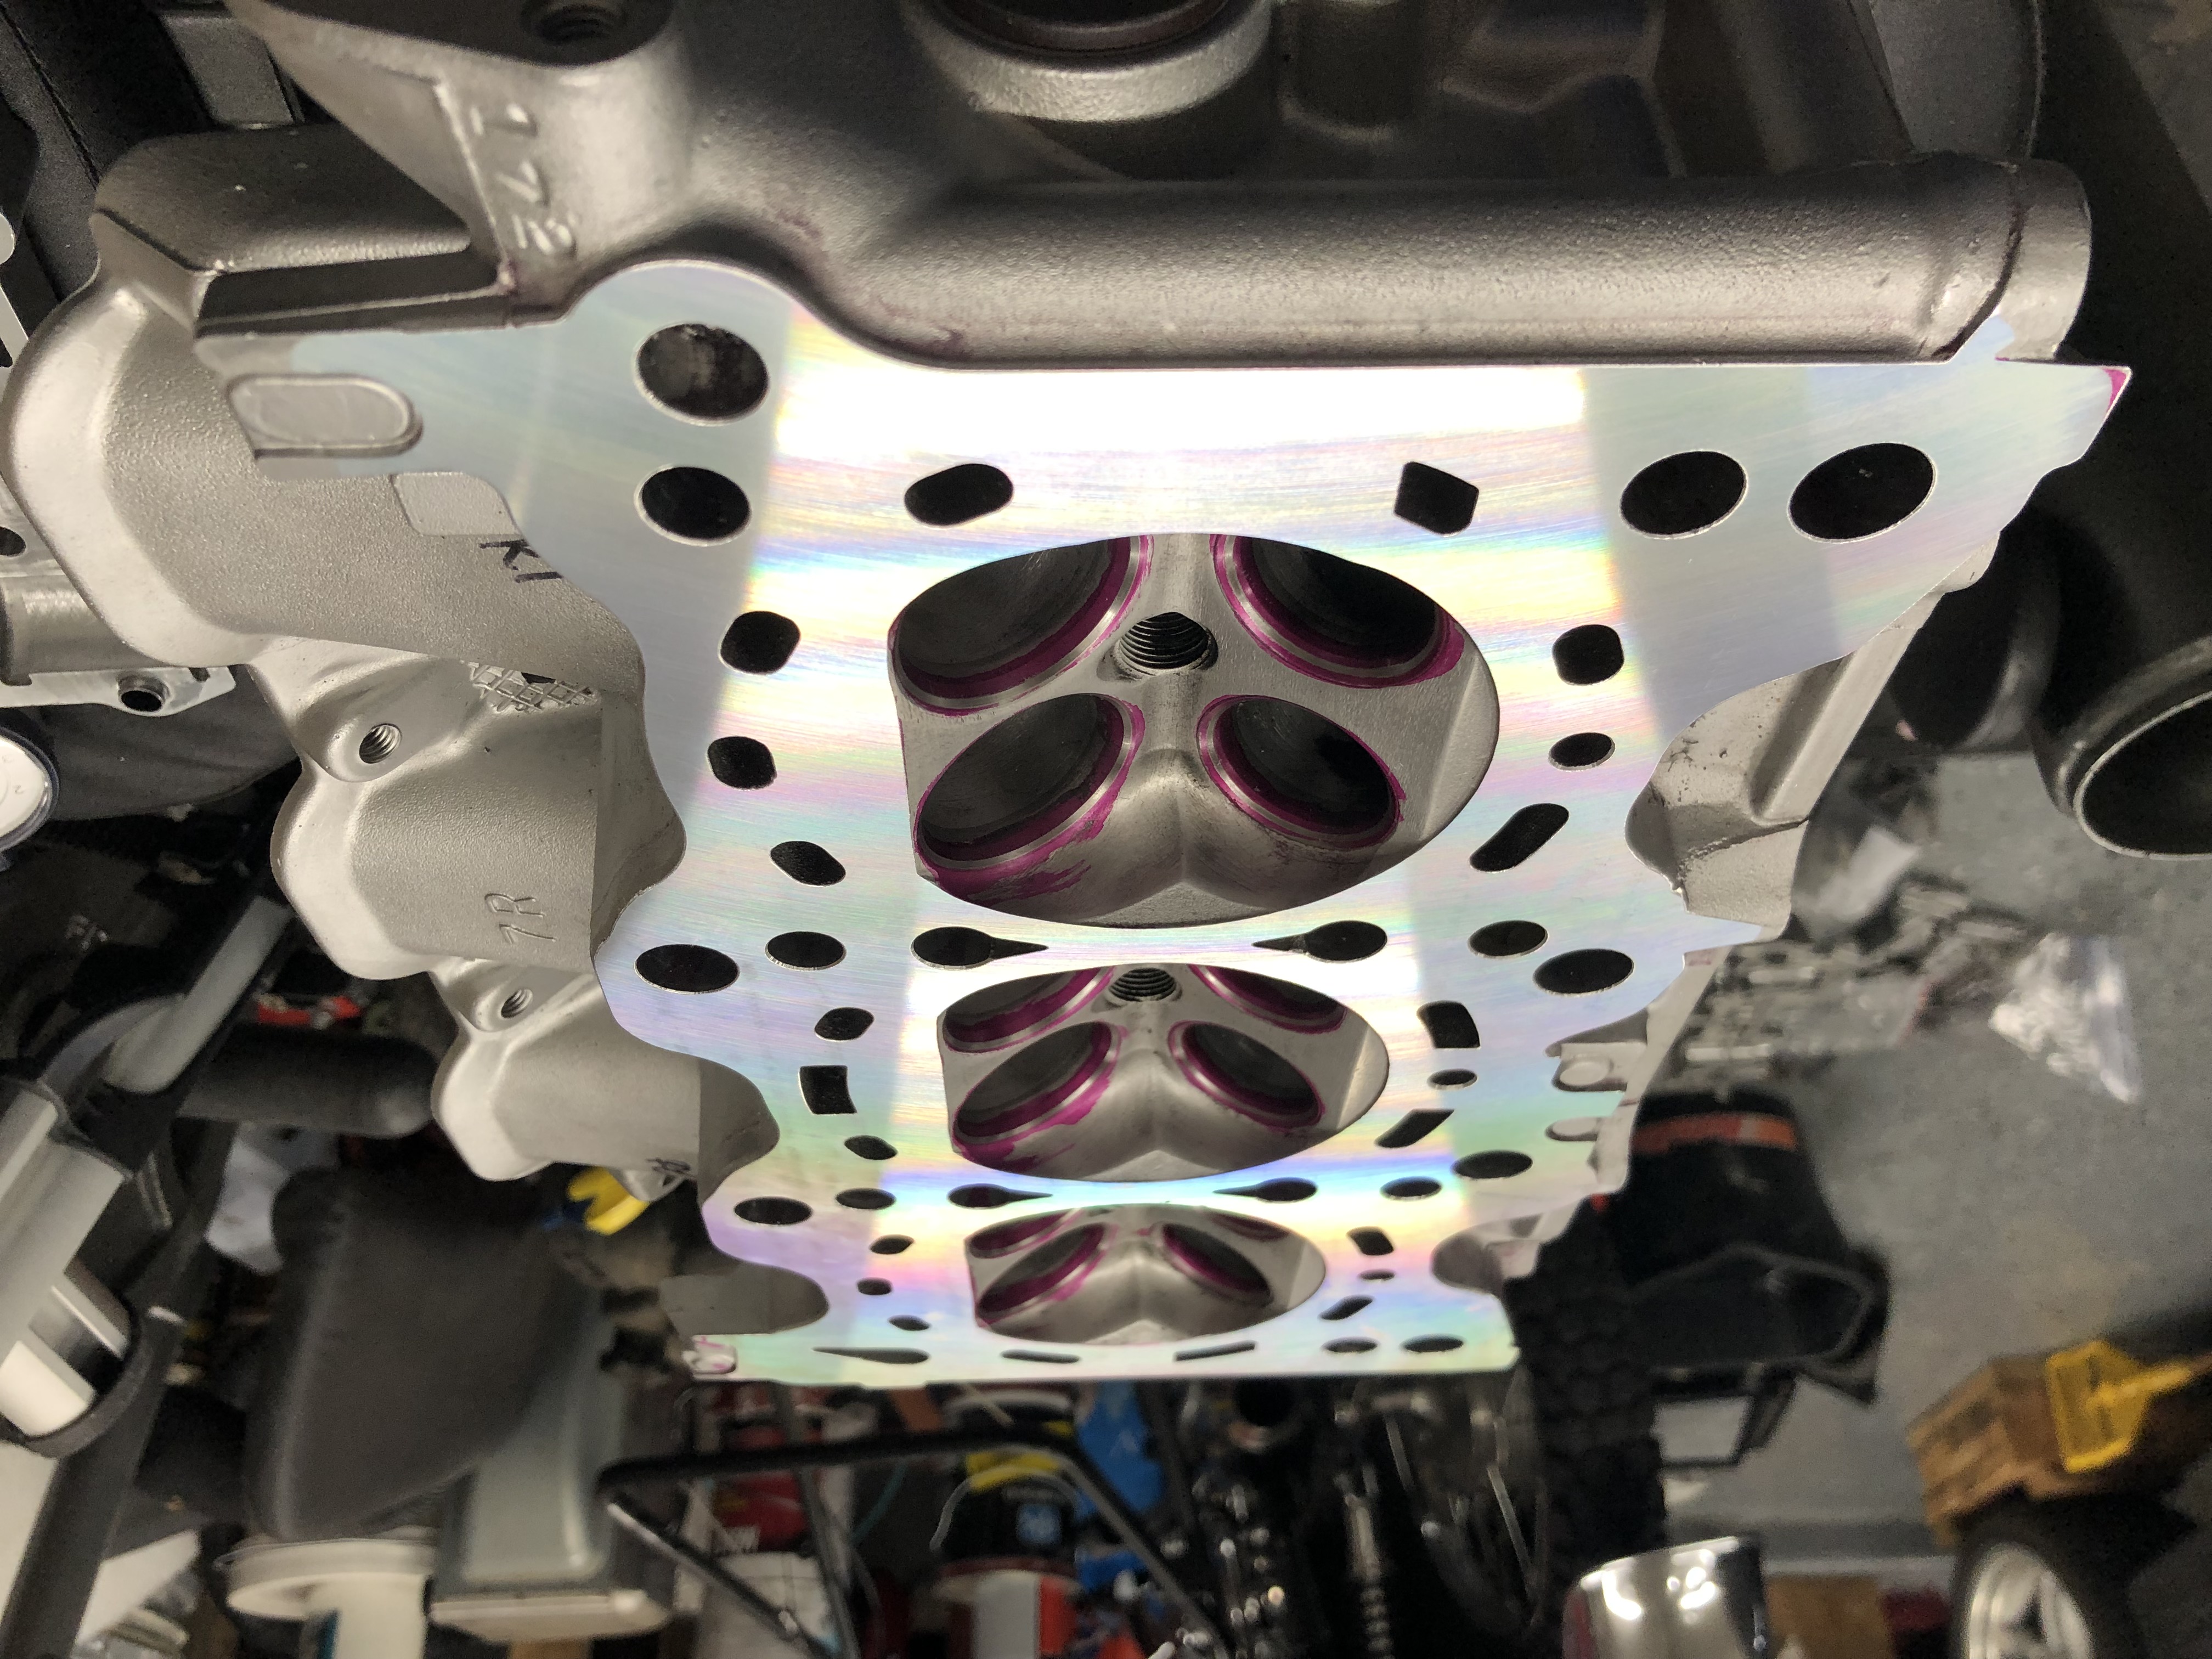
Finally, I got some extremely fine 1200 grit lapping compound and lightly lapped each valve into its seat. Again, this removes virtually no material and is essentially just polishing the valves into the seats so they seal perfectly and also lets me visually verify that the valves mate perfectly with the seats. Its just a minute or two per valve very lightly lapping by hand. The discoloration is just due to the inconel metal discoloring from heat, as these heads were previously ran. Once done, you can very clearly see the contact area between the valve and the seat.

IMG_6843.jpg


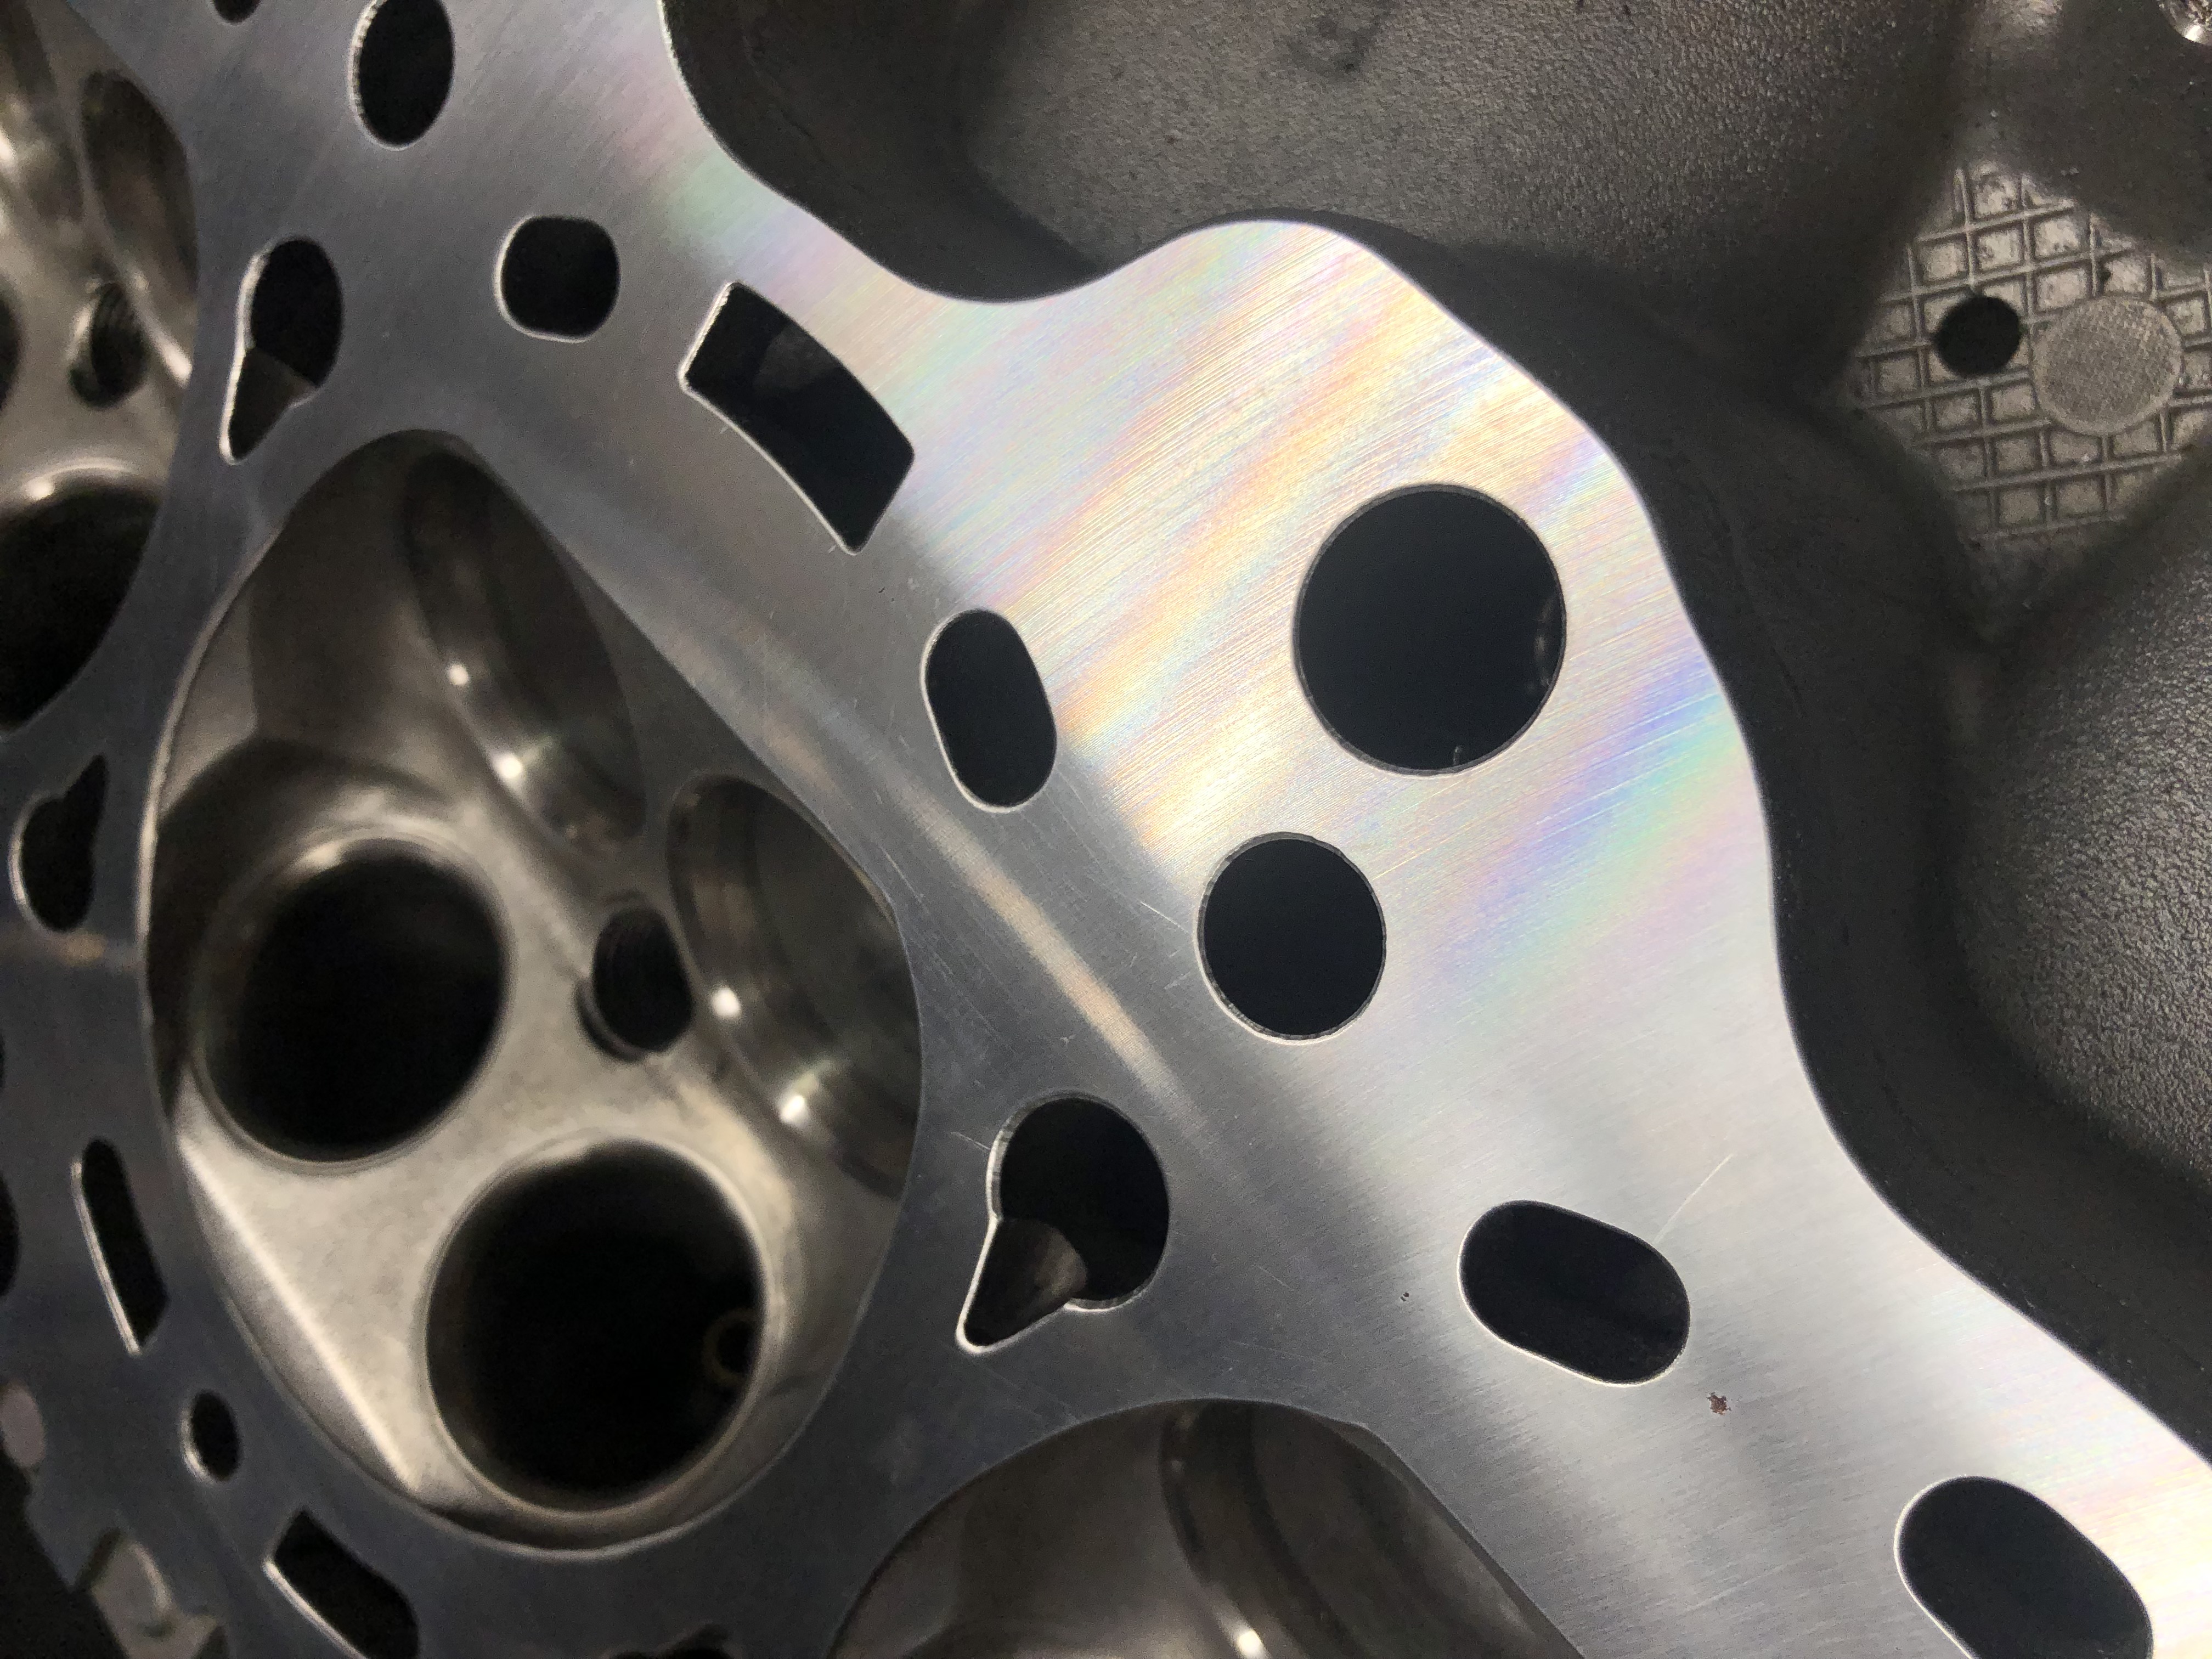
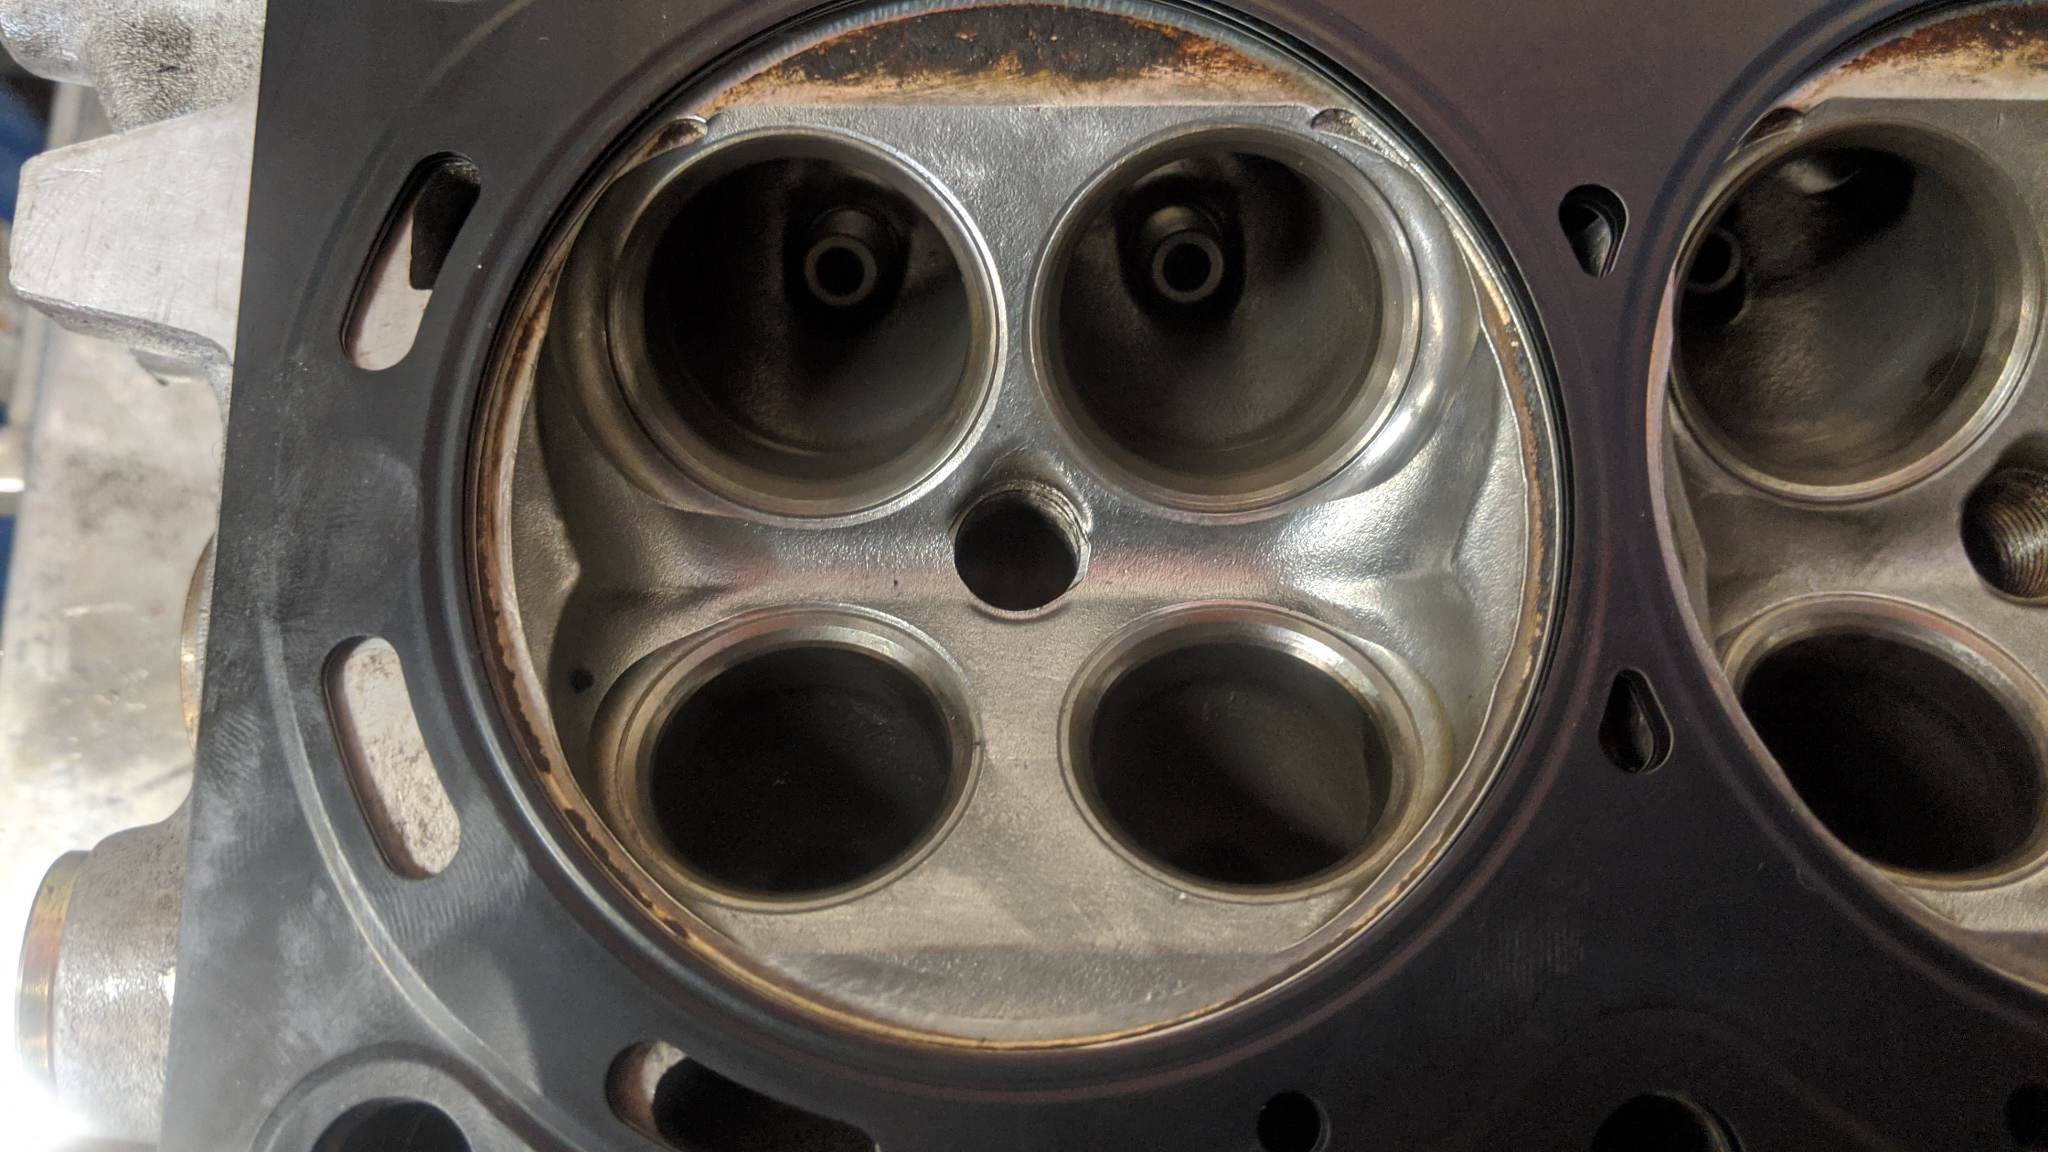
I'm also trying to figure out the best way to open up the 3.0 chambers to fit a 3.2 bore which is 93mm instead of 90mm. The factory 3.2 chamber is basically just a 3.0 casting with a small amount machined out to fit the larger bore size at the top, as seen here (image courtesy of Cole Mulvey of Bad Guys Worldwide machine shop). The deshrouding cut around the intake valves is also a little bigger than the factory 3.0 casting due to the larger valves and the larger bore affords more room.

32_chamber.jpg


That's a rather crude way to do it though since it leave some sharp edges protruding into the chamber. So what I'd like to do is find someone who can use a deshrouding cutter to cut the area around the valves out to 93mm to give the valves the most room to flow then chamfer the rest of the chamber out to 93 to match. I'm not sure if that will be viable though so I might just knock the sharp edge down and run it as-is.

Anyways, I'm hoping the block will be back from Mountune within a few weeks so I can get the main clearances set up and send it along for sleeves, and finally get this thing together. Or maybe I'll get lucky and someone will break into my house and steal all my engine parts, and release me from this prison.
 
Last edited:
This is a small thing but I got my ATI super damper correctly sized for my crankshaft. It started out at 0.0022-0.0023" interference with the crank snout, but I had an 800 grit flex hone in the right size so I went to town on it for about half an hour and brought the interference down to about 0.0011" which is perfect. I was a little worried about adding some taper or something with the flex hone but I was able to see some starting out early and dwell the hone a little longer to correct it and the end result is dang near perfect. I was able to tape off the damper to avoid getting any honing grit or oil in the damper and if I'd sent the damper off to have it sized up it probably would have been a mess.

IMG_7011.jpg


IMG_7007.jpg


I got my other set of rods back from the machine shop so now I need to decide which ones to use. I sent them to Perfect Circle Engines in Virginia and he resized them for about $300.

IMG_6986.jpg


And more machining woes. The fun never stops. The billet main caps I ordered were defective and apparently had the side holes bored too large before being tapped so there's not any threads there. And of course we didn't find out until Mountune started trying to work on my block. So I'm trying to get them replaced, and if I can't I guess I'll just use the stock main caps.

IMG_7055.png
 
Last edited:
The Super Dampers with steel hubs like the NSX damper come with instructions stating to hone the damper bore to a certain press fit depending on the crank snout size. For the NSX crankshaft it calls for 0.0009-0.0012" interference, but my damper came out of the box at 0.0022" interference so I had to hone out about 0.0010" of material so it wouldn't be too tight and potentially damage the crank snout or the damper during installation or removal.

The main cap issue seems to be resolved, there's a new set headed to Mountune so hopefully the main tunnel work will be finished up soon then the block can go off to Benson for sleeves then finally get put together for the first time since this project started in early 2020.
 
Progress here has been slow to nonexistent lately. I started a new job as an engineer at Amazon in June which is now consuming 50+ hours a week compared to my old job which took 15-20.

Mountune has completed the line bore operation on my block. I decided to go ahead and have them do the sleeves too to avoid an extra few trips around the country for the block, so now we are waiting on the sleeves to arrive from Darton. This was 6-8 weeks ago so hopefully the sleeves will arrive in the next couple of weeks and I can get the block back. Mountune is one of the few shops that has the equipment to bore the main tunnel vertically. This method seems to be the best since there is no sag in the boring bar like you might see with a more common horizontal setup, but it's not cheap, the line bore alone was $1500, not including the cost of the billet main caps. Before sending it in I fully deburred the block of casting imperfections and chamfered all the sharp edges and after vapor blasting it looks great.


I've also got pretty much all of the components needed to assemble a brand new Type R spec 6 speed transmission to go with this engine, it took about a year due to the temporary discontinuation of the 5/6 fork which Honda finally brought back. There's just 3 bits left that I think I will end up fabricating which are the 2 oil guide plates that feed oil into the shafts and the oil pump cover plate, for some reason these parts are on long back order or discontinued, so I'll be making a thread about that soon. I was originally planning on doing a "conversion" on my 5 speed box and reusing some components such as the reverse gears, differential, and bell housing but then found that it would be much cheaper overall to just build a new gearbox from scratch and sell the old one. But realistically I'll probably just mothball my R spec 5 speed box along with my spare engine in climate controlled storage.

I'm debating whether I want to do any WPC treatment of the parts or just run them as they are. @stuntman I read your old thread on the WPC transmission you built and if you could do it again would you do anything differently? I'm thinking of deburring the gear teeth then WPCing the shafts, gears, ring gear, synchros, forks, and shifter mechanism.
 
Last edited:
At risk of making me sound weird(er)...

This build is the kind of thing I fantasize about while I'm mowing the lawn. I was the Service Manager at a small, multi-line powersports dealer (Suzuki, Kawasaki, BMW, KTM and Ducati) and have a fair amount of experience with sport bikes. Based on that experience I'm a big believer in a properly balanced and blueprinted engine. Now I know a few people here have stated that they expect the dyno results to be disappointing, but I agree with MotorMouth93, Honcho and others as that's not really the point, and as (I believe) Honcho said, a 340-370hp engine "will be fearsome to drive". I couldn't agree more. I'm confident that not only will this engine make an honest mid-300hp, it's going to be smooth, quick revving engine with a lot of character.

I don't want to jinx MotorMouth93 by saying this, but I want to be first in line to buy this engine if (Heaven forbid) he needs to part with it for whatever reason. Seriously, God forbid you have to sell it, but I'll buy it if you do!
 
Last edited:
Excellent thread. 12:1 is gonna Need some really high quality fuel!

The hardest part on the valve train is the involute on the Toda cams, they’re super hard when closing. Great for closing fast and high rpm performance, but it can cause excessive wear on the valve seat so just be aware. I ended up with a cam near the B/C spec (not running VTEC in my car)

Can’t wait to see/hear this go!
 
John's engine, when finished, is going to be the best NA NSX engine since the GT1 Le Mans cars. I can't wait to see it!
 
Appreciate the kind words guys! The block is on its way back from Mountune so I can finally start thinking about putting this thing together. The main remaining tasks are:

1) Decide which cylinder heads I want to run, I want to find someone with a flow bench who can compare them properly but I don't want to ship them off again.
2) Select main and rod bearings for desired clearances and have them WPC treated.
3) Weight match/balance the rods and have the rotating assembly balanced.
4) Remove the poorly applied ceramic coating on my pistons and redo it properly.

@Track Addict I think by the time everything is said and done the motor will be in the high 11s rather than the 12.1:1 Toda advertises, between my smoothing out the edges of the pistons and chamber and adding some strategically placed dimples in the piston tops based on burn patterns from my previous failed motor some material will be removed, but I think it'll be worth it for the detonation resistance and (theoretically) increased burn efficiency. For break in and initial tuning though I'll be running 100 octane race gas just to be safe.

When I plotted out the valve lift for various camshafts (Toda included) here the Todas, while definitely more aggressive than stock, seemed to do a decent job of setting the valves back on the seats smoothly. I definitely don't expect to get 200k miles out of this motor but I think it'll be reasonably reliable, especially since the Toda As have a pretty mild low cam. I've been going back and forth on whether I want to do anything with the finger followers, a lot of people will DLC coat them but the cost is exorbitantly expensive to do all 36 of them and also pretty pointless for the low cam so one option is having just the VTEC followers coated, but DLC can fail too so maybe WPC is the way to go, and realistically it probably doesn't even matter.

I really need to do something about my exhaust soon. It would be a dang shame to hook this engine up to my clapped out Pride V1 and ancient SoS headers.
 
@Track Addict I think by the time everything is said and done the motor will be in the high 11s rather than the 12.1:1 Toda advertises, between my smoothing out the edges of the pistons and chamber and adding some strategically placed dimples in the piston tops based on burn patterns from my previous failed motor some material will be removed, but I think it'll be worth it for the detonation resistance and (theoretically) increased burn efficiency. For break in and initial tuning though I'll be running 100 octane race gas just to be safe.

That’s better for longevity, better to get more power with timing rather than extra compression. I’ll be tuning for 91 and likely ending up running ~93 Ron for the majority of its life. For that extra safety margin.

Hyped to see how your motor turns out. I agree with removing any hotspots on the pistons/combustion areas.
 
I'm not even going to bother with pictures for this update.

I got the block back from mountune and the bores measure 0.0015-0.0020 piston to wall clearance. Can't run that so back it goes, I requested 0.0027-0.0030" clearance and even sent in the pistons so they could measure them. Not sure how they screwed that up, its engine building 101 to measure all the pistons before you ever hone a block.

And then the pistons, UPS ruined one of them, there's a big ol gouge in the box they were in from when I shipped them to Mountune 3 months ago and a big gouge in the skirt. The gouge itself isn't an issue but the skirt is collapsed and deformed nearly 0.0010" so I can't run that either. (maybe mountune measured only the deformed piston LOL) If I'm lucky Toda will sell me a single piston but I doubt it, and UPS isn't any help either since there is a 60 day limit on filing a claim.

I did get the rod bearing clearances set up though so thats good I guess. 0.0020-0.0021 across the board which is nearly perfect.

Rant Time

Still no end in sight. At this point I'm just tired of this shit. If I could go back in time I would have never started this project and I recommend no one else try it either. I never in a million years would have guessed that I'd be on block #3, at this point I've spent well over $15,000 on block machining alone and have nothing to show for it besides 2 heavy paperweights sitting on the floor in my spare bedroom. Theres virtually zero accountability with machinists and shops slap anything together that they think they might be able to get away with and pass the costs onto the consumer. Nothing holds up to scrutiny. Whats even more insulting is that these guys have the nerve to try to tell me I measured wrong or oh it's fine just run it, or act like they're doing me some sort of favor by fixing it when I take it back because they didn't deliver.

Edit: And now we begin. :rolleyes:

"Whats the ambient temp" (low 70s, within a few degrees of the 68f most machinists like to work in)

"Do you have a deck plate on it" (nobody expects me to actually have one, but yes I do precisely because they like to ask this question, not that it actually changes anything by a meaningful amount, its still 0.0010" too tight with or without a deck plate and head gasket bolted up)

Lets not even talk about 0.0010+ taper and out of round. Which TBH I'd be willing to accept at this point because pretty much every block ends up that way after honing.
 
Last edited:
It doesn't take much to put a piston out of round. Have you thought about using sos forged pistons? I think you could get that one back round again with some taps of a wooden hammer and some careful measuring.
 
Back
Top