• Protip: Profile posts are public! Use Conversations to message other members privately. Everyone can see the content of a profile post.

Honcho's Long Road to Imola Type-S Zero

General

More parts arrived from Japan. Lots of bolts, door lock button blank, NSX-R clutch damper delete, MT block coolant passage, and most importantly, genuine S Zero center caps! :D

20200930_205158.jpg20200930_205448.jpg
 
Engine Refresh 25

Removed the oil baffle plate and oil pickup for cleaning. Also, inspected the cylinder bores, which look perfect with fresh cross-hatching. Still amazed after all these years to see those shiny gold titanium connecting rods.
20200930_213243.jpg
20200930_213253.jpg20200930_213310.jpg20200930_213328.jpg


Won't touch the oil distribution cap because it will disturb the carefully set clearance on the mains- I'll let the hot Mobil 1 clean it over time.
20200930_213412.jpg
 
Body and Paint Work 36

The big day is here. Because we removed the front and rear subframes, we had to get creative with how to transport the chassis. Normally you would roll or drive the car onto the flatbed, but that won't work here. It turns out the chassis dolly I built worked quite well for the trip to the body shop. I was prepared for a struggle, but thanks to the dolly and some scrap wood, the whole thing rolled easily onto the trailer. No drama. We used ratcheting straps to hold down the chassis and dolly and also to hold the doors closed. Based on what I observed while following the trailer on its ~25 mile journey to the shop, we will use more straps for the return home. The car was always secure, but based on some oscillating movement I saw, I think extra straps will make ME more secure next time. The shop began work on the panels today- several are already finished by the previous painter- and they will begin repair work on the doors and front bumper tomorrow. We hope to have an orange car in 3-5 weeks. Still going back and forth on the black engine bay. It is correct for an S Zero, but I kind of like the look of a black NA1 engine on an orange bay. I need to get moving on the engine and transmission. And I need to find out what is going on with my seats...

Staged and waiting for the trailer.
20201005_084848.jpg20201005_084856.jpg20201005_084929.jpg20201005_084945.jpg

Packed up body panels.

20201005_084657.jpg20201005_084726.jpg

Rolling onto the trailer.

120609295_280224752967419_5961007317364046353_n.jpg120656934_406497587012995_8643156667245292170_n.jpg

Strapped down.

20201005_102449.jpg


And we're off to the shop. First time the car has been out of the garage since 2018!

120810508_349430829821360_7697505107055518807_n (1).jpg

Special thanks to Mrs. Honcho for taking these pictures while I was crazed with nerves and [MENTION=34522]NSX_n00b[/MENTION], who as always was key in the process.
 
Engine Refresh 26

Removed the oil baffle plate and cleaned to this level. The hot Mobil 1 will clean the rest over time. Interesting that the factory workshop manual described this plate as helping to stabilize the oil level in the pan during cornering. Here in the U.S., we call this a "windage tray" and it is intended to prevent splash oil from hitting the rotating assembly. It has nothing to do with oil level in the pan.

20201006_221130.jpg

The pickup O-ring. Your entire oil supply passes by this O-ring. It costs $2. Flattened, stiff one next to the squishy new one in the bag.

20201006_220831.jpg

New O-ring placed on the pickup tube.
20201006_220940.jpg

Pickup tube placed on the oil pump and torqued to the spec using the Tohnichi high-accuracy wrench. 12 Nm.

20201006_221737.jpg20201006_221751.jpg
 
Last edited:
Engine Refresh 27

With the bottom end complete, it's time to move to the big job- cleaning and preparing the block deck for the new head gasket. I have seen so many very, very bad ways of doing this on the internet. Basically anything that involves any kind of hard abrasive (sandpaper, scotchbrite, roloc wheels, etc.) is 
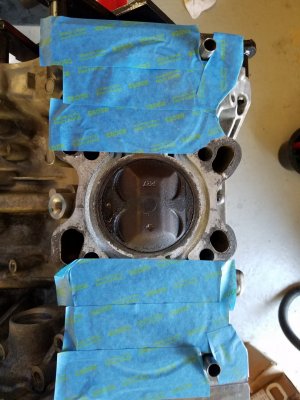
NOT what you should do. All of these products contain small particles of very hard abrasives like silica and aluminum oxide. They're basically tiny, jagged edged rocks. When you start scrubbing, you create a cloud of these particles, which fall into the cylinder and all of the other engine crevices. If one of these abrasives gets into the bearings, or between the cylinder and piston ring- you're looking at a rebuild. Also, the abrasives remove the soft aluminum of the block, and completely ruin the machined flat surface necessary for proper head gasket sealing. So, I use a different method. First, I tape off the rest of the block to prevent any contamination of areas where I'm not working.

20201010_145607.jpg

Then, I plug the water jackets and oil drain ports.

20201010_145848.jpg

Next, I lower the piston to about where the oil ring sits- about 3/8" below the deck. I have a reason for that, discussed below, but it also helps keep the razor away from the piston crown.

Then, I begin the cleaning process. First, I take a fresh razor blade and very, very carefully (the hard steel will gouge the soft aluminum if you make a mistake) start lifting off the major chunks of old gasket, carbon and graphite. You also could use a ceramic scraper too, I suppose. The key here is to go slow and have a light touch. If you feel the blade resist at all, STOP. Reset and try again from a different angle. You'll know the scraping phase is over when you can run the razor over the deck and feel no resistance- it will feel flat and smooth. At this point, lots of debris will have fallen into the various crevices. It's mostly carbon and graphite, but still, you have to keep it tidy. I use my shop vac (exhausting oustide so as not to make a cloud of aerosol particles in my work space) with a crevice tool to very thoroughly vacuum out all of the debris.

Next is the really tricky part. What is left on the deck is mostly very hard carbon/graphite that is baked into imperfections in the metal surface. It's too close/low to the surface for the razor to pick it up without risking gouging the surface by digging in a corner of the blade. But, it is raised just enough to prevent uniform gasket seating, meaning you will get hotspots and/or leaks. [MENTION=25737]Kaz-kzukNA1[/MENTION] mentioned using "the oil stone" to finish prep the surface, but never explained it on his blog. I envisioned something like this, soaked in machine oil, and being gently passed over the surface at a 45 degree angle, and then the opposite 45 degrees until the surface was clean and flat- like a cross-hatch. Without Kaz's guidance, I had some concerns. First, where does the oil paste full of dirt and stone grit go? Second, stone is harder than aluminum- how can I be sure I'm not removing any metal? Third, how can I be sure it is truly flat? What if I hone the deck at a tilt? This all scared me too much. So, I went to my old standby: fine grain steel wool. I use high-strength remover like this, which does a great job of emulsifying the carbon. The steel wool is rough enough to scrub the carbon off, but leaves a completely smooth aluminum surface. I use a very small ball of wool- maybe the size of a small marble, to minimize shedding and focus the pressure where I am trying to clean. Working very carefully, you get this:

20201010_143120.jpg

The reason I lower the piston is that the steel wool does shed. If you leave the piston at the top, your scrubbing will jam that wool into the small crevice between the piston and the head, where it will sit on top of the fire ring. By lowering the piston, it lets the wool settle gently on top of the crown instead of getting jammed against the fire ring. It drops tiny pieces off like falling snow. This is where the vacuum comes in. Once you're done cleaning, the vacuum lifts it all away. I vacuum twice and wipe with a microfiber in between. The microfibers cling to and lift away any debris as well.

Once I'm sure there is no more loose debris on top of the piston (I inspect obsessively using a flashlight), I'll raise it back up and clean the crown. Again, I use steel wool and remover, taking special care not to get too close to the edges. Then more vacuuming and wiping with the microfiber. I found that a plastic scraper works well to get the carbon out of the valve recesses in the crown. Once the piston is clean and I'm sure there is no loose debris anywhere on the head, I lower it all the way down. Using a clean microfiber, I wipe the interior of the cylinder to remove the old oil and any small contaminants that made it past the piston rings. Then, I vacuum out the cylinder and wipe again, this time with acetone to clean the carbon rings near the deck surface. I do one more vacuum (to grab any carbon bits that might have fallen down) and wipe, and then I wipe down the inside of the cylinder with clean Mobil 1. This engine will not be started until December or January, so I want to ensure there is no corrosion in the cylinders.

20201010_143730.jpg
Here is another trick- I rotate the engine a few times and check the cylinder. Any leftover debris sticks to the oil. #4 had some bits leftover, which I wiped out with the microfiber and re-oiled. # 5 and #6 were clean. Each cylinder took over 2 hours this way, but I ended up with this:

20201010_220256.jpg
 

Attachments

  • 20201010_145604.jpg
    20201010_145604.jpg
    172.5 KB · Views: 0
Last edited:
Engine Refresh 28

Checking the deck flatness with my super-accurate precision straight edge. The tool is flat to 0.012 mm (0.00047") across 500 mm. I prefer solid spring steel to aluminum for this purpose. I checked the 3 different axes per the workshop manual and the deck was flat to less than 0.0015" at all measuring points (0.0015" is my smallest measuring gauge). Well within the new spec of 0.003" and frankly not surprising coming of a gently used AT with no history of engine work. Next I have to clean the head bolt holes and oil return passages. Then I tape it all up and move on to the rear bank to start all over.
20201010_220852.jpg

20201010_220405.jpg
 
Paint and Body Work 37

Stopped by the body shop. Most of the body panels are prepped and sanded. They were able to get the driver's door perfect. Only major pieces left to prep are the front and rear bumpers. The upper front bumper requires some minor repair work due to the damage from the lower skirt pulling off. They ended up using primer on most of the panels to get a perfectly flat surface. The problem was the cheap MAACO paint on the driver's side of the car. It required so much sanding to remove that they had to use primer to restore the proper surface finish. It added extra materials to the overall cost, but we agreed it would result in a better finish on the car.

Hood surface prepped and ready.

20201013_151609.jpg

Left quarter panel. This needed the sanding and primer work due to the $200 paint job. I also had them blank off the antenna hole so it is now correct to the S-Zero.

20201013_152013.jpg

I have 2 spare red tow hook covers in addition to my genuine Imola Orange piece from Japan. The shop thought it would be a good idea to paint both after I explained these have a bad habit of coming off during hard driving.

20201013_154110.jpg

Headlight covers and gas door prepped.

20201013_154118.jpg

Mirrors prepped.

20201013_154122.jpg

Spoiler is ready. I'm a little bummed I couldn't source a Type-S spoiler, since it is several pounds lighter, but I will have some extra paint left over, so maybe a future project.

20201013_154115.jpg

Right side door. This was nearly perfect and had factory paint. They just had to clean up a few shopping cart-type dings on the upper section.

20201013_154349.jpg
 
sexual chocolate.....:wink:
 
Paint and Body Work 38

When I got to the body shop, my car was actually in the paint booth having the engine bay converted to black. No turning back now! They hope to get some color down on the jambs and the rest of the chassis early next week, as it will take a couple of days to prep those areas. The owner of the shop is painting my car personally. He trusts his painters, but this is their first NSX and I think he wants to make sure it is right. I was impressed with his attention to detail. The engine bay black will dry to a semi-gloss similar to the factory paint. The paint here is fresh and wet, which is why it looks glossy. He also had to prime and block the roof, since the sun burned through the clear coat in a few spots.

IMG_20201013_1456559121001 (1).jpgIMG_20201013_1457032991 (1).jpgIMG_20201013_1630571681.jpg20201013_155023.jpg20201013_155007.jpg20201013_154957.jpg20201013_154943.jpg20201013_154915.jpg20201013_154900.jpg
 
Last edited:
Paint and Body Work 40

Big day today- over 2 years of planning. Imola Orange Pearl.

The small pieces are painted. The PPG Deltron 2-stage paint is nearly a perfect match to the Honda genuine tow hook cover. They are going to start the chassis today. I am heading down there in about 30 minutes to check it out for myself.


IMG_20201015_1756495781.jpgIMG_20201015_1815330721.jpgIMG_20201015_1756569301.jpgIMG_20201015_1757373731.jpgIMG_20201015_1757478931.jpgIMG_20201015_1757134261.jpgIMG_20201015_1815444971001.jpgIMG_20201015_1757075371.jpg
 
How Exciting!!!!!!
 
Amazing work Paul. I had no idea when I meet you that you were capable of such a project. You owe me ride in this car if I'm ever out your way.

Congrats, it looks great.
 
Truly amazing. So much grit and passion. Really inspirational.
 
So beautiful! Congratulations Honcho!

Thanks! We took a mirror out into the sun and it was absolutely stunning. He's painting the chassis on Monday.

How Exciting!!!!!!

It's so gratifying to finally be at the big part of the project.

Amazing work Paul. I had no idea when I meet you that you were capable of such a project. You owe me ride in this car if I'm ever out your way.

Congrats, it looks great.

I've got a few Padron 1964 Anniversary in the humidor and a bottle of bourbon ready for you. You get to drive it, since the first NSX I ever drove was yours. ;)

Truly amazing. So much grit and passion. Really inspirational.

Thanks Tiger. Glad to see you posting on Prime again!
 
Are you going to do a paint protection strategy?
 
...I've got a few Padron 1964 Anniversary in the humidor and a bottle of bourbon ready for you. You get to drive it, since the first NSX I ever drove was yours ;)...

I gladly accept. And I’d let you, and most any other car aficionado, drive any of my cars at any time. What’s the worst that can ever happen. Becoming friends with another car nut. 😀
 
Are you going to do a paint protection strategy?

Yes, since I plan on tracking it and doing mountain drives. Here in Colorado, it's like a sandblaster up on those mountain passes. I'm partial to the Xpel Ultimate, but honestly I'll use whatever the shop is most comfortable with. My only requirement is that it must be self-repairing and totally clear like glass so as not to compromise the look of the paint. Right now, I'm going to do the front bumper, hood and mirrors. I may also do the upper rear bumper, since that's where all the soot ends up after every drive. Having all those petroleum byproducts baking on the paint is not ideal. I may also do the front fenders, but honestly in 5 years of driving my 91 in Colorado, I never had a chip on the fenders. Just the hood and bumper. Painter says minimum 90 days for the clear coat to cure before PPF, which is fine, because the body panels will be the last thing to go on the car- we want to do as much reassembly as possible without them to minimize the chances of scratches. Right now, looks like January maybe?

I gladly accept. And I’d let you, and most any other car aficionado, drive any of my cars at any time. What’s the worst that can ever happen. Becoming friends with another car nut. ��

I'm holding out hope you find yourself a nice Long Beach Blue 02+ and come back to the fold. Or a MCB 97-01. You're a huge asset to the NSX world and I'm glad you're still posting.
 
Yepee!! It's always exciting to see paint sprayed on...a sign that things are moving along.
It's going to look great when it's done.
 
...I'm holding out hope you find yourself a nice Long Beach Blue 02+ and come back to the fold. Or a MCB 97-01. You're a huge asset to the NSX world and I'm glad you're still posting.

I've learned and come to realize that experiencing newer cars is more fun for me at this time. Also more comfortable and faster, with the latest technology. I really love my M3 Comp with a true 6spd manual. It does everything so well, that I can see my self staying with the BMW brand for a very long time. It's also easier to get in and out of since I have two herniated discs in my back. I hate to say it, but I'm getting older and the low sports car just isn't as enticing as much.

I'll hang around prime and poke my nose in the room every now and then. And maybe I'll instigate a little with the NC1 guys. :D
 
Paint and Body Work 41

Larger pieces being prepped. The lower front bumper skirt is brand new from Honda. They are using a sealer primer to ensure good paint bonding and even color tone.
IMG_20201019_1120055081.jpgIMG_20201019_1120229001.jpg

The Route KS carbon side scoops and Mita carbon B-pillars. The side scoops fit ok. The B-pillars fit...sort of. They will need a a lot of work to fit properly.

IMG_20201019_1120096381.jpg
Sealer primer going down.
IMG_20201019_1144490211.jpgIMG_20201019_1145205261.jpgIMG_20201019_1145100251.jpgIMG_20201019_1145065791.jpg
 
Back
Top