• Protip: Profile posts are public! Use Conversations to message other members privately. Everyone can see the content of a profile post.

Honcho's Long Road to Imola Type-S Zero

Battle Scar

Managed to hit a giant 8" chunk of road surface concrete. They were resurfacing the road in the other lane (breaking it up with a excavator) and this chunk must have rolled over to my lane, SUV in front of me covered it up and I swerved to avoid it, but I must have just clipped it with the wheel rim. :mad::mad::mad:

20230828_201809.jpg

I wonder if I can file a claim with the construction company?
 
Battle Scar

Managed to hit a giant 8" chunk of road surface concrete. They were resurfacing the road in the other lane (breaking it up with a excavator) and this chunk must have rolled over to my lane, SUV in front of me covered it up and I swerved to avoid it, but I must have just clipped it with the wheel rim. :mad::mad::mad:

View attachment 183320

I wonder if I can file a claim with the construction company?
I know certain states have a point of contact for damage caused by road construction. I assume the state then subrogates and goes after the construction company. You might try looking around to see if there's a form or something you can fill out with your state.
 
A/C Woes 6

Thanks to the generosity of my next door neighbor, I was able to put the NSX on his very nice 2-post lift. This, plus access to nearly the entire catalogue of Milwaukee cordless tools, allowed me to replace the compressor lines in about 3 hours. Only one picture, but here are the highlights:

20230908_163415.jpg
  • The front beam must be disconnected and slid toward the front of the car. It is not necessary to remove the shift cables. You just need to get the beam out of the way as shown above. BTW, the compressor is hanging on the old, leaky line. I would never do this with a new line.
  • Don't forget to remove the harness plug- the compressor will hang on it and not come out.
  • The R134a lines use smaller mounting blocks than the R12 ones that came with the car. It's a 6mm difference. I had to shim the bolts to take up the space. Otherwise, the bolts will bottom out on the mounting block. Thus, if you are replacing R12 lines, you should order the correct bolts when you order the lines: 93403-08025-05 (x2)
20230908_171521.jpg
  • Make sure to support the line mounting blocks with a prybar or something rigid when torquing the nuts on the body side of the lines- they can bend easily even with the relatively light torque settings.
  • Having a second person makes installing the front beam a fairly easy process. One person can hold the nut while the other threads the bolt.
Once the lines were finished, I brought the car back to my garage and I replaced the receiver/drier (it can be done without removing the bumper). I then pulled a 25 in/hg vacuum on the system for 24 hours. A check the next day revealed no leakage at all. Finally, I charged exactly 834g of R134a into the system along with 20 mL of PAG oil to account for the drier and replaced lines. The air was blowing ice cold.

Hopefully this is the end of my A/C woes...
 
Last edited:
A/C Woes 7

Just a quick driving update. Plenty of cold air after a few days of running the car in the heat. Fingers crossed that this one is finally solved.

Next up are the three leftover items and then I can call the car officially complete:
  1. Repair the leak in the Koyorad. Koyorad will not replace the radiator, so I must braze the pinhole. I purchased some Super Alloy 1, which can be used with a propane torch and holds to 20,000 psi. However, I must drain the coolant to perform the repair, so this will mean a coolant change too. I likely will do this job over the winter.
  2. Have the body shop do final fitments, paint touchups and fix the driver door beam impingement on the window.
  3. Weld new mufflers on the exhaust and extend the rear adapter by 20mm.
 
MCS Suspension

Also, while performing the A/C compressor line replacement, I noticed that the suspension has settled a bit. As you may recall, the NSX-R suspension sits at the following heights measured at the jack points:

Front: 4 3/8 inches
Rear: 4 1/2 inches

The car currently measures at:

Front: 4 1/4 inches
Rear: 4 1/8 inches

So, assuming the shop set them correctly, the fronts settled by about 1/8" and the rears (with longer springs) by about 3/8". Since the front of the car meets my needs at the current height (clears speed bumps and the concrete gutter in front of my driveway), I may just set the rears to 4 3/8" and restore the proper rake.
 
I am not sure a 1/8" adjustment is worth it nor would it be noticeable on the road.
 
I am not sure a 1/8" adjustment is worth it nor would it be noticeable on the road.
Yeah, but right now I have reverse rake lol. I'll just bring the rears up a bit. 1/4" is about 6 mm. Not much but at least the car will be nose down again! :)
 
NSX Type-S Zero Project - A Look Back

PART ONE - "STAGES"?

Now that the project is effectively complete, I thought it would be a good time to look back over the last 5 years to get a sense of the scale and scope of the project, both for my own purposes and for other owners who may be considering going down this road.

What was the project goal? I wanted to take a beat up early AT coupe and turn it into a replica version of the legendary Type-S Zero. Basically, I went from this to this:

lookback1.png
This goal involved four major undertakings:

(1) COLOR CHANGE TO IMOLA ORANGE PEARL

lookback2.png
lookback3.png
(2) CONVERT FROM AT TO MT
lookback4.png
lookback5.png
(3) MAJOR ENGINE REFRESH

engine3.png

engine2.png
engine1.png

(4) FULL REFRESH ASSEMBLY TO S-ZERO SPEC
20230115_154205.jpg
It makes sense to go back to the very first post in this thread. Originally, I planned on four "stages" starting in 2018 and culminating in a 3.3L ITB 6-speed car in 2022.

Screenshot 2023-09-19 102643.png

So how did I do? First, I was a year late. The project largely completed in February 2023. Second, there were no "stages". Given the amount of work required in each of the major undertakings, it would have been an enormous waste of time and money to take apart the car four times. I ended up doing it all at once. In hindsight, a year late wasn't too bad, considering COVID had a major impact on the timeline.

In terms of scope, let's see how close I came to the original goal and what changed:


Imola Type-S Zero STAGE 0 --->> 2018 - 2019. Main points of concern are the auto transmission (working fine, but 139k miles and unknown maintenance), intermittent EPS light, brake light warning light in dash and the windows, which are popping and slow to come up.
This went fairly to plan. I got rid of the AT and the EPS, replacing with a restored manual rack from NSX Rack repair. The windows also were fully cleaned and greased.

Also need to repair the front bumper.
This also happened. I ended up getting a brand new OEM lower skirt from Honda (the last one in the U.S.).

Once I sort those issues and do a full inspection, making notes of all areas to address, I will do a full "super clean" and some paint correction so the car at least looks ok. Then, I will start on the Type-S Zero path, which will involve removing:

(1) Air conditioning and all lines; Did not happen. Summers are hot here.
(2) All audio and wiring; YES
(3) Power antenna; YES
(4) TCS; YES
(5) ABS and all wiring/computers (gonna fab up my own ABS delete rig with prop valve and go to a FF/RR bias split); Sort of. I ended up with the S2000 ABS.
(6) Cruise control; and YES
(7) Engine fan YES

I will also DIY my very own NSX-R mesh cover (and [MENTION=16180]comtec[/MENTION] style prop rod holder) out of the existing cover. Goal is to not know it's a fake unless you put it next to the $2,000 OEM version. Home Depot mesh, glue and a jig saw....what could go wrong? Should be super fun!
This partially occurred. I went with the MITA fiberglass cover, which I ultimately had to mod slightly to stiffen it.

Overall, "Stage 0" largely occurred. I removed a ton of stuff from the car for almost zero actual cost.


Imola Type-S Zero STAGE 1 --->> Late 2019. Color change to YR-514P Imola Orange, along with full Type-S interior (including seats!), badges, NSX-R bars, etc. Definitely coolant hoses and Koyorad. Possibly suspension, if the $$$ is there.
This also occurred nearly 100% to plan, including the NSX-R suspension. Though, it didn't really happen until 2022.

Imola Type-S Zero STAGE 2--->> 2020 - 2021. Conversion to 6-speed, engine refresh, cams/valve springs and EPROM tune. Stage 2 will also see NA2 brakes, Spoon rigid collars and manual steering.
This is where the plan started to drift from the original goal. By 2021, there were no more complete 6-speeds for sale, as Honda discontinued them. I have the skill to build my own 6-speed out of parts, but the cost (~$10,000) would have busted the budget and just wasn't feasible. I instead went with a 5-speed I found for $1,800 that came with a nearly-new OEM clutch set. I built that trans to NSX-R spec, so it's close, but not the 6-speed. Clearly, here the budget won out.

Also, the engine refresh happened, along with the Comptech cams and Demon ECU system. However, I chose to keep my 91-96 brakes. I did end up with the Spoon rigid collars and, as noted in Stage 0, manual steering.


Imola Type-S Zero STAGE 3--->> 2021 or later. Full 3.3L ITB engine build. I'm starting to waver on this, as ITB might be more trouble than it's worth. At least I have some time to figure it out.

This never happened. Again, the budget won out. As @MotorMouth93 can attest, changing displacement and going ITB on the NSX is a very, very expensive and time consuming endeavor. This likely would have added at least a year and over $20,000 to the project. I just couldn't justify it.

Looking back, the car has exceeded my expectations. This is about as close as someone can get in 2023 to having a brand new "old" NSX. The car is taut, sharp and incredibly responsive. There is no tired flex in the suspension/brakes like you feel when driving an un-refreshed NSX. Steering is telepathic, the 300+ lbs of removed weight is readily apparent and the engine pulls much harder than a stock NSX. I never got the chance to buy a new NSX when it was still offered by Honda, and certainly not a Type-S Zero. I had only recently graduated law school by 2005 and was in no position to fork out $90K. Still, I feel like I have achieved that goal. I'm really happy with the result.

People often ask me if I would do it again. Honestly, probably not. However, if I had to do it again, I would start with a MT.
 
NSX Type-S Zero Project - A Look Back

PART TWO - BUDGET

So, as discussed in Part One, this project was worth it. How many people get to drive a LHD Type-S, other than Zanardi owners? In a cool JDM color with new everything and Comptech power to boot. But, as one can imagine, it came at a cost. One of the most burning questions in this thread and elsewhere was simply: "how much did this cost to do?"

As I have advised other owners who are going down this long road, it's a really good idea to start with a concrete project goal and a budget. Having a budget helps you make good decisions during the long journey and keep yourself out of trouble, e.g., ending up with a disorganized mess of a car and/or descending into an inescapable money pit. For example, budget was the reason I chose to forego the 6-speed in favor of a NSX-R 5-speed. Driving the car now, I could care less about the extra gear. Anyway, this project did have a firm budget.

When Mrs. Honcho gave me the green light for this endeavor, she made me promise three things:
  1. I could spend no more than what our 2013 GT-R cost: $75,000
  2. I had to be prepared to have the car sit in pieces for potentially years
  3. Neither the time or money spent could interfere with our family life, i.e., "the car comes last."
Taking these requirements to heart, I planned a project that would last 4 years factoring in a lot of downtime. I also put a high focus on re-using as many parts as possible from the original car and sourcing as much as possible from junkyards, Prime member favors/hookups and the JDM parts vendors where appropriate. Also, I resolved to do as much work myself as possible to save on expensive labor costs. It was this focus that really made the project possible.

Some ground rules and caveats before we dive into the numbers:
  • Virtually all of the labor time is DIY. Paying someone to do this job would likely double the final cost- at least.
  • Post-project items like the PPF, tuning and final touchups are not counted here. I consider those to be running/usage costs.
  • Many of the parts prices included in these calculations have gone up significantly since 2018.
  • Or, these parts have been discontinued. It will likely be much harder to do this project in 2023 than it was in 2018.
  • Whatever your timeline is for your project, multiply it by 2 or 3 to get a realistic number. Most of the work done here was 45 minutes at a time, each night after the kids went to bed. Life gets in the way quite often, as it should. :)
  • The biggest key to making this project work was finding a body shop that was willing to take on the job and work with me. I can't understate how critical this is. The wonderful folks at Franktown Restoration Garage were the real key here.
OVERVIEW

After spending months poring over my research, I determined that it would cost about $50,000 to do the job as originally planned. With a budget of $75,000, that meant I had to find a NSX for $25,000 or less. In 2018, that was quite difficult, but I lucked into finding a 92 AT on Autotrader of all places. The car was rough, but again because I had a firm goal and plan, I knew I could overlook all that stuff. What I really needed was a straight body. The rest was going to be replaced/refinished anyway.

Here are the overall numbers:
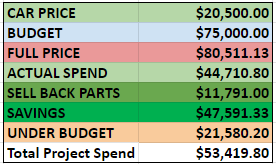
Screenshot 2023-09-20 094236.png
Overall, I spent $54,310.69 out of pocket on this project, which includes the price of the car itself. I beat my budget by $20,689.31!

The car was a gem of a find, as I was able to scrape it up for $20,500. This left even more room in the budget. Based on what went into the car, it would have cost $80,511.13 if I paid full price for everything and just did a huge order from Honda/Acura. By working the junkyards, vendors like ATR and MITA, Prime members, etc., I was able to knock this spend down to $45,601.69. This was massive. In addition, I was able to earn $11,791 back by selling parts off of the car that weren't needed for the project. That money is still coming back in, as there is some stuff left in the Prime marketplace.

BREAKDOWN

It was important to stay organized with a project of this scope and scale. I maintained spreadsheets of costs and divided them into rough categories below. Also, I used a bag system and a coding on these charts that added a red box next to a part once it was installed on the car. This helped me understand what was still in bags versus what was on the car. It ended up being VITAL. Still, if I did this again, I would add the date of the order in the description box for each parts. You can see I started to do that in 2022/23. It would have greatly sped up searching for stuff, which cost me hours and hours over the life of the project.

Body Repair - This covered all parts required to repair exterior areas of the car.
Interior/Mechanical Repair - This covered the interior and all mechanical replacements.
Coolant Service - Included the radiator and hoses
S Zero Conversion - Items/services needed to turn the car into the S Zero spec
Fuel System Refresh
ABS Upgrade
Intake Manifold Refresh
Transmission Conversion
- Everything needed to go AT --> MT, plus rebuild
Timing Belt Service - My standard service for the TB/WP
Engine Refresh - My "Stage 2" refresh, where the heads come off.
Engine Upgrade - Everything needed to accommodate the Comptech cams and tuning
HVAC Repair

At $15,663.97 in actual spend, the S Zero conversion was the most expensive part of the project. This is primarily because it included the repaint and expensive items like the S wheels and seats.

Screenshot 2023-09-20 095450.png

The next most expensive area was the AT to MT conversion at $9,245.64. Although I got my 5-speed super cheap and the clutch for free, the cost to build the trans to the NSX-R spec and replace all the internals was quite expensive.

Screenshot 2023-09-20 095931.png
Screenshot 2023-09-20 100119.png

Next most expensive was the Engine Upgrade at $6,798.40. Engine work is expensive on the NSX and here, most of the cost was in the head work needed. To make the most of the Comptech cams, the 3.0 engine needs the larger 36mm intake valves. My valve guides were also shot and out of spec, so bronze guides were needed. The cams also necessitated using the Supertech titanium retainers and up-rated springs from SOS.

Screenshot 2023-09-20 100736.png

The 92 NSX was in rough interior and mechanical shape, so many replacement parts were necessary. Total cost came in at $4,568.75. In retrospect, I would have separated the interior refresh out from this section.

Screenshot 2023-09-20 101352.png
Screenshot 2023-09-20 101440.png
Next most expensive was the body repair. The exterior of the car, despite the repaint, needed a lot of work. Total spend was $3,392.14.
Screenshot 2023-09-20 101736.png
Screenshot 2023-09-20 101817.png

Next, believe it or not, was the HVAC work at $1,842.29. Mostly because I had to replace my condenser fans and compressor lines recently, which added to the cost. This is an area where my budget focus hurt me- I re-used parts I thought were ok but turned out to be bad.

Screenshot 2023-09-20 102503.png
Prime members should be interested in the next expensive section, which constitutes my personal Engine Refresh service. The TB/WP job itself cost $1,167.92 and the refresh service, including replacing the head gaskets, was $1,112.40. Remember that this is parts only, all the labor was my own.

Screenshot 2023-09-20 103421.png
Screenshot 2023-09-20 103449.png


Finally, the smaller items came in at: Coolant Service $890.89, Fuel System $302.78, ABS Upgrade $436.51, Intake Manifold $180.00.

Screenshot 2023-09-20 103930.png
Screenshot 2023-09-20 104002.png
Screenshot 2023-09-20 104039.png
 

Attachments

  • Screenshot 2023-09-20 093410.png
    Screenshot 2023-09-20 093410.png
    21.1 KB · Views: 8
  • Screenshot 2023-09-20 100040.png
    Screenshot 2023-09-20 100040.png
    147.1 KB · Views: 7
ECU Tuning

More tuning is happening. Used the last 2 months of logs and I am now on version 2.0 of the BIN (overall the 12th iteration of the tune). Next step will be to shut off VTEC and tune the low cam in open loop. It's running rich, which is causing a AFR drop on the VTEC transition. Basically, the car is locking in the rich low cam map as it transitions to the tuned VTEC map, which is leaner. I also made a few tweaks to the A/C clutch injector pulsewidth correction factor, which has smoothed out the idle when the A/C compressor kicks on.

Best part is I downloaded all of the songs from Gran Turismo 1 and 2 and Forza 2. So it's a 90's tuner culture overload as I'm working. I feel like I'm back in college LOL.

Screenshot 2023-10-04 230522.jpg
 
I thoroughly enjoyed following your build.
It was great to see everyone involved, not just the community here, but also your family and friends.
Thanks for sharing the adventure with us and congratulations on finishing the car. Now, go put some more miles on it.
 
The organization and documentation is amazing. The cost of everything even more amazing. Were you really able to get an abs S2000 modulator for $50?
 
Yea this was great to read. Nice work with all the writeups and especially with the breakdowns. Am I reading your cost breakdown correctly on the S-Zero conversion section; did your body shop completely change the color for $8900 with no prep work done? You delivered it disassembled which obviously helped, but the paint looks intact when you dropped it off based on the pictures you posted.
 
Yea this was great to read. Nice work with all the writeups and especially with the breakdowns. Am I reading your cost breakdown correctly on the S-Zero conversion section; did your body shop completely change the color for $8900 with no prep work done? You delivered it disassembled which obviously helped, but the paint looks intact when you dropped it off based on the pictures you posted.
That was pre-pandemic pricing. Today, Mike would charge about $12,000 for the same job. Most of that cost is the paint. Imola uses a ton of metallic flake with very little color, which is super expensive. Mike said non-pearl colors are cheaper to mix. The car did require prep work to all of the surfaces. The front bumper and driver door were the worst. Ultimately, we decided to cover the entire car in a light gray primer to ensure even shading across the surface. That added some cost as well.
I thoroughly enjoyed following your build.
It was great to see everyone involved, not just the community here, but also your family and friends.
Thanks for sharing the adventure with us and congratulations on finishing the car. Now, go put some more miles on it.
Thanks! It's like the entire NSX community put their hand in and helped- the car is a reflection of the community in a certain way.
The organization and documentation is amazing. The cost of everything even more amazing. Were you really able to get an abs S2000 modulator for $50?
Yep. $39 plus shipping ;) I ran the diagnostic before hooking everything up- you should always do that even with the genuine NSX modulators.
 
S2000 modulators tend to leak internally so its good to take the electronic portion off and inspect it as well. I bought a few cheap ones on Ebay and they all leaked internally so I just bit the bullet and bought an NSX modulator from Japan. I'm sure it'll start seeping at some point too though.
Yeah, I probably should grab another one as a spare and inspect it.
 
Before I leave our mortal coil I need to drive that thing....
 
Oil Change Service

Whenever you rebuild the engine and/or transmission, it's a good idea to change your oil after about 500-1,000 miles of driving. For the engine, this oil will pick up all of the debris left from cleaning and installation, as well as the assembly lube. In the transmission, the oil will collect the same material plus small bits of steel and brass from the new gears and synchros. I like to flush all of this stuff out. In my case, the oil has about 720 miles on it.

Although I have been spending time on Spencer's car, I was able to squeeze in this vital service for the Zero.

20231005_133854 (1).jpg

The engine oil came out exceptionally clean. The color was like a dark honey and it was still transparent. This is a testament to my obsessive cleaning during the refresh. I filled exactly 5.3 quarts, but the oil level is about 5mm above the top hole on the dipstick. I'll run the engine up to temperature and re-check. If it's still high, I'll use the oil extractor to set the level correctly.

20231005_142336.jpg

The transmission oil was even cleaner- it came out the same light yellow color as virgin Torco MTF. But looks can be deceiving. The filter was full of tiny flakes of brass and steel.

20231008_120757.jpg

Notice the flakes reflecting in the sunlight on the bottom of the pan?

20231008_125000.jpg

This level of debris is perfectly normal for a new gear set and synchros. You actually want to see this. These tiny flakes of metal are the casting/machining edges flaking off of the parts as they are run. This indicates that all of the parts are "wearing in" properly. This is why a new trans will feel "rough" or notchy during the first couple hundred miles. These sharp edges are preventing a fully smooth engagement of the dog teeth on the hubs, sleeves and synchros. once they are knocked off, shift quality improves. This transmission now shifts flawlessly hot or cold.

I always recommend taking it easy on the shifts for the first few hundred miles to let the gears do this important work- it can help set up your trans for tens of thousands of miles of smooth operation.

While the mesh filter is fully washable and re-usable, I always replace it after a break-in run. From now on, I'll just wash it. Here is the used trans fluid ready to go for its UOA. Also make sure to replace the O-ring on the filter plug.

20231008_120803.jpg

The current oil will run in the car until this time next year and I will continue the UOA to get a sense of the state of the engine and trans over time. For my NSX, I do annual oil changes, since I never drive 5,000 miles in a year. I may do a 24-month interval on the Torco MTF, depending on what the lab says.

Now that the car has fresh oil, next up will be tasks in the left rear wheel well: tightening the loose, crappy Route KS side scoop and modifying the intake snorkel to add an additional intake port to see if that helps my manifold pressure drop above 6,000 rpm. Then, we will install tune V2.0, warm up the car and take the compression test. After that, it's off to the paint shop for final touchups and a repair on the internal door beam.
 
Intake Modification

Some of you may remember that in my VTEC tuning logs, there was about a 2% to 3% drop in manifold pressure between about 5,000 and 8,000 rpm. Such a drop is a classic symptom of an intake restriction, as the camshafts, valvetrain and headers are trying to move more CFM then the induction path can deliver. Obviously the best solution, as @MotorMouth93 jokingly put it, is to go ITB. Plenty of induction CFM there! Indeed, ITB was Honda's own solution for their naturally aspirated race cars. However, ITBs are very expensive and difficult to tune to a OEM level of reliability- I'm not sure I want to get into that deep of a hole on this project, considering the time and effort already spent on it. This started me down the path of studying the system in a hope to find a relatively simple and inexpensive solution.

I found clues to this puzzle in Honda's own efforts on the 3.2L engine introduced in 1997. Anyone with a ruler can figure out that the throttle body is the narrowest point in the NSX's induction loop. The assumption, then, is that by enlarging the TB, you will gain power. However, over 20 years of data tells us this isn't really the case. The BBTB threads and dyno tests are variable, at best. Even on the 3.2L cars, some owners picked up 2 or 3 hp and others got nothing.

Such a result appears to jive with the advice I got from Shad when I was first spec'ing out the Zero's engine. He was adamant that changing the size of the TB on the NSX was not necessary, even with the Comptech cams and larger intake valves. Honda appears to have agreed with him because the 3.2L TB is the exact same size as the 3.0L. This despite the fact that Honda engineers were tasked with increasing power and torque across the band for the new engine. We know that the tubular headers, bigger valves and increased displacement provided the increase, but by increasing exhaust flow and intake flow (via the larger displacement and 36mm intake valves), Honda had to find a way to deliver more air into the engine and the TB was not it.

So what did they change? The snorkel. Thanks to @Eric KS H, we got a good look at Honda's revised induction system for the 3.2L cars.

20230330_190001.jpg

In the revised setup, the NSX draws air from the rear-facing tube during normal driving. Then, under hard acceleration, a vacuum diaphragm opens a butterfly valve in the front tube, feeding the engine from both tubes and providing an exciting induction noise for the driver. Notably, this system was not used on the US cars, possibly because it would have caused Honda to have to re-certify the car's emission status.

This got me thinking- if Honda thought it was a good idea to feed the engine more air via both tubes, maybe I could try it? There is some aftermarket precedent here. First, Prospeed offered a revised system that pulled air from the rear fenderwell like the OEM 3.2 system:

bottom.jpg

On Bisi's dyno, this system pulled about 25% less vacuum than the stock snorkel, though it also deleted the factory airbox.

JacquelineNSXvacJun12web.jpg

The vacuum drop appears to have helped the engine in the region where I'm seeing MAP decrease: 5,000 to 8,000 RPM. +10 hp and +6 lb/ft and that's on a bone stock NSX with no tuning.

Also, member @nsxlr8 fabricated something simpler, but deleted the front snorkel:
DSC_0499.jpg

Both of these solutions follow Honda's lead by pulling intake air from the low pressure region behind the rear wheel.

I figured this was enough for me to take a stab at it myself. Here's my solution:

20231014_165826.jpg

I took advantage of the longer AT resonator to add a 30 degree coupler mated to a 2.5" velocity stack. The length and angle of the coupler place the stack perfectly into the fender well and does not interfere with the fender liner.

20231014_170718.jpg20231014_171209.jpg

It's a fairly smooth pathway into the airbox.

20231014_165834.jpg

With this change, I've effectively doubled the volume of air that is available for the airbox. I am excited to test it, but the Zero is still down because the exhaust is currently with @NSX_n00b being repaired and refurbed with new mufflers. I'll have to wait a bit longer to see if this helps the pressure drop at all.
 
Last edited:
Exhaust

As I have mentioned elsewhere in the blog, my used Prospeed exhaust is in bad shape. There are leaks all over and both mufflers are blown out and rattle. This does give the NSX a glorious roar in VTEC, but in truth, it's a bit much. Thus, it was time to pull the exhaust and have all the holes fixed and new muffler cans installed.

In addition, due to my own ignorance, I need to have the rear header adapter extended by 20 mm because the Pride V2 headers are based on the 2000+ Taitec units, where the rear header is shorter to fit the 00+ cats. The great LarryB himself explains it here. This should help my rather drastic exhaust skew and leaks at the header ball joints. This is the only picture I took LOL. It took me longer to find the right sockets and extension combos than it did to pull the exhaust. Use anti-seize, people! :)

20231014_173128.jpg

The cat looks new inside, btw, thanks to @MotorMouth93's excellent tuning script. No black soot here!

Pulling the exhaust also allowed me to see some truly beautiful blueing on the headers. At least you know the car is being driven properly. Enjoy the exhaust pron!

20231014_173057.jpg20231014_173034.jpg20231014_173011.jpg20231014_173000.jpg20231014_172953.jpg20231014_173041.jpg
 
Condenser Guards

While perusing T3TEC's instagram feed, I noticed that they had a Type-S in the shop and it had Honda OEM grommets installed on the condenser guards. As this whole point of the project is to be as close to OEM as possible, I had to do something! A quick check of the JDM parts diagram confirmed it- you need to use the 30 mm grommet. Luckily I had a few spares.

20231014_173653.jpg

Here they are installed.

20231014_173752.jpg
 
Are the condenser guards OEM? Whats the P/N?
Yes. Mine are the Garage Kite aftermarket versions. They require a lot of sanding to fit properly. The OEM are:

71107-SL0-900
71157-SL0-900
 
Health Check 04

Apparently the prior owner worked at Pep Boys, so there are all sorts of cheesy bits on the car. The interior is rough, which is ok, as it is all going to be gutted to go Type-S.

Pep Boys door guards.

View attachment 155085

Air Jordans

View attachment 155086

Looks like I hit my quota limit? Will try to post more tomorrow.
I don't like to quote and reply, but of all the ricer shit on this car, this one floored it for me. I hope you bought this car for real cheap, cause I dont know who decided they wanted to ugly mod the crap out of a Civic, and then said, no for ten times the price, ill do it on an NSX instead. the Italian part of my ancestory is upset at the aestetics here
 
Back
Top