• Protip: Profile posts are public! Use Conversations to message other members privately. Everyone can see the content of a profile post.

Honcho's Long Road to Imola Type-S Zero

Headlights

20231104_180116.jpg

20231104_180030.jpg

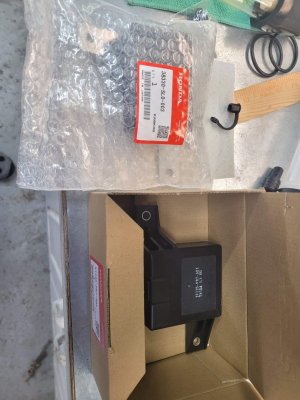
While the Zero is in the air awaiting its exhaust, I'm attending to some housekeeping items that were left over from the build. You may recall that I installed Hikari 2020 LED bulbs in the lights and replaced the levelling units with the updated 2001 version. However, I kept the original halogen hi-beams. Since my headlight control module is on the fritz (new one on the way from Japan), I decided it was time to replace the hi-beams with the same LED bulbs for a complete look and install the rubber caps on the levelling bolts.

Prime's very own @Wild Turkey printed me these very nice extended bulb covers, but They broke on removal- it seems the bond failed at the seam. No worries, a little CA glue and overnight in the clamp restored them.

20231104_180056.jpg20231104_180051.jpg

Installing the Hikari bulbs in the hi-beam.

20231104_180046.jpg

Job done.

20231104_211308.jpg

Back in place. Note that with these bulb covers, you must remove the entire headlight unit to take them off- no changing bulbs with the unit in the car anymore.

20231104_212137.jpg20231104_212143.jpg

Confirmed the levelling bolts were at 13mm and placed the new caps. These are probably missing on your NSX.

20231104_180036.jpg20231104_180131.jpg
 
Headlights 2

Fun bit of JDM unobtanium. Honda Genuine headlight screw covers in Imola Orange Pearl. You can also see the crusty old rubber caps for the levelling bolts.

20231107_103636.jpg

Snapped into place. A bit nerve-wracking TBH.

20231107_103839.jpg

Now we do the right side of the car. After that, I'll have to put the rear wheels back on and put the car back on the ground. Then, I can level the beams. Hopefully the exhaust will be done by then!
 
Strange spot for a break with way more strain on the tabs. Glad you were able to fix it. The vented ones aren't as strong as the unvented, but I'm still surprised.

Those headlight screw covers from Amayama can be a bodge to get in (I dropped one & had to take everything apart to get it back again. :() I actually thought of tossing them after ordering them all the way from Japan since you only see them with the lights up. And, they're only on the outside for some reason so it looks like you forgot the inside ones even when you didn't. But the stock stickler won out & I left them.
They broke when I twisted them. I think it was just a failure to bond fully at that particular seam line. The rest of it, including the tabs area, is quite sturdy.

Yeah, the covers are a bit annoying. You kind of just have to line them up, close your eyes, pray to the gods of Tochigi and then press harder than feels comfortable lol.
 
Headlights 3

Right side is done. Wanted to give Prime a closer look at the Hikari bulbs. Hikari makes brighter versions than this one now, but I like the light output from this single, bulb-shaped Cree XHP 50.2 LED than the flat multi-LED designs. It's a very even light similar to a halogen or xenon. 15,000LM is plenty of light for me.

20231107_213451.jpg20231107_213420.jpg
 
>I actually thought of tossing them after ordering them all the way from Japan since you only see them with the lights up.

Uh oh.

>But the stock stickler won out & I left them.

Whew, I was about to excommunicate you from the club. We are all about taking these cars too seriously and concerning ourselves with the unseen quality and beauty that few will ever see...just like the original folks who designed and built these cars.
 
Exhaust 01

The short version: At this point I should have just bought a new exhaust.

The long version will last several posts. As many of you know, I believe the ultimate exhaust for the NSX is the Fujitsubo Super Ti. It's really the only one that checks all the boxes. And you can reference my extensive thread for more info on that. However, it is less well known that I believe the best sounding exhaust for the NSX is the GRF EX-001. Well, GRF has been out of business in Japan for almost 20 years, but luckily Brian at Prospeed decided to make one for the US market. He called it the DSE-001.

Thanks to my NSX Prime friends, I was able to source a used one that came off a race car. However, both mufflers were blown out with loose metal in the packing that rattled, several of the welds were cracked and there were a few holes in the pipes. Even in this condition, it sounded AMAZING. But, I had to address these issues for long term use.

The exhaust was delivered to a muffler shop and he replaced both mufflers with new cans. I chose the Totalflow product mostly because they were the closest in dimension that I could find to whatever unicorn Brian used on the original exhaust. Basically, a 5 inch can that is about 14 inches long.

He also fixed all of the holes, but in truth, the welds...could be better.

20231227_222324.jpg

I'm a little concerned that while the flanges look like they will line up fine, the tips may not be straight anymore.

Next, because my Pride V2 headers are based off of a 2000+ NSX system (the Taitec GT-011), the rear header is 20mm too short to fit onto the 91-94 cats. Thus I needed to extend my rear adapter by 20mm. He did that too:

20231223_134317.jpg

Except that he welded the header flange 90 degrees offset! What you see above is the "fixed" adapter with the flange in the correct position. So, yeah, I had it fixed. I took it to a Meineke down the street from my office and they said they could spin the flange 90 degrees no problem- they had a custom exhaust guy that did really nice work. But, he was out for the holidays. I said no problem.

So they call me a day later and say it's done. This is what I get back:

20231223_134331.jpg20231223_134345.jpg

Yeah... So the manager said he felt bad. The custom guy was out for the holidays and one of the regular techs (who is not a welder) grabbed it and did the job without him knowing. First, he cut the flange and not the extension seam, so the flange orientation is off. Next, the weld looked like an 8-year old did it. He said by the time he caught it, it was finished. They didn't charge me.

So now I have a questionably fitting exhaust and a ruined adapter. Sigh. Ok, but this is a journey not a destination, so I pressed on. After burning through three dremel grinding bits, I was able to get the flange to be relatively smooth:

20231227_182722.jpg20231227_182734.jpg

I tested it and it now fits on the header donut seal. However, it's probably not a good alignment anymore. I reached out to Chase at @PrideExhaust and essentially begged him to make me a new adapter that is 20 mm longer then their standard one. Hopefully he can do that. As for the exhaust, I'm still gonna try to save it.
 
Last edited:
Exhaust 02

Forging ahead. I decided that since the exhaust was badly bronzed from all the heat and moisture in its life, I would paint it black with VHT ceramic header paint. I hoped the paint would minimize some of the bad welds and also provide a layer of protection for the stainless steel. First step was to prep the metal with a die grinder. I removed all of the years of grit and discoloration.

20231227_182920.jpg

Completed. Seeing it shiny like this made me want to continue and just polish the whole thing. But, even when polished, the metal will still eventually turn brown.

20231227_222536.jpg20231228_114108.jpg

Also, prior to sanding, I test fit my titanium tips and marked off where I needed to drill the bolt holes.

20231227_182707.jpg20231227_222530.jpg

Next, it was time to mask. I decided to keep the cans shiny.

20231228_124524.jpg20231228_124546.jpg20231228_124559.jpg

I laid the paint down and took advantage of the Colorado sun to dry it. Turned out nice.

20231228_135330.jpg20231228_135300.jpg20231228_135338.jpg20231228_135343.jpg
 
Exhaust 03

Next was to add the titanium tips. My engineer father taught me that any time you put two dissimilar metals together, you should use anti-seize. So I coated the tips with a thin layer. I also hope this will prevent any vibration/rattle.

20231228_143202.jpg20231228_143451.jpg20231228_143458.jpg

The side effect of this is that the tips slid on easily. Also my holes lined up perfectly.

20231228_143615.jpg

Installed. They look beautiful. One issue is that Pride only included two bolts, so I messed up in assuming each tip needed two. I'm off to Ace Hardware tomorrow to buy two more.

20231228_144448.jpg

I'm really pleased with the result. Some people might think burnt Ti tips are so 2005 rice, but I like a little wasabe in my futomaki if you know what I mean. ;)
 
Radiator 02

While I was waiting for the exhaust paint to dry, I decided to tackle the radiator using the Alum-Bond epoxy material. To prep the area, I sanded the dried crusty coolant away and scuffed up the metal. To my surprise, the dremel sander actually filled the pinhole with aluminum powder and it did not weep! Taking advantage of the dry surface, I mixed the epoxy and applied it to the area. A bit of good fortune, as I completely avoided having to do a drain and fill. The epoxy takes 6 hours to cure at room temp and it's winter, so I'm leaving it overnight before I start the engine. You can see in the picture where I nicked the paint with the dremel- d'oh! One more nit to touch up...

20231228_143020.jpg20231228_143007.jpg
 
Exhaust 03

Well all that grinding with the dremel paid off. The adapter fits perfectly with no leaks and the length puts the exhaust in the correct position. However, while the exhaust technically "fits," the side hangers don't line up anymore. Right now, it's hanging on just the bumper hangers and looks pretty good. It looks like I need a right side hanger that is about 10mm longer to pull the right side tip into position. In other words, the right tip needs to come in about 10mm and the left tip needs to come out 10mm, so it needs to rotate counter-clockwise. One of these might work well. Vertically it's perfect though. Will update later with pics.

Drove the car on errands today for the first time since October and man is it good. It could be the colder air or that my new intake is working. The car feels torquier all over the powerband. A local cop pulled over next to me in the Safeway parking lot and started gushing. He's like "I read about this car on NSX Prime! I can't believe it's local!" We spent 15 minutes talking and it's clear he's read the build thread LOL. Anyway, nice to have the local PD on your side.20231230_115232.jpg20231230_115203.jpg20231230_115157.jpg20231230_115144.jpg
 
Last edited:
Radiator 03

We have a successful repair. I ran the car well up to temp today driving around and the Alum-Bond epoxy is bone dry. Hopefully I can finally put this one behind me.
 
Oil Change Service 02

Checked the oil level today after the drive and I'm a little high- about two pips above the top dot. Strange, as I measured exactly 5.3 quarts going in, but I drained it cold so maybe some oil was left in there. I've been changing NSX oil for almost 20 years and never missed the mark, but I guess there's a first time for everything! Anyway, should be a fun job to test my new oil extractor and see if I can get the level right.
 
what are the chances the local constable would be fanboying on your car...
 
what are the chances the local constable would be fanboying on your car...
I sowed the seeds of that one, I think. Another officer would stop by the house occasionally to check on the restoration progress. I referred him to the build thread and I bet he shared it with his buddies. Our PD is only about 20 officers.
 
Oil Change Service 03

I made a mess LOL. Thankfully not on the car.

Here is my dipstick. As you can see it's about a good 5-6 mm above the top dot.

20231230_113151.jpg

Doing some maths, I estimated that I needed to pull about 75 ml of oil out to hit the right level. So I used the oil extractor to do that.

20231230_114144.jpg

Another dipstick check showed I hit it right on the mark!

20231230_114132.jpg

As for the extractor, I think there is a problem with the air venting because I could barely pull back the handle- I was fighting air inside the cylinder. Then, when I tried to push it into my oil container, it exploded from pressure, blew the hose out and left a puddle of NSX oil on my garage floor. I still managed to get the job done, but I need to figure this thing out better.

After setting the oil level, the NSX turned into an amusement park ride, as each one of my kids asked for a long drive. So I drove a 30 min loop on the highway for each of them and got the car good and hot. All is well.
 
Nice to see this thing out and about! How are the ECS treating you so far? My RS4's have finally bit the dust and I'm thinking about trying a slightly more temp-friendly compound to extend the driving time I get during the year, but a little concerned about how the tire feels compared to 200TW...
 
Nice to see this thing out and about! How are the ECS treating you so far? My RS4's have finally bit the dust and I'm thinking about trying a slightly more temp-friendly compound to extend the driving time I get during the year, but a little concerned about how the tire feels compared to 200TW...
I really like the ECS. Very comfortable, quiet and responsive. Grip is excellent above 50F ambient. I've run them down into the 20's and they still grip, but obviously give up a lot of grip due to the cold. No cracking or hockey puck stuff or anything like that. They are wonderful in heavy rain.

I haven't been to the track yet (still ironing out the tune), but I figure you'll give up 1-2 seconds per lap in the ECS compared to a dedicated R-comp 200TW tire.
 
Honcho my name is Mitch I live in Brighton co do you ever go to cars and coffee with your cars
Hi Mitch-

I'm South of Denver, so I usually go to the ones around here or in Parker. I'm usually the only NSX there lol.
 
Maybe I will see you at the vault in Parker this spring I hit all the north ones laffiette Loveland Denver outlet mall
Some car shows also
 
Headlight Retractor Module

It feels nice to finally be dealing with fixing little nits on the car versus building it. This week, it finally warmed up enough to drive (I don't drive my Conti ECS tires below 20F), so I decided to tackle the headlight retractor module. In my quest to stay on budget, I re-used the old module, since it was working fine. However and of course after the interior was fully built, the headlights started exhibiting the stay-up and randomly going down behavior associated with a bad module. Like the Main Relay, the Retractor Module suffers from cracks in the solder joints that cause intermittent failures in the headlight motors. It's just old and needs to be replaced. Here's the new one from Japan:

20240121_120935.jpg

Interestingly, the part number is -003, which in Honda's part naming convention means this is the 3rd iteration of the part. I wonder what they changed? Better solder joints?

Installation was challenging as always. I found myself muttering "of course this is hard- it's the NSX" over and over as I contorted myself over the seats to reach it. The reason was that I could not fully remove the upper rear trim piece due to the aftermarket seats. Plus the module is pretty tight in there with the harnesses and it is zip-tied to the throttle cable. Whew.

Here it is all installed, complete with a new OEM zip-tie (purchased separately). And only one skinned knuckle to pay for it.

20240121_124040.jpg

I also took the time to replace the two push-pins that were shattered on the upper trim piece. Interestingly, the new pins are black instead of the original white. This time, I put a little shin-etsu on them to potentially avoid another breakage on removal next time.

[HOLD]

Finally, I had planned to replace my re-used original fan control unit at the same time.

20240121_120928 (1).jpg

However, the lower bolt was simply inaccessible. I realized I would need to remove the center speaker panel, which meant removing the seats and the console box. It was a bridge too far for that day. Hopefully the old unit will continue to run until I open up the interior again to remove the wideband hardware.

Took the car for a nice long drive on the highway and it was sublime.
 

Attachments

  • 20240121_120928.jpg
    20240121_120928.jpg
    151.9 KB · Views: 2
Last edited:
Back
Top