• Protip: Profile posts are public! Use Conversations to message other members privately. Everyone can see the content of a profile post.

Honcho's Long Road to Imola Type-S Zero

General

My original turn signal light units are badly sand-blasted from 29 years of use. My original plan was to polish the plastic to restore them, but there is so much red overspray on them that my initial attempts yielded little improvement. With the NSX parts price increase coming, it made sense to purchase new units. Notably, I will have to move over the breathers and light sockets from the old lights. Also, the new ones do not have the foam on the top and bottom. I'll add some epdm foam to compensate.

AM-JKLXMZtIvV_DoBAXME_otOGgw47grzsEaa6-HBvtqrVFfi-VLDhOwok2JC9TxbX3Vc48kCQBOtDjAS2kv4gzHfPS_QRgpNgA9KkLC5_gOXvil1XRCJxl65dk6GA5-WjcqAaTr7nANVZyKmO94p1xqqxfK=w933-h1243-no


AM-JKLX3t5UJVOB5pzJUamKsKQG30vVCMkiSxMsXgAzOdE9DyidKs7GXKSaG7yhTahh_MuZEtl3Fq2yGpElqUJN0hU86w9uc8ZxtzcMP4FyQ7ciwv1LSlImR5uucVDQ-S2WFfUCVmqo19JEBKi8mliIxh9TG=w1283-h963-no
 
Last edited:
Re-Assembly 29

Power Window Regulators

I planned for my Saturday to result in fully installed windows and door seals. Unfortunately, the NSX had other plans. My window regulators are missing the factory rubber guides, so I bought a set of the yellow SOS replacements. But, to install them you must remove the window guide from the rail. The directions say to use vise grips to pull the cable down to release it from the guide. This is bad advice and resulted in my fraying one of the cables (by only one strand- I hope there is enough left to bear the weight of the window.)

The better way is to unwind the cables from the internal spools to relieve the tension. This will also permit cleaning and greasing of all the moving parts. Problem is, I have never done this job before. Spencer and I struggled for 5 hours trying to wind up the spools correctly. We watched Hugo's video over and over, but they are still not right - the cable tension is too loose. After some very frustrated research, I understand now how to wind them properly. But now I have to re-do both regulators. And, the door internals cannot go together until the glass is in. So, we're behind by a week now. :mad: Even worse is that I discovered my regulators are fairly new (2013 and 2014 production), so I frayed the cable on a perfectly good regulator. I'll run it until the cable snaps and the window drops. Then, it will be a zillion bucks and a kidney to buy another one I'm sure. :mad::mad:

I'll add some pics of the cleaning and re-winding process later.
 
Re-Assembly 30

Door Glass Guides

In between swearing at the regulators, we got the glass guides cleaned and re-greased. The original Honda grease appears to be more of a moly paste, which turns sticky after years of age. It is also very tough to remove. The moly is left behind in a super tacky and sticky residue. To clean it properly, we washed the rails in hot water with a de-greasing dish soap. This removed the large sections. Then, shop towels soaked in acetone were required to be pushed through the channels with a screwdriver to get the rest. We finished by blasting them out with brake cleaner. Having done this now and seeing what is involved, don't believe any tech who says he can clean these guides while they are still in the car. They must be removed and cleaned to this level:

AM-JKLXweVH-kmWFcR2OpWBdVtoGiGByJZo9q_MpTFe6DtOfgSPGvQ3ThKGSU2dsNYwfw7JhIZcahexnrKliMSFdo-ClT3KEeIGAXy2noJbMoch94GrkTRCccu_AL69sjlfmQv-ygMcusISSpnt9T8MDCErT=w933-h1243-no


After lots of research, I settled on the Super Lube silicone grease with PTFE (teflon) for these windows. The idea is that the silicone is super tacky and should resist water/weather similarly to the urea grease. But, as the silicone carrier grease evaporates away over the years, I'm hoping that the PFTE powder will remain in the rails and provide continued lubrication. Ideally the silicone won't leave a sticky residue like the Honda grease does. Here are the cleaned window guides and lubed up with the Super Lube. I test ran them through the rails and it's pretty slick. Hopefully, combined with re-greased regulators and cables, I'll have smooth windows for many years.

AM-JKLUu4SAuQwBu72llsvyxP5yKOZMs3hXR_SbIk1FFR79EaleEXt9lroj_ZhLgOI-J64QV7p7JArVx1vRLjYKm2glkW3nKtFotzMj6OyuoCZyqm8-YGa7OVvrtBYA_lSqXg9NOzxPPtg0JAWbWQIx4CchR=w933-h1243-no


AM-JKLWb8TQYA7u7a-In8BAcrq9exxhXOtb8LFn9g9nbM-zmMyFVkS9Mq-cTQMViXzp4u0LLDe8IrVSEuHFIkYdYi-A1PRYj6X2hzgZCwrnIMprJ-hIG-6JKMphBKlGKSz4RhA7WVv73waKxF8Gw6NrNPplA=w933-h1243-no
 
Last edited:
Re-Assembly 31

Headlights

My MITA order came in, so I was able to place the Left headlight stopper, using the techniques I outlined in the DIY thread. I also ordered new cover mounting screws. I noted that they are now metal-finished versus the original black color from 1992.
 
Last edited:
Re-Assembly 32

Mirrors

Carefully assembled the painted mirrors. After observing the complexity and design of these small parts, I know we'll never see another car like the NSX again. Honda must have lost so much money on this car. Anyway, carefully cleaned the rubber spacers, including scraping away the red overspray on the driver's side with a razor blade. Tedious work and my eyes were tired. A soak in 303 and then it was time to assemble the mirrors and mount them. I noticed the front nut on the passenger side just spins and spins. I'll go back to it, but the stud was barely poking through. Perhaps it is binding on the rubber spacer?

AM-JKLVm8FdSA1ys73NWQ22aY6pfr5E11_-klgg_4FuHIEhHnUn_GEvv3-nl4l_EU0HnJ7tz6YzKT_nf-lqgC4uuc3xL1Veq3t_NtAsDz8sDF_MKe1-dLhnu9AAexSI9LJoL9Ri47aGDJUKVesvGYGMDQfXy=w938-h1250-no


AM-JKLXbLu-6K3TMscc1S6jPBhw-oDNafuMzGIhaX0gXm8yNTCppMAUqUgcW8Im95QsUD9T08lrxmrS-v4KgrVJvqcNr4KVzGzUtfi2pLrAWs-hgx3d8rNKphJoCJUud3MZtgfuJ90dUBMj3pm4e7qQ6_6sc=w938-h1250-no


AM-JKLW7Wv5CB2ShqObH4uKYwpuaLZaIsBdrc5pLvoB6Y-U-1bj4StZ5lXN5JcmQwvgr4eIhB-8RtrPcnUQWxQTeTXgHa5a97blHZf4aOT1-wlGgRh66g8vmNgoJrZPHmLg5ntWec2_ZZFwBwzuvizA-IIWs=w938-h1250-no


AM-JKLWg3btImV2i8hPKZPsDkIRcOvZ25jyEwgtjA1tmb57kAgHZA0rfV_8nyJm8HXGpzkaL3tNN-KIWf3SGkqYS1h4WvxqabC2-nSXsL9iD0sAyGKIq6sj1H5L1GHTGfIIJ4KYSj5IUFcN3eUfRFztWOvEF=w938-h1250-no


AM-JKLU3wW0djbQ5JXHEGstCnhXGHsfrK6hE_u50aoFfA835EDQyO_Ip8HRCzeedxHyUxJAPNPrJOqmsw4ePv0mZffR-Zc3BWVerygyJmqY57lnbmGkagrfCSHbHDLWaFte5xVhlScKiclfcTlSdR3ev9a1M=w1279-h960-no


AM-JKLVHnUNuPTzI8WimV7zZ8UMkYHBmZUxCKQ_EDyS9ESkPtt0UVWFpaxavIHoUNbcROr54VbT3A0PHBOXC7RwdEdn23oK8zNkidLrU04Az8Qz8VmWyf2WoEynsVdO8WP8BLyUCeRJ8sQxrQ1Ivt_ZWl05k=w938-h1250-no


AM-JKLXlZXbau7munsZasCi68jJfK5xXxnui9zTuY4vW-bcHByBtDeAtsZSOQkUExreXL_Wjc4nlmo13EAGPPVea0gHsDEKSFCGdOzI_jB-rAFlsoAodvibOCRV1qh25FC6jj6eIczShLOaeq-8kUnbEfrgC=w938-h1250-no
 
Last edited:
Is it weird that the one thing I'm most jealous about are your window guides?

Nah- I kind of went back and stared at them a few times too. :D

I’m interested in the cable rewinding method. Where did you find the info? Care to make a video?

I managed to find a set of Hugo's written instructions, which are much more helpful than the ancient 480p YouTube video. This, plus my 5 hour exercise in futility the first time around gives me what I need to know.
I'll start a thread in the DIY with a video if I can convince Mrs. Honcho (or maybe Small Daughter) to run the camera.
 
I'll say it again .your painter did amazing work...
 
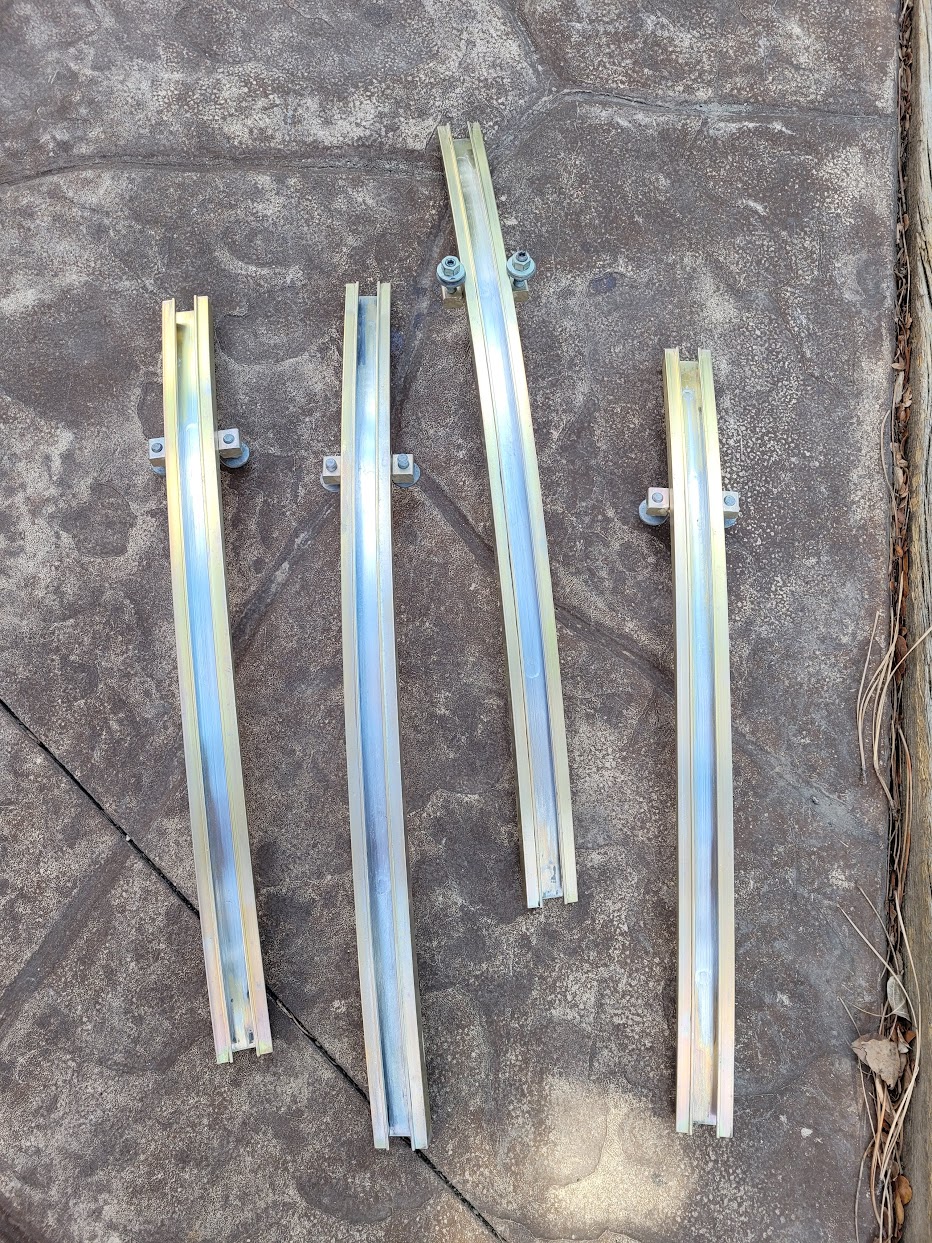
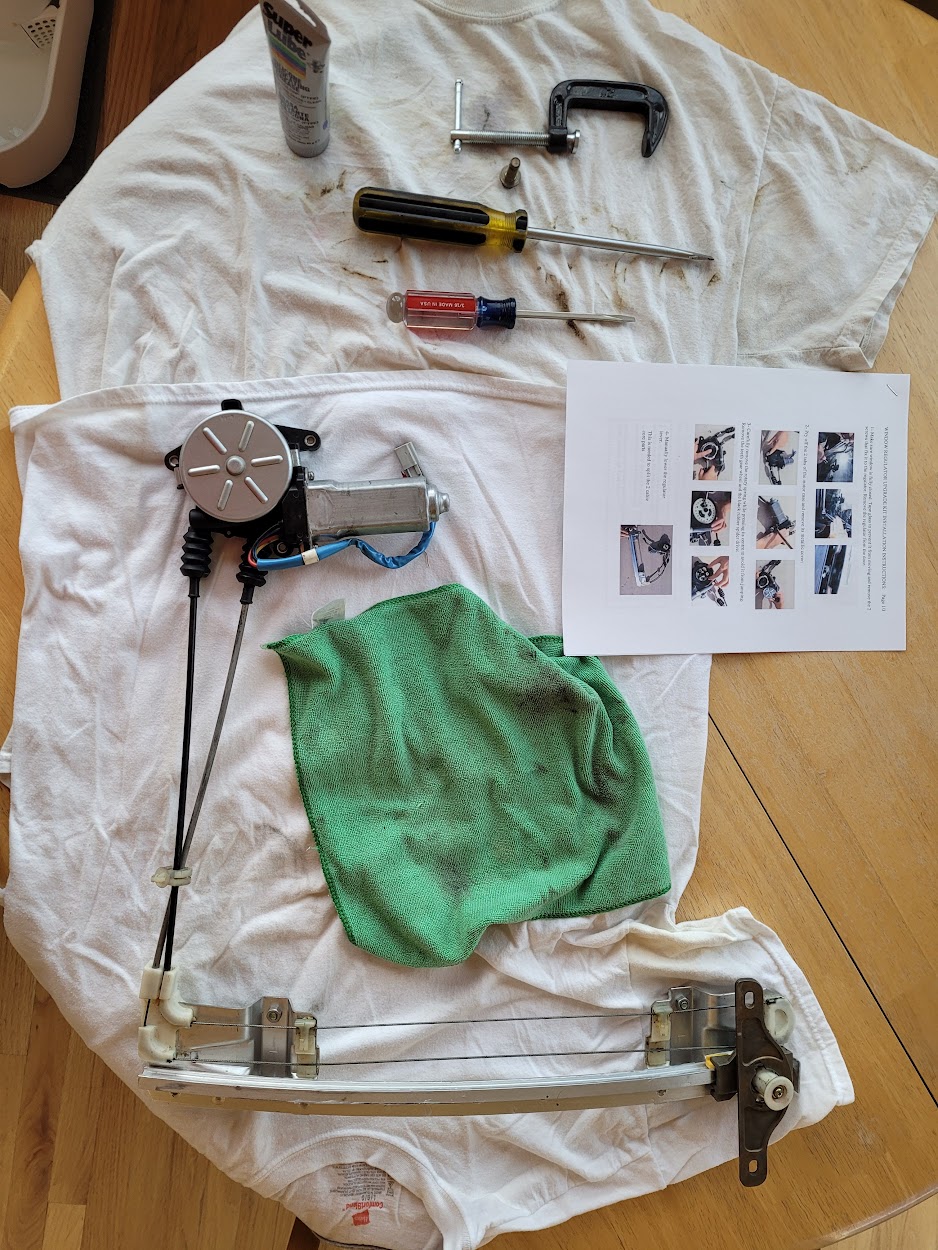
I just rebuilt my regulators with the Hugo kit. Like you I was easily frustrated by the video. Also like you, I found the written instructions more helpful. I debated making a new video while I did the work....now I wish I had. A couple of things I learned that aren't clearly described in the video or instructions:

1) Buy or make a small C-clamp as shown in his instructions/video. This is key to being able to hold spring compression at the spindle. At 6'02" in the video.
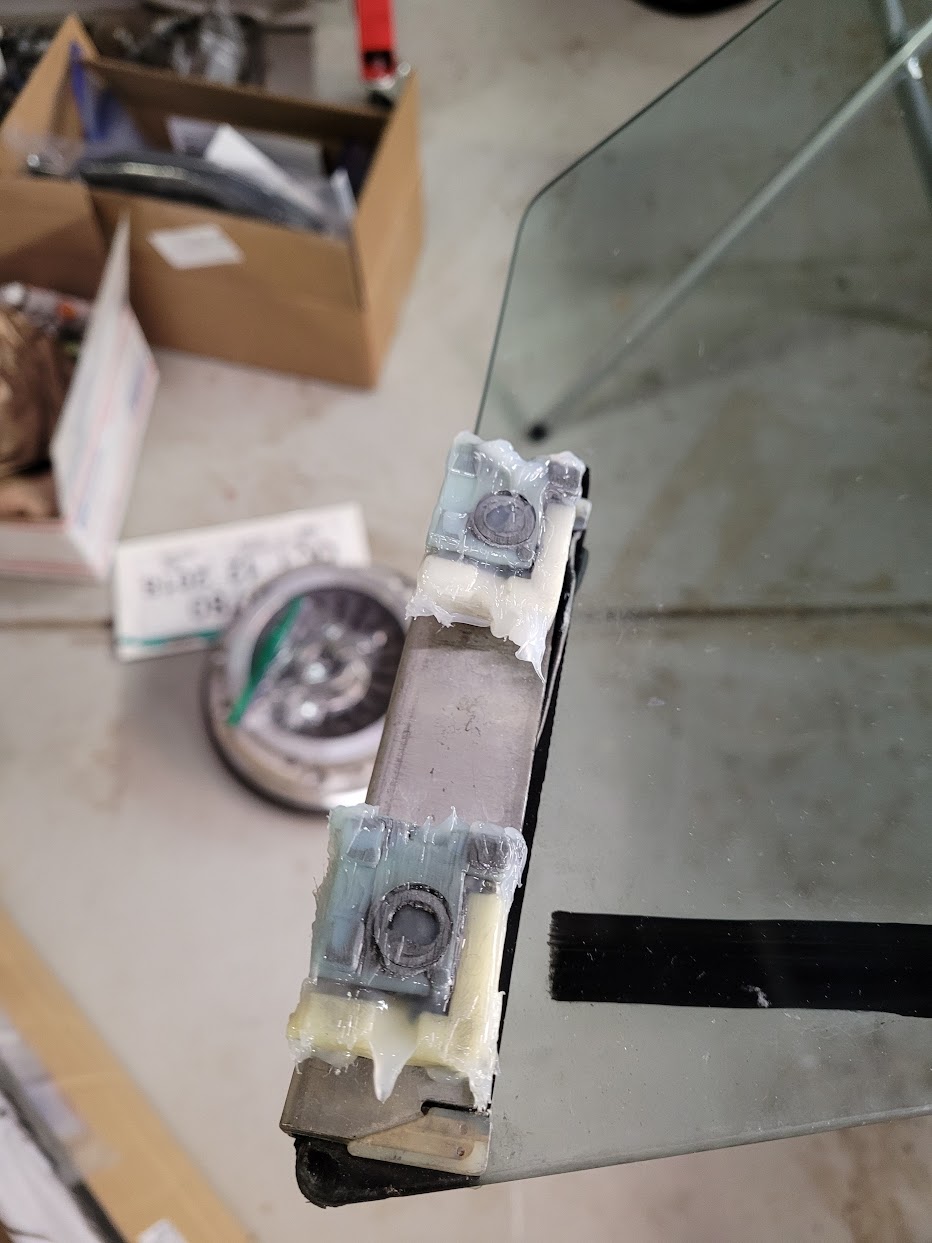
2) If necessary, clean and re-lube the plastic gear parts with light viscosity grease
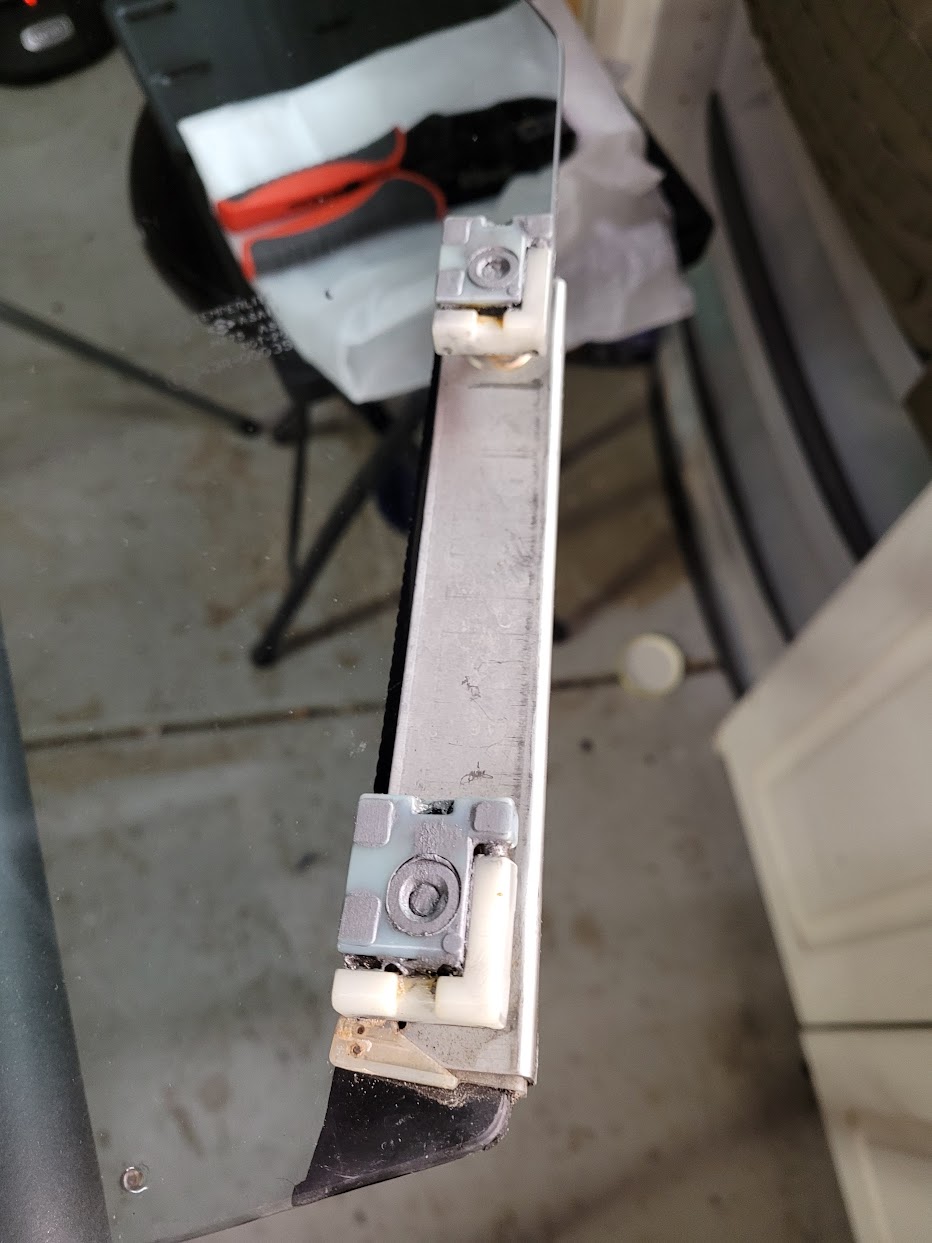
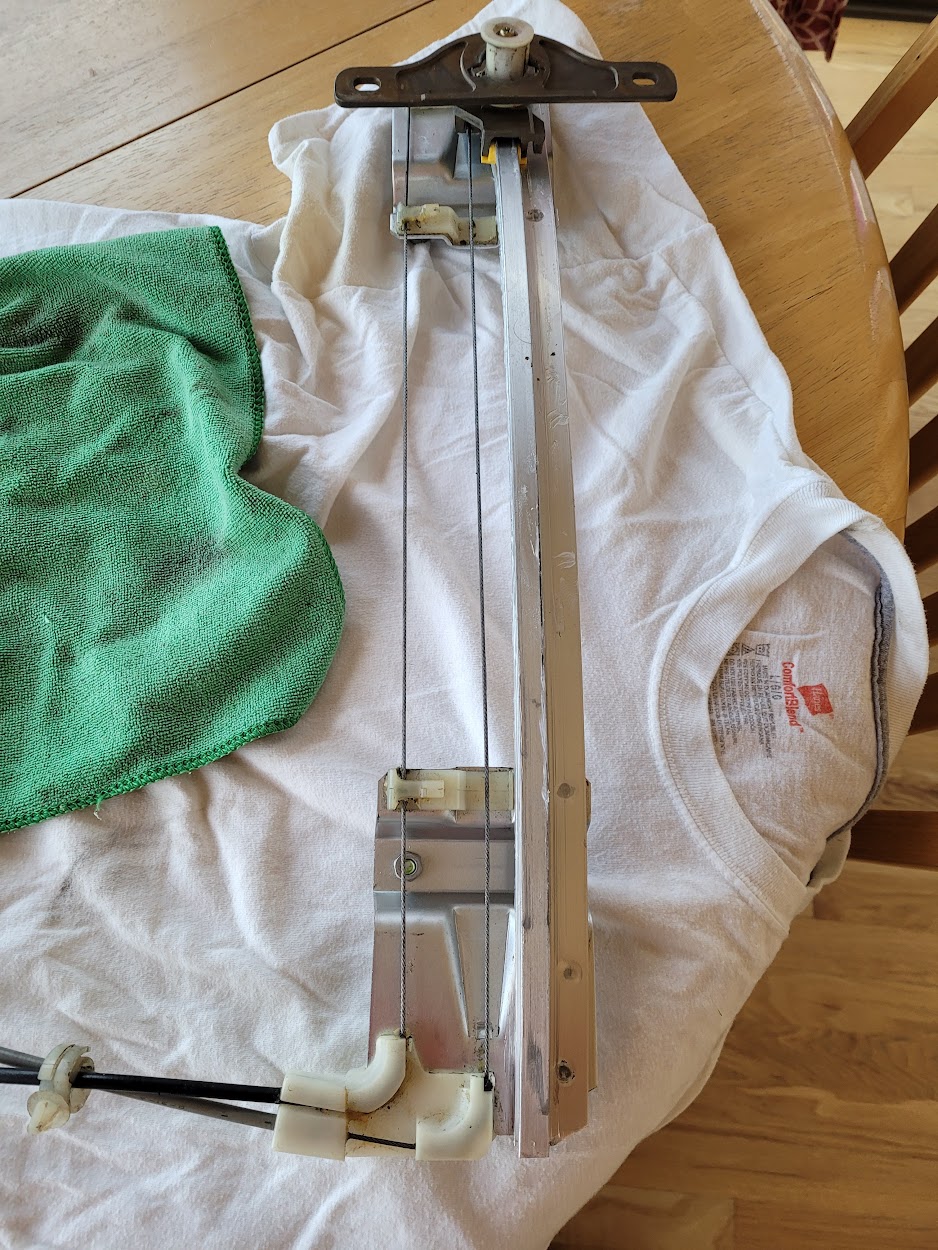
3) After joining the two plastic cable cores together, make absolutely sure the cable rests inside the plastic grooves (akin to laying a cable in the threads of a large bolt). At 5'42" in the video.
4) IMPORTANT!! During re-assembly, make sure you raise the regulator assembly on the track before you re-install the spider drive tooth gear. If not you get to disassemble the gear case all over again. At 6'38" in the video.
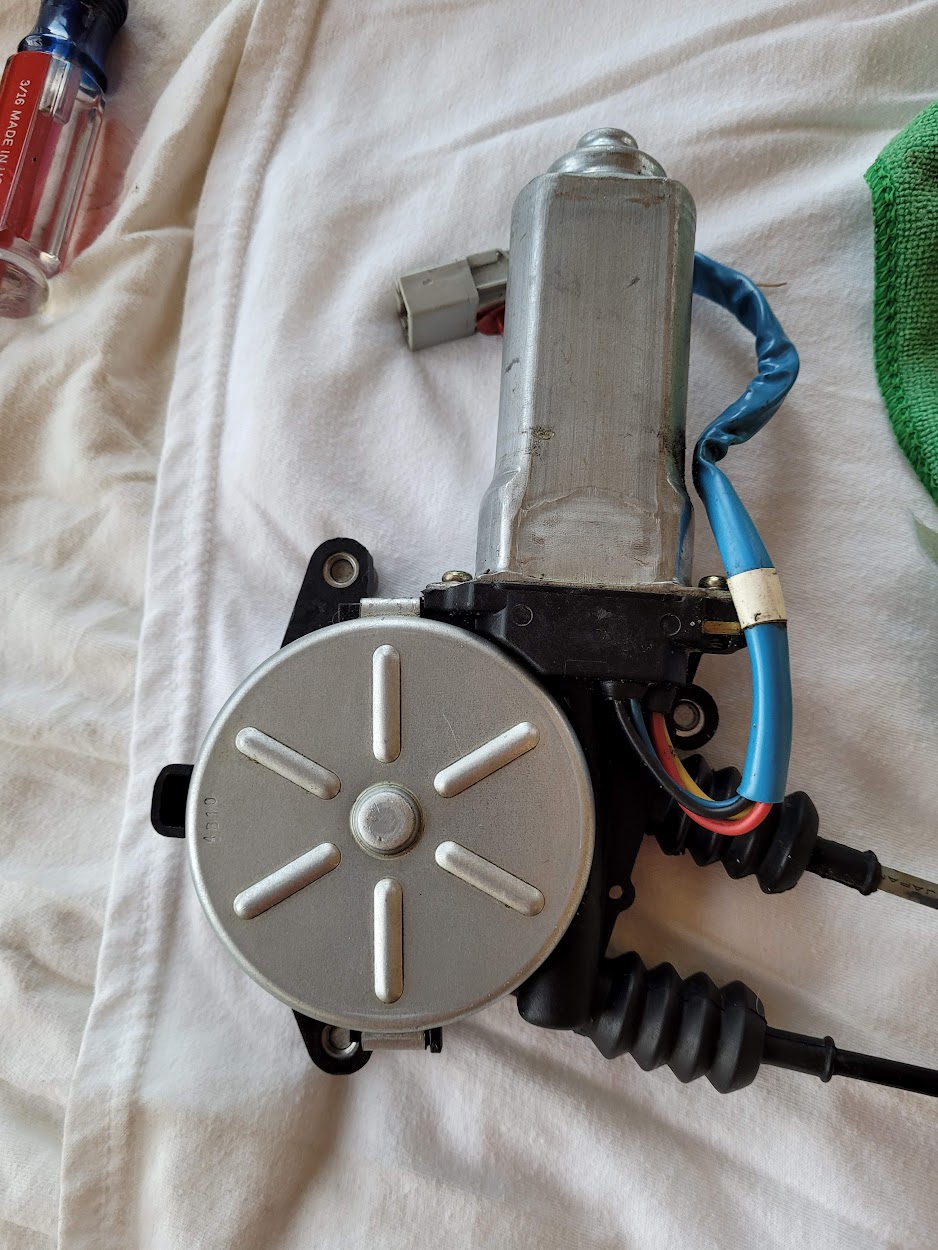
5) When installing the rotary spring, right door regulator spring is wound counter-clockwise, left door spring is wound clockwise. When winding the spring, make sure the center of the spring is properly engaged with the center spindle, otherwise it can pop out. If it doesn't appear to engage properly, bend it slightly so that it makes solid contact. At 6'55" in the video.
6) ALSO IMPORTANT!! Test the regulator before installation by plugging it into the molex plug and raising it up and down. Call me superstitious but could save some grief.
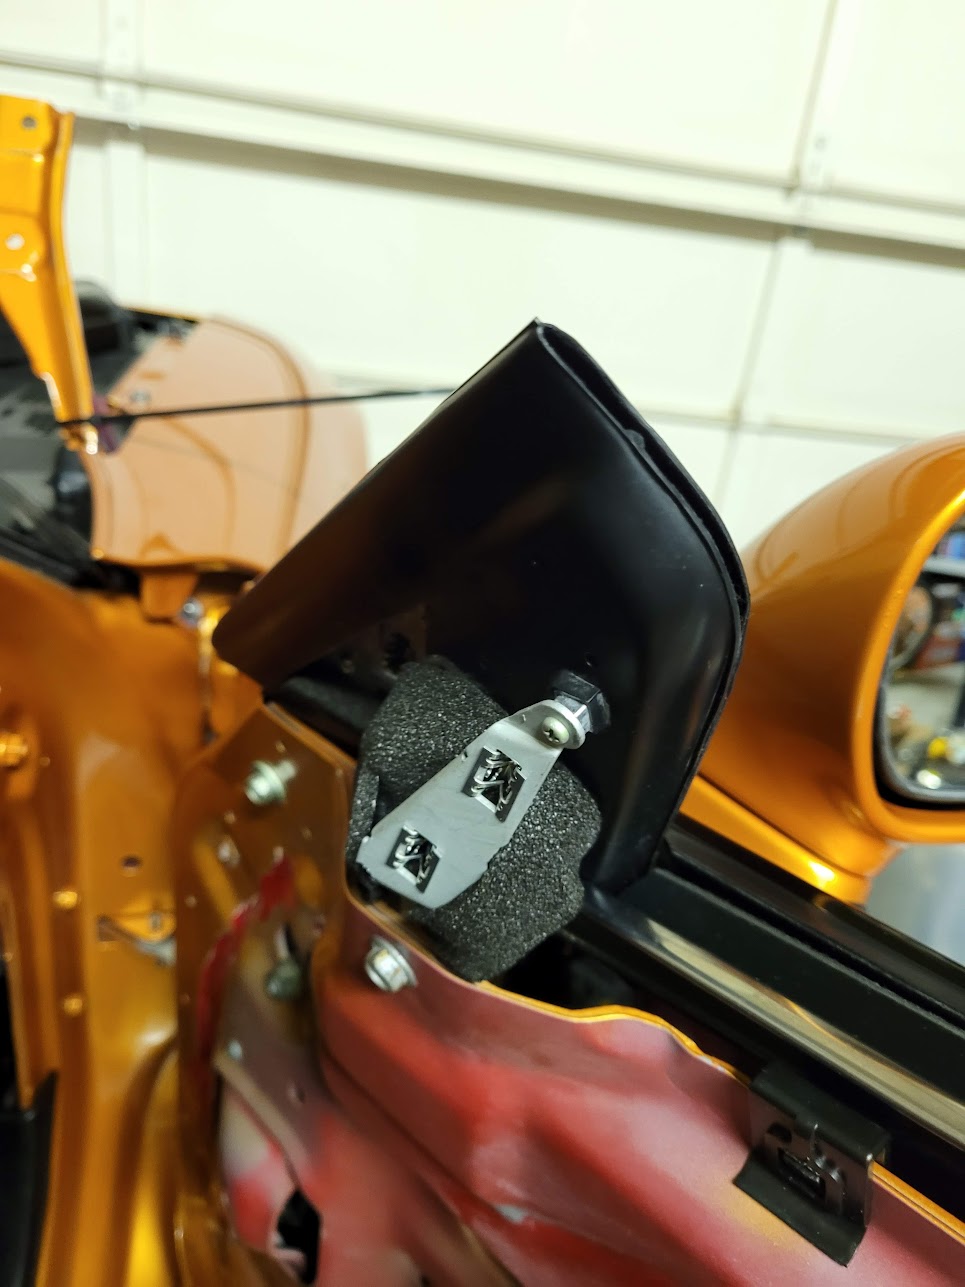
7) During final installation of the regulator, you might have to lower it a little to get it to align correctly to the window, not a big deal.

**Also of note (for people ordering Hugo Cornilleau's regulator repair kit). Hugo lives in Portugal, so the kit ships from Portugal. Took over a month for me to get the kit. If you need it in a hurry see if Hugo offers expedited shipping. Link to his YouTube video is below:

https://www.youtube.com/watch?v=SSzUMkjHv5w


Sorry Honcho for hijacking your build thread, listing the steps above has been strangely therapeutic. Only now realizing how frustrated I was a few times during the regulator rebuilds. I'll get off my soap box now.
 
Engine Refresh 32

Cylinder Heads 1

The cleaning process. The heads are stripped, valves removed and then cleaned multiple times in the industrial-sized ultrasonic cleaner, which uses a 100C hot solvent bath. All plugs were removed from the heads prior to cleaning, so all of the oil passages are fully cleaned out.

Ready for their bath.

AM-JKLWWOwHD84p2MXvvpAM3Wcb5JfUlzOorhRlASaCP7pbP0n-AFQxAoJfHQGaqy__U423IjbMnlkPLchPojr-QvI9Q1uvpghii02J6ti_B37zKfnDwYPBR5vlHlc9db54kscscFIbRcJJxVV1epZYlFDas=w935-h1250-no


AM-JKLX6dAz4ufJR7Vvzn7k-FnLXtEEzd0v_71CRZCSIUJaDS4yi7uSesks_koBXehvYSJq69rNCXlz8xpvtneRjDCU-CS4EKgT979kz54Y5bz9tPEnaYTGYPxH3bTLGnA8jYQkxp1oIafsmtBtAAuCN9qHb=w935-h1250-no


AM-JKLWSYea7EJfYeaJ96Lsw9zS5TFpcElGnJpBjtz0Wvpg-AriOTL0W0_gdMu5wHrMYN9xFfBPIfh7YLta9G7D8SQXUM7IM__EpAdkOrq0Qkng0O2XwE9IYx__F1MjLPKIaAwuXHxv7ANhSnvtPGZNx6aL5=w935-h1250-no


Into the tank

AM-JKLWIeF8qVDFwV4U4doMtWIcm88kF96BaUvaZV1PT-0WtCyMCeq5jM6uo8aJ8a1T8PKX7aSxP2ZfFfOTk3KfMk7UuakPdIPctjLD-zdNlN4luP4RiRRSaImfOKXm-sowPXhFK36fFFCJtD6Da9qTKCQ79=w1279-h960-no


AM-JKLWuHA0j8f1oVu7lbJRgvnoGcUmYn4yZKt_29WSCiT7mNMH02atBcR5mhLhuQJUGDnaYsayCtOHlfy90KgTJ2hfp-1eKdeU6cUs7MokiXR42YPhnl1-w5tq6yp3iO8Hclt3kTwEj-jbzL-goAdUY7pNb=w1279-h960-no


AM-JKLUQgAVHB9QjUXKxXIX521u4sGIXezF4wkdiTC0tAXjO23u53w9-3fGL7b94g-wvPk0mOs4-Te9RqNjmhdjO7vq5MlqBRmFVbKOSm95joN7SW9UKwKfWROOnsHGlz1vd_po45tI6MIEvJx-lE3Hd9tgC=w1279-h960-no


The solvent does a great job in the ports. Also notice how smooth the castings are- you can feel it with your finger. This is one of the secrets for why the NSX heads flow so well from the factory.

AM-JKLWCyYugTVTzXq0Jz4V7eYqOgThmAMdX2P1t95QuaJr5FHGF35VP8C2gktCbq722WdsAwpgJ-_48V1VwELo6PigR7C2y7LtcTDv4jj9Evf3m0tQBy7FIkKPpi2gsAXltd3WWkh2UpXTB5mZG19LZrUN_=w935-h1250-no


AM-JKLWRcbWB2EZIO9qQAVCAHLwzhIV35D6uevEe0ApiY9vAXD56nHbZiH_FIF_NZb7zKA2KERDpPmHT_fAT_jcJEw_OBmD6kGq5UFqZEKz762hAwnisRzCkBeovshQNfZSV6Xb_I86q9iPrG86e00GDiEPl=w935-h1250-no


They also cleaned the cams and cam caps in the same machine, which is critical due to the many small oil ports inside the caps. These ports are vital for proper camshaft and rocker lubrication.

Going into the tank.

AM-JKLX94_S-yPLF_9CuSivWHSBU7jYWXDecFR-xHPgOfcpZZ190D9RpUpe_oJEn1iyYCMmZmlilAyB_i8ASGEaLTZBXp1ODaEHZ1CqQxu6DRDXcD5l3X4mn5IKDvFFL3rbuYhuX_DMUhkbsuDtlmVWfLG7t=w1279-h960-no


Before. Notice all the PCV blowby

AM-JKLWTSRWFE_qIQtylRnt5parw68z9Xm03Oq7Q3YGVaGwm4tRzVWTKBYcWHZaj89cqzKZpt5P3qn1Go7jCFt_t0s3N4cKP4-YpQQEcapBOujKVxOkVHpUfXDWygvhuhm_rg6OY5qWsp5qMzMfgjLcwFEvW=w1279-h960-no


AM-JKLWGwtLf9e8K7MWGfB3T7V6cEtDIHuKalMio_stHvMUyW1IG7uRGLvy-IntCYVH5MIGenr4woLMTYqnaE81NjxmLJYJLsCmWbHyEssfG_douC9JfAKl8A2c41dhexZZAgAXJfQI0Pfql9wNnK34rpHKj=w1279-h960-no


After.

AM-JKLWoC6aEnCdCV2YMKIJcjQAidrUVgL8OvdrFJ_bHOMdPrIqybSnuKU1wQHMd0YHAwfLrc_VZCHn8Sv5cdNO5WLjXYJuhrCbzVk8FEB9tB_Z4ldjHYnsUg_Ajtx5VjP9d1_kHDLPjMMEzS_fuMltH-dfk=w1279-h960-no


AM-JKLViMnehGkcnf_wD4ibb6lzm6gb_7G56l7kDp7g16IJRRLLONQbm85eXa1F_N9IoZuvlXmb8DWn964hF8PyhErxloMHSUVxWN3SR-g9pZ7GWZOe4USWFuncl9So2LkWojBKfFu0sNRmzTql2kzjdH57k=w1279-h960-no


Cleaned cam cap journals. Not bad for 137,000 miles.

AM-JKLVtYQftJn3dGu0XcHU0aYAX2U0V2vS2XDn5Cz7miuZjcii7PYMrztFUj09daekmhJPF_43L7CxjobqYueGtHW2RfyxUdLI_NyZ2xawb5z4vZkRYfXJVfAMirGSpj6mk7ATQgq6adrp7Fwpj7X9W0bvx=w1279-h960-no


AM-JKLX3MiGtsnhaR-1OsscBrzKhB1-eM-H6m865W23ORa16BnJP5O67osTSF5_n2sE2q0qZUDAjx53S_SYImzOssdLA-sNVUE2aBV9ZGk5ZgdYIltz2HEdH74kmRLxHVeN_UY7__GlZB3N4c1wO9i4YAVVy=w1279-h960-no
 
Last edited:
Engine Refresh 33

Cylinder Heads 2

Valve Guides

The heads were evenly heated to 300F in an oven, rather than on a hot plate as specified in the workshop manual. Then, the cast iron valve guides were knocked out. Then, the manganese bronze valve guides were installed. Because the NSX guides do not have machined stop ridges, guide install required several cycles of fitting and measuring to ensure they were installed at the proper height. Many heating cycles were necessary.

Going into the honing station.

AM-JKLXggD9o3ZvG0DYT8WxGEmq78-rqzvAlC06MpY97RtDux8E2PZiTkXl9Iyf8PGMVjjIn0l128H8svzohjIhzeTjPJBrU04Z2f1NLvtTJg1NZXYBQF2v1ONKs4nKo3mOhgHNu2RuI4ckfcEAQcV7qhJNH=w1279-h584-no


Lubricating the guide.

AM-JKLW2vMI_O6GdKjw0EDevhTHi1EYKYF491-6nq1f2vMWrJIEmA1h_mR7BcUmSFHEYc3qpN9jTJl58H85NWarZ7n2QZ3x5u3-WkxdoyM0HC7NXrs7ncZmgKFBd_fr6T11hHmjnLDCYn6G21-MQ5ly3hd5G=w570-h1250-no


Honing in progress. Over 0.003" was required to be removed on the exhaust guides!

AM-JKLXLN-zOKbauBtG1SB80Ack4BnYR1BQkoO739DPWCYgAAlHrw8ngRYa3TrBBkXxpgxMN4yK9zBrA3XNxr9n-pAzzJR0NzvRRTNdGooLjYEYJSmroDiEpoSQwWrLSMZkfmXDKnVeScRyno5Lt48C12pTa=w1279-h584-no


The guides were honed to 0.0015" on the intake side and 0.0018" for the exhausts. Although these are aftermarket parts, my machinist was able to achieve factory-spec tolerances or better. As a result, we anticipate a long service life, despite the use of bronze guides.
 
Last edited:
Engine Refresh 34

Cylinder Heads

Valve Seats and Milling

Here you can see the larger cut for the 36mm Supertech intake valves. After cutting the seat, they did a final "bowl cut" at the upper edge of the seat to smooth the airflow. Basically, they take the 90-degree edge off of the entrance to the valve port.

AM-JKLUtTbHGKgzTOLYPEeU75HnJebNhUpU4px39nTbuAgpiT0iRsAo5Tnq029MdQRV_YxH28tjD64Uf869zDRLFfJfPT0myI9j0_C-snEcZEl43qScCuCdk5V7qQrR-gHAVqLOKdZJb9hqeZBiGTf6PMfoz=w570-h1250-no


After careful measuring, the heads were flat and within the low end of new spec: 5.493" However, the machinist did not like the condition of the surface, so he milled it .002", which leaves plenty of meat left, if ever needed.

In the milling machine.

AM-JKLUiq6hivxhSG00ejzaro_BQMQWTV582soJ3rGAgNNgRSeJpFFo3_C9S4jy2IvEaD-OKM2Nhr2qL2oJYwRLz2aJXs1Ku0SLHaQH7O5j7cFPIJtBWzhWbca-qZjXWItBHvophLLPaewidL3XcxB5QJ8Mu=w1279-h584-no


Finished. Perfectly flat.

AM-JKLVbwiRsxJRl64uOpQSyr8OoJT12yIWUDYebJ41LgD4kwCa0-qele0b0zy_--UmdEWxa7LqZQBA8ytGaBavA7ymYpDJfXpr6sIJVn3Qft25dFw05FazaMn12LDeXv7FpcBEu-dzkLV9Q8hVyE8lh3T1S=w570-h1250-no


AM-JKLWwfb_RMo54TWV79pqpzEZO4Hk_BLSv_Do2FnKrj5Y0PQTkJJF31sy0Re-zddrBRVUHGLhcI_oNsNo019Y2YPyRgqI3AnR-6KRQiRBj9g-gK3clgqvvXtTh4PT9YKWrouhrsoNnWlzMmg-JSahPtfZd=w938-h1250-no
 
Last edited:
Engine Refresh 35

Cylinder Heads

Assembly

They carefully assembled the valvetrain, which included setting the spring length/pressure for each valve and making then even across the valves. This required some 0.020" shims for some of the valve pockets. The cam caps are finger tight with assembly lube- he just wanted everything nice.

AM-JKLVoW6LqDB6O7H3T7qDFqti4VZNxT2JsOi1YoSkmya8nTKUehNkXze72LxThg5RjTodUBwtBnggQRAxtvsj9lAEdlJig4cyok1tpa9-RPc0hgD_oNQu9cPVIuOTPQltxVQd2IPV8FfAEjAbptH1E16GB=w938-h1250-no


Supertech titanium keepers.

AM-JKLXPHxJLVp8v4-7Mler3VeCYv1iye2o596x2IOG3RE1C3G3dmyUD1dctaLigXcehKZUPYIwMQ40EmTK-5xgJXGU9yGpGaEymebvIbsX2cXpmmXkjL-SfOI2OW3XolOzQxx9fH7uZxgwIVy0EPoTxxU_L=w1279-h960-no


AM-JKLWJZvJoQb6XYf5ni5TEwwmdD3UlnIucPFZ1FPtfuIohbvJRvlDTtMcb-gmQK64C-W04PipSZiZx2hSWyIJZZ0ezJ1sf49FBNQfNvTxOQ3r9w8CnUC9lbQc2ghLi-L2uxNUjXXVMmHmx61xbMgPG8wLc=w1279-h960-no


Viton valve seals.

AM-JKLXRT7mAQMLT0yEjIltPgxfeBfz86x0xymgncXGQTAUrWTgCxAd7JMs-w-L-BrdopVT-kCqxG7CHlN6sT-4zEf9Rgsq05p-tijqWehVKC2d9sJ9Fv03UO5TssTwjPz4t5m3ahK9tvvFzAy2JxMPhY7Tz=w1279-h960-no


All of the plugs were cleaned and re-installed with new sealant.

AM-JKLURGkGoHN4IGQd8pH3kLmjR9hgOZz7FZzWcma_1e-pmhkXk2IuwVLLhER7XPQcb963C1o07sRB1mw9d6KEDjtGaiTZulHCEsVypSjWSzdf3OSs3acU3p9rVMYcgT51c-x6mRhB9qMxFNNBK99IXbSnD=w938-h1250-no


AM-JKLWIpexUTr4Irc0WU1o-WjHpMBVMFdLrgOJQkF4GglcyvFCHW1sfR34eCVa9-lVpKQcrZBB-WgeyptFxyIvGDHsG7REPo_zGDiyx0CSOHkXvXI8yyhOQ8WdqbQQG1dScmAxGrqe2FScISYv0LZ-v8wfq=w938-h1250-no


Clean Comptech cams. Next to them are, are two of the cleaned AT cams.

AM-JKLX9oNMdhaw8e-3Msk61jYJI2QI3Y6r9tXF7aqvdVDPOxPTaqz4h5o_lglxZ0iVaAxAYNTGfUwOD86pGBtOTyhNpPz-JyLaxlyQKNSwtUs79TJlmjJzsLWyeoiJgpFvK-cH5cE7KRCS1gz4PQ8WxMhVL=w938-h1250-no
 
Last edited:
Re-Assembly 33

Window Regulators

The misery.

I only have three pictures. But it took two full days of work. This should give you an idea of the efforts involved. Cleaning and greasing the regulators was the easy part. I fit the SOS dolly guides also. Where it all came crashing to a halt is the re-winding and tensioning process. Hugo uses a special C-clamp to hold the lower pulley in place so his hands are free to wind, tension and attach the upper pulley. It's "special" because the clamp shaft is thin, allowing the top pulley to fit onto the lower one without interference. My C-clamp uses a thicker screw shaft, which blocks the top pulley. It took hours, but finally Mrs. Honcho figured out a solution: three people are required. One person tensions the lower pulley by holding the cable spring tight. The second person holds the lower pulley in place (under tension) with a large-blade screwdriver angled outward so the top pulley can fit down. The third person winds the top pulley cable, threads it through the groove on the top of the lower pulley, tensions it and locks it down on top of the lower pulley. You know you did it right when both cable springs are fully compressed. Because everything is greased, it will slip loose many times.

Next, the fun part is you have to move the window mount to the other end of the track before you install the gear wheel and spring. Moving the mount causes the cable pulleys to spin, and, if they slip out of position (they are covered in grease), you get to do the tensioning process all over again. It helped to have a person hold the pulleys down gently with a finger as the other person slowly moves the window mount. Once the mount is at the other end of the track, check the cable springs to make sure they are still compressed.

Now, you think you're done, but no. After you mount the gear wheel (pretty easy), you have to tension the clock spring 1.5 turns. However, the spring wheel wants to drop down into it's grooves every time you turn it, so you have to carefully lift the wheel up and turn it in steps. While you're doing this, the spring can pop out of the center groove, or, if you're really lucky, you can accidentally lift the cable pulleys and lose the cable tension. That means go back to square one and start the entire process over! I was **this** close to just buying new regulators from Honda. But, we finally got it done.

Important note is to connect the window switches and test the regulator before installing it. Thankfully, mine worked perfectly. A successful repair!

AM-JKLVTezhDmEQSzedmP8f2ELjmAuG2hpGTi_0AuvoLMJQn3ALca3fVGB3A4yRCqdqLF8NMJfXUgOWTbyXqqJULMzenrC58BTcHE58yn68sGsoHxeRCCLAm13jLO97otUpMuea39hP0UmJYY-7wl48JdRaM=w938-h1250-no


AM-JKLWs6FzVDkfZtrTUgrC7JpLQqphQ6CPpvoTp3RHc2b1GEFDXyQYbyd3EMRgHnww6Rp2YhrkDtmITyH83-62dMeIcpkMN_0uZgGw5FU1c0wJH7h3UGaagWXi6ROzqaFXS71ObOk9Pwa8DD5_s3zU1dz6S=w938-h1250-no


AM-JKLWI5hewcqjjLeFJRJIGuRxGIi1ow6PENeKyRPs-cRq2CW4VGYh8TMGsO0FWCVc3HdTrkHusOY7cj9Wq52k8jpEgi4IB2tkRx7KGu9qCWv_rBZvz4-wROYF3qztKBx7kjdpSvXFhVQo3NfqPyGAcGXXz=w938-h1250-no
 
Last edited:
I feel your pain on the regulator rewinding, Hugo's video makes it look criminally simple. Since it was just me at the time I used the same kind of C-clamp to hold the lower pulley under tension while I fit the top one on. Like you say the clamp's shaft is too big to allow the top pulley to fit past so I ground down the end of the clamp until it fit. I still remember the whole assembly popping loose 2-3 times once I was nearly done which forced me to start over again. Good times..

SfoZrF5.jpg


I'd put this job up there with rebuilding the driveshafts and replacing the front bay coolant hoses.
 
Last edited:
Re-Assembly 34

Window glass, trims and alignment

Lots of work installing the window glass. The alignment procedure was not too bad. I found that setting all of the adjustment screws to 3 full turns (out) from tight put the window fairly close to spec. Only minor adjustments were necessary after that point.

For the "B" gap procedure, we found it helpful to do the job with two people. One person sits inside the car with the door closed. One person stands outside the car and marks each measuring point with their finger (they're impossible to see inside the car. The person inside measures the gap with dial calipers. Then, you adjust and do it again. The key adjustment (for my windows anyway) was the glass stoppers. Making a slight change in the rear stoppers got the window to line up perfectly. Also, each adjustment- no matter where- causes all of the gaps to change. So, work in small increments. You have to think of the window as a 3D shape, and then it all makes sense.

With regulators in place, both windows moved very smoothly. I'll double check the alignments one more time just to be sure, but this job actually turned out easier than I anticipated. Using new parts helps.

New front sashes
AM-JKLXABnPmwuvS7ZCIvQDvwi1lncL39EqVrii294OjDCi6gll4rAw-FxA0Y1-tjF9ASfTxyl9PMJVq02BLifdbPtKFgAoFhL-cv8k6U8-dUZffiQXOavmeLwhX2KmjMJTyS_L4cZYaJi0VuTeH9VXe0QMz=w966-h1287-no


AM-JKLUvthYj1AruCb4NTEndTbl_I9O2Cr-yYDTZUCdsYXdSvhz4CZUj0UyNpQew8S9HCxcKqrSNnbEfgy0xu9a0fsUBCnDYAIu-cLAZxMj7wrE2OJmo0Zd0KiPMCoHTMuA5UNaUWPAzK7d3zeTQYUmw63ZV=w1278-h959-no


Freshly painted window trim.

AM-JKLXTaSeVvCV7UlF3e0mChDr-KVC-7KK3hL8M2qsZ10mpRYZWi44mCYMpuCYIb8cyvLiYCVdy_vRHTtBPVJXOkYQbJH6fFHw5BVPZumNrIw15RzQqAQ6r_4UElBEJXEDR-1Mmg42jfI6ytSW5tniPHRcw=w1278-h959-no


Rear sash not quite fitted yet.

AM-JKLU_aCkv5uhnqaxeKLPB40gDa12FYP1lhOs1YZWu3OsY4P-GTNvCIDxtWZIf0yCSu0MsU-pTsQT0fodLhYnEMiDPyGCyJpk9eBgk35zbvaqlLDYx0Dxt0i0BrkuHsznYsz_N1QeRtYS1VpFmWIL7KS0X=w966-h1287-no
 
Last edited:
Re-Assembly 35

Upper door trim, weatherstrip and B-pillars 1


I went through the process of re-attaching the rubber trim to the painted window trim panel. This involved a considerable amount of work/learning about the 3M adhesive transfer tape. I finally developed a method that works- hopefully it will help other owners who do this. You can buy these from Honda (pre-painted!) for $600 each. Thus, I was motivated to solve it.

  1. Wash the rubber seals in hot water with dish soap to remove all dirt and grease. Dry thoroughly.
  2. Apply 303 protectant to only the rubber side that touches the car roof. Do not get any on the areas that adheres to the trim piece.
  3. Clean both the trim side and rubber side with alcohol and a microfiber.
  4. Apply the transfer tape to the rubber.
  5. Heat the tape with a heat gun. Be careful not to melt the rubber! This also has the advantage of heating the old adhesive too, which helps the tape material not lift off with the paper.
  6. Press the tape into the rubber firmly.
  7. Carefully remove the paper, making sure that the adhesive sticks to the rubber and pulls away from the paper.
  8. Work in 6 inch sections until the entire rubber piece has adhesive on it.
  9. Find the two slots on the rubber piece where the black trim retainer fits and install them on the trim piece. This will align the rubber.
  10. Heat the adhesive and work it into the trim piece. It will "snap" in two places: on the ridge of the trim and the flat section under the lip at the back. Work in 6 inch sections, pressing firmly as you go.

Some photos. Not many, as I had to work fast once the adhesive was hot.

Adhesive on the rubber. Also showing the two slots that fit the trim piece.

20210404_153505.jpg

Transfer tape applied. This piece was way too long. I had to cut it down into sections.

20210404_153509.jpg

Finished. Looks new.

20210404_154507.jpg

You can see here where the body shop ripped some of the rubber trim and then it got painted. Luckily, this section is buried under the hood cowl and is not visible.

20210404_154515.jpg
 
Re-Assembly 36

Turn Signal Light Unit


The new light units ship "bare," meaning you will have to transfer some pieces from your old lights. Namely, the bulb sockets and breather tubes. You will also have to add foam strips, since they are missing from the factory.

First, the foam. I had some EPDM foam weather strip left over from my blast cabinet project, and it worked perfectly here. I wiped the surface with alcohol and then applied the foam, following the OEM profile from the old lights.

20210404_134639.jpg

20210407_081430.jpg

Next, it was time to clean the sockets. 30 years of road grime.

20210404_132228.jpg

Sockets clean and bulbs installed. Note- when using LED lights, polarity matters. I plugged them into the car and turned on the running lights just to make sure they were in the correct orientation. I applied a light coat of Dow DC4 silicone grease to the O-rings prior to installing them.
20210404_132237.jpg

20210404_133033.jpg


The tricky part is the breather tubes. They are stuck on quite firmly and the rubber has hardened with age. I was lucky on the first one, but the second one ripped quite badly during removal. After cleaning and soaking in 303, I decided to use some red RTV gasket maker to adhere them to the new lights and also provide a water-tight seal. It worked well.

20210404_133055.jpg
20210407_081442.jpg20210407_081436.jpg

Finally, it was time to fit the captive screws. I bought two new ones. Then I broke one. :mad: However, I found that the captive housing is just a simple clamshell design, so I was able to put the shiny new screw from the broken piece into the old housing. Worked great.

20210404_135727.jpg
 
Last edited:
Fantastic. Re: breather tubes, assume you warmed them up a bit, letting it cool down then twist and pull - mine were stubborn too but this way helped
 
Fantastic. Re: breather tubes, assume you warmed them up a bit, letting it cool down then twist and pull - mine were stubborn too but this way helped

Yes. It worked on the first one, not so much on the second.
 
Re-Assembly 37

Windshield Upper Trim


In order to fit the door window trim pieces, you must first attach the windshield upper trim. TSB-93-013 is very helpful here, but I noticed a few changes since 1993. First, there are no metal stiffeners in the seal piece. Instead, Honda appears to be using plastic ones in the shape of the lower "J" that fits under the windshield. Second, I found the wallpaper roller to be unnecessary.

I carefully cleaned the roof mating surface with alcohol. An unexpected challenge was that the adhesive on the trim retainer had dried out and was no longer sticky. (!!) Who knows how long this part has sat on the shelf at Honda. Well, apparently too long. My first solution was to heat up the adhesive with my heat gun. It helped a little, but the piece still popped off the roof. Thankfully, I still had a bunch of my 3M adhesive transfer tape from the door trim rubber project. It worked perfectly- applying what I learned on the door pieces, a few passes with the heat gun and it stuck to the car hard.

Instead of dish soap (which dries out rubber), I chose to use my old standby of Pool Lube, which is basically a silicone gel with a bit of PTFE. LarryB saves the day again. Using the Pool Lube, I was able to use my thumb to push the seal in and I could hear it snapping into place. It made a bit of a mess on the glass and roof, but it is easily cleaned up. I ran the roller over the seal just to be sure, but it made no difference- it was already fully seated.

That detour cost me about an hour, so I was unable to fit the passenger side rubber door seal. I will do that job tonight. I still can't get over how good the deep black looks against the Imola.

20210414_220050.jpg20210414_220055.jpg20210414_220100.jpg20210414_220107.jpg
 
I'm very jealous you're able to document all that beautiful head work. The shop HQE works with are a bit old school and I'm 2hrs away which prohibits regular visits. I'll try to ask for photos anyway.

I'm jealous about everything except your guy left a part of Jerry Garcia's beard in the runner :D Well, i'm hoping it's a beard hair and not something else

ACtC-3fRz-PC5OLMUOf5g0coY8DLvMRBKUFm_C5MWhN0gqGrss2JYVbyM7Fd_LESXBrh6drCHOInau4D1WWdPu62xDHol8GXX0vXbWGcajYIc9xH6gROl_gCB9VzAr9vVSaclnDNisLDVHaYYlfA8Rktrft4=w943-h1260-no
 
I'm very jealous you're able to document all that beautiful head work. The shop HQE works with are a bit old school and I'm 2hrs away which prohibits regular visits. I'll try to ask for photos anyway.

I'm jealous about everything except your guy left a part of Jerry Garcia's beard in the runner :D Well, i'm hoping it's a beard hair and not something else

Partly I'm doing it because I was inspired by Kaz's blog, but also to document the history of the car. I wish someone with more software knowledge than me could figure out a way to scrape all my posts (with pictures) and export to like a pdf or some kind of book format. I'd print it out, slap it in a three ring binder and put it on the shelf for the agreed value insurance policy appraisal (along with the 6-inch thick stack of receipts). Plus, I'll never see the heads this clean again, so I wanted to have something for posterity lol.

Thankfully, that runner picture was taken in the middle of the cleaning/machining process (most of those pictures were provided by the shop), so Jerry's beard is long gone. :D
 
Back
Top