• Protip: Profile posts are public! Use Conversations to message other members privately. Everyone can see the content of a profile post.

Honcho's Long Road to Imola Type-S Zero

Engine Refresh 89

Clutch

Re-checked torque on the flywheel.

AM-JKLVw4-Id0f1PYzrNRLEwpae5zJK7FX-BTqPPZ4JWWxPkp9VCz2M41lDgY6xDl9j6FSlE2R3-IalMMwSfnbg5sUKzOcN3iWNsWypYhzkfBavUESF6u4uHmxtFA611eM0BUenILyES5hcZLBoYUsFiXmZvnw=w933-h1243-no


After wiping the surfaces with acetone, installed the first clutch disc and mid-plate.

AM-JKLUJjXfoceCAaTMSgSWdohoK7Sq1M0TC-qb7e4qXs5DD1kb0dB8Dd1_ihE3l8dC8EE3dVvFgJY5N26chD_rmIy0Y5R6tYDyuakismvUuX2M1HoLspblVnCv3QCnfZCtdW6An7HBJeZ2Ok1H912mP03Emzg=w933-h1243-no


Wiped the pressure plate clean and applied a small amount of Urea grease at the bearing contact surfaces.

AM-JKLWi0S0q8LZygQ7k0isje0qUh-YsTpQxDzDF9k3idDhbkENgN68yPczpS1cHgRAe0Y9votaPHKCNzBChLvPFG54_8JeAgYoO7oUwb1OGhOo4RfhX-8w_8lpW9SrDxALyDtQ6dLTqztAEn_FymX383uluwg=w933-h1243-no


Clutch bolts torqued to the spec. Using the old mainshaft to align the second clutch disc. A bit tricky to install the pressure plate because it won't fit over the mainshaft. So, you have to hang the pressure plate/release bearing on the mainshaft and then install. Not too bad, but a little fiddly. I really should just buy the Honda alignment tool- the plastic ones are terrible.

AM-JKLXdna6fWYLI9RA96oJmNLsU7j-mnphJP1c3CxFizt9fwFs6M9LMKF6StMlImu712ZfROfEQ-k_i6yTvOD80fywOIUhFr6-Ju6UFLz3Ov8UKFN_ColUii2-XKB49Dg_yhMCqQy4NnFKDifBzjJxFVip5Zg=w933-h1243-no
 
Engine Refresh 90

Transmission

For the first time in 3 years, the transmission is off my bench! Big moment.

AM-JKLUoZMDGtJLO9Ay5tLBvRKCk_YSOhmeqWbh8wCAnb3HofuIzTZiCKAkMQ3s67Bow0rUNPP3ZI1j4qh2ZcxwYoeKTOJcEPJegPtak8earTjet6hv1_EjeoXTEi8SVtdg0O_h8db8RvMVTafGVBnmwBDK99A=w933-h1243-no


Then, the struggle. Mrs. Honcho and I attempted to lift the transmission by hand and install it on the engine block. It was a bridge too far. The closest we got was getting the mainshaft into the second clutch disc, but we did not have enough muscle power to both hold the weight and push it forward to the pilot bearing at the same time. Tonight, I will try the engine hoist to hold the weight so that I can focus on pushing the transmission laterally. If that fails, I'm buying the transmission jack! :biggrin: in the meantime, covered the assemblies to prevent dust from getting on the exposed Urea grease.

AM-JKLW4t9hqOYyI1znew6XrEtIeLHriS6Xo1zP1EbhCHJh1M9LC-K1Nln9EkrVLTAP6Xr7QX0GO1pdXUuaO7tCpftXQK6TaLxYiwLPNqTwf7h0xy326J3xSBB2AxO7rgzHWU5g8_sSujLzVakK1FQDN8hbalA=w933-h1243-no
 
Engine Refresh 91

Transmission

Success.

AM-JKLWS-edoLsOH73EpMS0kK0CmvY9ywRxRzmHaNl60JTaoxdseLyeRRFIFSyT87DELaiuZpzXpezbQTiCd6uQqEw4eordsOMSN00HgY0-46xVCTRUh5kliqAgbOf45FE-qRAaEuLWTr-df526RJqv2iJnQGQ=w1283-h963-no

[MENTION=33247]MotorMouth93[/MENTION] suggested hanging the transmission by both hangers to stabilize it. While it didn't get it perfectly level, it was close enough for me to maneuver it into place. I found the best method was to set it lower than required to position it under the coolant jacket, then raise it to higher than required, and finally gradually lower it as you slide it into place. It has to be perfectly straight on, so, once the mainshaft was in the release bearing, I used the edges of the trans case and engine block as a "straightness" guide to raise/lower it by small amounts to get it straight on. In my case, it slid in and stopped on the dowel pins. Because I knew it was engaged on the first clutch disc at that point, I used the mounting bolts to "walk" it into the final position. Worked very smoothly. I turned the engine to make sure the clutch spun freely and there was no mechanical resistance.

Also, it turns out the shift fork was the culprit on our earlier struggles- it was jammed against the clutch. I know a lot of the guides on Prime say to release it and just let it hang anywhere, but you really need to pull it out and away from the center. I believe that's why there is that little black spring on it- it fits against the access hole and prevents the fork from falling out.

Some more photos of the process.

AM-JKLVnWdPx4d6-opgbi6itqPuo0zpU0FzDJv4WiN3qEw4vjuiRNk2lXo0wTNposQhFQD1GBEOyVOHcMdl2AcG4TcGq-Pze2rCvkG791T0uftlaqvn9uep-FqFHdgDgu2czxig0xlPogHSJ5LpztFJdSpWcDA=w1283-h963-no


AM-JKLW1X_AzGT7t7iJrVg650BqP6meekUE7fVHSmsIZNmhC3_3ZhtXemtLbw-1hB7WZGl0EYJJe6Ihf7WaHtTjMemeT9D1LLTdiSweokXRgrUOKnLdwXnmc8WA_Bf0wkKoo0iPPon_VL4XLUSTr--rhPqf5ug=w933-h1243-no


AM-JKLXp1r_lt9IQDQLb1Gh6_vaY4bDhwHkiooUNVHRV_gYXSUNdKsPMoHA6YqjqG_uyKHFYH-PB29Q7M1GJyoRtdFZb4RuHth6UajoYrUDMbgohqIY4udRoKn23Cj1Q926QQklBkVI_wGZtu8lD9kBwjnPxfw=w933-h1243-no


Note the large 17mm bolt here is the old 70 mm one from the AT. Technically, the MT calls for a 65 mm bolt, but because this is an open thread hole, you can re-use the 70- it just sticks out 5 mm more.

AM-JKLX_GnMjK3DkjC2sOx4R0iYBDUAFMD7zOMEx1GDxImUisS4uYHOblG7fUSYlvCpJaRsoTLyoyNMOeucplVLxTFBpbxic3fMVp76G9VZ2iTESwIRTxTPrJb-5reX3S6gkWYp6WJIWa6omX3GrcSaZe14ASA=w933-h1243-no


AM-JKLXfhyC4w-5jzp3ZYVh4nT2-2UFbpD-czGfdvy45oPWCzPSmOxwRvCAjQCaKDIkrVCY9x2ZBVeM-gJ8ygKDXkQiUYcSw8_BpNXMVtKDcuP1prVXmy8UysrO1UBKE-wIhYLv7IsNCp6VbUeJGtICJ7rT1HA=w933-h1243-no


AM-JKLX9wfnMFCfDiUVGPumHF_62DuLt0oqtGxZKA7Erq41inXCYh3jkDOKLnv7Pbd8BL-Am2KMttnBZtOsUvg7fdsnOcqLBUflzPipM1wVEavJOnByab_JZWeqe29-hujXbH4rMimLbRRkRfFaa5g6-_idojg=w933-h1243-no
 
Like the new avatar Dutch...
 
everytime I catch up with your thread my jaw drops. This is like 100x better than even the Honda Factory restoration service i'm sure.

So.... Do you plan to drive this thing when it's all done or eat off that tranny housing in the living room???

Thanks, but I bow down to the people who work at Tochigi.

My plan is driving. Lots and lots of driving. :cool:

Basically I will be making my own Best Motoring videos in the mountains.

AM-JKLU6ZQCykAD-y9fQooDIUfxrJB7RCNGVooTqDbscnfhAMwrkgh6I8oLNOZFWo-BXwt96gqx3JIVqNMLol4datm-oKWz3QWVZoBsfFoerfhHwpzbhFoZGH857K5U1Fvuq7-Rkw1evCWEGHEcoqp_5fAGULQ=w997-h526-no
 
so you cooked up a story and sent the 6 of us into a meat grinder...my men are not expandable..I don't do dis kinda work...
 
Engine Refresh 92

Belts

Replaced the incorrect A/C belt (4PK980) with the correct one (4PK975). It's 5mm shorter and even with that small amount, I was able to achieve the specified tension. Of course, I had to remove the alternator belt and then re-install everything. I was also able to torque the alternator nut to spec- it turns out my O2 sensor offset socket (22mm) worked perfectly to allow opposing wrenches.

AM-JKLUQwZzpH2frgsfTkbNh12DcR-GspohIpGlemkEipN8-VmfIpEivBKywQeSHtMb9vt1PoO-zIsXLYN9713rtQxlKepjVbLGmkUGT11kY9uas5Qdz0Eswr5O7xrbhY7P_fBsy-KJGQAuWI-SaFHZ_V6vfpw=w945-h1260-no
 
Engine Refresh 93

Speed Sensor

Considering the favorable access, it made sense to replace the speed sensor now, as the current one is of unknown age and may have as much as 137,000 miles on it. I remember the first thing to break on my 91 was this sensor about 3 months after I bought the car. I also remember the misery of changing it in my apartment's parking lot. So, it gets a new sensor. :)

The assembly is complete from my AT. These parts are identical between AT and MT, as far as I can tell.

AM-JKLWCucndiy84q2M1yO8PbcE-VZvaB23KlktD1E_a_rtjphrzOxwkcEkgjUGPQO7VifJzOO-calZF6pmuRM9o5FvFXA21hEUJzEDBx7OjTXsUcVe1NV4ESKxv_R3M9ZFcrXFPGstJ6rs5O-_wYPonLLzQnw=w945-h1260-no


New and old sensors. The old one doesn't look that bad, but no way to tell the age...

AM-JKLW6VAXvwfnIuNVqdPSmk-pnPSV7624zxLGTL9c8q7R0aywrzYvkQxtIghZGj5IrNqivoWmTixIynPVBt2rzJUvn0zJxyPupUGZMLzmea8mZARzOnPjseQAoEeweJHnm-PukkSqZjCkxZs8xTAN1eSDBZg=w945-h1260-no


Shaft assembly with the rotor pin removed.

AM-JKLUdpbGkYzajEXtQJ0twYQdAnRIvLQmJ-cIguXd9oHOXzqdRPjxX0jLTR6n0-DAbX0jyKRCIf_bTwc8bFaRXOTpHO8JZ0a0byNqWRY8xy6C-RHXGYBrRk0xQqLmMtbrHb2NJHVr7ZHjO-SIwW0xqazZxPw=w945-h1260-no


New rotor pin (it comes with the sensor!) installed with a dab of synth grease.

AM-JKLVkXv9yh5ToeF1TPXSXgBxax85Piq9NM_UQRtBtXAK3mRjE3kxUTVKcNOHOlZmy1xtWYV0vnYTiVS9yk0GxxSC8x5lFDixJLbLu5MFkOsknQsV8HBj2RZ9-KScsrOzWrbwm2MiqNdJGlXdDHNFo0Facww=w945-h1260-no


Old O-ring and new one.

AM-JKLXoaID8_U1yH9VrL7WBc2iC3zzcl4vgjjzlY0bUgZxWDS__hI_VatFP4S5vkkEiVwsZZfRcv8GmmedX2kdShrUhTj2OYQAbG8mfT4MMWVfQKhplEES-7nlcPJ1NMYiftiA2IwaNbcZcPiBgWO9FqOVFOg=w945-h1260-no


New O-ring installed and coated in fresh MTF.

AM-JKLVv5ai6nM6uy9av74WIdC6ln-Tc7ThasTjfsfAm_0mGzomLqFkiQAMS9LbiTXcTuoG-Cal1rJfEKx5_BGnEuY8OQimBbgeKW1AkAp2E2X2olF6r7kLsEWFUBcOWO3YDCgCsDvF8IugBXkBdjHEhftiVIQ=w945-h1260-no


Installed and torqued to the spec.

AM-JKLWvK6taoi6CZK_hQfUM8LiBpMLtlFdMr1bQ8vaZ6Rtarq8c8yTGtqUXuMRs9s0b_db2Kzs6Tgu6OgNKgjGlsUk0apuTwH_y-P7ROzzUjXa_PNsDyoCCVbcBBV3X09xhzcXR6vZpcaZ5_ZUMkpTJfZy_3Q=w945-h1260-no


But, I noticed this gap at the housing. The bolt is all the way seated, so not sure why this isn't all the way down. I may pull it tonight and try to re-seat the sensor shaft before installing the bolt. Even thought there is an O-ring seal here, I'd prefer to keep dust and moisture out of the housing.

AM-JKLXCsGifVDlRfR0R6JnBRFH6UvpV2ircldWMz6aUCQPMYjGayUDA7a8i7_u3vcaR5kxFtwxt35H70k2tQJr8mnpwos2lgtYFSJoTBMYzbBIcIvyVaNFu-eCjiy96sWfsA37-CKRdKddHx5_VMAlDfqX1Mg=w945-h1260-no
 
Transmission Refresh 31

Starter

This starter has seen almost 30 years of use, so it's time for a rebuild. On starters, most failures can be traced to the plunger assembly and contacts. So, these are replaced.

Old plunger removed and old contacts. Note the wear- it was about 1 mm deep into the copper.

AM-JKLXQU6Slk8liW-Av300BeGf1WgXB7JNiz55f_rEampytQyrkie9alNjyxEzuC3PfgyKXKVWbLt8IsIt0EA9YmPd2tmrEWRTLcn7mkAwWmXCnrMMG93QNIibfkJuYfnz85q8vovzl0JyjomkXdKU-cPR4TA=w938-h1250-no


Internal components.

AM-JKLVjG0mFTu6KN1aj5qlGdL6_2b6NSyZy9kL9MfgKejtTyCh1ZZev5R9heIBCG3Fg_R_VSyEKAYSfn34Z-FS-WCsd8TNgcGhxz6YL3YoEnGvjLQEiAxgCHAV_xldwQOtYPrN2Bcu4C5LbpThE_hy0-YNGLA=w938-h1250-no


New plunger versus old.

AM-JKLVGl5Yp2pbJDIqJ4bCjuFjYs78BIK2HEP3UEIBrrXM5VcSJiXXafu-OmFFkoN-22c2SDOunvugQIu5CBXN5w-_ZdBWfj0u8fscVoubnsa2wNbv1VBfgv0CIXELEzGJCM4uMG2a2eqlqd9oeYrysZdqElg=w938-h1250-no


New contacts and plastic housings. Ready for another 30 years.

AM-JKLWKeEIyAM474PLUsrZT38Poyhrvi14GzMRamLtV-572QFvdQAVAI_BzhFcdyTGUkYIHy5frQ7AC6pnCt0b40Ltr3lX956-VBmDkwe3OCXoJHjv2kStiuri9fNHsdIsYmVOHG1JBHTA2G3Ij6MkIaNyPNw=w938-h1250-no
 
Transmission Refresh 32

Starter, contd.

Installed back on the transmission.

AM-JKLUhQGmC4Lqp_wTI3gTeNlwyZvrTn7L7nxF2kuKF0E87N5SiS7xE2I7HtIaoumm-oiypSlS6vbQ3CSUW9AJscChvY-11Xk5B1gU9x4kwEIvVrikr5LaqMorUTGzDdUiiTZrlRymkwzi-OqxfZVjZ4uROQw=w938-h1250-no


For the MT, you can re-use the top bolt, but the bottom one must be replaced- 115 mm.

AM-JKLVdt9OhIrcF2HD1RK2tn_V-SD2pRyADuQ7rxzRAgzq7XTcIpbT-UUieYy2M-meP7fCqO6MxSb0QQYQ8ObMr20ogK3nq85GJ7BJqfjEZahB0oP3QQBJgMPOrFabwf4CpsUPBWI6kYDxJxJVnrh3DJqrwzg=w938-h1250-no


AM-JKLUb6YqBPC8xvAXiloDg_oraKI-HGEQot6Fo5VZAQP-LYvFKZjJUf0COtzAT-P9X19GWsxiAVs86gJwE9_BAMvvF868etpS4ubK5UzQEwOU1_b-3mn0kJxqoMy0HWKb8bZRh1YKX07E44i0i8u7E41eHBA=w938-h1250-no
 
NSX-R Suspension 1

I was able to acquire this used NSX-R suspension in 2018. Considering the age (15 years) and mileage (~45,000), I decided to disassemble, check and replace all components like the rubber and bump stops to restore a new feel.

AM-JKLWrnTDdLSOJW4OxOalHLZFN-BlcFGb33vbgcXcy4cR_xcINosJk-q6dP8kBnDzjxNnjTmcnLhFJfd-UuMSGp7f9wpRpt6Dgr4qDJnUjn-qAMeAq2jD9J3N3Qe-s6YD4oihaqrKIpcAIVG16w7344ppaCw=w1279-h960-no


AM-JKLWP1h17ODCyJdvKVykyVimb_c9X3CZTSv0iwnLLMaQgRokEgQ-o1FCLRLZtt2W8t3QeJxDFmiuoNZPRop3kKE9wQV9tPln6EcdctQyT6NDzSmUZ27cx3UM9yEqhBd0ufsUL2JvXLZI8Jmh-Q7-PmhkvFg=w938-h1250-no


AM-JKLXSJBq5SdrLaG-tu3QJS_akKN2zMd_5d5IH0qi5uL9GcT6TGCVegM_nxAh2xQUS3nItk-Rp8WsunOC6xHAasvk9bamnyMng3lhTn4JC4y_JBKpcOq1q-xtwIbysUy33h-rQg792fa1t-D3Aq90TNnARKQ=w938-h1250-no


I had a special helper, who made sure the rear shock was SUPER clean. :)

AM-JKLVHCcY_Gk8hfDXCrUGh1wFwmGFfKc-8BBekjQAEaQsbOyXQXAu_C88yjNy-vr11lUb8KaBtinsF1gvGNpq607uHVMYA9gB_Nua4qXuDzfyCf_ygCEF-JR8oWdzBPrIVUKMxifaYC79WHRFJPOuQuHmZyQ=w938-h1250-no


Unfortunately, the performance check yielded problems. :frown: The right front shock is leaking oil and has lost 100% of its gas charge, meaning it will not return to zero after compressing the shaft. The other three shocks are dry (good), but their gas charge is quite weak. They will return to zero VERY slowly, which indicates most of the high pressure nitrogen is gone. The good news (sort of) is that the dampers still have a strong resistance and smooth stroke, which indicates the piston, shim stack and compression valve are still functioning well.

But there's no way around it- these shocks will never feel like they are supposed to, even if I replace all the external parts (which are sorely needed, as the bump stops were almost totally disintegrated). So, what to do? I'm exploring three paths:

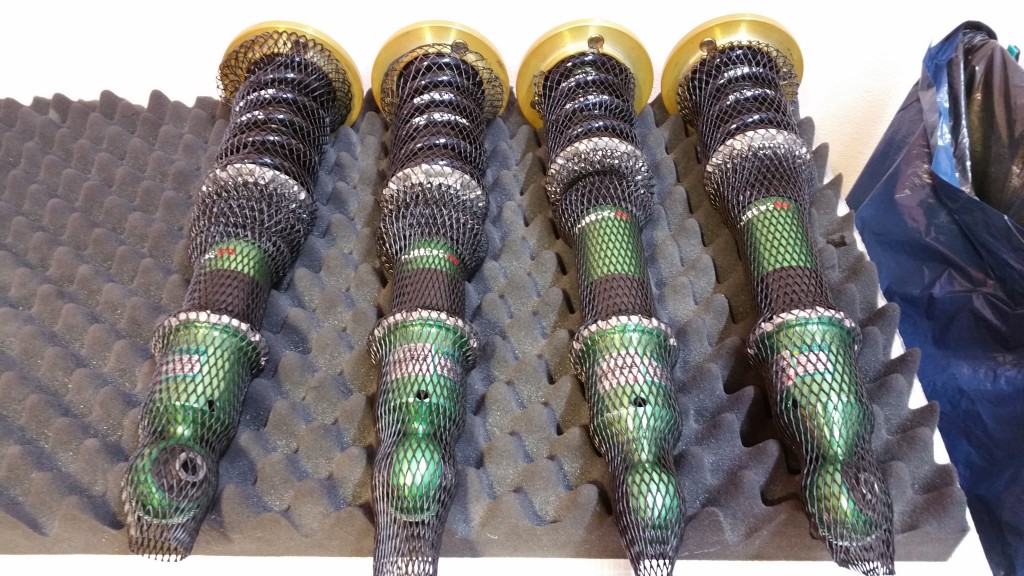
1. Rebuild the NSX-R shocks. Our local race shop, 3R Racing, has expressed interest in having a go at these dampers. Two problems will have to be solved for sure- the dust seal cap on top of the shock and adding a schrader valve so that the dampers can be re-charged with nitrogen. Considering the cost of new replacement shocks, this is actually an economically viable path and would give me the ability to rebuild in the future, making the R suspension a serviceable component.

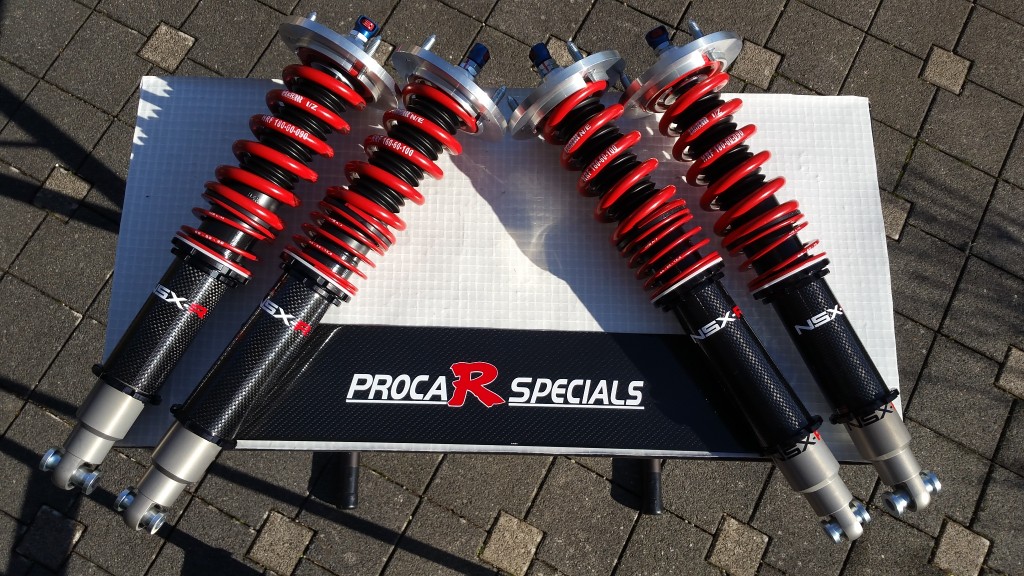
2. The [MENTION=5576]Procar Specials[/MENTION] H&R/Bilstein suspension. Super exclusive, ultra-rare. The holy grail for the NSX, as far as I'm concerned. Detlef has said he will make a set for me if I want. Price is "more than you can afford, pal," but in the ballpark of a new R setup.

3. The JRZ RS/Hyperco setup from SOS. Uniformly loved and praised.

My head (and wallet) says JRZ, but my heart is set on the NSX-R because I've watched too many Best Motoring videos and as you all know I'm a sucker for OEM JDM. So this means, of course, that the right answer is the Procar. :biggrin:

We'll see...
 
Last edited:
wow, nice and detailed pictures.
Your son is a true 'helping' hand, miss that and dont have this .-))

You have to know that the NSX-R JDM NA2 suspension has a weight of 28,78 kg, way too much for unspringed weight and not good, especially if they loose function after a short NSX lifetime.
Overrated and over 17 years old now. !

option 1
NSX-R 24h race car suspension, which was developed from Procar many years ago.
Result: 12th overall postion at the 24h Nürburgring race.
Price range: 5 digits

photo-13375-f9d836fd.jpg


Our answer

photo-13144-56e2b915.jpg


And still the lightest suspension at the NSX market.
Our favs, bit over 10 kg for all,1/3 of the last NSX-R suspension weight setup. Procar cnc spring perches and HRS springs, not beatable at unspringed weight ratio, we have 2 last sets in stock.


photo-13133-431bd870.jpg
 
Last edited:
I'd go for option #1 - the Showa remote reservoir. 06521-SL0-900 at the rear, & 06511-SL0-900 at the front - if they can be rebuilt, recharged & re-gassed locally, then so much the better. These are what the S-Zero had from the factory...
 
Why wouldn't you try the type-S suspension? Isn't that the direction you're going for?

I'm very surprised your starter has lasted this long! That's interesting to see the rebuild pics. I got my spare ones rebuilt for about $120 locally.
 
The S-Zerp's shocks are not the same as the "regular" S - they are carried over from the '92 R in the S-Zero, as a link between that R and the 02+ R.
The suspension tuning on the S is for "winding road" driving, whereas the R is the ultimate, including track capability (according to the press releases of the era)
 
I'd go for option #1 - the Showa remote reservoir. 06521-SL0-900 at the rear, & 06511-SL0-900 at the front - if they can be rebuilt, recharged & re-gassed locally, then so much the better. These are what the S-Zero had from the factory...

It's really up to the shop, but once the dampers are altered, it kind of ruins the "magic" for me...

Firstly, have you driven on the R dampers and are you ok with them? They're like bricks on bumpy surfaces

I have been fortunate to drive the R setup on both the street and the track. I've actually had quite a bit of time with it. I guess I'm in the small group that finds them perfectly fine on regular roads. From the condition of the bump stops and top hat rubber on my set, I suspect some of the harshness people complain about are from riding on used and worn out setups.

Why wouldn't you try the type-S suspension? Isn't that the direction you're going for?

I'm very surprised your starter has lasted this long! That's interesting to see the rebuild pics. I got my spare ones rebuilt for about $120 locally.

I thought hard about that, actually. I love the Type-S suspension, but the regular "S" isn't the concept of this NSX.
 
Did you replace your knock sensors? I recognize with the induction components mostly assembled this may be a bit late to the party. Its only because you replaced your speed sensor and you commented about much easier to do it now because of access that it occurred to me. Knock sensors tend to be dumb-ass reliable; but, if they do fail, on the NSX they are miserable to get at.
 
Did you replace your knock sensors? I recognize with the induction components mostly assembled this may be a bit late to the party. Its only because you replaced your speed sensor and you commented about much easier to do it now because of access that it occurred to me. Knock sensors tend to be dumb-ass reliable; but, if they do fail, on the NSX they are miserable to get at.

I did replace them, with 45k mile ones from [MENTION=33247]MotorMouth93[/MENTION]'s engine. There was nothing wrong with mine, but at 137k miles, the piezo crystals can drift out of spec. So, I went with "younger" sensors. :D

That said, with all the work we've done on the OEM tune, the NSX really doesn't run into knock/timing problems on the factory timing, which is quite conservative. While it's important to have knock sensors, in practice they are more of a theoretical safety measure.
 
Transmission Refresh 33

Clutch Slave Cylinder, etc.

Fit the new clutch slave using the Urea grease and the rubber boot from the 6-speed. Always a bit fiddly to check engagement on the clutch fork and then re-seat the boot.

AM-JKLWE2vaWWfhpERcYv2Rx7a5-TI_bkHm4JZ6KJfC4Uk84u98-1yqDYj7Cs7HOBBEO9zcjyQujouNSUaL7E8WDzO5gRSI2xbeTvZzcQZ_NEB0uAttjqDSzr3F4zFycAyimGbUm857_EwCOW2IWYqLviSFsiw=w933-h1243-no


AM-JKLUkYjkMye_CyZNZuK27dRpJFoi2wqu5jB2h3lLEIgNpVzNcfpsVChBTpb7LTulO0tr8Cq7By9GPycZqrJA0QvCNFj9OoikeCjs6X7wtoywSx0iKKaTnHBrA9as0ebNPKkV8zXy7mbCsLZI4tXzAulKW9w=w933-h1243-no
 
Engine Refresh 94

Coolant Hoses

Pre-fit the final coolant hoses in preparation for install back into the car. Note that Honda did us a favor and marked the jacket end of the hoses with a dot, which helps with orientation.

AM-JKLVMM7aQ1SrX0zKu-1yyLwcH9C-KkzAAvBVydCH0dwEBsQwtzYzUI5ileKYbkNMOG-u_QQsd36pl02x-YfwgAc4FNC-vT-hF5TqEygoercZMB3nIIqrShoGUim_mQT28GtTj_n8gVBm0EmGCNa95MAc4IQ=w933-h1243-no
 
Back
Top