• Protip: Profile posts are public! Use Conversations to message other members privately. Everyone can see the content of a profile post.

Honcho's Long Road to Imola Type-S Zero

Intermediate Shaft 1

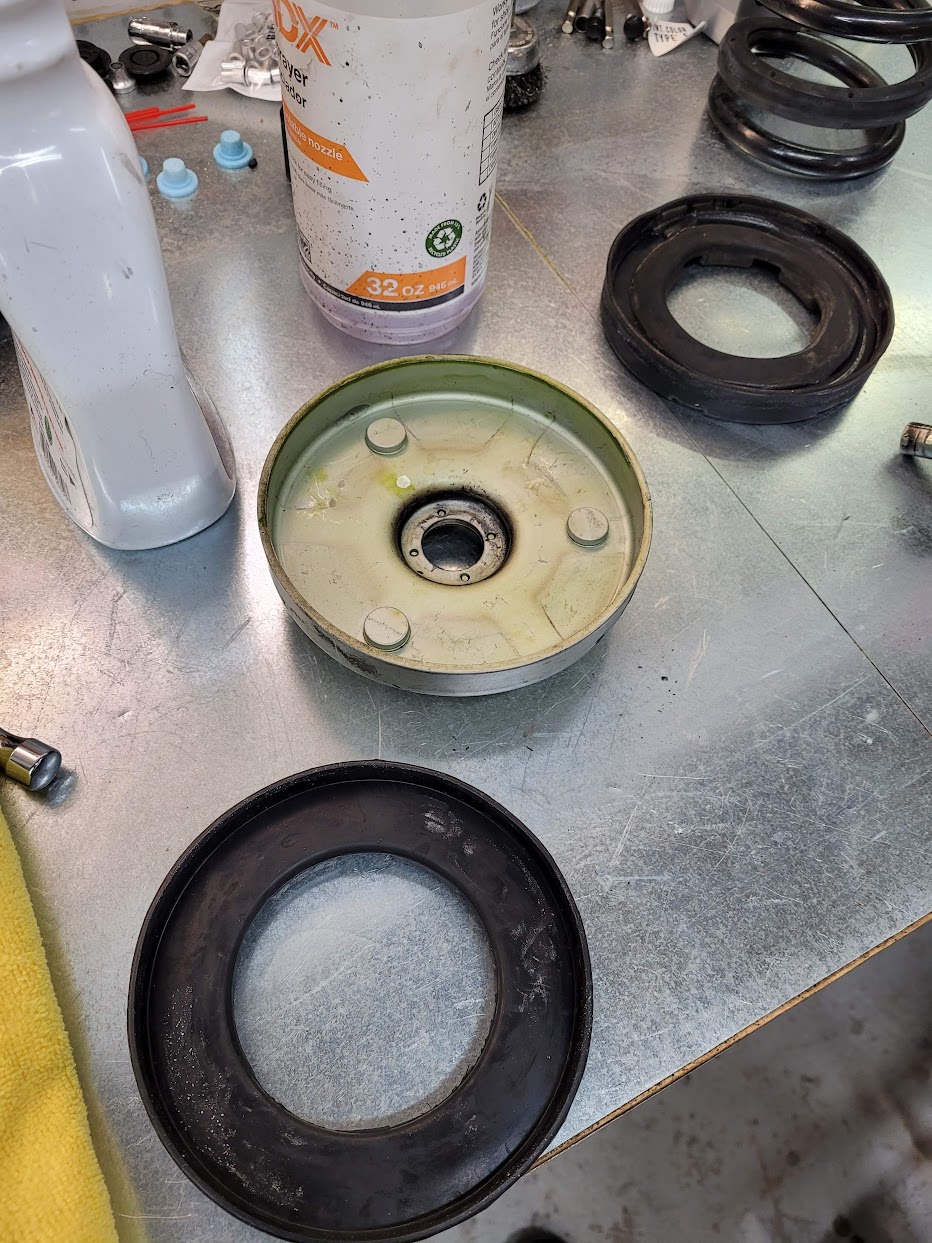
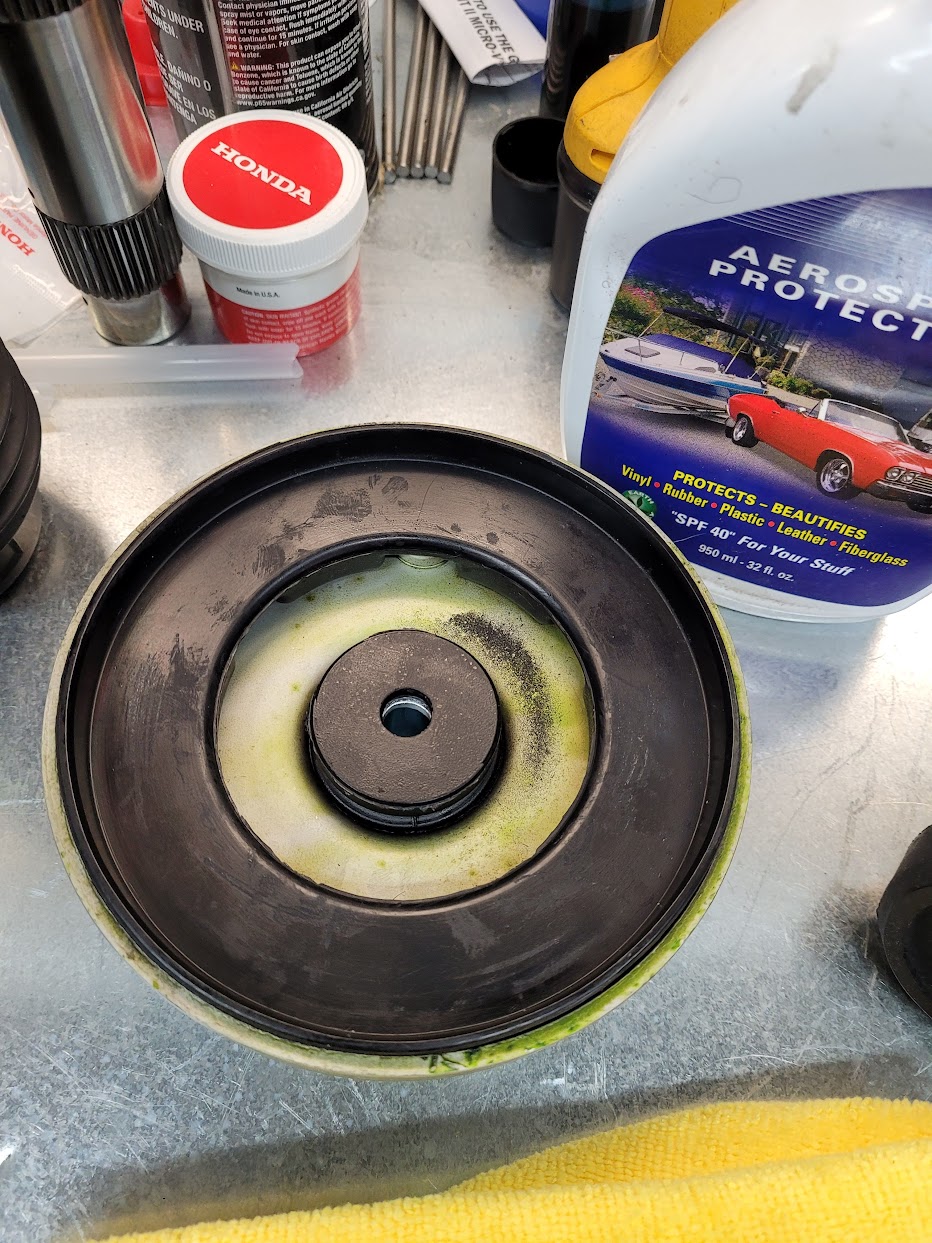
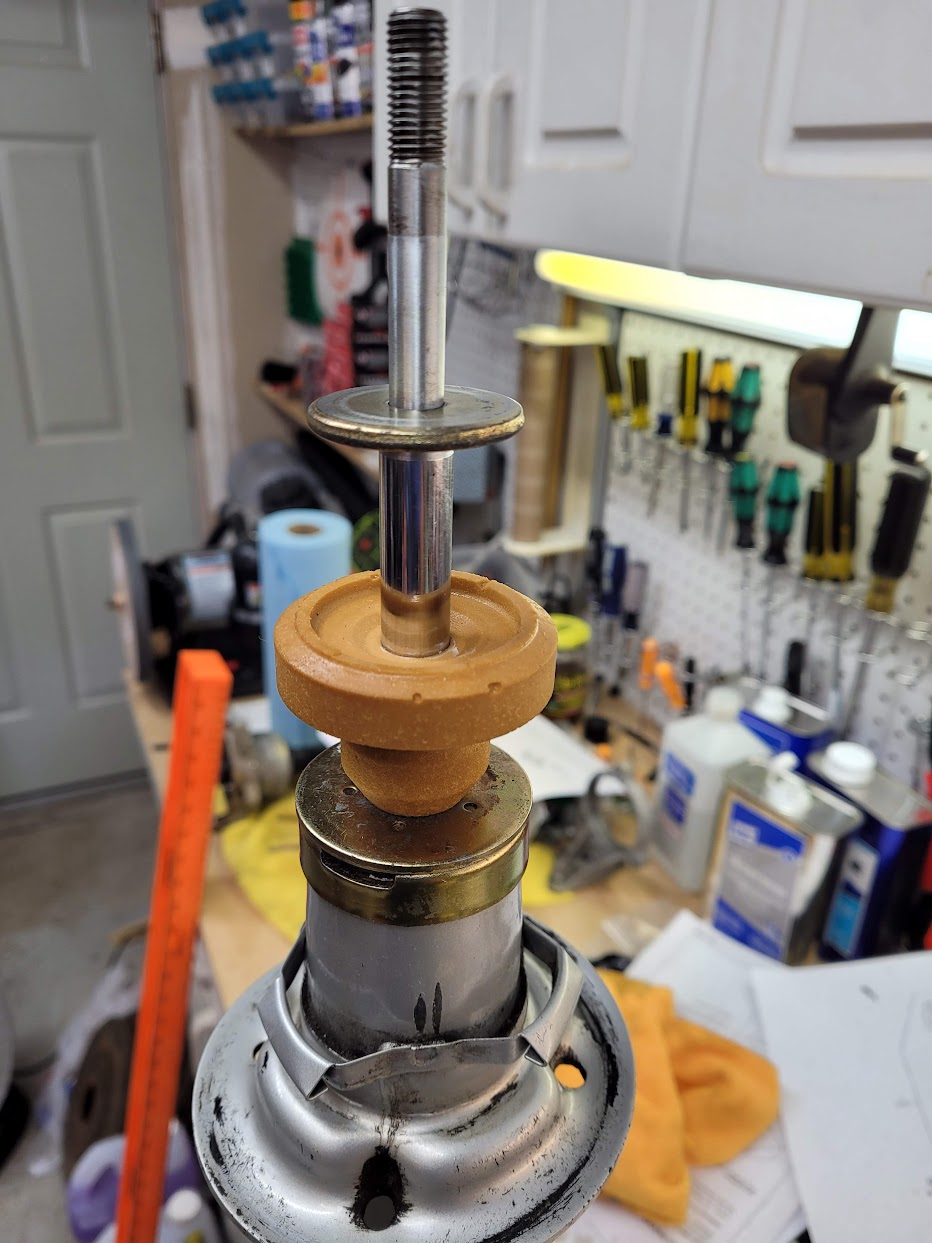
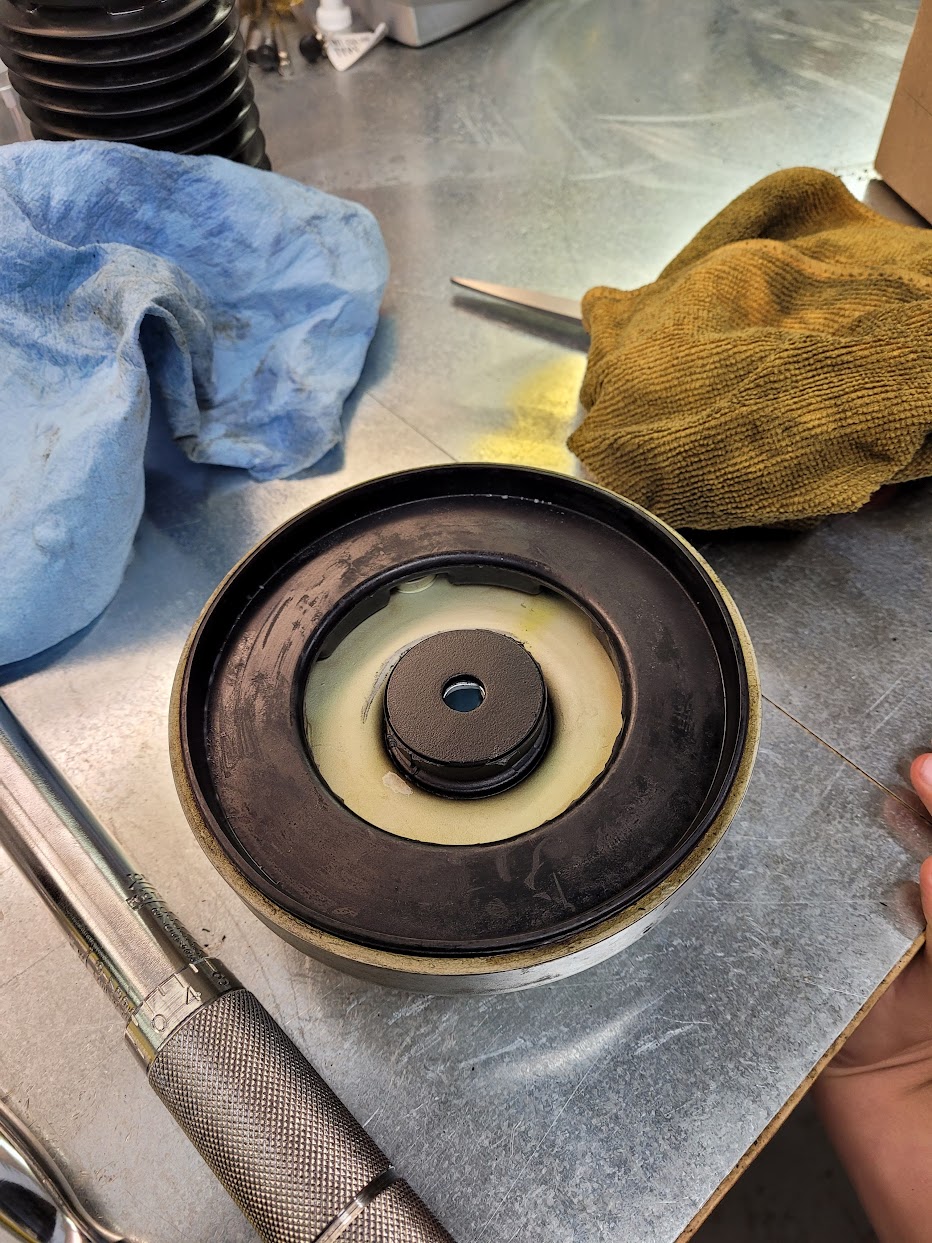
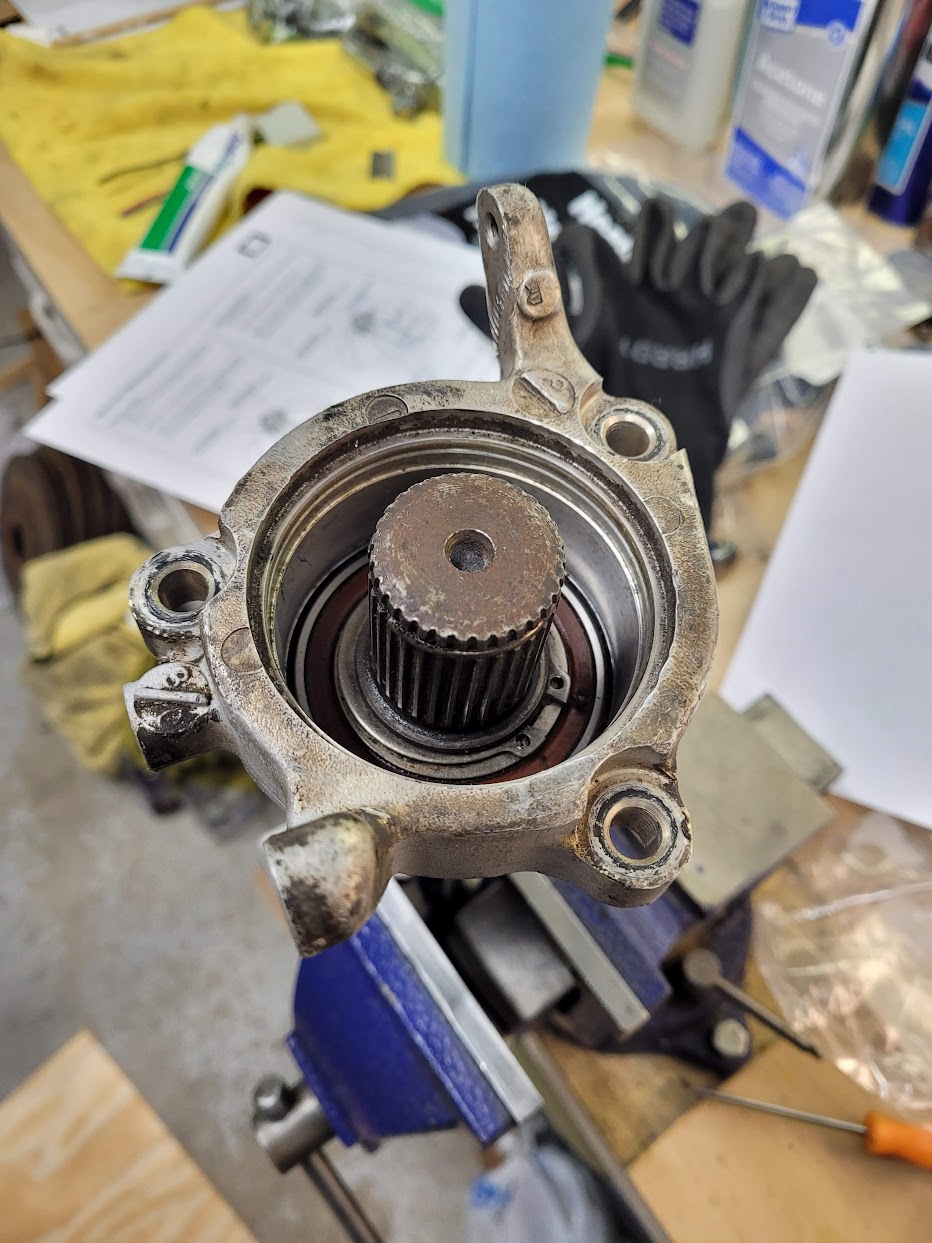
Began the process of tearing down the donor MT intermediate shaft. I will replace the bearing and seals, along with a refurbish of the driveshaft itself. Long reach circlip pliers are required for the smaller circlip shown here.

AM-JKLVImrQjQIU5UnR388QNPAUzgdHqLq9izbdQmbjIjqGtbiYjrkblNnum1LfM6NHLmj2HyYwPaEH2aiD2_k6Qnrhfu5Qn4aYUlbA24Q7IEI9qwV5t7AWuX211p4dKtUbtzaACGYkemV7kQ-1t8yDhFenIbA=w933-h1243-no
 
NSX-R Suspension 2

Unfortunately, the shop cannot rebuild the dampers. :frown: Thus, I will use the Procar Specials instead. In the meantime, in order to drive the car, I decided to go ahead and refurbish the suspension as much as possible with new rubber, bump stops and hardware. Although the gas charge and small leak mean this kit's racing days are over, it should drive just fine on the street.

Rear Shock New Parts

AM-JKLXPl9XAqVx_7T_DLgnkxHn2UhBYa84nDy7mygtOEgOP2MRXpSoeiPIgL_gNoMlS5pSZa86YGJyj2oKWzv9yMMAevPXowBZ3udlmrUBXNNJLAxpdWheFPD31Vzo65OrOiTeUVW-AiAoHPT0mdRXRtHl4bQ=w933-h1243-no


Old Versus New. The lower portion of the bump stop was almost totally disintegrated. I think this is why so many claim the NSX-R suspension is so harsh over bumps. Without the bump stop, any hard bump is going to jolt the entire car.

AM-JKLUh4uKSXpvvAufdogThTtWo3E6Y6xMNXCqi82U3P0a_2bBWT0yhun_RRcBWJvMgrU0R4ZZJVp9dtwjZ9oXlhUPN-ceAZnnLb411O3Lv_SAupMPD6t-_GMEYD5n56fiEMez6BLsZ1I_vuhjnCYoOdRswsw=w933-h1243-no


Rear shock cleaned and ready.

AM-JKLXz-CBqDeudAKKF0Dbynl5AoV_v7PbGYQtWrb4u4Z3s1G9VpceMuVnGF5vjI-VGNYScm6yMwg82Or_AZ-sFeBtOnWwOBL_wYa1uQ0QyPH6LIWHOO6Ak2x7eEHTwgyqiiMNibDemEkCa1sSR14_L-ItT6g=w933-h1243-no


Bump stop fitted and corrosion-X applied to top of shaft to prevent future corrosion.

AM-JKLV3LWd4YtmyXXnjTUxVhjU94Ofu1LDVHwebp46TFUxEcuVg9jOjgqc-Bn18RQ9YAzvTQSPww9sxUpIe7NtpZaeUtPcWrHbgq1FKDDNnyT9u1qHEqMM17tzvfWd0gkBAXaHVAadgbyLDcoJ7v551K6i7Bg=w933-h1243-no


Cleaned and applied 303 protectant to the dust boot.

AM-JKLXw64oEwyCEeody0G_89CFp77z0-gLPOuYJ5I76XkxqZ0yIKkR-BeaWBejizoc5Mtd0Pmj-ZXNyPNlYEohBf2SAYyTkKot4wEvXAsEW-l3Wy7629Izal-vKQ-DSop8wwNSIvc_tzlWhrw4ZTxtIPTbTWA=w933-h1243-no


Cleaned and assembled the top hats with all new rubber and shaft collars.

AM-JKLVmzWIcJJvHH_pbsWp9xyyeKrKsZ8RtcKLFUaLs2N6BsQN9fqbSPiM4F5_6PBbhuAQe7xkPZu4rh3GZwsmNvPZeDhvzl0PBYcD2V4HxzKTpNeLOEZxKYm9AG7W_5d1DTd0QZZ9dMwmcfEjvTGbtZbp87w=w933-h1243-no


AM-JKLUKYZWBBHaYXitkGuJHMeCuXu9pRxBjdWF_O8yKAXrebfXmWlDVogIXEL6J4RPHjYV-Ck10ZhkULzQZ22v46ntRrvoVQaq-5l-XRCvl7bPZZkz_VP0BEUMV41Geh1PCqbgA4DupucBZC94f_II7GqDXkQ=w933-h1243-no


Our problem child- the leaky front right shock. New bump stop installed. These were completely missing from the original suspension- disintegrated long ago.

AM-JKLXxpNYdunx_6qzaKiUUKeqzAIAWQ_1mOvBKegC8RuEzcFWqgQsgdYgaAvvTPI7oiSOw2aA7bGdUtwvz_O2eStqzBholPZYHFaJKyjM6yIYm0A1UgKLBKuxpYGSOhdwClHmDj6xybqGtwyl70uLFRetBZg=w933-h1243-no


New rubber for the front top hats too.

AM-JKLVA62eHA1S7azP9Y-bMeL-phgezh8Qi3or2-noJjmY1jsNImgwYvYj8fNNJAQ7RM-KoPKf_r52th85heY2wMeFp6N1Mqa-bSMnUrdRpT7CtaSau6DMyn0d_DKgwPcSR1nqsIOatIFK90q3BnYnuHt9NEw=w933-h1243-no


Front left fully re-assembled.

AM-JKLVbKsZIrEd-1WKZ5a8DF8vYhSURQrNeMRl6j0I5bIDP7cR6gdKn-iqIiNyLWyjV-L9JffwBXoKKQXaYPX_0Fn8ugeBXJhdtoTjTbHIFn0ae2jR8f4KZrV2KAi7qPLQM5B-hDj87MvrIi_UFtsa_iGmsYQ=w933-h1243-no


A new lease on life!

AM-JKLVQ1fS2Odxk4g93c_a9jqiE4MqsXEmsgnjEd5WidpskcPNTI0BsGtsn7nwU-wcveWdhZZ-rbd1iDrJKciIpoZF6wNHme7KpOt8TLw5jGGlPJV36R0yI_YK6-7a1CGN9nlMNZR8l1XY9_8xU4xCKIn8yLg=w933-h1243-no
 
Last edited:
I did replace them, with 45k mile ones from @MotorMouth93's engine. There was nothing wrong with mine, but at 137k miles, the piezo crystals can drift out of spec. So, I went with "younger" sensors. :D

That said, with all the work we've done on the OEM tune, the NSX really doesn't run into knock/timing problems on the factory timing, which is quite conservative. While it's important to have knock sensors, in practice they are more of a theoretical safety measure.

I don't know whether piezoelectric sensors are prone to deterioration; but, the wiring associated with the sensors is. A lot of piezoelectric knock sensors have a high resistance connected in parallel with the actual piezoelectric element. The ECU uses the resistance as part of the knock circuit sensor test. The ECU checks for the resistance (probably a voltage divider test) and if it doesn't sense the resistance it generates an error code because the circuit is deemed open. I expect a similar test is done to check for short circuit on the sensor. The pre OBD II NSX ECU has two error codes (front / rear) which are knock sensor circuit tests - not an indication that you have detonation. I don't know whether the circuit tests run at start up or repeatedly during operation.

You are correct that modern combustion chambers have relatively high combustion speeds making them fairly immune to detonation. Compared to old school push rod engines which may require 32 - 35 deg of advance to get combustion completed fast enough to achieve peak cylinder pressures, 10 deg of ignition advance is not uncommon. As such, the risk of a knock sensor failure leading to engine problems is probably fairly low, especially if you avoid purchasing your gas from dodgy vendors. However, when some ECUs detect a knock sensor circuit failure, they implement an ignition timing map which is retarded - just to be safe. I don't know whether the pre OBD II ECU on the NSX does that. If it doesn't, then a knock sensor failure is just an inconvenience. If it does implement some retard, then you do have a potential performance hit even if there is no detonation.

I am assuming that when you installed the newer sensors you checked the wiring pigtails. If so, you are probably good to go.
 
Yep, Honda sells them. They are standard Nippon-Denso bearings that fit dozens of different cars, so nothing special about them:

Front: 31114-PT0-013
Rear: 31111-PT0-003


But, I got them included in a complete rebuild kit, which also includes replacement brushes and all of the rubber seals. They are WBD bearings (double sealed) and fit perfectly. I had to buy the rectifier and regulator separately, since none of the kits included it.

Where'd you get these? You've inspired a mini refresh on mine as well.
 
[MENTION=7537]MJK[/MENTION] I got them as part of an alternator rebuild kit. Tons available online. I think I got mine from Ebay.
 
I don't know whether piezoelectric sensors are prone to deterioration; but, the wiring associated with the sensors is. A lot of piezoelectric knock sensors have a high resistance connected in parallel with the actual piezoelectric element. The ECU uses the resistance as part of the knock circuit sensor test. The ECU checks for the resistance (probably a voltage divider test) and if it doesn't sense the resistance it generates an error code because the circuit is deemed open. I expect a similar test is done to check for short circuit on the sensor. The pre OBD II NSX ECU has two error codes (front / rear) which are knock sensor circuit tests - not an indication that you have detonation. I don't know whether the circuit tests run at start up or repeatedly during operation.

You are correct that modern combustion chambers have relatively high combustion speeds making them fairly immune to detonation. Compared to old school push rod engines which may require 32 - 35 deg of advance to get combustion completed fast enough to achieve peak cylinder pressures, 10 deg of ignition advance is not uncommon. As such, the risk of a knock sensor failure leading to engine problems is probably fairly low, especially if you avoid purchasing your gas from dodgy vendors. However, when some ECUs detect a knock sensor circuit failure, they implement an ignition timing map which is retarded - just to be safe. I don't know whether the pre OBD II ECU on the NSX does that. If it doesn't, then a knock sensor failure is just an inconvenience. If it does implement some retard, then you do have a potential performance hit even if there is no detonation.

I am assuming that when you installed the newer sensors you checked the wiring pigtails. If so, you are probably good to go.

I have some fairly recent experience with NSX knock sensor problems. I was getting a knock sensor code shortly after installing new NTK brand knock sensors from RockAuto since I wanted to save my pricey new OEM sensors for the other engine. Big mistake, OEM sensors or bust.

When a knock sensor fault is detected the ECU pulls a ton of timing at high load, 8-10 degrees or more, through the knock retard timing modifier. Base timing still comes from the main timing tables.

The knock sensor wiring isn't anything special aside from having grounded shielding, any additional circuitry needed is located within the ECU itself. Given the amount of heat the knock sensor sub-harness is exposed to and the relatively low cost of replacing it though it's probably not a bad idea to replace it if you're replacing the sensors.

FWIW the stock timing maps run about 25 degrees of advance at high RPM WOT. You really feel the 8-10 degrees knock retard when a sensor is bad.
 
Thank you, gents!
 
Re-Assembly 51

Wiring AT-MT, Oil sensor, etc.

It's wiring week!! This means we're getting close to the finish.

Lots of different items to fabricate and install in the car.

AM-JKLXv-WpYWSTqT-9muofRHYZqb8OqPA90b5vv-Mv0WmEhro43H_BRd-JQWZdFy8S3yzXUMumpaY0GZj9QPfLGAh7QisfZTvKpGf7krqUWsNIaZSzuUWJrkjOqrjN_VjYfsfoWpVvoqW6Q5EZc2k6P6GM3Jg=w945-h1260-no


A big part of making harnesses is measuring them in the car and "mapping" where everything will go.

AM-JKLXwz9yy1OoL2qjs8ZMpyFf3a3VHp5WTt7oD_JdPLgjrV1WIaHqMFn942PYieZ0CwnyZpMXraE_5jCS-tVGvLtS5m44nNVM5VgOfgBMTpyEnPiu_QppoNJbRFXeWHg8tW-vJw8_rDecag3_ZHbsl_s9GeA=w945-h1260-no


This is my custom microcontroller for my oil temperature warning light in the dash (using the catalytic converter overheat light). I mounted it on the metal tab for the Interlock Control Unit, which is not needed on the MT. I was able to bend the tab in my vise to match the contour of the rear module area, and I used a piece of soft rubber as a vibration isolator. The functionality is a simple operation- the light stays on until the oil reaches a safe temperature for full VTEC operation, then it goes off. If the oil temperature gets too high, the light will flash on and off rapidly until the temperature returns to the safe range. Overall, it turned out quite nice.

AM-JKLVZ_6HzLsvztXmlMq59zj5mg1h2eTuBkgdA9teYUKAjClG8xrZmezzrSrAvtbMfP47GMpvla1Z3Pmh7kZUaiXOIpIsGDyOOl1aHhsqShl6oGI3LOY2nN9fUyj6gLh_h23hf66oVqFxtixw2jxGB6ComZA=w945-h1260-no


AM-JKLV8AQY1odNEDhh5nMhgvr6BZDf04McJvStP5-a840Hir8iCjallcJZtqKl1z3x6PNLWOeIZkfkrjTow1QefGmK5tt6FfzmaL5rVWcBnhfS2hYJGGREEzL3Or9Tb_kJbFdDrw9GHFPxSO1ETDP7iCHyB-g=w945-h1260-no


AM-JKLWSEkvrR2i49MwM1KwD3ICfoth5Yg3YfgoCrYw_Jsq7JSPBU1IS43VMsYo5iYCOG2ErZi9WIuJn9zckMBZp_6uRFF5BS7JHyhEZvDdWpErXh0noITmJTGNvXNrStotRFGXJ8W6a1aYiGioBnv_OI5PTmA=w945-h1260-no


AM-JKLUhMMwJa3ZE71bs-W_OkYKA69LKSGPq3oqSreVK4JcVN_XkyaP4vJTHo3Y-Zhwf4xJ7glPrWfRa1CVNaKa32Ikds4Lx8RM3yN5n8G8yClclbHezSWD0lU3Kzbipk5U-9hiOlu1wpEdFMtYKU0TDOm7FNQ=w945-h1260-no


It recessed quite nicely where the AT computer used to fit.

AM-JKLWE4HBncWwh0ePZ9H0Kta8iIGLWQvmNORqS9HsgYMcr8x3CyEV_N1DQsQ9plqBd_08fIiRS_VPeNdyWJU0gI2elYel7davzZk2D6Vt2XzLo1SfOMxV2xyYwQYl7o1-2u5AKgClEWGdI7pyfcVowmRNiTQ=w945-h1260-no
 
Mainshaft Thrust Clearance

So this begs the question- on the NSX 5-speed, is it better to be tight or loose on the mainshaft clearance? I recall [MENTION=12356]Mac Attack[/MENTION] mentioning that he was a hair tight beyond the minimum (less than 0.14 mm) and he had some notchy shifting. This has me thinking looser is better- thoughts?

Just saw this. Looks like you're having a lot of fun! IIRC, my shim was a hair thick. I chalked it up to maybe not applying enough force on the mainshaft and just went with it. The transmission shifts like butter even in 20F ambient temps, but that's also because I run a custom transmission oil blend. No problems being a hair tight that I've found in the ~10k miles since doing the rebuild, so that's one data point.
 
I have some fairly recent experience with NSX knock sensor problems. I was getting a knock sensor code shortly after installing new NTK brand knock sensors from RockAuto since I wanted to save my pricey new OEM sensors for the other engine. Big mistake, OEM sensors or bust.

Maybe you got some counterfeit product. My NTK sensors have worked great for the past 9 years and 25k miles. I've looked at the output through an o-scope and have been able to tune the AEM settings to it while being compared to my in-cylinder TFX combustion pressure analyzer.

The counterfeit stuff is a real problem these days, even if it's labeled Honda OEM.
 
No idea if they were counterfeit or not but one of them was definitely dead. Given their placement in the engine and the difficulty of replacing them I'm just going with OEM from now on. (which hopefully means they'll be fine for another 30 years)

The OEM knock sensors are made by Matsushita rather than NTK. The price on them also dropped considerably at some point in the past year or two and now they're about $100 each from Amayama. (Still $200+ from Acura though)
 
Last edited:
Just saw this. Looks like you're having a lot of fun! IIRC, my shim was a hair thick. I chalked it up to maybe not applying enough force on the mainshaft and just went with it. The transmission shifts like butter even in 20F ambient temps, but that's also because I run a custom transmission oil blend. No problems being a hair tight that I've found in the ~10k miles since doing the rebuild, so that's one data point.

Getting there- I tell people I am building a car 45 minutes at a time. :D

Discussions with Kaz yielded the advice of ideal is to hit right in the middle of the range, but because of the space between the shim sizes, it isn't always possible. He advised that if you have to be "off", it's better to be off on the looser side of the spec.
 
Re-Assembly 52

Wiring AT-MT, Oil sensor, etc.

After extreme frustrations with the Prothane bushings, I decided to take a breath and walk away...back over to the wiring, which for some kooky reason makes me happy. Months of poring over the ETM show that there are several ways to skin this cat when doing the AT-MT. I ultimately settled on using AMP 070 pins to splice the required wires. I added a little heat shrink wrap to hold everything in place. You can see several spliced loops here for the backup lights and power for the wideband O2.

AM-JKLXBvAsdfgoJg7M9O4vJVyQnbswUwtacf5a2PE01_vpmTwqIN3H63s1BXCmo4nbGEb38fjosi6ugk27_z0l2xe6HZ-7OsduD8YqWraZVu1cK9hlRKVvmsCloDqJ-5b3JMtBBi_-n7A5iFfIQI9-WXEiecA=w878-h1170-no


I decided to pirate the TCS harness plugs for my various needs on the oil temp light controller and wideband O2. It's plugs C494 and C492, which are AMP 070 Mk II connectors. It's all restorable to factory. Here you can see the power (Light Green/Black) and ground (Brown/White) leads for the wideband (+12V) and Arduino microcontroller (GND).

AM-JKLV6PjFxaYlWlYvkDOKys5c1tcmZQgK1I2xAoshQMJ2lASU8O55TkmovSK1iCFz3wQ4X_PtUFcp5QggJrYjHY5ZfiavGZOZ0nb5wfD7lYO1jZTdyZWVflPNECyht9lHQNan2wujaig419Ougmf4E9NedUQ=w878-h1170-no


Reverse light switch lead to be wired to the AT Computer 12V wire (Black/Yellow - Pin 23)

AM-JKLVBBNtwfqeWNtYOWoU6LsIby3wTuGA2GOtcDFeneGaeVC0ipd_iioiAu66D9Y1wvWpdlIqmlnQazn01G6U1byJDy7iyJr8oHaNrFcKgfH5UhNU6Cy3-eI8NBIIuxQNJ44WZ4sBnMwMylSyV0bc8ckKvVQ=w878-h1170-no


Running the neutral switch green wire over to the ECU (C161 - Pin 9)

AM-JKLVqp5eKFLkOiGICdoX6tWH0eLP_Tr7bSQSOL0iCCjMErLg-l7ZijJZMDmt2PnoTzDykVh-0eBwGEv-BoOZIx0gY2pAA5W73x9TE1NWQOYasPrOaFXK4FsLNQU6X3XeGff-VlksqidY0PYgToKzBWVutKg=w878-h1170-no


Wiring up the 8-Pin AMP 070 connector for the oil temp light controller.

AM-JKLV9S-vM2P0_rbTJneTD6jAdSp8VjBQXvZY7Sz5vJULzJ4LFN_r_8g7VrtqefiN3jdgBW6DEnKdZ7AiAUGoETUWVfVRYMwdc8BaueCxc7Z8VY3cwNQu2A-2894AQbzGrkyCDTa7a3wkBRMJ_xxToNfReHw=w878-h1170-no


Fabbing up the pigtail connector for the clutch switch (C156 - Pin 4). It's a AMP 040 pin.

AM-JKLVvpN2IA2znb4WX7Rk0g9VeyDekWJRz9t5lpMKMm5Ek7Y478JeGGa9doNrGt0ztTGwOXxy30A4vL8mee8sROpj3hPSL4iGmvxXV1Zqact3rGp2qbWEVgIPQD2Gps2EG_UZ5uz1WTPf5r7uZfwUYeF-n2Q=w878-h1170-no
 
Last edited:
Re-Assembly 53

Wiring AT-MT, Oil sensor, etc.

MOSFET for the oil temp light in the dash.

AM-JKLWvSsz8R2sFSnlnZnKhy05bhOCRg8YdIx-LK70Va2Daz1TnAk2h92ndv5Kof0sRBipHyjm63Uuozlhbm0_LRBOkkgn9CwJRF_tVHmNMDA235TDcSXgau_9YIiW-Bib14VJFvvmqZ1o-Pc3amLmqolVHLw=w878-h1170-no


Wideband controller.

AM-JKLXsiQtPSuYkeR0O6N8irIARVrHX__QRnLvhWH-hxcn-4Rc2UDcmQ_s7Pb3v9NV3QMiRxd_NOdvCepNLA3MrpLjA09c0-7RhEFoKVIopqcPU56NusmjQvGC5Cmb2rskbKz5ywTvGuL99Q1A4nlDQj1NjRQ=w878-h1170-no


Ghetto spec mounting LOL. I will eventually burn a chip once it's fully tuned, so it does not need to be a permanent mount.

AM-JKLUbjfU-3rB5JQp6IhIQG63bW1pXBYS133-jWd4z-uUdyMYZRcwjp5HxaO_zkOKS0uvYmrEfTc911d00J-QWa7YaL4xQegwYxBo3NfEEpQfpeLRjWina9ZHOEarDMTBbt5EpPU0qVI17tLctDVvTNb199A=w878-h1170-no


A stray factory ground- likely was mounted to the TCS module. It's a bad idea to leave open grounds, so I designated this as my aftermarket ground source. All of my wires will ground here.

AM-JKLXYXI72ROpucP8hR3qIlwYMob76_qvSP5fTElzP2lGkbTulcad6UTuvzp0Gwkb17h8ILq9Yjsr1epal9HOmAotoO3-uAdOXrPru82Pyp7M0TEX-7FnPtcMUlsou6YGrVJugu3lExwBgSGaOjkCWR4BriA=w878-h1170-no


Custom power for a USB charger inside the center box. To power the bluetooth speaker. You can see where the PO just blasted some sheet metal screws into the body. Sigh. Like, the proper holes are right there!

AM-JKLV6owzm6cLdakpxxKRjJ86P4Cl84TGFUW07eH-Q5VqJFwIqXmrAITF2Ua8s1-VGoNdjrBSysgKKjhLjMxzFt9_poUxhgFcPgdaTA5InUNJCmzcth4ICebwZ-8y10KiDsBG_PgMaD6cZlVaFcIXDTc1SXA=w878-h1170-no


AM-JKLUm_Dz1Ku6lUp0rXhLxD4LA8AWFg3r0FSybbhj5wa3UBiaA-hne6nVdPN6Pp7ubT9kXn62-5lobp7idBseWZjejENc7dPJE57bvsjkcy3h1ES2T9ETMGyRuuu2LJCmMzS8NKDCJhK2_hBUiFM4ThwRTbg=w878-h1170-no


Custom switch for the Blackvue dashcam. This will give me switched power for when the car is parked somewhere sketchy.

AM-JKLV1KlwGvcOj_HOAqdhqgcb4gjaIr3afTJhIcp8Yy37mEjfwar1Hv8DReMo2iwMkFy3_GZJp797F5ZPoNJf9kOlN4ahPi9x5QlBm3shrvl4wDbIQEwINeyPvJpxJob-Qo_-tPBX4IDsqpnoumqVJJpoVrw=w878-h1170-no


Diodes to protect the car's internal circuit.

AM-JKLX1sLdJ6JV8zggaAxT9GzFO7IhymWr0eh9j8JWHtFdqkosh3ea7YxPNvaOloblAtL9-yBiODIe-dyT9CZYE227pk9SRHsoqdL_pqIfsMZsRAn2LpiqNu8Sp1Et65VPLZt-dYO4u-1YihdbmbUmbnkoJ9g=w878-h1170-no


Fitting the ECU Demon analog and ground leads. I used the same crimp pins as on the Arduino. They give a nice, positive engagement onto the analog screw clamps. Just need to cut a small notch in the aluminum housing so the wires don't get pinched.

AM-JKLVIAX2c2eqISRsBfo3Qb-imf3k7gDQzHc2u9Qr8wjkawEVZk9wrfiKkNh1AUkSYjesziaUqpvTxYJ1kEWQPphlQGzxDKnYDxH_LGWfYkQxU2OYvtB-1dLuOxf6TtZR5BOS2xwu1QfFBCdxiH-oQzJxgbw=w878-h1170-no
 
Re-Assembly 54

Wiring AT-MT, Oil sensor, etc.

Sigh.

AM-JKLWmNGPSnt6ByhG6vMMASSwsPbT51S0-R0Dro4RNxixIWMgCj-r16yWQQARyJZ9-9akEftDkiZr3SfdSKQm4zhwaxr7OMNpJsThe4EuIq-5UDPkpj3bFX9k5DZENlFknWPR8Ggk6Hg3xy4nu3YPyxCBHmg=w893-h1189-no


This is what happens when you work on a car at 9 pm after working all day and putting the kids to bed. As I was buttoning up all the wires, I suddenly realized that I had wired the wrong side of the connector! Basically, all of my leads were dead ends. D'oh! So, I had to undo all of the tidy wiring I had spent the last few weeks making perfect.

Well, like they say in Doom, the only way out is through. So, I cut all of the heat shrink with a razor blade, cut all the zip ties and removed all of the vinyl tape. I then crimped all new pins, and re-pinned the OEM connectors. I kept the ETM on the floor of the car and triple-checked each pin before clicking it back into the connector. Then, it was all new connections and heat shrink.

AM-JKLWD0XzKQz4_ficfwx-S-TANCQ-om1r_I3duqHsd63MXhR1lIXGkeIyis7BM7k_uuoEwFkzY1QiP0ZFCS6TiN-MV4fjjMuDVHFe59vaGoR06eBTnM4X5hNWGYgbZWaHrHYy0G4PvzLQd6ZBrybskR1aJJQ=w893-h1189-no


That's better- the connections actually lead somewhere now.

AM-JKLWc0iCIh_Cu06OVqHhkK6qO_I6mm9EfS1uO-r-sFKFx7PvWYBGeqO8FeNAYlr2V913BwQd-idIXejAob9-PKRkQFiYzKm1II-aX2MMC7Ts2ojQS9nPfUBtbzP2dx_6LpeJP_Z-X6eY-w5KOmKpeFshIUw=w893-h1189-no


An unexpected and frustrating detour, but amazingly, this correction only took about two hours. Now, back to tidying up all the harnesses and completing the wiring so the interior can go back in the car.

All buttoned back up.

[HOLD]
 
Re-Assembly 55

Dash Cam

Completed the wiring for the Blackvue dash cam. It was a bit more complex because I wanted to have a switch that would permit me to activate the camera while the car was parked. Thankfully, the EPS controller plug had ground, constant and switched power all available right where I needed it. I'm getting good at de-pinning the AMP 070 connectors.

[HOLD]

I originally wanted the button on the lower cover, but it didn't fit with the glovebox. Now I have a hole in my trim LOL.

[HOLD]

I re-located it to the glovebox under the trunk switch lock.

[HOLD]

Soldering the switch.

AM-JKLWlcaTQJ0nneETWPFIIs-BlaeCXY0cAX5r2c1IuG60MJ-tvUEyApXvVV83NHvN4RIcJ3-0K8cZUdfjaqcWeKgmja3x8MotuD3gN4RW--yigSXUk-gM5UutvwliCh5SvKLiCpX9IHj2ZPFngUXtHHpgQbQ=w945-h1260-no


Adding the in-line diodes to protect the car's internal circuit.

AM-JKLVzn0wckMUXIYXEI_hlNFSbC9WYECIaCeBwaGw5k3m4kkX7G8s5ZWvhUPMOewF7kvveRZ8jpqKjB_93LrRYnzrZMOqrLlXLay7OLlpXkHqIxFHerJztNgTfJc2xKAlBLI8MBJ4VJ8oLfsVXaFWj3gFQaQ=w1280-h960-no


Camera in place and wired through the headliner.

AM-JKLWpWtMo0BS4rcPXymv15yZIZSe9VBQbzemN5DH8YUg-iIrP-Yk7-CodRIII3FDmG5TQQMHT4R-LX0lJPciCD12YRdtnGoRbDYIK_IfBqtu7PqemIOqOVK9R4HlEhWS-_o-54WRfxZOM9O7UTD5reC87XQ=w945-h1260-no
 
Lol you should add heated seats:biggrin:
 
Re-Assembly 56

ECU, Demon II, USB

For tuning purposes, the ECU must be modified to perform two additional functions: first, it must be able to receive signal from the wideband O2 sensor. Second, it must be able to communicate with the laptop. This means adding cabling.

For the O2 sensor, I decided to make a harness from a standard 090 2-pin connector and using crimp pins on the wire side going into the demon analog inputs. This will eliminate the need to open up the ECU each time to connect/disconnect the wires. There is not much room on the right side of the ECU due to the Main Relay blocking the area, so I needed some slack to route the connector. Yellow is signal, black is ground to the rear firewall.

AM-JKLUzTmCKjBVNUppU2kgSf_GDPAZpisQl_GMrUfpQZyNsZpXzWBQY3Fqn3W8hXGJ-McOFQCJ-Rs-mOATVsBOaorU16wHRObR3XBOsIzxa7zi_QYcCx8OCxwNfbF86XrUGlnYzVDtkSSVlI2AsLuP_NjIa8Q=w945-h1260-no


To prevent damage to the wire insulation, I cut notches into the ECU housing. This is the O2 wire notch.

AM-JKLXkTA3jpZY8vsk2n94KMCT8yIw703Lb51Z9eZzT9gEiDfTyw5Fe1NoJ7lPW6kGAHDxB_101S6OyYIpM8SCPYH7ZR2_fOraozJ6W96PbjTx9PYqwbypahIAPkNv6GLUkWh8mLQcvE3NRjc97P8djCjkUjQ=w945-h1260-no


This is the USB/Laptop notch.

AM-JKLW8vccyhQOskANfhQv9NL_rGkor4RXkHu-RoYiKd_bAg0E5Sz20Z5vzmrJKGroDc-6d8_mas-yI8jZmZIHhXTcU4sLCvvao0IUGx0xMDt98UVN9V30tNSd1XMOMzKs71D7WNUfG0Yom3eDX2zp09gRqWw=w945-h1260-no


AM-JKLW8vccyhQOskANfhQv9NL_rGkor4RXkHu-RoYiKd_bAg0E5Sz20Z5vzmrJKGroDc-6d8_mas-yI8jZmZIHhXTcU4sLCvvao0IUGx0xMDt98UVN9V30tNSd1XMOMzKs71D7WNUfG0Yom3eDX2zp09gRqWw=w945-h1260-no


I cut small pieces of poly wire harness to cover the sharp edges of the notches.

AM-JKLXzIZe0QWcJBSHu7i-FCyX57RnEAy87JU7gDowox6Uc1V9AYZUGs5oWIZink-4NwWwKRGq50mRzU37MuTrZMJoeXEqSp7RL9kWZFdRCUBWSiOQegTJ1OLo0tiDVT7lSZvRod44Ui87HpU47gkdBkuaDag=w945-h1260-no


ECU board removed to cut the case.

AM-JKLUIUX4F9heN4PH7i_D3fKeg7oZrtD9QAo9gqTofTNZOQJCwlGfLQHmXOgwMh5Gh_PhAtpTf3yHFROrkL0AmWqYrfKVNGX3nnNSaLSeW6ZOveo-T3kgFiq2PsKvRHUrMhnj14kr5lYGUeU3GMnSuBCQirg=w1280-h960-no


Back of the ECU board.

AM-JKLWVepY8FjvQguKNb79i2GsF9W_1lnY-Md7519NYJ5uiKXpxt2vH8CUQAT8ohwF4olU5VnvL7omk6X5BMR792SKUIy8WcX5_i-A2gqauiCtGXPSSEO83TiXMdqQ_wy0geDm--OzSJChz3I-cV0JG5iOoXg=w1280-h960-no


Initial routing. I added a ferrite bead to keep the signal clean.

AM-JKLW2hgm9NeUddQdR6qu66Y147_6EYzLpjgQsaKvK8m3RBfNU460_fP8lTnXOP9X6J5XPcp0p0J_wG0o9UyuaGilddHWXjmNE3xGmoFVQVjW2UkcZ08Q0f9unKHIw_YzRWHKOjuxCwo5W7qmXpfQfFXBjJQ=w1280-h960-no


Turned out really clean. Just a little bit of bowing on the top cover, but it should be just fine.

AM-JKLVqZNXojlgZAWVCWaGPGRkzOLLRQrODIrDFif_m0MoEGXNe9b-07-CL4XXxermbmWtJKhPubSS-dr0LsZZ2V1APFO18IrZilEVV674EL079Jangoc00NbRBzLnTYTkjOJqVmSRLnIeDvGmfsSmElGKJ4w=w945-h1260-no


AM-JKLXOAqvJmma28xvmDqh7fHN1o_fhvx1jG8ploDYFkK7jlge-r6v6l3hL53y6GO_CT9-8Sr6E2UL_03bnnRUlrShEgWa8YNWRim5TchnWwrZ7ve0XSSGjVLdHpk5VOmNkBVgIbwZA-HLES3FvL4Kra3C9BQ=w945-h1260-no


AM-JKLVuyZPts8cWx0Y0rmFCx5PibmOdHoa4di_9RmAGRE-Ubqi_69-ijBW5YLEmUEUzi0LdxTErAKLJaSsAXxLPkn83i4YliKbc1J-K0eDLi_2Qa4hZDRX3GjrVQC1-cnYtHq5L8ShM2vQ7xCcbcgehhmPUKg=w945-h1260-no


AM-JKLUsSe6agKyRG0XdrWsThGqj2GuOe1qeILRJyO-DzVp5UgKos0U5LmNJwjq3WYVdstIRSAhXAwIglwDbtYqO6M6HBcvGkLWFPv69O9dyfDwDSInSvfg9Qp7F4k2ucTGSA_FgUFaSWRe4RFzvPdXBUX45YA=w945-h1260-no


AM-JKLWayoSLpZ_wiRHHgj-MZPYYWN3SR9MpYqT_nAml0f6hM2IOGRj-7qiZUGtkRRWw3BwtATtXsPSBYix51eMRttcGKFeHxkjupexItUvkiZHNYSMLsgAfUS4HE4ZZmF-S7z-LLxbAFO87M29mMRS_JMCvKA=w945-h1260-no
 
Re-Assembly 57

ECU, Demon II, USB

After 4 years, the ECU is back in the car.

AM-JKLVYXPytnMVW30LIUGVnPsQA_-RAiWvgHZZ0Re90gcWDbQKaC4pdWTwvdz82jsHZkpNPGkvkBxGQxWZhVqlThAkmsrGhCUNeAiemSZuOV1g2iTIe3rO6hYrn76K1AIoG9-q8-bOeGs6UHR7p5xO72gsT9g=w945-h1260-no


Replaced the broken blue wire harness.

AM-JKLUnXvFUdb6iUe59QyVFj1_2_7DxylhUupz0q7S1Ctsieq2z1iyAbeJGlmixltf7Dbe5vyz3ONFC7mRXDyxjivRA1PZz9C-7lSIvcpJKAYM_o2FuBKyf68Ow52WHRw8WXCdhsiDKnE6uWlCcyFF2ZD3-yg=w945-h1260-no


My cable routing ended up being really clean.

AM-JKLVDz8H8bQniPFPwsE06ApIiSTIp1x4IPvX6sII1hn_oukN4GaG7dOIewGy2vIFUrOEreOA9JbmE7EXxdr4FHIvpXnJ1GsNyVJqzDfLM2TXlrDzIjJ6IkLODdKL4KT2yhlSfd1mIR-oEKNlLeUj_cyMbUQ=w945-h1260-no


Zipped the O2 connector to prevent it from flopping around. You can also see the main O2 controller plug just above it.

AM-JKLXNnlZkqZATwtJAz5NQ28hD2ec89KjnpohSEEyRvHdaOua0hrgXLMhCnRdeVVBRgLlAJkjrn7QTa7uIEOW-No1EstaIM7-I_smpCl-faDH52NIPEmxmZpb1_SjisOoaZtZAbve5VuDBsKkDHoJ2_27Grw=w945-h1260-no


Routed the USB to come up through the carpet here for laptop tuning. Added another ferrite bead to keep that signal clean.

AM-JKLXSHzK7TyP_1ozwzfm9BjqUnav_3wzrl0C_4uWekA_SjkxJljZfjnCEIUZIsWmDuRSgY8M8bCmub0eR2-4wFlBoi5GLcw_LtxwOxh7V5FdFcDtl2huiCrjwZspuqw6mE9gpEiI-xAE6tyZcRgPCCcO_Uw=w945-h1260-no
 
Re-Assembly 58

Door Panel

With most of the wiring complete, it's time to start installing the interior. It's been a long wait. It was difficult remembering the order of assembly from 3 years ago, so no pics, but I got the passenger door panel in place. All new OEM plastic liners/tabs.

AM-JKLXe1BULoU5H6OReatuUNdcxV_r6RDYCbO0PhiN0_nGI4NO8pt62ZA0RmXnTcjG0kfsC8CteAomq3C8XDnJZL4UdM29B6k_bOz1w4ZPpnpMmKeFUgZLxhWSCvt6QDtgFrlwUrRWjsRy0FVFAh7mt1nIEkA=w1280-h960-no


AM-JKLUpFNiBLMzliOGoq1R-2s5-3zD7kUNT-pAvLvYL-x7_urS7RdpfL-kjLEhPJ3LWFm40_-luI-ysxcn-rOYkXQl0p2KtgKGgJ0Y6wthlgBTFoPiWJgwD-z4HsVMmmnWD6gyy7bSj8ozF3P0S4f9PDQ69Lw=w1280-h960-no


Refinished consoles look amazing. Perfect match to the wheels/shift knob.

AM-JKLWfbTeZ07mCYaOXxhxc1LA-bjsDGv00LE--kMHlBCtul_jH8zbYcBFNvn-zudGyvc568pcH3-DAJ_mmf-QCaX0Vd-j9euwB2OXiNe2_cgFPXeVd6xKDgaZBPGRSlJu4c4jwW1Pb0NsQwEIA_I36ZTHuHQ=w945-h1260-no


The titanium lock knobs are a nice touch. Special thanks to [MENTION=33247]MotorMouth93[/MENTION].

AM-JKLUkHOp_OY7lc7gqIv83ASgINsTmIwV-pVYTCrbBCI2ClBHYh-iThh6sZV-qdfZocwoMR7jVZ-uHCJYk7Hz582UqeUOHZIv8FOg_tPpeO5zFU2_niizTq0cI3o8x9t3lqC7mr3oYd16sqMrJ1gBwRs5TJA=w945-h1260-no
 
Re-Assembly 59

Interior Panels

Started cleaning and mocking up the interior panels. First, I replaced all the crusty, broken and missing clips with new ones.

AM-JKLXoTpxsPF10UeKDtlvGIZz-YyzblbadaeGLCD15olgduXdjz030qfRkcziATlwAJz9o3_oKYrcLRF4SYtGuaF5YmAizq3Ug20cYEgifHV3sCemI4y--jP6cVgvSVzxCNavFWm0A0hwduHKmRNqDa51S7A=w945-h1260-no


AM-JKLWlAIpM4hr-CAupd3ULfNrknJGmc1TBilM6OKIwryPPJBUA0B7YAx4fvATglKJmZmRsQpQghddXKeNQvQAyJGZ-nJB8-JMOtMFtFIkS2FZjdKfY9jylkWiB7CJQy9x7XvHsA4kExR3xUAjJRR3zbVaBkw=w945-h1260-no


AM-JKLU-i8GSAzOwjswNjR8Xr0mQt8GqQZRd6-w8-B5bVGsDmNy0EVk0jL6A4klWQV-sEc1ZCNJ4mINWJvHoMFbRmpFW-DFgdqgxKTr115iPA9AB6Jg7rMM0DmAKi2b4niZ0eh7_shltTzGkzeh_iIEv6-kS0Q=w1280-h960-no


AM-JKLWz3prtgNmLrJ77f21BP2ezMBcs92SZYOLC4N30omtgv7QL2WbjO2bP2he1I_Rs3OyCdsS0PlwrOjImOJWCsY9tADpJQvBFdribFhx9Fipml0Ow9o59umTp3eqKasVzCEXLCwSdQ_abi0ilrXMyEtXqeQ=w945-h1260-no


AM-JKLVjY6Y7AGNz6qLDni_x9MP3-VQcA6C1yH4NSfBUsuDknnXxvLNCI95CraumTqonIyXPIAeR2BpTgZ13K4Pq-jFGQ7RA2i3QQsRobiGFa0lYfiB4pAnnMkdJ0i6r9NMnoqBpwNCLzL19ZDIve-cpUYuvgA=w945-h1260-no
 
Door Panel

With most of the wiring complete, it's time to start installing the interior. It's been a long wait. It was difficult remembering the order of assembly from 3 years ago, so no pics, but I got the passenger door panel in place. All new OEM plastic liners/tabs.

AM-JKLXe1BULoU5H6OReatuUNdcxV_r6RDYCbO0PhiN0_nGI4NO8pt62ZA0RmXnTcjG0kfsC8CteAomq3C8XDnJZL4UdM29B6k_bOz1w4ZPpnpMmKeFUgZLxhWSCvt6QDtgFrlwUrRWjsRy0FVFAh7mt1nIEkA=w1280-h960-no


AM-JKLUpFNiBLMzliOGoq1R-2s5-3zD7kUNT-pAvLvYL-x7_urS7RdpfL-kjLEhPJ3LWFm40_-luI-ysxcn-rOYkXQl0p2KtgKGgJ0Y6wthlgBTFoPiWJgwD-z4HsVMmmnWD6gyy7bSj8ozF3P0S4f9PDQ69Lw=w1280-h960-no


Refinished consoles look amazing. Perfect match to the wheels/shift knob.

AM-JKLWfbTeZ07mCYaOXxhxc1LA-bjsDGv00LE--kMHlBCtul_jH8zbYcBFNvn-zudGyvc568pcH3-DAJ_mmf-QCaX0Vd-j9euwB2OXiNe2_cgFPXeVd6xKDgaZBPGRSlJu4c4jwW1Pb0NsQwEIA_I36ZTHuHQ=w945-h1260-no


The titanium lock knobs are a nice touch. Special thanks to [MENTION=33247]MotorMouth93[/MENTION].

AM-JKLUkHOp_OY7lc7gqIv83ASgINsTmIwV-pVYTCrbBCI2ClBHYh-iThh6sZV-qdfZocwoMR7jVZ-uHCJYk7Hz582UqeUOHZIv8FOg_tPpeO5zFU2_niizTq0cI3o8x9t3lqC7mr3oYd16sqMrJ1gBwRs5TJA=w945-h1260-no

Where can I pick up a set of the titanium lock knobs. These look perfect


Sent from my iPhone using Tapatalk
 
What a build!!! Where can I pick up a set of those titanium lock knobs? Those are perfect


Sent from my iPhone using Tapatalk
 
Back
Top