• Protip: Profile posts are public! Use Conversations to message other members privately. Everyone can see the content of a profile post.

Honcho's Long Road to Imola Type-S Zero

Reassembly 92

ECU, Oil Temp Sensor, etc.


Also, I never tested to see if my custom oil temp light circuit would actually work. It uses a MOSFET N-Gate switch controlled by an Arduino Uno to cycle the "Hot Cat" light in the dash, which is a JDM feature (it's where the seatbelt light normally is). Basically, when the oil is cold, the light will stay on and when the oil is too hot (at the track), it will flash. Finally, when the oil is at a normal temperature, the light is off.

I had to learn C coding to program it, and John suggested I try a test blinking code to see if the switch would even work and/or if my wiring was right. Well, here you go. :)


View attachment 175801

Were you the individual that was thinking about repurposing the clock display window to display temperatures or other data? That was a couple of years ago and I often wondered if anything ever came from that discussion.
 
Last edited:
Honcho and I have been kicking that idea around for a while. I have a spare non functional clock assembly and was able to source some dot matrix vacuum flourescent displays that will fit in the clock case and allow small graphics and text at high enough brightness to work in a dashboard. I started on the PCB layout at some point but the displays took 6+ months to arrive though so the project stalled stuck on that and never restarted. It's still on the back burner but is a low priority.
 
Were you the individual that was thinking about repurposing the clock display window to display temperatures or other data? That was a couple of years ago and I often wondered if anything ever coming of that discussion.
That was me and I started with a Zeitronix display and last year upgraded to the SOS GaugeArt naked display which sits in a housing I fabricated to mimmic the dash display cover. Iit lets me access every input from AFR, boost, coolant temp, oil temp, oil pressure, fuel pressure, ethanol content, IAT and more. I love it.
 
That was me and I started with a Zeitronix display and last year upgraded to the SOS GaugeArt naked display which sits in a housing I fabricated to mimmic the dash display cover. Iit lets me access every input from AFR, boost, coolant temp, oil temp, oil pressure, fuel pressure, ethanol content, IAT and more. I love it.
Yep, that's our idea too- but this way it is an OEM-looking install.

Were you the individual that was thinking about repurposing the clock display window to display temperatures or other data? That was a couple of years ago and I often wondered if anything ever coming of that discussion.
I'd still like to do it, but John is the real talent behind the effort, so it's his call. :)
Honcho and I have been kicking that idea around for a while. I have a spare non functional clock assembly and was able to source some dot matrix vacuum flourescent displays that will fit in the clock case and allow small graphics and text at high enough brightness to work in a dashboard. I started on the PCB layout at some point but the displays took 6+ months to arrive though so the project stalled stuck on that and never restarted. It's still on the back burner but is a low priority.
 
Finally found a suitable pic to show what I had done. And thie gauge does everything including giving a warning if the set ranges are exceeded for any set value.GaugeArt Carbon Fiber Cluster.jpg
 
That's pretty slick Valhalla. Do you have a side shot to show the casing?
 
Engine Testing 1

Gas tank, fuel pressure, cranking


It smells like hot exhaust in here... :) We had an inadvertent startup. Today's menu was simply to fill the gas tank, test fuel pressure and dry crank the engine to circulate the Mobil 1. Many components were not yet ready (muffler, wideband, some grounds, etc.), so starting the car was NOT supposed to happen.
  • Filled the gas tank with 5 gal of fresh 91 Octane - Check
  • Activated the ECU and main relay to prime the fuel pump - Check
  • Cycled the fuel pump several times to prime the fuel lines (lots of gurgling and burping as air moved from the lines) - Check
  • Checked all connections/injectors for fuel leaks - Check (all dry)
  • Hand cranked the engine a few times with the wrench - Check
  • Pull clock fuse to disable the injectors and spark plugs - Check, but WRONG
The next step was to crank the engine with the starter for 30 seconds to build oil pressure and get oil on the bearings and in the heads/cams. That's far as we were going to go until we could hook up the rest of the exhaust and little bits. So, imagine my surprise when the NSX ROARED to life after less than half a crank from the starter!

First, open headers sound glorious. Second, the car sounded really, really healthy and smooth. But I cut off the ignition after about 5 seconds once the shock wore off.

To be honest, we were more confused about why the car started than excited that the engine works. Turns out the clock fuse erases the ECU memory, not ECU power. That would be Fuse No. 2 in the dash box. After I pulled it, I was able to crank the engine safely. It cranked beautifully too...means my starter rebuild and flywheel install were proper and correct. During cranking, I saw the oil pressure gauge move up a little, so I know the oil pump is working and the pickup is drawing oil.

This Saturday should be the "real" startup- assuming I can get the exhaust fitted.
 
Last edited:
so happy for you!;)
 
Those fire sticks want to spin...
 
That is awesome news! Congrats. One BIG step closer to that magic first drive!
 
**********MAJOR PROJECT MILESTONE!!***********

It's been a long journey, but we're finally there. The NSX started and ran today. :D
Happy Daniel Bryan GIF by WWE


Look, I had planned for a major event, but I decided to do it more Soviet style: launch the rocket and only show the footage if it didn't explode in mid air. Well, I also have no footage LOL. Basically, I had everything ready today and I just decided to just send it.

The car started on the first try and idled smoothly. No leaks at all from any key area- oil, coolant and fuel. Totally dry. Nice, solid oil pressure at idle. I ran it two times. Once for 30 seconds to move any air bubbles (more on that below). And again to warm it up to temp. During that time, I was able to roughly adjust the idle set screw to get the car to idle stably at about 900 rpm. I did log the first two starts in TunerPro and will review the data, but I don't expect any surprises. There were no CELs, so at least I know I hooked everything up correctly.

I cannot explain how relieved and happy I am- all of the other bugs to work out will now feel easy and fun. This was the big hurdle and, if I didn't do my job right, it could have been a big disaster. But, it seems like I dodged that bullet and the NSX is back to having a working heart!

So, what next? First, I have to chase down two issues that revealed themselves during the run up.

COOLANT WOES
The most critical is the coolant. I don't think the vacuum filler purged all of the air. The car is full of air. There is no coolant at any of the bleeders, even after running it for 10 minutes (rad fan did NOT kick on though). The radiator is cold, lower hose warm and top hose cold. The heater hoses are warm, but the thermo hose is cold. The temp gauge was sitting at one click below halfway, which is normal temp, but again, the rad fan did not kick on. However, I noticed the coolant level in the bottle rising dangerously close to the top, so I shut it off. When I shut off the car, I heard gurgling in the coolant tank and saw steam escaping the loosened cap. My best guess is that once the car shut off, some big air bubbles made their way to the coolant bottle. And, since the rad fan never turned on, I didn't run it long enough for the thermostat to open. I think I will just assume there is air all over the system and (1) open all 4 bleeders, (2) run the car and (3) close each bleeder as I start to see coolant. Hopefully this will purge the rest of the air. With a head overhaul, the system was completely empty and I suppose it's possible for many air pockets to have been trapped in the system during the vacuum fill. Thoughts?

A GHOST IN THE HUB?
I also noticed at idle that the rear hubs were turning slowly with the car squarely in Neutral. Thinking that the new gears might be "sticky" from being new, I shifted into 1st to circulate fluid around the transmission in hopes of lubing them up and stopping the spinning. But, when I put it back into N, the hubs kept spinning. I can stop them easily with my hands though, so I wonder if it's just inertia from the spinning mainshaft? Anyway, another mystery to solve.

Despite these wrinkles, I'm beyond happy and excited to finish the car. I'm waiting on some NSX-R upper control arms from Japan, so no driving until those show up. But still, what a big day!

JANKY EXHAUST
My Prospeed exhaust is way crooked. It's pulling about 2 inches to the left of the car. I'm going to see if I can loosen the rear cat flex bolts to center it better. Sounds awesome though. :D
 
So awesome that it all went well! Can't wait to get that Soviet video of it on the successful maiden voyage.

A lot of times cold oil in the trans will facilitate hubs spinning in neutral. The gears aren't engaged but there is still momentum on some of the shafts and with cold, thick oil it's enough to make things creep, especially without wheels on. My guess is your checks will all be good and this likely won't be an issue.
 
Interesting on the coolant stuff. When we opened the thermo bleeder, I remember that nothing came out and nothing out of the top radiator cap either which I've not seen with a normal drain & fill, so maybe it has to do with the system starting completely empty. If the car's off, the coolant is topped off, and there's still nothing coming out of the top bleeders that would seem like air locks to me which seems confirmed with the outlet hoses staying cold, which means little/no flow.

Maybe squeeze some of the larger hoses with the caps open to burp out as much air as possible? I hesitate to suggest filling the radiator from the top as generally that can end up trapping more air, but it could help just get more coolant into the system and displace some of the air out. Definitely not while the car is on & water pump spinning, as doing that will compress the air in the system enough to let you pour more coolant in to the "proper level", only to have the air decompress when the car is shut off and you'll probably blow hot coolant everywhere out the overflow.

I looked back and it doesn't seem like the Stant thermostat installed has an air-bypass check on the top, so no air will be able to bleed past without the thermostat being open. That might be trapping a lot of air that wouldn't be an issue otherwise (i.e. why the tstat bleeder was dry before startup).
https://www.nsxprime.com/proxy.php?image=https%3A%2F%2Flh3.googleusercontent.com%2Fpw%2FAM-JKLWvYIA9DeRe84kUXEGgP1r6hTecTPfdhwHjKDcvvTukkJRdioYgdlW8_VUJ-gq6mNIqZN0tOByw2eQ73kBW-gHHP0CViAoX9qeZTiKu60EeaU5uHGzoGIorZai_fMwUSTye91osFOeDrzlftDq4kAB6%3Dw938-h1250-no%3Fauthuser%3D1&hash=3f31dbbac8b7cd5476eb22fcd3865498

I agree on the hubs moving in neutral, I would anticipate that once the wheels are mounted that they would have enough inertia to stop anything from moving.
 
Having all the electrons going happily through all your honcho connections is fantastic..air and water , fire and earth ..then you just need Mrs Honcho as the 5th element.............;)
 
Interesting on the coolant stuff. When we opened the thermo bleeder, I remember that nothing came out and nothing out of the top radiator cap either which I've not seen with a normal drain & fill, so maybe it has to do with the system starting completely empty. If the car's off, the coolant is topped off, and there's still nothing coming out of the top bleeders that would seem like air locks to me which seems confirmed with the outlet hoses staying cold, which means little/no flow.

Maybe squeeze some of the larger hoses with the caps open to burp out as much air as possible? I hesitate to suggest filling the radiator from the top as generally that can end up trapping more air, but it could help just get more coolant into the system and displace some of the air out. Definitely not while the car is on & water pump spinning, as doing that will compress the air in the system enough to let you pour more coolant in to the "proper level", only to have the air decompress when the car is shut off and you'll probably blow hot coolant everywhere out the overflow.

I looked back and it doesn't seem like the Stant thermostat installed has an air-bypass check on the top, so no air will be able to bleed past without the thermostat being open. That might be trapping a lot of air that wouldn't be an issue otherwise (i.e. why the tstat bleeder was dry before startup).
https://www.nsxprime.com/proxy.php?image=https%3A%2F%2Flh3.googleusercontent.com%2Fpw%2FAM-JKLWvYIA9DeRe84kUXEGgP1r6hTecTPfdhwHjKDcvvTukkJRdioYgdlW8_VUJ-gq6mNIqZN0tOByw2eQ73kBW-gHHP0CViAoX9qeZTiKu60EeaU5uHGzoGIorZai_fMwUSTye91osFOeDrzlftDq4kAB6%3Dw938-h1250-no%3Fauthuser%3D1&hash=3f31dbbac8b7cd5476eb22fcd3865498

I agree on the hubs moving in neutral, I would anticipate that once the wheels are mounted that they would have enough inertia to stop anything from moving.
Yeah good point about the T-stat- I suppose have to wait for it to open until all the air on the thermo side can make its way out. What's odd is that both heater hoses are warm, but no coolant coming out of the heater bleeder? I'm not going to add any more coolant- it got dangerously close to overflowing. Interestingly, the coolant level dropped about 3 inches as the car cooled off. It's now near the MIN line on the bottle. It was burping quite a bit of air, so it looks like it drew in more coolant.

So awesome that it all went well! Can't wait to get that Soviet video of it on the successful maiden voyage.

A lot of times cold oil in the trans will facilitate hubs spinning in neutral. The gears aren't engaged but there is still momentum on some of the shafts and with cold, thick oil it's enough to make things creep, especially without wheels on. My guess is your checks will all be good and this likely won't be an issue.
I think you're exactly right- the Torco fluid is thicker than the MTF II, more like the original Honda MTF, and it's been really, really cold in my garage (like 40F). Even super cold though, it shifted into 1st like buttah! :D I'll run it up again on Friday and wait until the thermostat opens- maybe that circulation will push the air to the bleeders...
Having all the electrons going happily through all your honcho connections is fantastic..air and water , fire and earth ..then you just need Mrs Honcho as the 5th element.............;)
It felt like that- my heart was RACING.
 
Yeah good point about the T-stat- I suppose have to wait for it to open until all the air on the thermo side can make its way out. What's odd is that both heater hoses are warm, but no coolant coming out of the heater bleeder? I'm not going to add any more coolant- it got dangerously close to overflowing. Interestingly, the coolant level dropped about 3 inches as the car cooled off. It's now near the MIN line on the bottle. It was burping quite a bit of air, so it looks like it drew in more coolant.

I'd guess that there is some coolant circulating through the heater core, but once the car is shut off the excess air in the system bubbles up to the heater bleeder and the coolant level isn't high enough at that point to leak out. Of course, assuming you had the heat on high & recirc, right ;)?

The steam/air burping out of the coolant bottle when the car is shut off seems like what I had mentioned, where the water pump is running and compresses any air (or steam/vapor) to basically "shove" it into a high point in the system. The compressed gas becomes trapped and creates an air lock, which can create hot spots of low-flow near the engine and boil coolant. Once the water pump is off, the air/steam pocket frees up and some of the gas makes its way up to the coolant bottle (and bleeder valves) to burp out. Speaking from experience with other industrial closed-loop heating/cooling systems...

I've seen people drill a small hole in the upper thermostat plate to act as an air bypass, but based on this stock pic I found of the Stant 14127, it might already have the air bleed included but could have been clocked upside-down in the thermostat housing. It looks a bit hidden in the bottom-right corner of the pic below. Either way, it doesn't seem close enough to the upper part of the housing to me to really do much air bleeding even if installed right-side up.
https://m.media-amazon.com/images/I/81OM5sAc1xL._AC_SX679_.jpg

Hopefully you can either run the car long enough to open to thermostat, or a bit safer might be to remove the thermostat and either re-clock it or replace with another one with a better-designed "jiggle pin" location. It might make a big coolant mess though even if the tank hoses are clamped off.
https://www.gatestechzone.com/-/med...hash=D94D0366397AA0D5DFF246892BCB738076F66491
 
@Big McLargeHuge I think you are onto something. Based on the layout of the thermo housing, air should escape the Stant too, based on the position of the check pin- it looks like I forgot to align the pin to 12:00. :( No biggie though, we can just remove the thermo cover and rotate it. Clamping the lower bottle hose should minimize spillage and we'll just cover the transmission with tons of rags to catch anything else. Still, I can't believe there is so much air after the vacuum fill.
 
It takes forever to bleed that system. Did you have the rear of the car elevated at all when trying to bleed? On my last go around with bleeding the coolant, I upgraded to the NA2 front bleeder pipe for the heater core in the front bay. I also ran clear plastic lines from all bleeder ports to small plastic bottles to not make a mess. I left them sit with open bleeders overnight so they could gas out. Worked great.

Congratulations on the start up. A very good feeling indeed.
No, the car is still on jack stands so flat. I too upgraded to the latest front bleeder pipe- so much less mess! I am also using the plastic lines with bottles method, but I like your idea of gassing out the bleeders overnight. I think I need to get that thermostat open though so that I can move the air in the rad loop to the bleeders. However, I think I will try to re-clock the thermostat first so that the check pin is at 12:00.
 
Re: The hubs - in my experience that is normal. Did it both with my totally untouched 5spd and now my twin plate 6 speed. I can stop the rotation with 1 finger.

I replaced all the coolant lines recently and vacuum bled it too. Didn't get all the air out, but a quick drive and then opening up the bleed points a couple times did the trick. Like you, my coolant expansion tank likes to stay at more or less at the joint line. I can fill it, drive it and it will come back and cool off close to min again. It has always behaved this way in the 20 years I've owned it. It never goes much below the min and I never refill it between major services. An entirely new cooling system hasn't changed that (23 hoses, expansion tank, t-stat, cap, water pump), so I am calling it normal.

Yes, recheck the T-stat so that the jiggle valve is at the highest point. Bleeding always worked better for me if the ass of the car was in the air. And I assume you have, but if not turn the heater on max temp.
 
Last edited:
As I didn’t want disturbing your nice build thread, thought about not posting here.

However, you are happy for me to do so and other owners may re-visit your detailed thread in the future, going to add my experience here.

I wrote this for other owners when asked about how I bleed the cooling system years ago and it’s cut and paste of multiple messages from the past.

Very old info but should be still useful.


First, the basic.

The method in Workshop manual is OK but mainly written based on the theory.

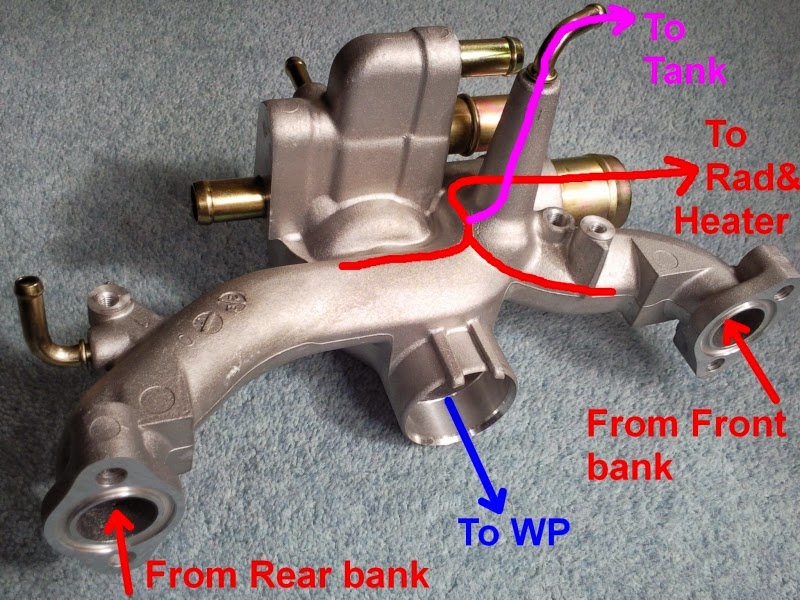
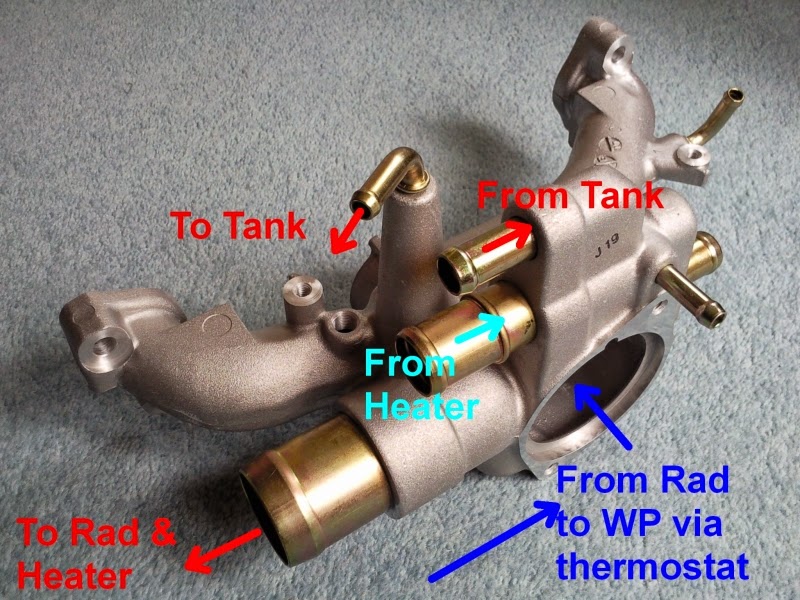
The entire coolant capacity including the tank is about 16.5L for the C30A and about 16.2L for C32B.
If using aftermarket radiator, you'll need extra amount depending on the spec.

Because the hose/pipe goes up and down across the entire cooling system, you can't drain all of the coolant even if you replace the radiator, hose and the thermostat.

You will be able to drain only about 12 - 14L of coolant depending on what was removed/replaced and also the procedure taken.

With the air bleeding method in the workshop manual, if you study each components including the water passage, coolant flow, heater core, etc., you will understand that it will leave several air pockets within the system unless you use dual stage vacuum pull/fill method.

At the factory, there is a big machine creating deep vacuum and that's how the cooling and the brake system are filled.
Obviously, it starts with an empty system so much easier than already partially filled system.

When you remove the cyl head, you will notice that fair amount of coolant left inside the water jacket/block due to tilted eng installation and the position of one of the eng block drain port.

Even after opening all of the drain ports, if you have experience of replacing all the coolant hoses, you would know that quite a lot of coolant was left inside the system.

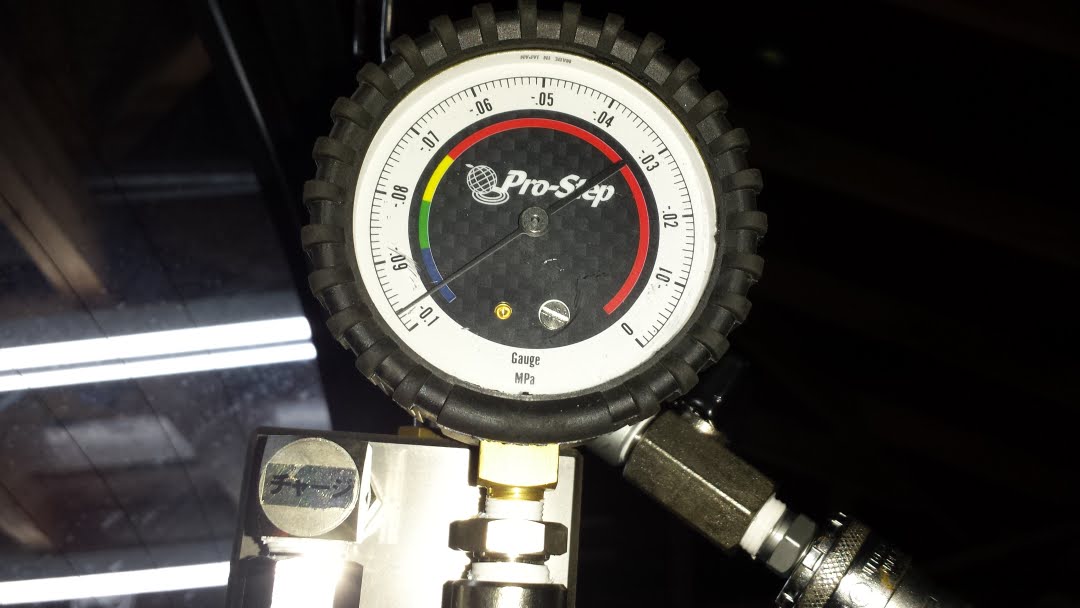
If using single stage venturi vacuum pump like the one in your photo, the performance is very basic and heavily depends on the temperature, amount of coolant left in the system, the compressor performance, etc.

I used to use one and I never managed to exceed more than 70% vacuum with my setup.

In fact on the first usage, I measured the amount of coolant filled and straight away, I noticed huge amount of air left in the system.

If you squash the big coolant hose attached to the thermostat cover many times, you may be able to feel and hear the bubbles created or if no coolant in there, you may feel/hear nothing.
That’s how much air could be left using the single stage basic vacuum pump on NSX.

It works nicely for the ordinary production cars with the short cooling system length and much smaller coolant capacity but not enough for our NSX.

NSX has really long cooling system length and as mentioned above, more than 16L of coolant for NA 3.0/3.2L engine.

For the clarification, it will work if other conditions were met but haven’t seen one at reasonable price tag.
Similar to what you can get for the HVAC vacuum pump between the single, dual and triple stage models.
I also use dual stage pump for the A/C Refresh as it's so much quieter and easier to get rid of any moisture left.

I kept using the single stage basic tool for a long time because I use different bleeding method from the workshop manual any way so the vacuum fill was more of keeping the area dry and clean.
Not for getting rid of the air pockets.


AL9nZEVaeT5wTspdj6fxJp7tiBix683eJD4pHXXmK3sjFL_Itff-BBGSBm72rbTcwejEjGvFBAK_bInfWBXqJzbj2HSBGPPjEdQ3aGGYevptiwJtte1KcNoesq_6v35h9YNJ_kAJS5gfm6O-47cSO9a_AZqC3A=w1080-h608-no

Later, I switched to the dual stage type and it significantly improved the air pocket situation.
As you can see, always managed to pull deep vacuum and although I still carry out the same bleeding method described below, most likely, no longer required.

By the way, it’s always good idea to measure the amount of coolant filled into the system.

You won’t know how much fluid left in the system so there is no single figure for all cases but if you repeat the same procedure many times, you would get some idea on the expected amount of new coolant to be filled. If big difference, something is not right.

Any air left inside the heater core could take ages to be pushed out from there so make sure to bleed thoroughly.

When the eng is cold, the thermostat is fully closed so the coolant only flows through the eng block and the heater circuit.

There is almost no coolant flow through the radiator back to the engine at this stage.

Therefore, any air pockets trapped in this circuit won't move until the thermostat starts opening.

There is a tiny float/jiggle pin on the thermostat that helps the air bleeding process.


Above should be enough as the starter.....


Now the actual bleeding procedure.


AL9nZEWEKtVZf63oenvhBfiOGQtePezVkUJuT8QiL2puN0RQMsM9_Ed2kcFb5oUBo4m6EsQn6Q3JXw6BsEroWimrIJnhCj4Qp1FAiw5ZGcab1Pf-NkGdoZkTjv5_yYJRAyL6LvTG5vjY8RkYkkw_UYELw-KaSA=w1080-h608-no

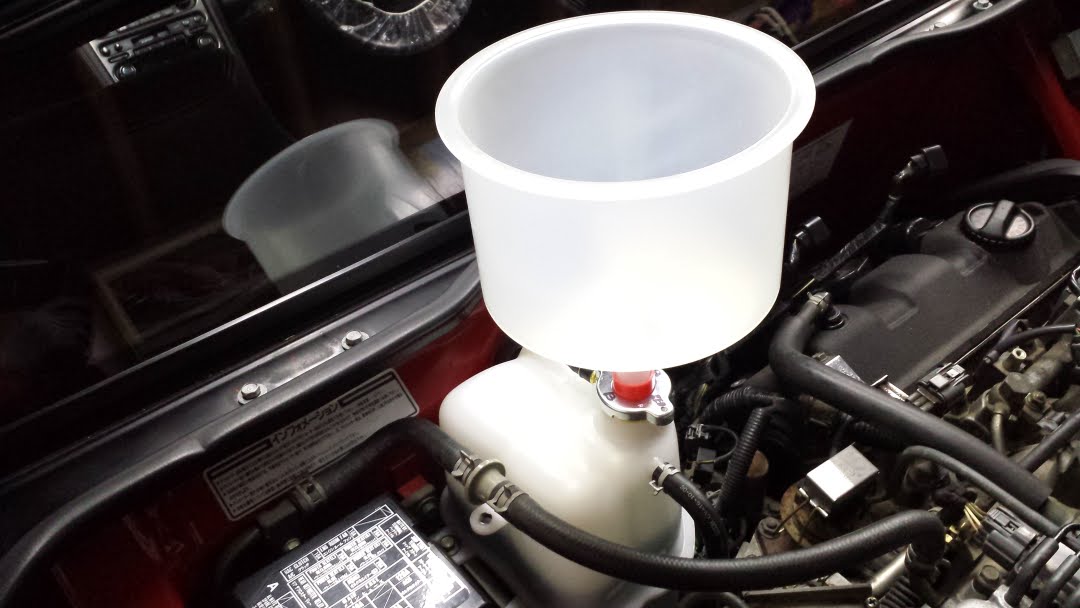
Not a must but if you can get hold of the coolant refill funnel that you can attach at the coolant tank filler neck, it will save your time.

Basically, the gravity speeds up the process.

Depending on the model, it will help removing the eng bay cover.
I normally remove it when working around the engine any way.

No need to lift the rear of the car.

Keep the coolant tank cap removed throughout the following process.


Keep water valve fully opened.

Turn IGSW into P2 ON, set CCU at max temperature setting and wait for about 30sec.

No need to actually turn the fan/blower On.
Just keep the CCU Off and turn the temperature dial fully clockwise.
This will move the water valve lever fully open.

Turn IGSW back to P0 OFF after waiting for about 30sec.

Or, if you have disconnected the A/C CCU and can't operate the water valve, just remove the control wire and manually open it.
If you look at the valve lever, there is even an arrow with engraved text 'SHUT'.
Move it in the opposite direction, obviously.
For the LHD, the lever should be pulled towards the radiator.
For the RHD, it's towards the cabin.

After filling the coolant using the vacuum fill or whatever the method you used and before bleeding, if it’s safe to do so, start the engine for about 30 - 60sec and stop.

This will push some of the air pockets in the heater system towards the heater core or back to the water passage.

Now top up the coolant tank up to the filler neck.


Yes, you read it right.


Fill it to the neck.


This is why I use the funnel at the tank because later, you need to top it up to the neck multiple times.
With the funnel, you can speed up the process by adding extra coolant above the tank.

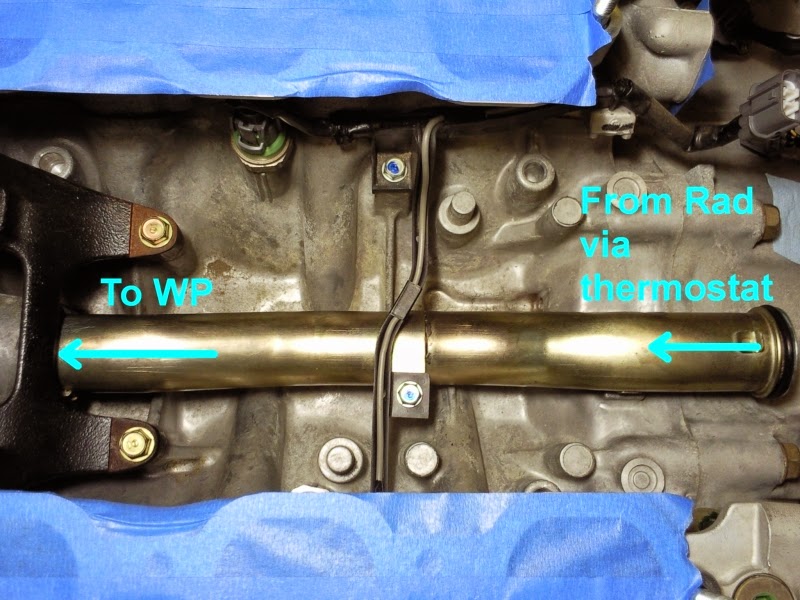
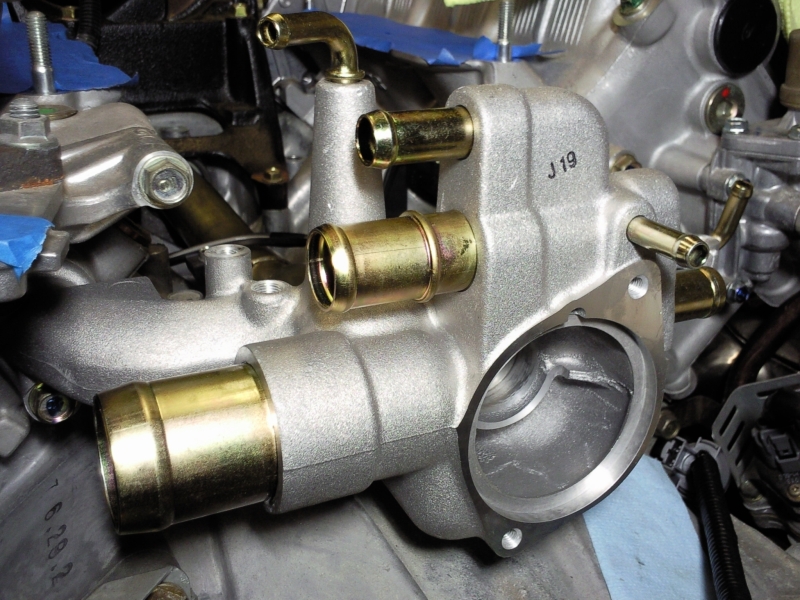
Attach clear tube (about 2m length) to the 1st bleeder plug (thermostat cover) with the other end in empty container that can hold at least 2L.

You are going to rely on the syphon effect so keep the container as low as possible.

Open the bleeder and keep it open until you collect at least 1.0L of coolant in the container.
Ideally 1.5L.

Hence, you must fill the tank to the neck or above using the funnel.

During this process, keep coolant level above the MIN line of the tank.
You can go well below the MIN line before allowing the air being sucked back into the cooling system but you want big enough safety margin.
You don’t want repeating the same process again.


7sp9ekgQhsQJDlLWBBsqLfSgs-1dvgyqRUqZhusEJItis8b7d0AorI1rOa_XiLOSYwOLjHClDsNZqKAR1jRL_HVyVCXFZHCtWW0xbb7CpOGopcu8UFeKRr421E-cPF7Aul3VAz-VRQmg6ftzqUCxD6qqKFaCAT4bqTj58x9OU3sQVfg4Aj2Nybu5fiH4T0uHDyR2rtY20txX1BIuKhTDtFZcSqlETGvKe71RxXsv6hUVlP3kseuOiqsck9j5mU4k8vCWJ5ew82_tmziAwpH9CGB7Nn5Ydj_Dupvu57A5sRuTVDR2KPiZ07utcNYIfFfaFrrTysE5y27pbZLfd57gLS9SptYI6CK7DZWZ00YCxz3kPtiWG7uYGMMJoY060qe4cv22PFRHwwRkPWuMlXs4g2n31qhpFUETrHt-z9AG97lddgN19XvzzH158RU3KOcXa1TLt_zSoW7BNMZQYki8NXM0oBTzGrma_EPJXpga9ZIbEPBm9lnkcPSh7Idunw3STBG0SMpgZEc-NXsU9W6d_L9LKO93DjYJ7deBkJeqMumwr6ElrF12jPf3ZUuj6GQ9-AAzaF2JNQBaXEd7a8rpMJujMD0pGOhdIKQu4IgB7fDXalDJf3dC5HE_9gyyJ76AA7E_sYvrM3kqute-UB6tLr2efqeF7_ds8lmvDuSQ_sCRz81uvBzAefEnRFflEnFxWTzmaP7vQa2Sh1tYWAMupq5Vjc8uvQHVVeBzL3VDzz3U-vVK914qf1SrwwAgYte8eCqoObU-UcWDBGte3NzfzkpgjMbzkhu9HbLeYeuihUkRtBbxtfXrqI8kJud5Rlz5tK7YCZCWnfmQ3hjItsFbjuX7cz6HW3U2dpq2D0vObmuc_71UrMuSLsbPaCWrgDNPVtxr6Ys43aP4QuCAOw5WF97mk1AdyC8sYwkbszBC5BrsN_YObQ=w800-h600-no

YBokcHZqymKjBgSJWhlq7QSLFTShqmB1vkmqTx6INEzWYzg0BnPDeM2qDsCqtH1cTkDgROk1hYkuV5PpdVvnj4-xxDNsSDpDhKxif3Z7DHfA3E1_FoTH0yow8jJlqPrO_Gg3m85hM0PFRcH1v9ui5jxV7gsT_nTB73GOPo9cTFrmMxFSatb6AXFx3yyoy67EHoTGPdMWEBAkeUgXaz1_sLWYQzmrzSsmTLo0Lh-PntTizqG4m0iiajhx1Jn5FYljQ14xav4JKjqcJwEUT9RByfZn37kAKmpwmCsWXFK86eXfDPJlYlwDJZ4oK_tAIukq9KbC6-NyXbOKgOeyVa9VGFJ4vqexirgK5tvvFOmXfu0cvyDfjxRY95cdV43f9PlKj17RHEYwtKsS8BlAfN8S7z_74v_KCNxADFxNSGM8RJtDsHozm_eS1PRY-NumPIarN66_yM4qYhxFNfwaUAjU9_kmnZ3LCfY7_XPjuAE35OjDwDiuzo4Giu_3L8qn-lcGuq0jKmOeuSs4uqHaYVHuKk4ba7YIZswdJBvV40ZI4e5vkcfUDlPP6QWT44yN41UcaEwtnfejA17aI1ip1AnkMftRR9QuYJj8MQP-37DcCW9yev4Ucpn220ODe6j1s6loONdWAiSlrivwkx3eFdIIP8CgAQG7QtTDldLfJzwlZCT3eTITIfDNFgAcB-mbeUIzoyVcAfyNdZWGh8Si2NO3cndPU60NwR09cDHH_WLvWk1cCfe_dBfds-VNJn4BIjYsMxyxv701pCYYEp8iAFwMkx4WWCKUTsFinA1ueWxCLnsyldnq5WYnvvyxvpNJmBwd2zHz93a_y3UpKgYZ2GlVHMzaFWA2wGbnYa-87nZOI64ZCRwdVF7-9NM-xRx5FvAJvJ6PF_RX80vIcCqlOI_R3X-yicnWSUbzui81pPA7S0YxqvWOWw=w800-h600-no

0oUf_SmgALaorN6f5BfGh2XHXqg7lsf5e52grTTiphqZz7O9eKK6iziey4njOYGqkegBa_wjvbou9GGWC-bfKBXWHPdY_SYCtROy6oAVCPlRhh3V9nS_qSX19M6SM4CrG7BJA2N1mEHWea3Kf4UOUrWXLVoVlPQS1SgjEMEdZV59Xzg4tUmvhmHqFeCy9nxkpW1npSEhJRRwhHJvBLWe9VqXt9H7Qxp7tmAlcXjfA8FjIMcb53LFX1BcrxR6KFjWo8X3hHoGeDm1H-87C5cOvcFj0QY3hmHvP3JshfbVpAs3zbq_a8dZHtglLQST770K3HkWqND_1RZWjS-_2GGeKADxCp_qX-A1FE3z8d7TVlCQY8Ep9bgK7GLaEf9dE7Dzf4zdxMMXclau14Tb24g0H5Ckq3t4265Zvlc-9nqiJWgKGXq7Bmmhz5W2Qgrt10us25RIG6gYq1aMNRMsixqqbt-9uUfVoT0bzzDu_YCWoRIYvAHjVbOU6091DdtENPVNv84E2rcy7iN5AYhH-gGZgaRkxclDa-k-QydtajhvsYq_2aTG66Doadvdp2uxjFljhAaRQxqvWxI3vY97iZFCQyY-B8IBNkdAS5fUD3-pk_2Dk7LBQMQ3tqzd0ta56pDBmve8GJc0PKUwWqDYjnEhKaCeT9HmQRbZmYINQeAqBS4iFpW3k17o-9PgSac0ixkZITf1MP5Zxs83SlFtlb3nv-ENAfDS1PFmwQHa6YV0rv8uoqiW4at37Y1IURU-f4GGP4p0SavRxOijsT1jynW3wh6FXIY7ZFo96d6JUUYo4qcnsVeFyOZBfXhOWwaHdG1ecjIHwpgRFwcYIAiEJvEkduuPWRGkY5RdhYuOuQHcVLuXUZPk5rTXai3HYSZuwC7Ev-E2wIqdP3AmpU3qqGr1nlLJv6Xl_WnR74aWbcko9_9Uyztj2Q=w800-h600-no

NH-AYKBtj6MTZk1qMOjvKdzxLHFjgDTu8E7Z5-ifyCLdn5KGfoW6r-IUg3TuWmvSm_d5nB2jBcmtHqLpJgTl5jPqQcOIQ68FxlxL02eICqp8TnThGzaF57M21XHo563UY0uRgbOvj3NN5ICOlUnDZHo5QtVYZgYawgsoNYqfR8T4Ee6wjphFM40tX1SMQDwG3pZhfGE2tReOP2UtKaqGSxAt_Js68oIdxKS0oey7Ym9TsKnKruG1RnSuYNDPudUsVXM_Xx9RV7mRWj3wLddx3rzMJSj711wy132M5EI9dSSdl3wr1ztD7SWp5q0KIQd9xKJ_LWDTWsavztoaM2ry-rsAeh7qSk5fawWA9bRpo970mTAnUzAGznUlF22RVn1VCwjOo1n0ttYKN9xVTBL7JYeTBNDqr8OTmieR3H_V_xOMa-7XeMXXIS2d0inj1NhJUrPXCVSVnbD3JJcp2-j3Aztwd_M_5Z0u_FOU4xtTNXdOIYHgKVE4gSf3BSD1dreuk2lPVY1wNVGcCq3ufDBGV8YvCkVLlkuCM7_fwG3J7iAJJkWrqBL9JwBGSL7ScHuvdawd9C6FNOPjVzxLH2oWEymadEdeyTZ5XIG2zxKUMsNIEhwrwwKdsj0UX4hYXN99gG9d3EyvIncdyWBtfhWMUkX8CysOzMd--_zFKoOV7rtoI_tKNj-PHq-fFNA8Z-3SGZ-lKr6ipMVesKv_OxYYn0mzfz31CsodZxmaRViZRezlsxUJGfUrAwHtNi7Di_ZihvC6vHj889jLxVO6CkbtyBAAR9CHz7Df9YIKxf415dnIHxuLTrVvDK56HMH-bTabbbhYk-Lt7YnOoacsZDcDBqYgzqxObpJCMgvYOvp4j6XAshEa8CLu4It-d2qy3UQTIFmDeadrPsdaiyhc8oU2ZeB5IhhOETZGTzCcJiihAtFxyJkC-A=w800-h600-no

oBSgzlcveMg4e4ntQxOgGMrnZhDeV6r8pbA90QDhbnY69CGyMpi4eg9V6kIIwEG3Yxa84lj1HHUTviHHvMqxQf8OIukyRFQeV1lqLeevgOvjtLxVZ0V5PmfeOyHYhM-w1zWBGeWjZwGGGlsyFyL1WPHbBy-MzUhSWPNguJZLvO5voF0e3Vw7ajxuBdW8K54zOmlLYeCtq-DbWCUCD1jVqosMrRlUTaj-Ilsj9Ig7giHVECk6GcTsYxu_v6PV6hHLDYdcrS4wmmk3RG36w2fMB0xQvFT7Z1ga3iv1Pq-6bW-7GtHuIDHJAsWJ_58_Zu9uNDsGYtD82-dSHHrack8Wm3apPJvwVvuTqxuT_3AzhqjGLZNfUoE9HWzTnKJ8E1iN9sNXAFVXXAA8P0qkN5AoKoATJzTTP6mtS2y5H8WkBYz8VV5qPi8Ao3xYXLLhfjgKIt45zn3oDTaTiywsGqcySzbc7Vg1F9uvpM-VGgUqagEvwdFtKXj13qAJuqKVaGCPQCGqK3o7h6cYdm2SdqJN33ciUexLOtkKmD2BFvwECWjgfQABEjecWC6OOQ5ZFXpOOn8x-Iy3tofOZJMmqMsWKkHZw2dwz5ZOAJ7jBM4zeGft3yhF_EXj20wNonbP9tE8_fcKvv7nFnJeE5ssB33p7SzYO_pnHmZzeZLR4FmBth9kH6w6PYKaIF9-ijpEtpv_jDn_CgYwlBRN3TOP5JJmFPaTXMBHer1v7_kSC8uCUCYcj75zGfBvrUSGqzYKiZdGdBKNGemNOpqFyOYwGpDhW8oJhrapJoSmM1TrplTbXJtO-4LNk09Szn749c86VIydYmrAq3_WcBnURdRKH2d6VYSaYHkmAw0NMSFCuf9PmQuDe3NxHBzcCLnk6GSDJ-x4cwVJPAMGbOqEgM4dEF5WrKCUT9oqRrgPpI4hsMlTB7GGRV1SKw=w800-h600-no


The MIN line is just above the air separator of the water passage and while the air can enter from the top small coolant hose, any air left in the separator chamber would be easily pushed out towards the tank once the engine started but you want to prevent the air being introduced during this process.

Close the bleeder plug, top up the tank to the filler neck or add enough coolant in the funnel.

Move on to the radiator bleeder plug.

Open the radiator bleeder plug slightly.

Keep eye on the tank level as the air escapes from the bleeder plug.

Wiggle the plug. You will start hearing the bubbling sound and once no more bubbles with steady seepage of the coolant, close the plug.


AL9nZEUDiiguZLh0T3jACVUKMtT5glz4KkKIKQTBJKC94_dCGB2Gc3h4ILHoPVn4U6dQWgr4kvaHB7SlIj7VA5YA2gWZUuvMc9oKctscg7nCNiGSq0ut5wdr7yVGkTQOMbfykIotV3nXQgAro8uvz0wk1WoloA=w1080-h810-no

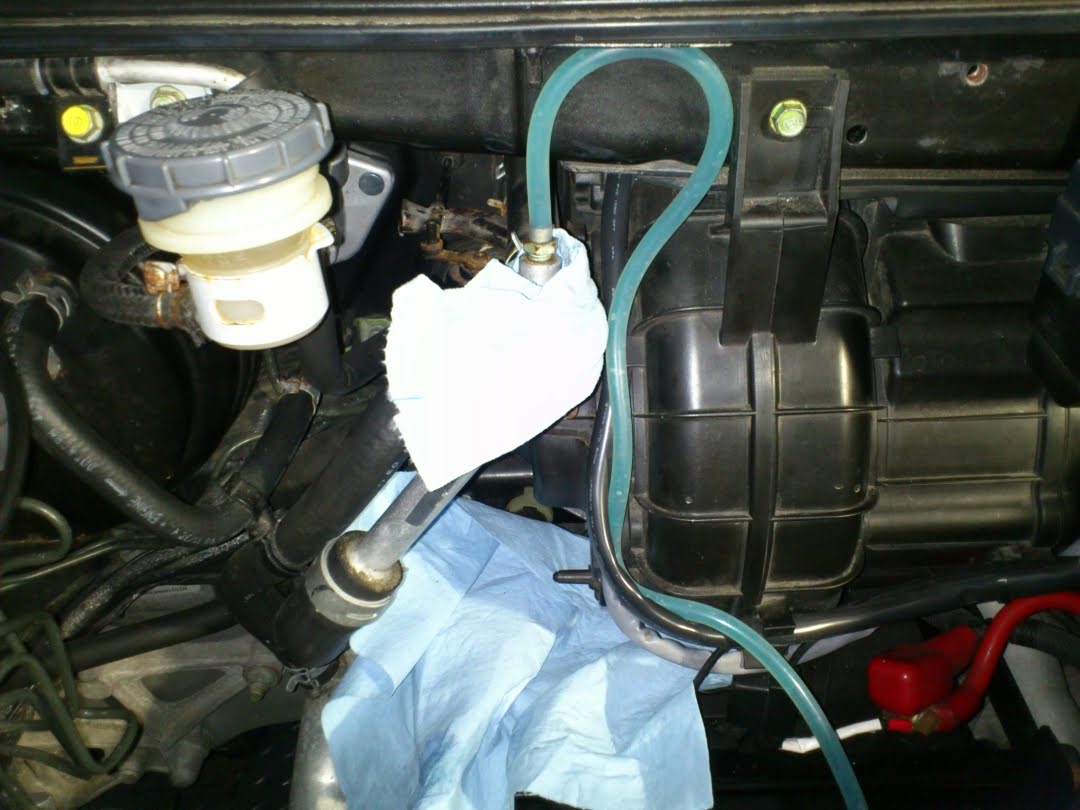
Top up the tank/funnel again and attach the clear tube to the heater core bleeder plug if you have later spec aluminium L-shaped pipe with the bleeder plug.

If you have very early model, it would be a rubber cap instead so you are very likely to revisit here later.


This is the most important area of the entire bleeding process because it takes ages for any air trapped inside the heater core.

Follow the same process as per the thermostat cover bleeder.

Collect at least 1.0 - 1.5L of coolant through this specific bleeder.

With the early model rubber cap, you could use larger ID clear tube just for this process but if you don’t have one, revisit this bleeder few times after each driving session. Will touch on this later.

Top up the tank/funnel and repeat the same process at the bleeder on the heater return pipe (eng bay firewall).

Top up the tank/funnel and repeat the same process one more time at the thermostat cover bleeder but on this occasion, collect enough coolant so that the coolant level sits just above the MAX line.

With this process, you can remove majority of the air inside the system.

Double check that the bleeder plugs are all closed (and the rubber cap + clamp for the early model).

Close the tank cap to the 1st notch (not fully closed).

Start the engine and keep eye on the coolant level as well as the temperature gauge.

The coolant enters the radiator from the bottom side.

Until the thermostat starts opening, the lower rad hose or the rad body itself would be cold.

Once the thermostat starts opening, you can start feeling the rad body getting warmer.

At this point, you could squash the big coolant hose at the thermostat cover.

You may be able to hear the float/jiggle pin of the thermostat moving back and forth while any remaining air pushed back to the tank.

Keep eye on the temperature gauge and the coolant level.

Wait for the rad fan to kick in.

Depending on the air temperature, it can take more than 20min after starting the engine so be patient.


If followed the above entire procedure, never experienced but if the needle gets even slightly above the normal level or the coolant level getting close to the neck, stop the engine even before the rad fan kicks in.

From what I heard, this situation can happen on the early model with the rubber cap at the heater core bleeder.

No damages done but you didn’t bleed the system enough.

Too much air still left in the system so you want to bleed the air further ONCE the engine has cooled down.


If you didn't experience the higher temperature situation or the potential overflow from the tank, let the engine run for several minutes after the rad fan kicked in and then stop the engine.

Park the car overnight and check the coolant level.

Top up the coolant if required to set the coolant level at MAX line.

Now ready to take the car out for the 1st test driving session.

For the test driving session, even in the hot summer, I’m afraid you want to keep the A/C CCU temperature setting at higher temperature range to keep the water valve open.

I always set the CCU temperature dial at max but keep the fan speed to min for at least 5min during the test driving session even during the hot summer.

Park the car overnight.


Now time to revisit the heater core bleeder.

This is especially important for those with the rubber cap bleeder.

While the engine is cold, remove the tank cap.

Now crack open the heater core bleeder or lift the rubber cap just enough to let the air/coolant escape from the L-shaped pipe.

If no air or just tiny amount of aerated coolant, good news and no problem.

If you hear just hissing sound with no coolant for like 1sec followed by the coolant, you may need re-visiting here again for the next few outings.

Adjust coolant level, close the cap and done.

Unless you track regularly with the aged radiator, you should not need topping up the tank until the next coolant service.

I never touch the coolant for the next 4 years using the OEM Type-2 coolant.
It can go for 5 years but I prefer slightly shorter service interval.


There is no need adding any chemicals or the use of different type of coolant.
If cooling efficiency is the highest priority, just use plain water.
No rust inhibitor or WP protection though….


If you think the coolant never boils even under perfect condition, imagine how high the temperature gets at the surface of the cyl water jacket and what happens with the coolant at the surface while pushed by the force of the WP.

Never recommend doing this but think about what will happen if you quickly put your hand in and out of the liquid nitrogen. That’s one side of the cooling system.

Kaz
 
Last edited:
Back
Top