• Protip: Profile posts are public! Use Conversations to message other members privately. Everyone can see the content of a profile post.

Honcho's Long Road to Imola Type-S Zero

Can you temp wire in a rad fan switch just to keep the temps down while you are going through the process?
what a process...:oops:
Believe it or not, this is fairly typical for the NSX. Prime is littered with the woes of owners (and service folks) with air trapped in the system- it takes ages and ages to burp it all out. In my case, the system was totally dry, including the engine block. Then, I sucked air back into the engine block twice to change the thermostats. Most people who do the coolant change don't realize that a good amount of coolant stays in the car even after draining. After a complete overhaul, it's a different story.

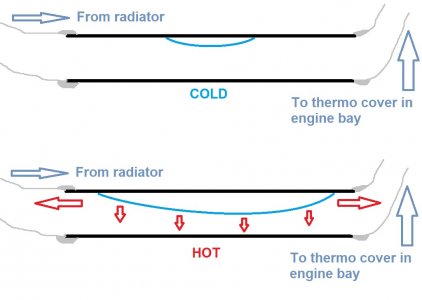
The rad fan process is actually a safety test to make sure there is a minimum of air in the system. If the coolant expands to the top of the bottle before the fan turns on (at the max temp the car will allow), it is a sign that there is too much air in the system and the car needs to purge more air before you can drive it. At idle/no-load conditions, the voids and steam pockets are not a danger to the engine as long as the coolant doesn't overheat (hence why I shut it down). But, when driving and under load, it's a different story- your head gaskets are at risk!

On the second warmup, I increased RPM to ~2,000 several times to help the water pump move the air bubbles to the bleeders. I fear I may have to do this several more times before I can get the air out...
 
Engine Testing 6

Coolant...once more


I am making progress. This is the running coolant level at 88C. The last time, it was at the top of the sight window.

View attachment 20230109_123440.mp4

The car clearly burped some air overnight. Also, during this warmup cycle, I saw two big bubbles come up through the sight window separated by about 60 seconds, so there is still more air in there. Still, it wasn't enough. At 94C (4 more degrees than last time), the coolant reached the top of the sight window and I had to shut down.
20230109_123901.jpg

Prior to this warmup, I checked all four bleed points and there was no air. Thus, I think my suspicion is correct- there is still air trapped in the engine (evidenced by the two bubbles, which occurred prior to thermostat opening.) However, this time, there was far less expansion during the stat-closed cycle. When the thermostat was closed, the coolant went up perhaps 10 cm at most.

This cycle has me suspecting the center tunnel coolant hoses. I noticed that the fast rise in coolant level occurred after the thermostat opened. This tells me that it is the coolant in the radiator circuit that is expanding when heated, not the engine block. Once the car cools down, I will squeeze the center hoses and try to force any bubbles stuck under the car to migrate to the radiator or heater return pipe. I may also try to raise the rear of the car to help them along.
 
Last edited:
Coolant Update

After chatting with @MotorMouth93, he pointed out that the rad fan should have switched on long before 88C. He suggested I check the rad fan switch on the thermo cover. Turns out the switch is bad. Primates, those of you following this blog know how many new parts are on this car. One of the very few I did not change was the rad fan switch, mostly because it worked fine prior to disassembly. So, there is likely no huge air bubble in the pipes, I'm just boiling the coolant because the radiator fan isn't turning on. :mad: :cautious:o_O

For future reference and other owners, here is the data. The temp in my garage right now is 55-60F or 12-15C. While the workshop manual does not describe the resistance sweep of the rad fan switch, it is very similar to the TW, or engine coolant temp switch in the front cylinder head. According to the chart for that thermistor, it should show around 4,000 Ohms at 15C. When I put the multimeter on the sensor, I got 13,240 Ohms! This translates to roughly -20C and I am 100% sure the car/garage is not frozen like the maze in the Shining.

So, it's off to the Honda dealer (or NAPA) tomorrow for a replacement. I truly hope this is the end of my coolant woes, because I really need to get this car on the road!
 
Re-Assembly 96

Center cover, front lip spoiler, etc.


After confirming no leaks from the center coolant hoses during all of the warmup cycles, installed the refreshed center tunnel cover. I washed it and then coated with plasti-dip. I also re-finished the original (and unobtanium) 91-96 front lip spoiler and painted it with plastic trim paint. There is definitely some battle damage visible, but the 1" of extra clearance I gain on the corners will make a huge difference in coaxing the car over the 4" gutter lip to my driveway!

20230107_164240.jpg
 
Man, glad you finally got the coolant situation figured out and hopefully sorted for good with the switch replacement. Just about everything that can go wrong, lol.

Now the brakes, driver's seat, and finishing the suspension & braces and then time to drive? :cool:
I'm not doing a victory lap yet. :) As mentioned above, I have a long and complex relationship with the NSX cooling system LOL. I was able to replace the sensor this evening (with surprisingly almost no mess) and I'll run the car up tomorrow morning. We'll see if that does it. If not, I have a new fan control unit just in from Japan, so that will be the next step. I'm also going to put 12V on the rad fan to make sure it still works.

Brakes are done and bled. All that's left is the driver's seat, hatch glass, license plate mount and a torque check of all suspension bolts. It's pretty much ready to drive. Oh and setting the base idle, but I need it to warm up correctly before I can do that...
 
Coolant...The Final Verdict

It was air trapped under the car after all.

After the new thermo switch, it boiled over again. 🔥

I put 12V to the fan at the pins and it spun perfectly.

Next, I swapped in my new fan control unit and the rad fan still did not come on.

So, new thermo switch, good fuse # 4, new FCU and healthy fan. That's literally the entire chain and yet the car was still overflowing the coolant.

My conclusion was that it had to be air. As shown in my crude diagram below, here is what was happening: an air bubble was trapped at the top of the coolant return line under the car. This is the big, straight hose at the bottom of the center tunnel. As the coolant got warm, the air bubble expanded, which pushed the coolant out and up toward the expansion tank from both sides of the system. While the expansion tank is designed to cope with fluid expansion from heat, it does not have the volume to handle air expansion. This is why you need to remove the air- it will displace too much coolant, since air/steam expands much more than fluid. And, the steam bubbles eventually become dangerous to the head gaskets...

nsx_coolant_bubble.jpg

I got under the car and started squeezing the hose. I was hoping to "push" the bubble toward either end of the hose and into the metal pipe, where it would rise to either the radiator plug or the thermo bleeder. I could hear the bubbles sloshing in the hose as I did this. To check my work, I cracked the radiator plug, and it let out a bunch of air. I then cracked the thermo bleeder, and a big burp of air/steam came out. The coolant level in the tank dropped by 1 inch. I went back under the car and squeezed the hose again. While I could still hear bubbles, the hose was much firmer than before, meaning more coolant was in there.

I fired up the car and all was well. Warmed up fully and the rad fan came on several times without any overflow. I suspect when I drive the car and it is on inclines, any remaining air will migrate to the bleeders and possibly even the expansion tank. Finally, I can call this job done. Hopefully this will help other owners in the future.
 

Attachments

  • nsx_coolant_bubble.jpg
    nsx_coolant_bubble.jpg
    87.6 KB · Views: 23
Engine Testing 7

Idle setting


While the car was warm, I attempted to set the base idle using the workshop manual method. Bottom line, it's likely not possible with the RDX injector setup. When I unplugged the EACV, the car would not idle. I started it with the pedal depressed and it fired up, but dropped down RPM and died. Even with the idle set screw 100% open, it would not idle after I released the throttle pedal. It may be that the RDX 410cc injectors do not have a low enough duty cycle to reliably idle at the specified 650-700 RPM, or that the current tune never set those fueling parameters and just tuned idle with the EACV.

With the EACV connected, the car happily idles at 896 RPM and, even with the lightweight flywheel, it will not drop RPMs too low at throttle liftoff. I will discuss with @MotorMouth93 but I may just leave well enough alone.
 
I remember hearing air bubbles under the car when squeezing the thermostat cover hose, and there were a lot of small bubbles coming out of the engine pipe bleeder before so I think your diagram is accurate. Never would have thought that so much air could get trapped at the lowest point in the system, it must have been air locked where there was not enough flow velocity to carry the air up to the rear of the car/expansion tank.

Maybe there is something to elevating the rear of the car when bleeding after all?
 
I was just going to suggest the same thing, jacking up the rear, and maybe the front alternately to try and get the air to move.
I remember hearing air bubbles under the car when squeezing the thermostat cover hose, and there were a lot of small bubbles coming out of the engine pipe bleeder before so I think your diagram is accurate. Never would have thought that so much air could get trapped at the lowest point in the system, it must have been air locked where there was not enough flow velocity to carry the air up to the rear of the car/expansion tank.

Maybe there is something to elevating the rear of the car when bleeding after all?
Actually, I think there may be utility to tilting the car slightly while filling, not bleeding. Though, I believe in my case it was the not-strong-enough vacuum pump that caused the problem. It left voids in the system when the coolant got sucked in. Once I drive around and the car tilts on road inclines the rest of the air should burp out.
 
Re-Assembly 97

Clutch pedal free play

I adjusted the clutch pedal free play. Originally it was about 35 mm. It is now 12-13 mm. This is important to ensure full engagement and disengagement of the clutch. Too little and your clutch may stay partially engaged even with the pedal up. Too much and the clutch will not fully disengage with the pedal pushed down. This should be done each time you replace the clutch master cylinder. It is cramped, painful and miserable- my right hand is shredded with scratches.

20230115_094124.jpg
 
Re-Assembly 98

Engine cover, airbox


After multiple warmup cycles, I confirmed no fuel leaks, no water pump leaks and no visible leaks from the head gaskets. So, I can install the engine cover pieces. I replaced the engine cover with the correct S-Zero plate.

20230114_174133.jpg

Also, my daughter came to help install the airbox assembly. It was fun to watch her work. Placed the new sticker after removing the wrinkled old one.


20230115_110503.jpg
 
Last edited:
Re-Assembly 99

Lower dash cover, knee bolster, ABS, etc.


Once the clutch pedal play was set, I could install the lower cover and new knee bolster. I chose a "warm white" 3000k LED for the interior lights- it is a closer match to the OEM lights. Hopefully I will not have to go back under here for a long time...

20230115_110528.jpg

With the dash in place, I finally cleared the ABS error codes. The car was flashing Code 17, which is the left rear speed sensor. That made sense because it was disconnected. However, now it's installed, so time to clear the memory. No photo, but good news- the junkyard S2000 AP1 controller is good and all original speed sensors reporting normal. No errors after clearing the codes. I replaced the SCS check plug with the blanking adaptor and put the check plug in the glovebox.
 
Re-Assembly 100

Seats, rails, buckles, etc.


Seats. The misery. NSX seats are tough even with OEM on a good day. Aftermarket seats and mismatched rails are something on another level. My back is killing me.

First, the Wedge bracket mounting holes do not match up with the slots on the seat rails. Thus, I had to drill new ones. But, I had to locate the holes in a way that (1) allowed 3-4" of front-back adjustment and (2) moved the seat toward the center console. This meant lots of testing the seat position in and out of the car, over and over. As mentioned previously, Grade 8 hardware used in place of the unknown (possibly Grade 5) included bolts.

20230115_125153.jpg

20230115_125142.jpg
20230115_125200.jpg
20230115_125206.jpg
 
Re-Assembly 101

Seats, rails, buckles, etc. Pt. 2


Finished. Forgive the look- the leather is shiny because there is some 303 soaking into it. The leather is matte normally. There are some fitment issues that will need to be addressed.
20230115_154111.jpg
20230115_154124.jpg
20230115_154242.jpg


The most critical is the belt buckles. The Wedge buckle mounting bracket is set about 4" too far forward, so the buckles cannot reach the belt hole in the seats. With my ITR buckles, I tried to wedge the between the seat and the console, which worked, but the buckle would fall down when pressed (soft belt). So, I used my new NSX-R buckles with a metal attachment instead of fabric. This worked, but the buckles are awkward and difficult to use. The driver buckle is...ok...but the passenger must rely on the driver to release their belt, since there is almost no way to reach the buckle from the passenger seat. I will live with it for now, but I am working on a better solution involving longer buckles.

20230115_154138.jpg

The second is as mentioned before- the shoulder bolsters touch the door panel. If I can move the belt buckles out from between the seat, I can slide the seats about 10cm more toward the center of the car- this should provide enough clearance. For now, however, I placed some felt tape on the bolster to prevent rubbing and noise.
20230115_154131.jpg
 

Attachments

  • 20230115_154138.jpg
    20230115_154138.jpg
    125.8 KB · Views: 2
I remember hearing air bubbles under the car when squeezing the thermostat cover hose, and there were a lot of small bubbles coming out of the engine pipe bleeder before so I think your diagram is accurate. Never would have thought that so much air could get trapped at the lowest point in the system, it must have been air locked where there was not enough flow velocity to carry the air up to the rear of the car/expansion tank.

Maybe there is something to elevating the rear of the car when bleeding after all?
Also, this means there was probably nothing wrong with my thermostat. :cautious:😐
 
Man, this thread is making me even less excited to do the coolant hoses on my car!

I feel your pain on the seats. My passenger seat is the worst (sparco evo2), either the bolsters hit the door panels or the front of the seat is deeply pressed into the center console. They are wide bois. And it got even worse when I lowered the seats. I feel like there is like 1/2” less width in the cabin on the passenger side than the driver’s side or something. Maybe just my car?

The only thing that worked for me on the passenger side has been a couple hacks: slide the seat to the point where there is the most room between the center console and door panels. Loosen all the bolts so the seat can move in the slop. Rotate the seat a tiny bit in the slop and tighten the bolts. There was a fair amount of clearance I picked up from that and was unnoticeable visually or while sitting. Even after that, the bolster would still rub the door panel a bit. I added a little aluminum shim under the right seat rail to tilt the seat a tiny bit away from the door panel. There is 1/8” of clearance to the door panel and it’s only slightly touching the console up front. Even after all that, no one gets to move the passenger seat around!
 
Man so there is no exact aftermarket seat fitment for the type S look....:cautious:
 
Man so there is no exact aftermarket seat fitment for the type S look....:cautious:
Recaro ABE + SoS rails is pretty close (but the rails are not powered)
 
Setting up seats to fit is a monstorous job. I have Recaro Pole Position and they fit quite well with SOS sliders. Takes a long time and many trials of in the car/out of the car to get the rake, centering the seat and getting the sliders to perfrom properly. But once set, I have no issues. But what an interior on your car! Just unbelievable beautiful.
 
Man... add me to the list of people who thought installing seats were a pain. Install itself is easy but things never seem to fit quite right. I hope my next set goes in relatively painlessly...

Car looks amazing - anxiously awaiting some driving content!
 
Back
Top