• Protip: Profile posts are public! Use Conversations to message other members privately. Everyone can see the content of a profile post.

MotorMouth93's 1994 Berlina Black NSX Thread

Before I could pull the motor again (or even move into my house) I wanted to coat the nasty stained garage floor, because lets be real if I pile up all my shit in the garage it's just never going to happen. I opted to use the Rustoleum "rocksolid" floor coating and so far it's held up well but we'll see how it looks in a year or five. I ended up etching the floor 3 separate times before I was happy with the roughness and it was overall a huge pain in the butt but the results are great.

IMG_3898.JPG


Pulled the motor over the past few days. Having done it before, even working alone was faster than having a friend help last time. I didn't use the manual either, just started pulling stuff off and had the motor out in 2 days of not working that hard. Having a 2 car garage instead of a single helps too.

This time I removed the rear suspension before anything else, it had to come off anyways so might as well do it first when it's easiest. I strapped it to my transmission jack since I don't care for the messy drop-it-in-your-lap method since it invariable involves getting covered in brake dust.

IMG_4020.JPG


Motor back in it's natural habitat: my garage floor.

IMG_4043.JPG


Rather than use the subframe mount holes like last time, I borrowed @Honcho's method and lifted from the shock towers.

IMG_4044.JPG


This drill press is possibly the best $25 Craigslist purchase I've ever made, its actually a decent quality press but the seller thought it was broken, turned out the starter winding was toast so its a pull start drill press. From scrap wood to titanium it powers through it all, and my 3/8" bolts were a tiny bit too short to go through 2 blocks of wood so out came the paddle bit.

IMG_4042.JPG


IMG_4045.JPG


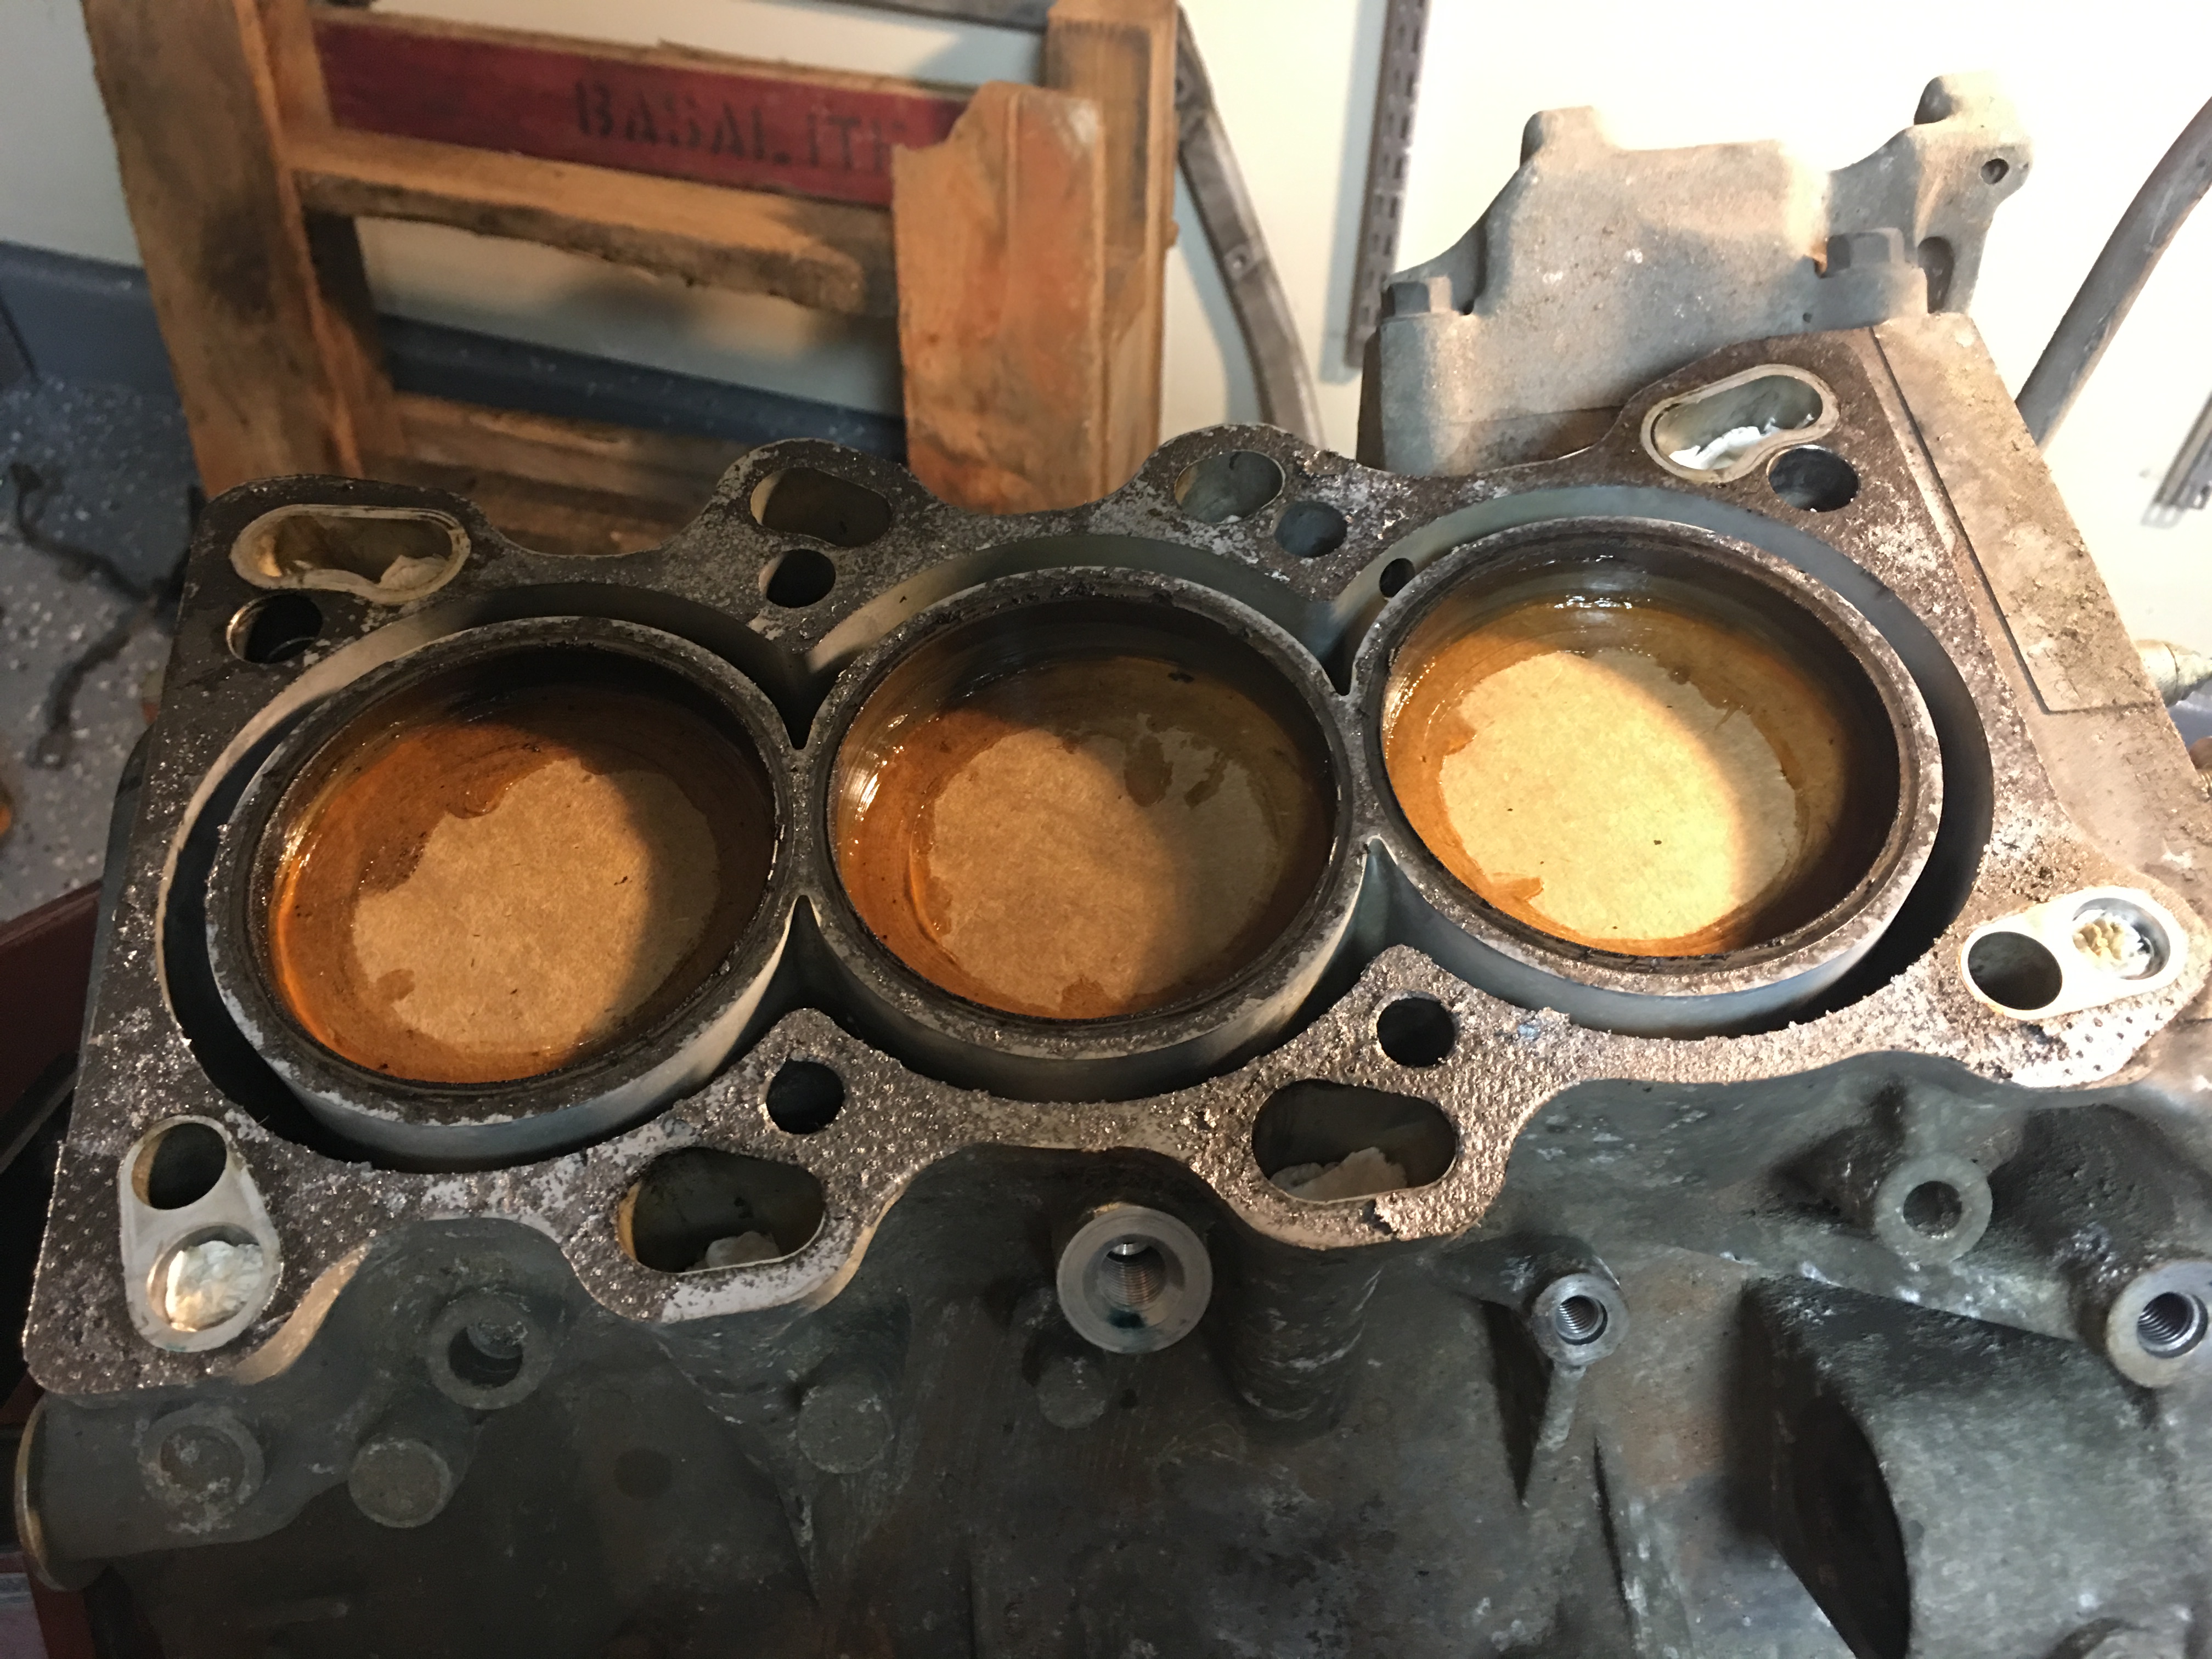
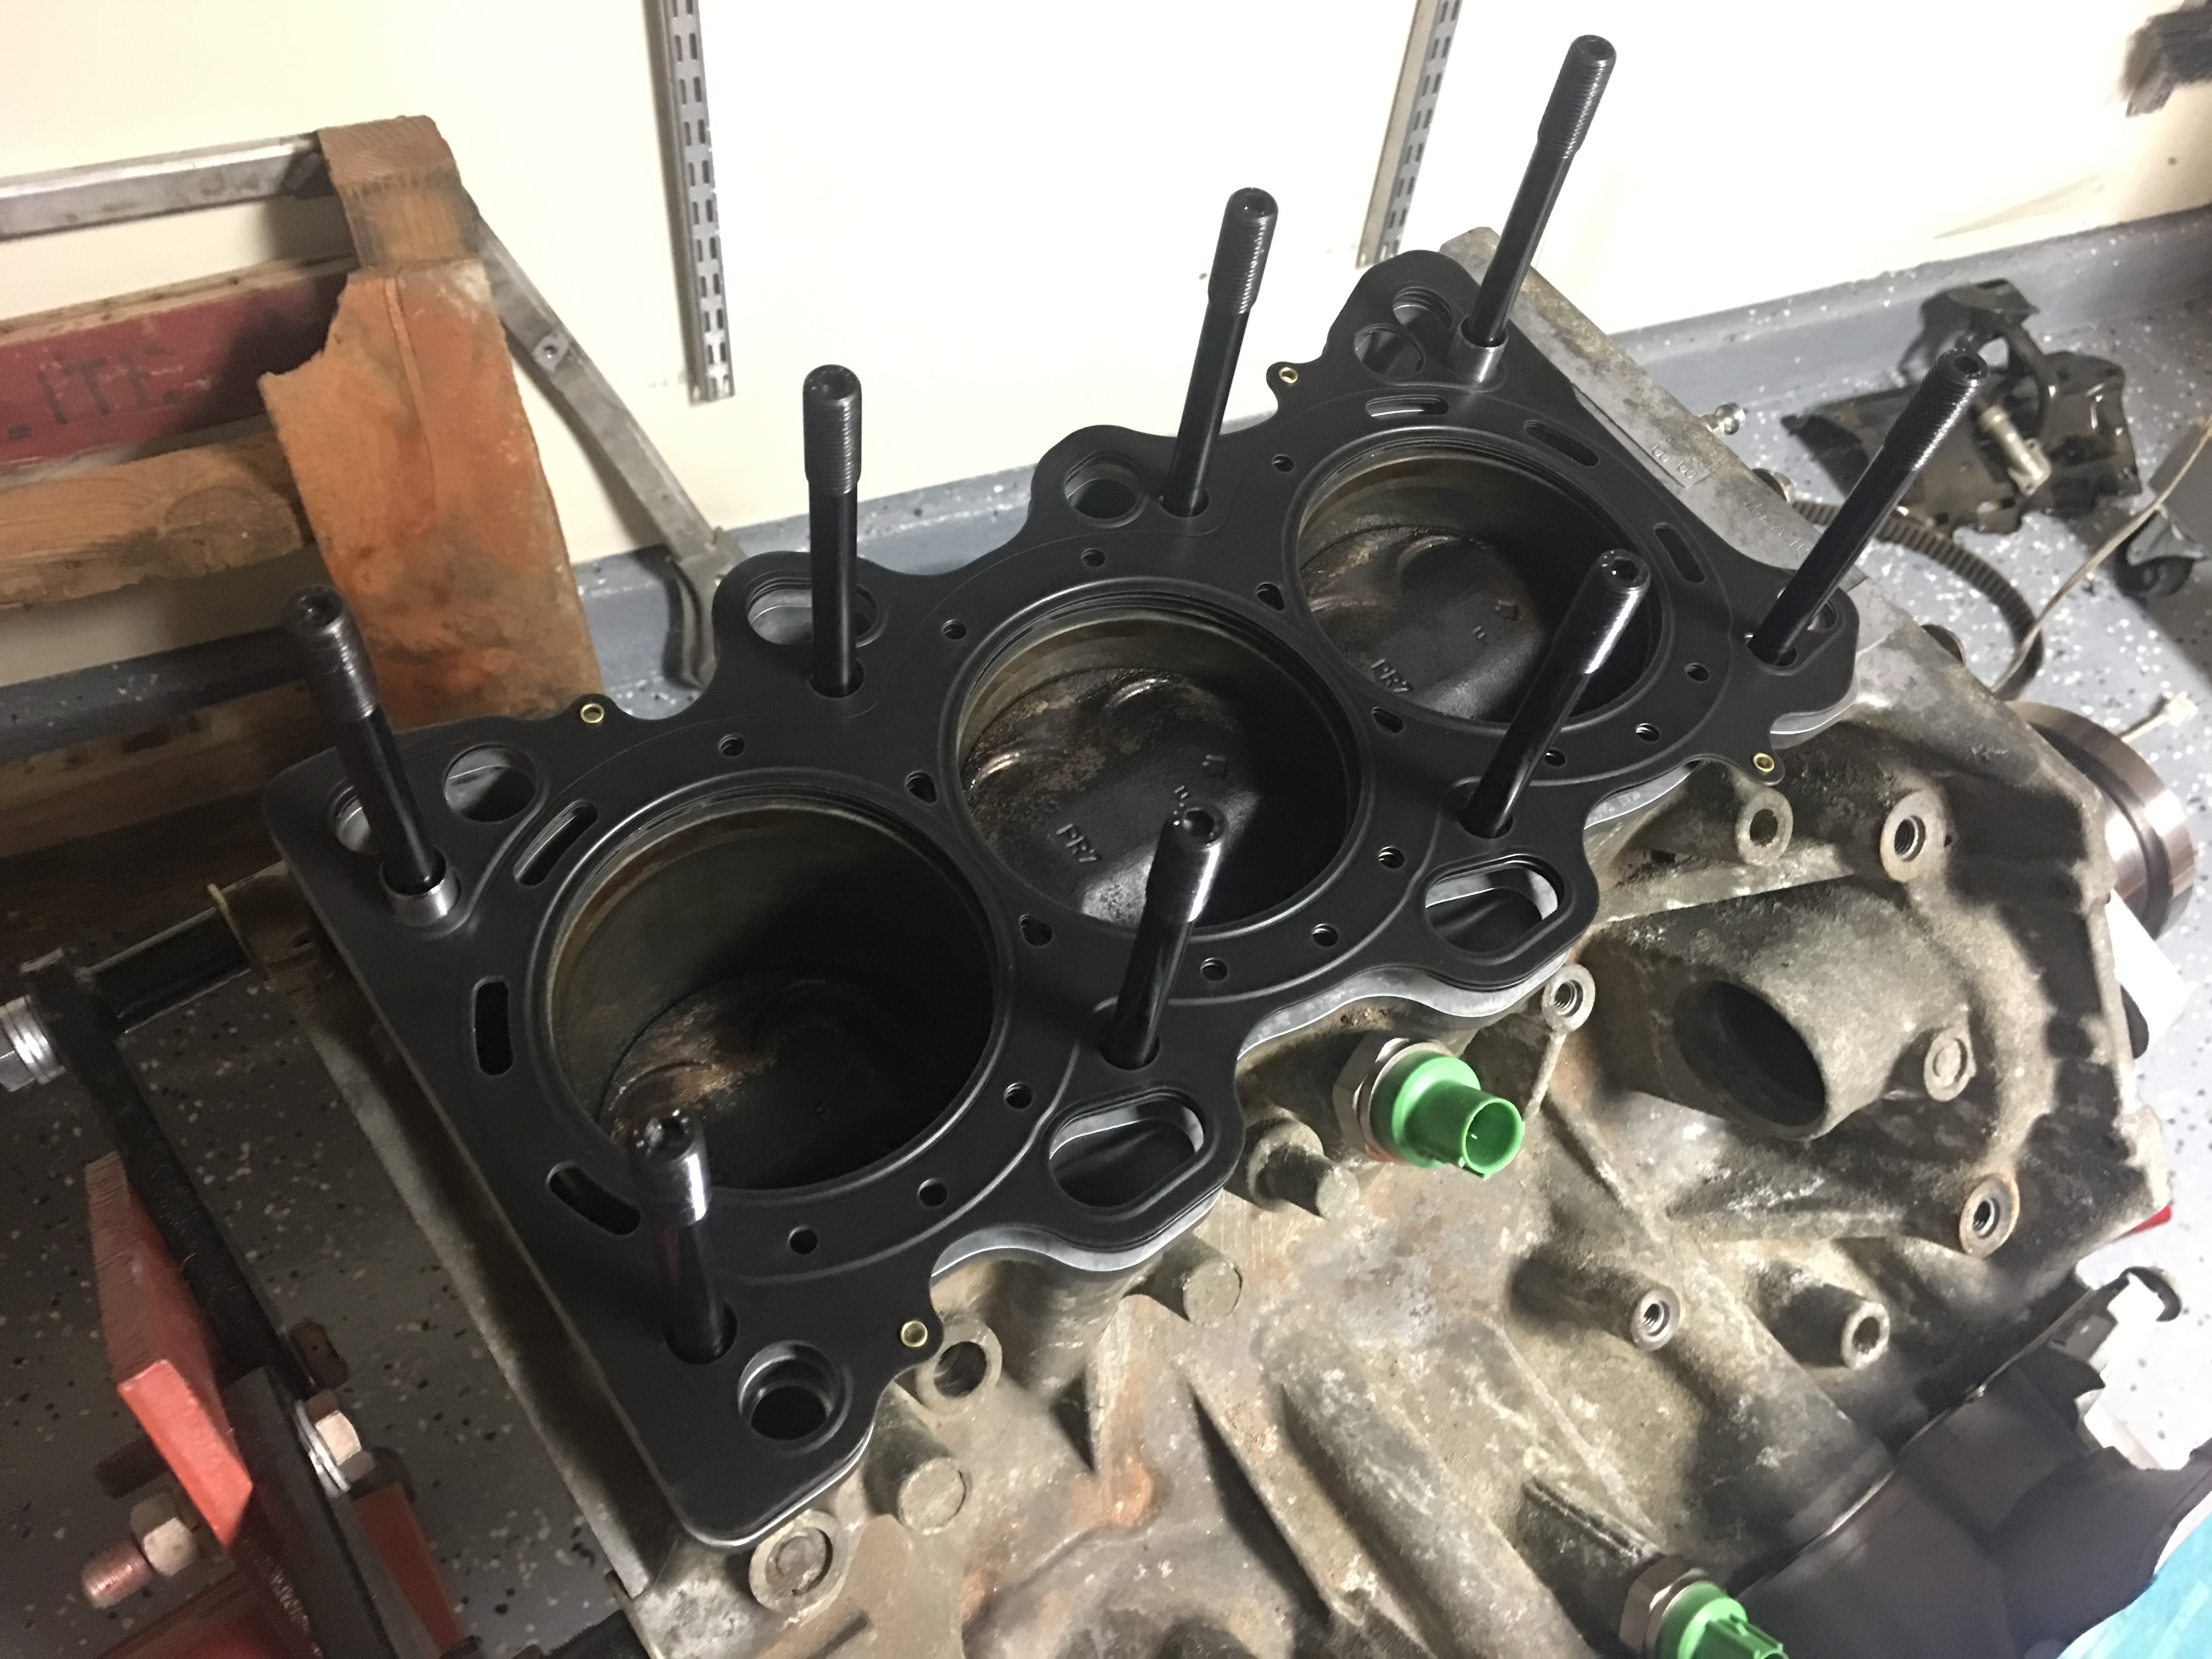
Next up is removing the engine/trans from the subframe and getting it back on a stand for teardown. Hopefully I'll know whats wrong with it within the next 2 days.

IMG_4046.JPG


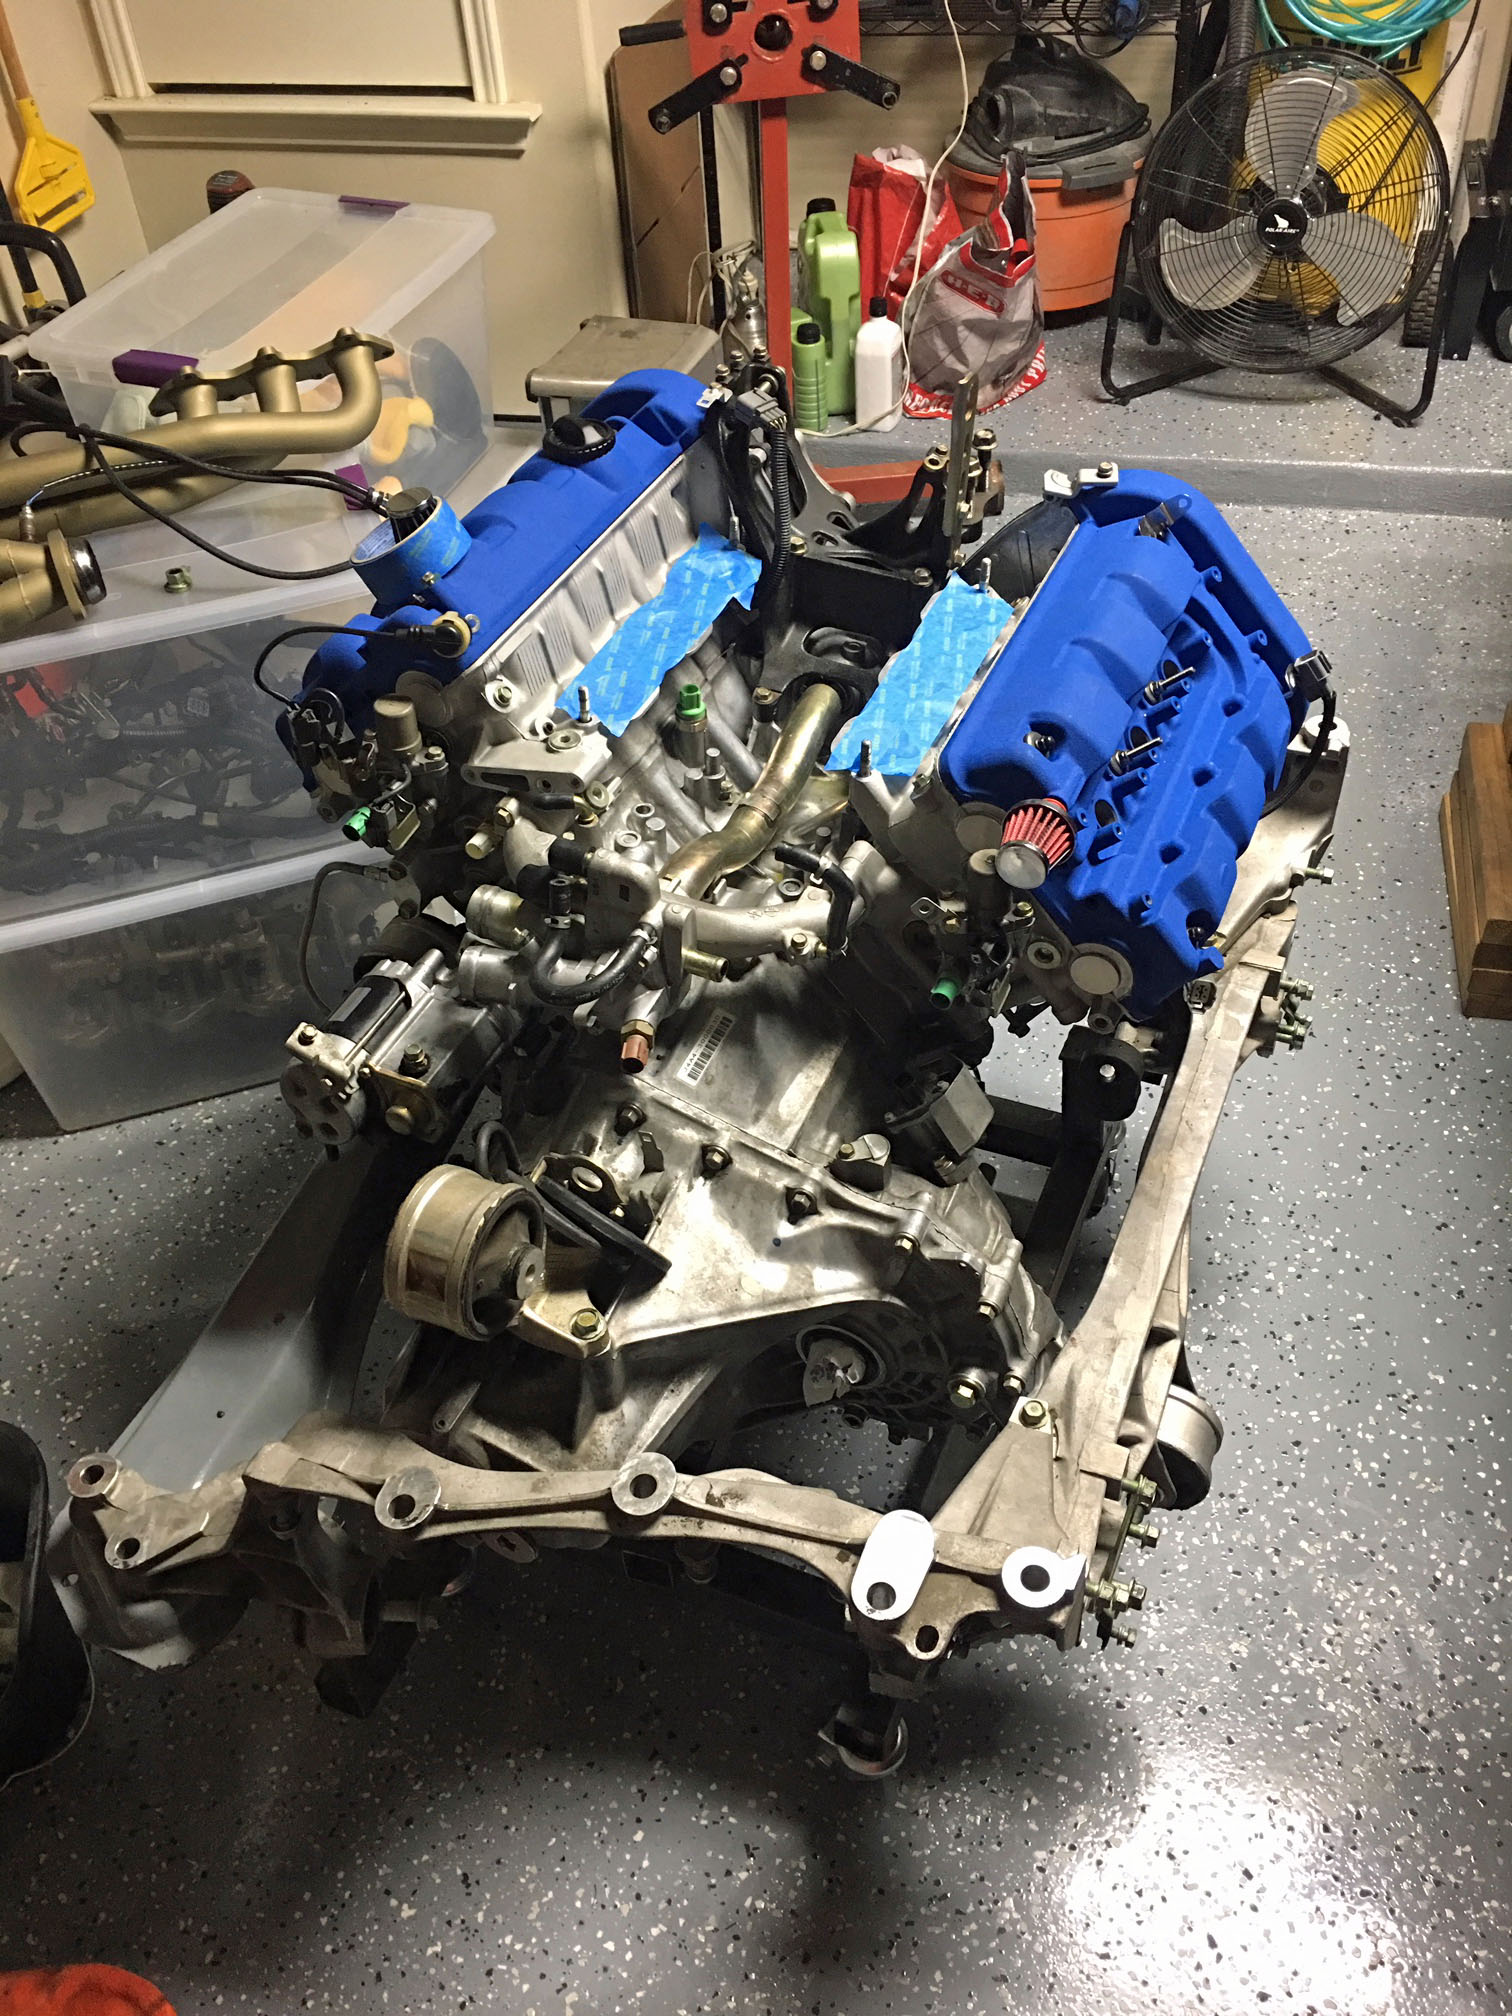
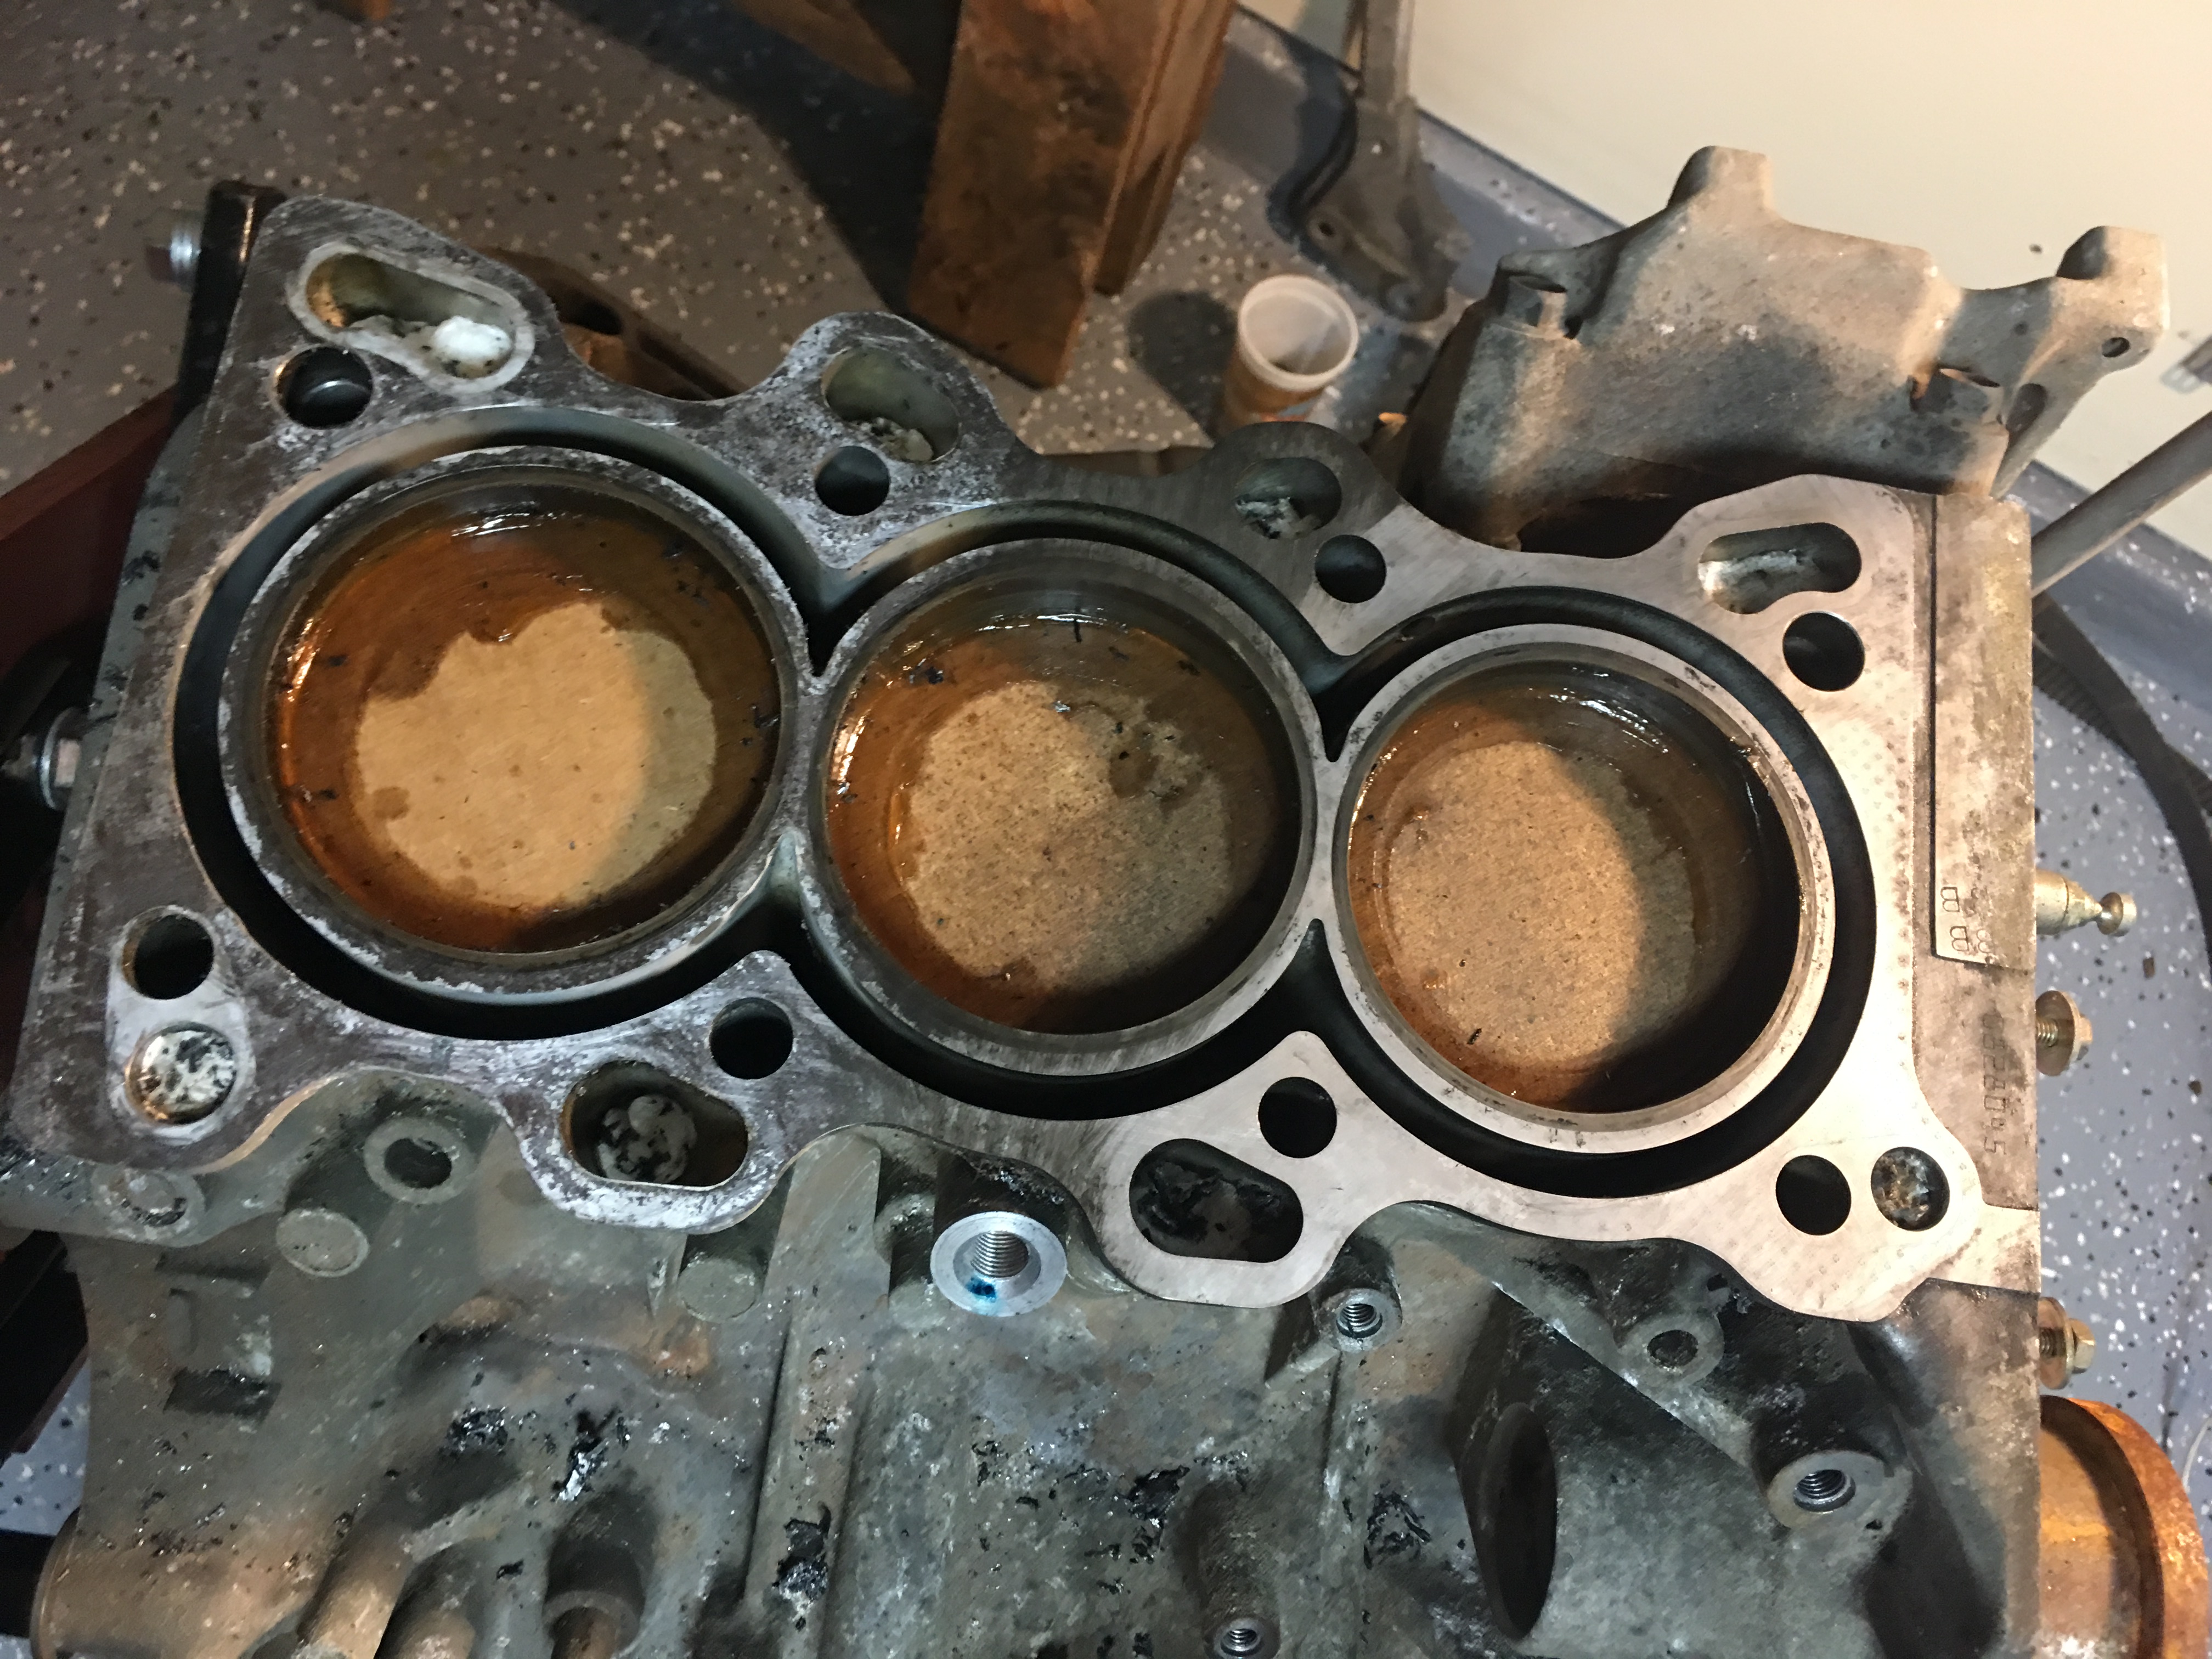
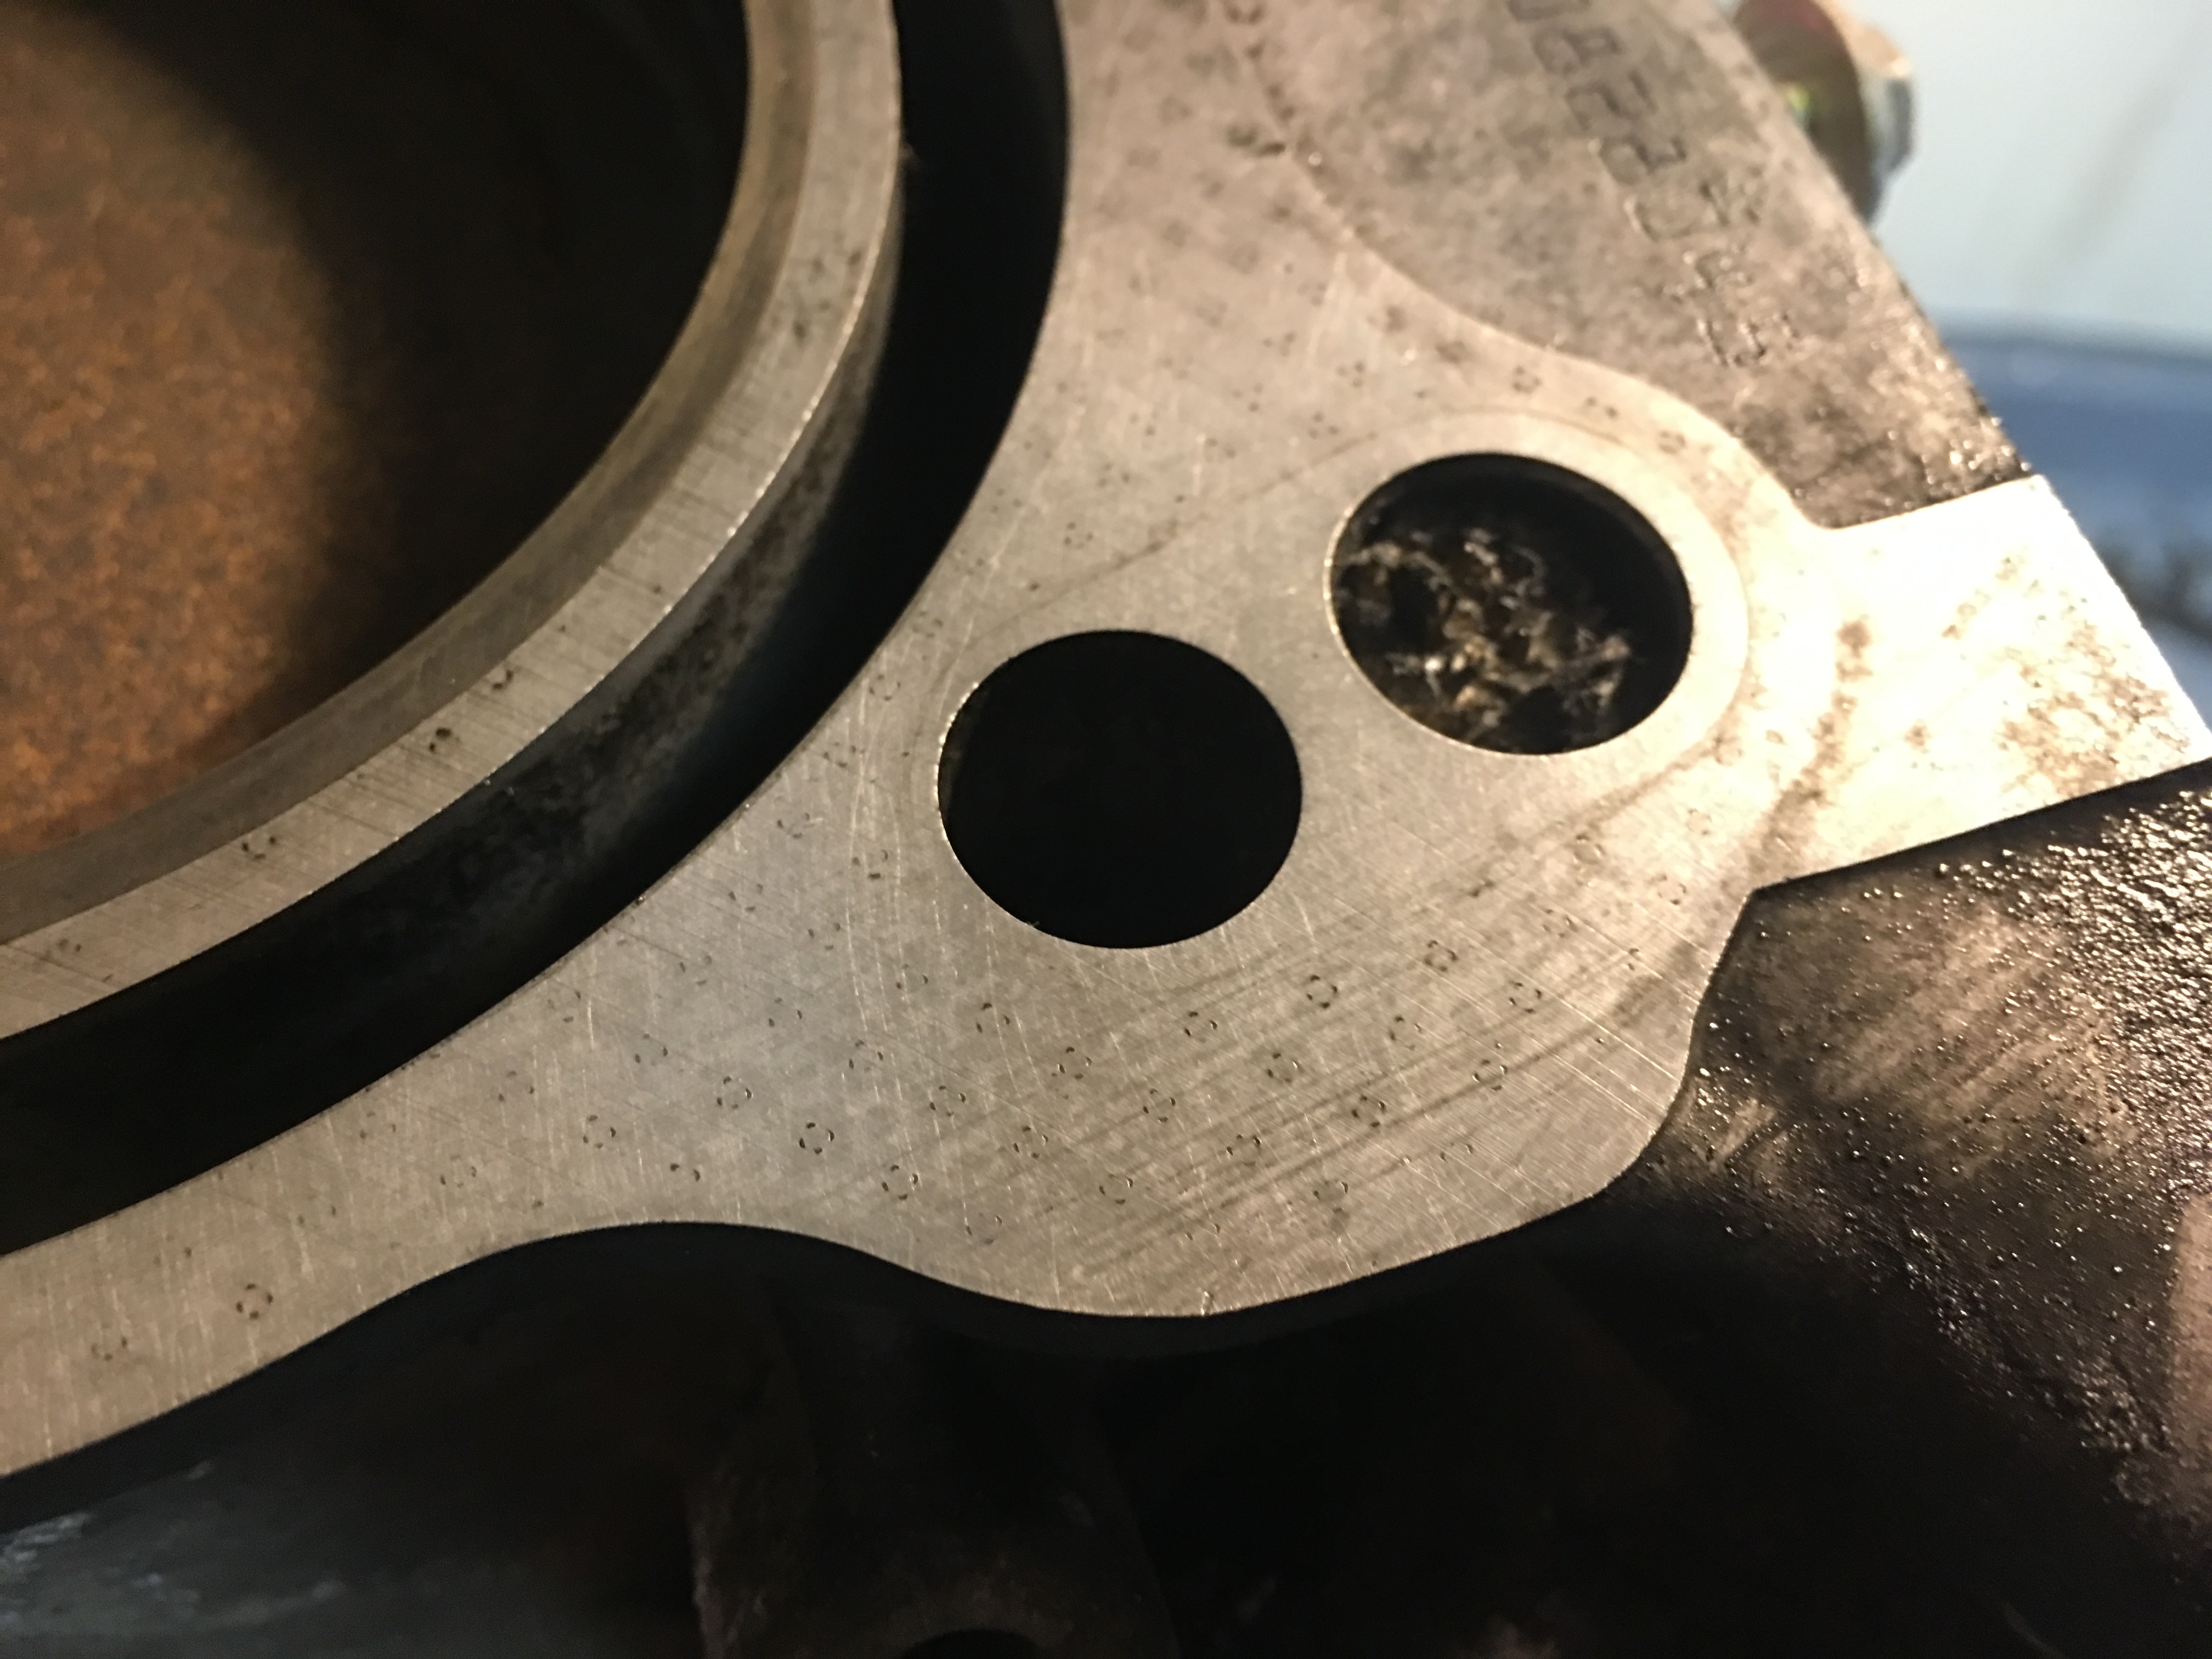
(Excuse the crappy little filters on the valve covers, those were my test to see if the oil burning was PCV-related before I found the cylinder walls wrecked.)

With everything apart again and plenty of time to spend inside I'm thinking I might do the rear suspension bushings, then tackle the fronts whenever I get around to sending the rack off for rebuild. What is the general consensus on poly?
 
Last edited:
Rather than go through the, um, ordeal that was removing the transmission from the engine with no good way to hold the engine steady, I decided to build a simple cradle for the motor/trans to sit on without actually touching the transmission. The engine side is heavier so you can get by with just supporting the engine from the sides of the block (but it can tilt forward if you push on it too hard), and this makes it super easy to get a transmission jack under the transmission and wheel it straight off.

My cradle is ugly but functional, I have 2x12s cut into pieces about 18" long that I use for putting under tires and other various things so those were the source for the material along with some 2x4 scraps.

IMG_4051.JPG


IMG_4052.JPG


From the time I started removing the transmission bolts to the time the trans was off completely was under 5 minutes, overall a very smooth and easy process.

IMG_4055.JPG


Engine on the stand.

IMG_4056.JPG


After pulling the heads I went ahead and measured the cam journal oil clearances with dial bore gauge (didn't have one small enough before so just used plastigage) and found them all to be within spec despite the wear markings, if you remember those. The worst ones were at about 0.0045" clearance and spec is 0.002-0.004, with the service limit being 0.006 so I should be good there.

IMG_4057.JPG


With the heads off I flipped it over and popped out a few pistons to get a better look, and here's what I found. Every cylinder has very consistent wear patterns in the cross hatching, and every cylinder has the correct piston to wall clearance as given by SoS and confirmed by Wiseco. With clearances correct, that leaves me to assume that this engine went together very dirty...but I cleaned everything, and with the amount of damage seen it would have to be a huge amount of debris in there, and since the cylinder wall oil supply goes through the rod bearings, the rod bearings would be trashed too but they look fine. There are a few little score lines that can't be felt at all with a fingernail but with wear patterns this consistent I feel like there has to be some underlying factor that I haven't thought of.

The bottom line is that the parts measure out fine, so I had to have screwed up somewhere, and its driving me crazy that I can't figure out where.

cylinders_fucked_collage.jpg


Oddly enough, the piston skirts look mostly okay so far. The grime is just bits of burned oil from the piston tops.

IMG_4074.JPG


The one single outlier that ruined this block is this nasty gouge in cylinder #2 , whatever caused it managed to lodge itself in the side of the piston and drag up and down the wall thousands of times. (!!!) I completely disassembled the intake manifold to clean it, cleaned throttle body, and had tape over the intake ports since before the heads were even on the motor so I am completely at a loss of how this happened. If I set the anvil of the bore gauge in the gouge, I get a reading of 0.002" larger than the actual bore size. It's that bad. I guess there was just some moment of carelessness combined with horrible luck at some point in the limited time were the intake pathway was exposed something got in somehow.

IMG_4072.JPG


IMG_4075.JPG


IMG_4064.JPG


At this point I'm not really sure where to go from here. Without knowing what went wrong, trying again would likely yield the same result and be akin to setting a few more thousand dollars on fire. There was a guy selling a used engine on Facebook, or I could try to source a used bare block and have someone like HQ engineering rebuild it.
 
Last edited:
Hey this is trieu ( u bought my rods). It looks worst than I thought. Wonder what rings gap u running or can u check it again see if it’s too small. During break in, does it ever get over heat?
 
I can't see any pictures, but cleanliness is one of the most important things.

Specifically for my build, I bought a package of varying diameter pipe cleaners and a steamer. Even when parts were returned to me "hot-tanked and cleaned," I still used the pipe cleaners, steamer, Dawn, pressure washer, and air compressor to blast out anything I could. Twice each for the block, crank, and heads. Then, I used a gallon of WD40 to blast it through with the air compressor to displace any water.

It's hard for me to believe though that something could have made its way through the oil passageways in the crank, through the bearings, and up near the pistons to get trapped around a ring and start wearing into the cylinder wall.

You may have had an issue like my Wiseco pistons. See here:
http://www.nsxprime.com/forum/showt...or-FI/page18?p=1718798&viewfull=1#post1718798

IIRC, there was some residual machining flashing trapped inside one of the piston oil holes so it wasn't obvious from first inspection. Yes, while aluminum is softer than the steel cylinder wall, given a big enough piece, it can still wear away the steel before its ground away. Especially since it wasn't in the combustion chamber where it would have just burned up.

Second, what ring gaps did you go with? If you used the XX Wiseco piston ring package, are you sure you placed the second ring correctly (the Napier ring)? The piston gap offset isn't that big of a deal (pros and cons for doing it Honda's way and Wiseco's way) - Certainly not enough to lead to your oil burning issue.

Finally, if there's an issue with the rods (small ends and wrist pins) and holding the piston correctly, or the cylinder bore having taper, the rings would not be able to seal correctly causing blowby or consumption.

Sorry man. Don't give up on this engine. You'll get it. Think of all this experience and wisdom you've gained!
 
My goodness this thread was such a roller coaster. We laughed, we cried, we felt panic, and ultimately we are left in a saddened state for our hero. I really hope you figure out what happened and find a great resolution. You have obviously spent so much time, effort, money, and thought on this project...and we all want to see you happily enjoying your healthy NSX!
 
No overheating issues at all, the motor ran great and pulled hard, just burned oil like a 2 stroke.

Ring gaps were set to 0.017 for the top and 0.018 for the bottom ring, the machinist set the gaps and I verified them before assembly.

The bit of something embedded in the piston is above all of the rings, so I think whatever it is came in through the intake rather than through the oil, since it's unlikely that a bit of debris that large could make it past the oil rings and the compression rings.

Right now I'm leaning towards Benson sleeves and Carrillo pistons and rods.
 
On hi rev engine I always gap bottom rings .004” bigger to eliminate ring flutter at high rpm. That could be ur problem?
 
No overheating issues at all, the motor ran great and pulled hard, just burned oil like a 2 stroke.

Ring gaps were set to 0.017 for the top and 0.018 for the bottom ring, the machinist set the gaps and I verified them before assembly.

The bit of something embedded in the piston is above all of the rings, so I think whatever it is came in through the intake rather than through the oil, since it's unlikely that a bit of debris that large could make it past the oil rings and the compression rings.

Right now I'm leaning towards Benson sleeves and Carrillo pistons and rods.

I still can't see the pics, but it it's above the rings, then yeah, it didn't come from the oil passageways.

Did any of the ceramic piston dome coating chip off in cylinder #2 ?

It's hard to imagine debris from any head machining causing this.

Can you please do me a favor and email me a picture of the piston dome and underneath one of the heads? It's weird, but I like to collect C-series combustion pattern pics. Thanks.
 
Is anyone else having issues with the photos? I host them on server space I rent so there should be no issues for anyone anywhere, or so I thought.

No chipping on the ceramic coating, and a magnet is attracted to the bit of debris stuck in the side of the piston crown so its defintely a bit of ferrous metal.

Definitely some issues with the rod wrist pin clearance, I didn't have a bore gauge small enough to measure at the time but was told that they would be honed to size as a part of the bushing process, and I stupidly believed it. 3 of the 6 bushings have shifted or spun a bit, and they all show abnormal wear patterns. The worst was out of round by 0.0040" (!!!), it had 0.0050" vertical clearance (more than 3x ideal clearance) and just 0.0008" (roughly half of ideal clearance) horizontal clearance, so this thing was just hammering back and forth on the wrist pin. (the scratches you see are benign and from the bore gauge)

rod_pin_bores.jpg


Here are the piston pin bores for comparison...zero visible wear, just light honing marks from the machinist honing the pin bores a bit to get the desired clearances. So definitely not a lubrication problem.

piston_pin_bores.jpg
 
Last edited:
Wow, I would make that machine shop pay for the damage. I know it’s really suck but at least u know what went wrong.
 
Is anyone else having issues with the photos? I host them on server space I rent so there should be no issues for anyone anywhere, or so I thought.

Usually the ONLY way I can see the pictures is to pull up the thread in the Tapatalk app. All other browsers (Safari, IE, Edge, Chrome, Firefox) I can never get them to appear.
 
Usually the ONLY way I can see the pictures is to pull up the thread in the Tapatalk app. All other browsers (Safari, IE, Edge, Chrome, Firefox) I can never get them to appear.

Weird- these photos always show up for me no problem... I'm using Chrome on Windows 10.
 
same ....but sadly my level of engineering limits me to shiny metal or scuffed metal...:redface:
 
Last edited:
Do you think the piston pin clearance issue caused your cylinder wall issue though? I dont see how, especially because the material in your piston was ferrous. There had to be something else going on as well right?
 
The bit of something stuck in the piston was unrelated to the cylinder wall issues. It scored #2 but the rest of the cylinder wear had some other cause.

The rod pin issues, while a big problem, I don't think would be responsible for such consistent cylinder wall damage. As far as I can tell there is no correlation between how messed up a cylinder is and how messed up its rod pin was.

I also suspect that the main bore alignment might be a bit off, I brought this up with Dan Benson and he said he'd check it out for me and line hone if necessary. The main bearings were showing weird wear patterns after only 400 miles so I measured the crank journals again to make sure I didn't screw up last time still found it to be within 0.0001" in both OOR and taper, and runout 0.0003" or so which is all pretty much perfect. The guy who did the block the first time had to take off 0.008" to get the decks true so I wouldn't be surprised if the motor was overheated pretty severely in the past, and the main bearings had very substantial wear at the first teardown. My concern here though is that if the mains are indeed out of alignment, will line honing them move the crank centerline enough to throw off alignment with the oil pump and transmission input shaft. Dan knows what he's doing though so I'll see what he says.
 
Last edited:
I got the sleeved block back and I suspect there were issues with the machining, the block was bored out too large by 0.001-0.0015" and I had a local shop confirm just to make sure I wasn't doing something stupid and measuring wrong. Benson has so far stood up to his reputation though and is willing to make it right so once the pistons show up I'll send the block and pistons to him to check everything out.

In the meantime I bought the used motor that's been for sale on Facebook for a few months. I'm getting tired of endless machining delays and issues and with COVID getting parts like bearings and such from Japan will probably take a long time, some of them aren't available in the US, and the last time I bought bearings from (nsx specific shop you've probably heard of) they showed up with gouges in them. If/when the rebuild is done, probably sometime in the late 2030s, I can just put the other C30 up for sale and get most of my money back. Or I might just part out the old motor and try to forget about the whole mess.

I also started vinyl wrapping the car since I can't really do anything else at the moment, I'm getting bored with black so I'm doing a color change to another color thats close to one of the more rare OEM options but keeping the roof black in early NA1 fashion. I'll post photos when I finish.</specialty></nsx-specific>
 
Last edited:
I got the sleeved block back and I suspect there were issues with the machining, the block was bored out too large by 0.001-0.0015" and I had a local shop confirm just to make sure I wasn't doing something stupid and measuring wrong. Benson has so far stood up to his reputation though and is willing to make it right so once the pistons show up I'll send the block and pistons to him to check everything out.

In the meantime I bought the used motor that's been for sale on Facebook for a few months. I'm getting tired of endless machining delays and issues and with COVID getting parts like bearings and such from Japan will probably take a long time, some of them aren't available in the US, and the last time I bought bearings from <specialty nsx="" shop="" you've="" probably="" heard="" of=""> they showed up with gouges in them. If/when the rebuild is done, probably sometime in the late 2030s, I can just put the other C30 up for sale and get most of my money back. Or I might just part out the old motor and try to forget about the whole mess.

I also started vinyl wrapping the car since I can't really do anything else at the moment, I'm getting bored with black so I'm doing a color change to another color thats close to one of the more rare OEM options but keeping the roof black in early NA1 fashion. I'll post photos when I finish.</specialty>

Aw man, that sucks! How hard is it to machine a C30? I mean, seriously! It's just a big hunk of metal like the thousands of Chevy 350 and B18 that get bored and honed every day! I can't believe it... I'm sure Benson will take care of you though.

Good call on the stock engine. The factory bearings can go upwards of 250k miles before you start to see issues, so best to leave it the way Mother Honda assembled it back in Tochigi.
 
The used engine I bought showed up in late may courtesy of a Uship driver who gave me a very good price for getting it to Texas, so I put it on the stand and started checking it out.

This motor was not stored properly, to say the least. It seems like it was stored in an open barn since it was covered in mud splashes and rust, and smelled faintly of manure.

IMG_4347.JPG


I pulled the valve covers off and had a glimmer of hope though, the valvetrain is immaculate in both front and rear heads.

IMG_4349.JPG


Those hopes were dashed when I hooked up my leakdown gauges and got 30-40% loss across the board with air gushing out of the exhaust valves. As far as I can tell, the moisture exposure rusted the exhaust valve seats so the heads will need to be rebuilt. I talked to the seller and I said I could either ship it straight back to him or I could pull the heads and see what I found, and I ended up pulling the heads and finding the bottom end in good overall condition so the seller agreed to pay for the machining on the heads.

Since I have a set of rebuilt heads from my other motor and don't really feel like waiting for that, I went to work putting those heads on this block, and so began the arduous task of getting the block ready for new heads.

I used my trusty cardboard in the cylinders for the cleaning process.

IMG_4357.JPG


I started off scraping the big chunks off with a plastic scraper, then applied some Permatex foaming gasket remover and let it sit for a while before scrubbing the decks with a brass bristle brush. This stuff seems to be mostly useless, but it does help on graphite head gasket residue.

IMG_4362.JPG


There's no way around having some stains left on the aluminum but they won't hurt any thing. The factory machining marks are still visible on the deck - the brass brush removes virtually no aluminum even with vigorous scrubbing.

IMG_4363.JPG


Since everything was blocked off I went ahead and very lightly deburred the edges of the block deck to make sure there were no raised areas or anything that could cause issues with the more finicky MLS head gaskets. I had an extra set of head gaskets from the other engine build that were the wrong thickness for it so I just used those here since they happened to be the exact thickness needed to compensate for the machining on these heads. I also had a spare pair of NTK knock sensors so I installed those as well, along with a spare water pump. Overall the cylinders look really good, so I believe the 60k mile number I was told.

IMG_4368.JPG


IMG_4371.JPG


The finish on the heads was very easy to clean, just a wipe down with acetone. You can see some burned oil residue from the other motor still in the chambers but most of that should get burned off by a good "italian tune up". The scratches you can see can't even be felt with a fingernail, they are just very visible on such a smooth surface.

IMG_4386.JPG


Heads on, pressure testing the block for good measure. I used a random coolant pipe from the auto parts store to loop the two big hose nipples then a variety of small rubber caps to block off the rest. No air leakage anywhere so we're good to keep going with assembly.

IMG_4393.JPG


Timing all sorted with the TB/WP/tensioner from my other motor to replace the rusty crap that came on this one. I'll have to order new ones for whenever the rebuild gets going again.

IMG_4396.JPG


Setting the valve lash. 0.006-0.007" on the intake side and 0.007-0.008" on the exhaust.

IMG_4398.JPG


Done. I wanted to just drop a used engine in, but this ended up being a fairly huge project that consumed pretty much all of my free time for nearly 3 weeks straight.

IMG_4400.JPG


Before putting the motor in the car I did a compression test by running the starter with jumper cables connected to my 540i battery. It put up 220+ on every cylinder so we're good to install.

IMG_4402.JPG


I'm getting tired of doing this.

IMG_4407.JPG


So far I've put about 150-200 miles on it with no issues. Pulls hard, doesn't smoke, and sounds healthy. After a drive I did a hot leakdown and compression test to get a good baseline for this motor going forward and got ~3% leakage on every cylinder and 225-230psi for the compression test which is all pretty much perfect. I'm scared to hope too much, but hopefully the engine issues are resolved for a while.

I'm going to try to knock out the rest of the vinyl wrap over the next week or so.
 
Last edited:
Great to hear the car's back on the road again, I'm sure it's been a long time coming.

Why'd you reuse the old black valve covers? Didn't want to damage them during engine re-installation?

Not sure if you've read about the Harbor Freight jack stand recall but looks like those are Pittsburghs, make sure you check if they're the "drop a car on you" kind if you haven't already.
 
My ideal plan would be to finish my built motor then pull this one out and sell it so I opted to keep the old black valve covers on. (realistically I’d probably end up keeping it because even a built motor will eventually encounter issues when boost is involved)

Good eye, those are recalled jack stands, I heard about the issue a few weeks ago but opted to finish the project with them since they were on the lowest possible setting so couldn’t really drop the car on me. They will be getting replaced soon. :)

As for the wrap color, I ordered samples of 5-10 different colors and liked that one best. It’s going to be a poor mans wannabe imola orange car for a while. Even just driving it around in it’s current orange and black state it gets wayyy more attention than an all black car. Every single car with a loud exhaust seems to want to race now.
 
Back
Top