Looks great Ken. Now people are going to be busting into your car just to take your interior bulbs. The domelights are the first things I'm going after!!!
-
Protip: Profile posts are public! Use Conversations to message other members privately. Everyone can see the content of a profile post.
You are using an out of date browser. It may not display this or other websites correctly.
You should upgrade or use an alternative browser.
You should upgrade or use an alternative browser.
Any advice on where to get ultra white 1157 parking light bulbs?
- Thread starter SaberX
- Start date
Yeah, pretty sad to think I have $120 invested in those!Malibu Rapper said:.... Now people are going to be busting into your car just to take your interior bulbs ....

3 x $30 for the Luxeons & another $30 for the 3 x 9-way Leds!
I must be crazy! <!--StartFragment -->


.
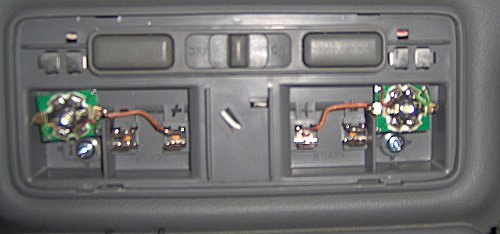
D'Ecosse said:OK, just added the 9 LED festoons to the doors & the driver's footwell area; added two Luxeons to the dome light.
It's very diffcult to photograph give a true image of how they appear because the camera wants to correct for the brightness of the light.
Here are a couple to give some idea; the interior really lights up bright & exceptionally white with the Luxeons in the there!


This next one was supposed to show off how bright it makes the interior but again the picture doesn't really reflect it truly.
It is impressive though, just have to trust me on it!

I just want to remind anyone thinking of using the Luxeons that these are not a plug n play solution - they are too big to fit between the prongs of the festoon holder, so I actually removed the prongs completely & just soldered the wires directly to the Luxeon drivers. Not a major job. They are obviously not cheap either - that's a $60 investment just for the dome pair.
.
looks awesome great job!
Found this old pic for comparison!

Direct comparison between old & new ....

Direct comparison between old & new ....

I just did the Luxeon upgrade to the dome lights. George at TaskLED is really good - I know of some NSX part vendors who should take a lesson on how to run a business from him... But anyway, here's a picture of how I installed them. I soldered wires to the outside of the existing lamp contacts so I could go back to the old style later if needed. There are black wires going to the minus contacts that you can't see very well. It's a bit tricky soldering to the luxeon modules, because the triangular contact on the module is soldered to the board, and so as soon as you hit it with a soldering iron it falls off! You have to clamp it with a small needlenose pliers to hold it in place and heatsink it as you solder a wire to it.
Yes, placing them where I did does not put them in their original position, but it's not a problem for the light dispersion. They are awesomely bright, much improved over the SuperBrightLED's. Good upgrade. It'll be even better when it comes down in price and gets smaller so that it can plug right in in place of the OEM bulb.
Jeff
Attachments
I probably should have taken pics of mine installed - as mentioned originally I just removed the festoon holders completely & installed the new assemblies in the original location. I figure they won't be going back to stock ever again (should be incredibly reliable & long life-time) although I still have the clips laying in the corner of my tool-box!
Recognize that the little triangle contact is only there to facilitate a plug-in replacement in the clips for a slightly larger festoon bulb - they serve no purpose when soldering wires like this application and better off just getting rid of them (when they fall off) & soldering the wires directly to the board.Jeff A said:It's a bit tricky soldering to the luxeon modules, because the triangular contact on the module is soldered to the board, and so as soon as you hit it with a soldering iron it falls off! You have to clamp it with a small needlenose pliers to hold it in place and heatsink it as you solder a wire to it.
Off topic, but thought you LED freakz might find this to be a good deal. Target has on sale a AA flashlight using the Nichia 1.5W Jupiter bulb. It's a competitor of the Luxeon star LED and it's an awesome deal at $9.99. Tough flashlight with 2.5 hours of burn time, very nice! They also have a version of the same LED flashlight but uses 2 C batteries instead for a longer burn time on sale for $13.99.
Review of the same flashlight under a different name. I just picked mine up at Target today so I know the deal is good as of today.
Review of the same flashlight under a different name. I just picked mine up at Target today so I know the deal is good as of today.
D'Ecosse said:Recognize that the little triangle contact is only there to facilitate a plug-in replacement in the clips for a slightly larger festoon bulb - they serve no purpose when soldering wires like this application and better off just getting rid of them (when they fall off) & soldering the wires directly to the board.
Good call. I sent George at TaskLED the picture of my installation, and here's his response:
George said:Thanks for the pictures, when I get a chance I'll add them to my website install page if that's ok with you. Looks like for the NSX install I should just supply them without the brass pins soldered on - in that case there would be thru holes (2 at the + end and 2 at the - end) that the wires could be soldered to, easier than to the tabs.
Note he says 2 holes on each side. I saw that the tab actually formed a bridge between 2 copper traces and knew that had to be kept intact, so I kept the tab in place. So if you do it this way, be sure to make that connection.
Jeff
COMPDNSX said:Since we are on the topic of lights...does anyone know of a kit that will make the brakes flash a few times then stay on solid? I know the Foothill Transit buses have them on an Amber light...:redface:
I suspect someone makes something like this. As a suggestion -- only do this to your 3rd brake light. That way if the gizmo fails, at least you have your main brake lights. This is not legal advice, etc.... :smile:
Now that the thread is this long and everyone agrees this a worthy mod, maybe someone should set up a group buy for:
1. Clearcorners.com LED clearcorners
2. WLED 6 bulbs front fog
3. LED Interior lights.
Sign me up:biggrin:
1. Clearcorners.com LED clearcorners
2. WLED 6 bulbs front fog
3. LED Interior lights.
Sign me up:biggrin:
Spoiler brake/flash unit
I've thought of the same thing as I have a similiar unit on my motorycle spoiler.
I have the following unit in my hand as we speak:
https://chretien.genwebhost.com/~rivco1/store/index.php?id=25&parent_dir=222
I was hoping to find some connectors that I could attach this to, and unplug the spoiler from within the trunk, and just plug-n-play this unit in between.
HOWEVER, finding the exact plug ends are difficult, and I don't know of any wrecked NSX's that I could cut out the plugs to use to test the unit.
What I don't want to do is cut and splice, and find it doesn't work. Then I have to re-connect everything, and have a bunch of cut up wires in the trunk.
COMPDNSX said:Since we are on the topic of lights...does anyone know of a kit that will make the brakes flash a few times then stay on solid? I know the Foothill Transit buses have them on an Amber light...:redface:
I've thought of the same thing as I have a similiar unit on my motorycle spoiler.
I have the following unit in my hand as we speak:
https://chretien.genwebhost.com/~rivco1/store/index.php?id=25&parent_dir=222
I was hoping to find some connectors that I could attach this to, and unplug the spoiler from within the trunk, and just plug-n-play this unit in between.
HOWEVER, finding the exact plug ends are difficult, and I don't know of any wrecked NSX's that I could cut out the plugs to use to test the unit.
What I don't want to do is cut and splice, and find it doesn't work. Then I have to re-connect everything, and have a bunch of cut up wires in the trunk.
Re: Spoiler brake/flash unit
No reason it shouldn't work. Although I think 15 flashes over 5 seconds is a little excessive....
SamBel said:I've thought of the same thing as I have a similiar unit on my motorycle spoiler.
I have the following unit in my hand as we speak:
https://chretien.genwebhost.com/~rivco1/store/index.php?id=25&parent_dir=222
I was hoping to find some connectors that I could attach this to, and unplug the spoiler from within the trunk, and just plug-n-play this unit in between.
HOWEVER, finding the exact plug ends are difficult, and I don't know of any wrecked NSX's that I could cut out the plugs to use to test the unit.
What I don't want to do is cut and splice, and find it doesn't work. Then I have to re-connect everything, and have a bunch of cut up wires in the trunk.
No reason it shouldn't work. Although I think 15 flashes over 5 seconds is a little excessive....
Osiris_x11
Gold Member, Moderator: Marketplace
List for ALL festoons (?) & 9 LED bulbs fit in dome-light (?)...
I'm fine-tuning a list for some LED's as we speak, but I have a few questions so I thought I'd get the NSX elec'/tech' gurus input! :tongue:
i.) 9 LED 31mm (#3022) festoon bulbs will fit the dome-light of the NSX coupe?
ii.) Total number and list of LED 31mm (#3022) festoon bulbs for NSX is (6)?
iii.) Ash-tray bulb type?
iv.) Dash-compartment bulb type?
*Please excuse my aloofness, I don't have my NSX on-hand to check... :frown:
--------------------------------------------------------------------------
Also, I've acquired three different types of 'white' LED wedge bulbs for 168/194 applications from different manufacturers (so I assume)...
- 9 LED refractive 168/194 (9 LED's are head-on, lens/cap of each LED is faceted/cut, LED's are white)
- WLEDx6 white 168/194 (6 LED's are head-on; brightest xenon-like LED's available)
- 5 LED wide-angle 168/194 (4 LED's are radial, 1 high flux LED head-on, LED's are white)
I have Ultinon 6000k G4 HID's... I will try to take a few pics of each one of the three LED bulbs listed above in place of the OEM bulbs in the front bumper combo' lights (parking/driving).
I'm fine-tuning a list for some LED's as we speak, but I have a few questions so I thought I'd get the NSX elec'/tech' gurus input! :tongue:
i.) 9 LED 31mm (#3022) festoon bulbs will fit the dome-light of the NSX coupe?
ia.) 2 bulbs are needed for dome-light, correct?
ib.) Will these 9 LED 31mm (#3022) festoon bulbs fit anywhere the OEM #3022 bulbs fit?
ib.) Will these 9 LED 31mm (#3022) festoon bulbs fit anywhere the OEM #3022 bulbs fit?
ii.) Total number and list of LED 31mm (#3022) festoon bulbs for NSX is (6)?
(1) Driver's footwell
(2) Doors: Driver's & Passenger's ("Break on through..." :biggrin: )
(2) Interior dome-light
(1) Trunk
(2) Doors: Driver's & Passenger's ("Break on through..." :biggrin: )
(2) Interior dome-light
(1) Trunk
iii.) Ash-tray bulb type?
iv.) Dash-compartment bulb type?
*Please excuse my aloofness, I don't have my NSX on-hand to check... :frown:
--------------------------------------------------------------------------
Also, I've acquired three different types of 'white' LED wedge bulbs for 168/194 applications from different manufacturers (so I assume)...
- 9 LED refractive 168/194 (9 LED's are head-on, lens/cap of each LED is faceted/cut, LED's are white)
- WLEDx6 white 168/194 (6 LED's are head-on; brightest xenon-like LED's available)
- 5 LED wide-angle 168/194 (4 LED's are radial, 1 high flux LED head-on, LED's are white)
I have Ultinon 6000k G4 HID's... I will try to take a few pics of each one of the three LED bulbs listed above in place of the OEM bulbs in the front bumper combo' lights (parking/driving).
Re: List for ALL festoons (?) & 9 LED bulbs fit in dome-light (?)...
There is a glove box festoon bulb. I just checked the service manual and for the large gloveboxes, it's the same festoon bulb. I'll have to check on my 95 to see what it is.
The ashtray bulb is a #74 type bulb at that website with a long name. This same bulb is used for the keyhole illumination and the lighter illumination. I changed mine to blue, you can see some pix here.
NSX-Ts have a single bulb for the domelight. Coupes have two. To get better light in the NSX-T, I'd highly recommend the Gentex mirror with the LED lights at the bottom and I heard they might be discontinued.
Osiris_x11 said:ii.) Total number and list of LED 31mm (#3022) festoon bulbs for NSX is (6)?(1) Driver's footwelliii.) Ash-tray bulb type?
(2) Doors: Driver's & Passenger's ("Break on through..." :biggrin: )
(2) Interior dome-light
(1) Trunk
iv.) Dash-compartment bulb type?
There is a glove box festoon bulb. I just checked the service manual and for the large gloveboxes, it's the same festoon bulb. I'll have to check on my 95 to see what it is.
The ashtray bulb is a #74 type bulb at that website with a long name. This same bulb is used for the keyhole illumination and the lighter illumination. I changed mine to blue, you can see some pix here.
NSX-Ts have a single bulb for the domelight. Coupes have two. To get better light in the NSX-T, I'd highly recommend the Gentex mirror with the LED lights at the bottom and I heard they might be discontinued.
While not quite as good as the pics, here is a video I took of my car with internal/external LEDs.
One of my friends actually thought I had installed neon on the back of my car cause the white LEDs on the blue plates give off a cool color at night.
http://video.google.com/videoplay?docid=-2366824877313093732
One of my friends actually thought I had installed neon on the back of my car cause the white LEDs on the blue plates give off a cool color at night.
http://video.google.com/videoplay?docid=-2366824877313093732
Last edited:
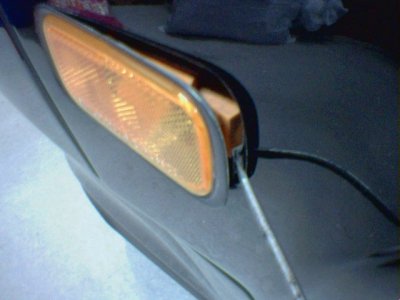
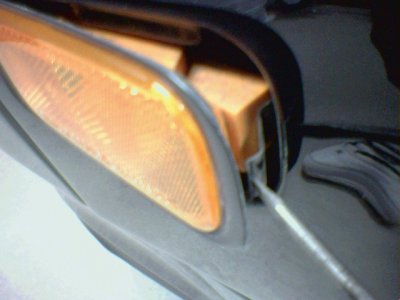
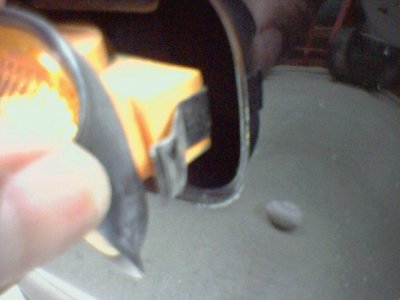
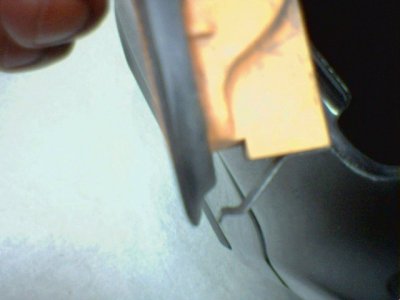
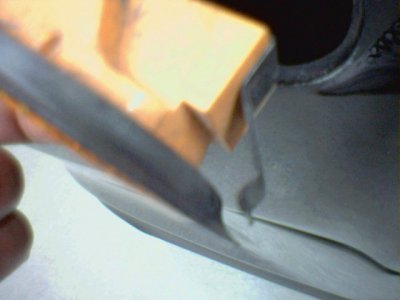
For anyone who is a little apprehensive (I know I was) about taking off the side markers to replace the bulbs with LED's; I thought I'd post some pics to show you just how easy it is to remove the side markers. The release clip for the side markers is located on the side closest to the rear bumber. Just peel back the rubber seal a little (you don't have to remove it), carefully slide a flat head screwdriver between the body of the car and the metal clip, press in gently on the clip, and use the screwdriver to pop the side marker out. It should take no more than 2 minutes from start to finish...that's it!
Attachments
- Joined
- 18 July 2005
- Messages
- 2,636
WOW....isn't this the equivalent to what clearcorners.com does for $725? Talk about gouging.
Talk about gouging.Ehh - not really the same scope of work. There's a significant difference between installing a pre-made plug n play LED 'bulb' and constructing a custom LED array & a clear face (for the corners anyway).SilverStone05 said:WOW....isn't this the equivalent to what clearcorners.com does for $725?
Yes, still expensive, even fo rwhat it is, but not fair to compare to what is predominantly going on here which is really just swapping 'bulbs'.
NSXB said:For anyone who is a little apprehensive (I know I was) about taking off the side markers to replace the bulbs with LED's; I thought I'd post some pics to show you just how easy it is to remove the side markers. The release clip for the side markers is located on the side closest to the rear bumber. Just peel back the rubber seal a little (you don't have to remove it), carefully slide a flat head screwdriver between the body of the car and the metal clip, press in gently on the clip, and use the screwdriver to pop the side marker out. It should take no more than 2 minutes from start to finish...that's it!
Eugene, I'm so glad you posted how to do this. I changed out all four corners and I'm happy with the results. Thanks!
- Joined
- 18 July 2005
- Messages
- 2,636
D'Ecosse said:Ehh - not really the same scope of work. There's a significant difference between installing a pre-made plug n play LED 'bulb' and constructing a custom LED array & a clear face (for the corners anyway).
Yes, still expensive, even fo rwhat it is, but not fair to compare to what is predominantly going on here which is really just swapping 'bulbs'.
I was referring to the pre 02' parking/signal/foglight assembly housing. True they put new arrays inside...but the pictures i've seen with a simple incandescent to LED swap look just the same and cost $700+ less. :wink:
Not even close .......SilverStone05 said:I...but the pictures i've seen with a simple incandescent to LED swap look just the same ....
I'm not pitching for these guys - but the difference in available light between those a simple bulb replacement is huge. Now do you want/need that? Not necessarily but the like/like comparison just isn't a viable argument. You most certainly can't go by a picture anyway.
- Joined
- 18 July 2005
- Messages
- 2,636
D'Ecosse said:Not even close .......
I'm not pitching for these guys - but the difference in available light between those a simple bulb replacement is huge. Now do you want/need that? Not necessarily but the like/like comparison just isn't a viable argument. You most certainly can't go by a picture anyway.
Understandable. By the way....you've got to be cursing the weather out there. My pops says it hasn't quit raining for the past month and a half. Ha, usually when we talk he's got great things to say about the weather, and now its ME here in Ohio (of all places) carrying on about the good weather. I've been putting some miles on the car these past two weeks. :biggrin:
Similar threads
- Replies
- 25
- Views
- 3K
- Replies
- 37
- Views
- 2K
- Replies
- 4
- Views
- 485