-
Protip: Profile posts are public! Use Conversations to message other members privately. Everyone can see the content of a profile post.
You are using an out of date browser. It may not display this or other websites correctly.
You should upgrade or use an alternative browser.
You should upgrade or use an alternative browser.
Honcho's Long Road to Imola Type-S Zero
- Thread starter Honcho
- Start date


I hope you are logging your hours....would be fun to price the car based on your labor after it is done...
Honestly I don't think anyone could afford this level of service. I spent an hour just cleaning the bearing. With labor, I'm probably well over $100k. You'd probably be better off spending the 100k+ and sending your car to the refresh center in Japan lol.
I would not reuse the t/o bearing. Too much trouble if it fails early. It would be a different story if like your other bearings you had complete access to clean and pack the inner race
The final check with be the dry fit on the bearing guide. If there is any play or dragging, I'll change it. This 5-speed is just a temporary bridge to the 6-speed, so the trans will be coming out again likely before the bearing fails. But, I generally agree with you. If I was leaving this trans in the car for a long time, I would change it.
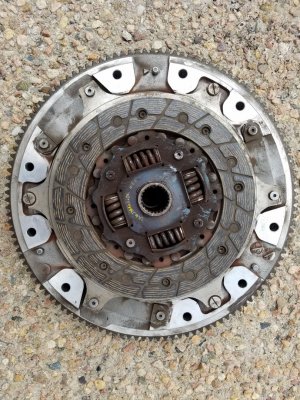
Clutch Overhaul 2
The clutch that came with the transmission was really dirty and the condition was not clear. The previous owner upgraded to the 6-speed, so he had to remove this clutch as it is not compatible with that transmission (unless you change the mainshaft). He did not know the age of this clutch, but based on the condition of the clutch discs, it looks to be a fairly recent replacement. After I cleaned up the parts, this belief was confirmed. This clutch is almost brand new.
Quite dirty. Symptom of the wrong grease used- there is some wear on the pressure plate fingers.


Cleaned up nicely.

You can still see the machining marks on the friction surfaces.


Although the flywheel is in good condition, I decided to go with the Jun lightweight flywheel to further emphasize the NA spirit of this car.

I will do a full inspection and clearance job, but I got lucky here. This clutch has a lot of life left in it.
The clutch that came with the transmission was really dirty and the condition was not clear. The previous owner upgraded to the 6-speed, so he had to remove this clutch as it is not compatible with that transmission (unless you change the mainshaft). He did not know the age of this clutch, but based on the condition of the clutch discs, it looks to be a fairly recent replacement. After I cleaned up the parts, this belief was confirmed. This clutch is almost brand new.
Quite dirty. Symptom of the wrong grease used- there is some wear on the pressure plate fingers.
Cleaned up nicely.
You can still see the machining marks on the friction surfaces.
Although the flywheel is in good condition, I decided to go with the Jun lightweight flywheel to further emphasize the NA spirit of this car.
I will do a full inspection and clearance job, but I got lucky here. This clutch has a lot of life left in it.
Attachments
I think that many owners underestimate the "sporty" effects of a lighter flywheel..because it is all about a sports mind for you!
My guiding philosophy for this project, translated into 1990's Hondaspeak:
NSX TYPE-S ZERO - SUPER LIGHTWEIGHT HIGH-RESPONSE SPORTS CONCEPT
My last NSX was a daily driver used in all conditions including rain and snow, so I had to make design choices/compromises that supported that driving condition. This NSX is different- I want this car to be the perfect distillation of what the spirit of NSX is to me. The essence of early-90's Honda, if you will. To me, that means lightweight, high response and world-beating driver engagement. It must be as light as possible- I'm shooting for 1,200 kg. This is why I'm keeping the 91-96 brakes, for example- they're lighter. Same with the 16/17 Type-S wheels- light. And so on. Also, the driver engagement must be maximized. This means deleting the clutch damper and using the lightweight flywheel. It means manual steering and a cable throttle connected to a naturally aspirated engine. I'm using Shad's rigid toe-links and the NSX-R chassis bars combined with the NSX-R suspension. With the Comptech cams and RDX injectors, I'm shooting for 340 hp and 300+ at the wheels. My sincere hope is that when finished, this NSX will speak to me like those early 90's Hondas did. Every time I turn the key, I want to hear the spirit in the engine. Essentially, I'm trying to manifest the Eternal Sportsmind in the form of a car. I hope I am successful...it's a lot of work.

Driveshaft 02
The AT left side axle. It's longer than the MT version.

Setting the spiders and snap rings after cleaning. Although you can put permanent marker marks on it to get the 60-degree offset, I found those marks wash off with the acetone cleaner used for degreasing. It was easier to place the axle on the flat metal table and adjust the spiders until the axle sits level. An offset is obvious, as the axle will rock back and forth.


The AT left side axle. It's longer than the MT version.
Setting the spiders and snap rings after cleaning. Although you can put permanent marker marks on it to get the 60-degree offset, I found those marks wash off with the acetone cleaner used for degreasing. It was easier to place the axle on the flat metal table and adjust the spiders until the axle sits level. An offset is obvious, as the axle will rock back and forth.
Driveshaft 03
The completed AT left side driveshaft. Just need to set the inner bands and compress the air out of the boots and it is finished. Time to move on to the right side axle...


The completed AT left side driveshaft. Just need to set the inner bands and compress the air out of the boots and it is finished. Time to move on to the right side axle...
.jpg")

Interior 01
Melting the foil with a combination of muratic acid and hydrogen peroxide. You must first remove the paint layer before the solution can work on the foil.

End result. Now to start the plastic repairs and paint prep. Some of these are for [MENTION=34522]NSX_n00b[/MENTION]'s car.


Melting the foil with a combination of muratic acid and hydrogen peroxide. You must first remove the paint layer before the solution can work on the foil.
End result. Now to start the plastic repairs and paint prep. Some of these are for [MENTION=34522]NSX_n00b[/MENTION]'s car.
Interior 02
Time to begin the headliner upholstering process. I am using a black jersey mesh style from the 2002+ NSX-R and Type-S models. First is to remove the old vinyl. It was sagging and covered with stains and some sticky residue I'd rather not think about.

The headliner board.

Time to begin the headliner upholstering process. I am using a black jersey mesh style from the 2002+ NSX-R and Type-S models. First is to remove the old vinyl. It was sagging and covered with stains and some sticky residue I'd rather not think about.
The headliner board.
Interior 03
Removing the A-pillar covers revealed severe damage from improper removal in the past. I will attempt a repair.


Removing the A-pillar covers revealed severe damage from improper removal in the past. I will attempt a repair.
Interior 04
Sizing the fabric sheet.

Preparing to roll the fabric onto the headliner board. I used Weldwood adhesive to ensure no sagging or separation.

Pushing into the grooves.

Nearly finished. Time to set the adhesive to cure for 24 hours and then move to trimming the edges and wrapping them. The wrinkles go away after curing. The color looks gray here due to the white balance of the camera, but it is jet black in real life.

Sizing the fabric sheet.
Preparing to roll the fabric onto the headliner board. I used Weldwood adhesive to ensure no sagging or separation.
Pushing into the grooves.
Nearly finished. Time to set the adhesive to cure for 24 hours and then move to trimming the edges and wrapping them. The wrinkles go away after curing. The color looks gray here due to the white balance of the camera, but it is jet black in real life.
Weight Reduction – S Zero Conversion 38
Headers are here from Pride. Unfortunately, the flanges do not fit perfectly onto the engine block, so I will have to drill out the two outermost holes on each manifold before installation. However, I noticed much better finishing on the tubes and collectors compared to my 2012 version.

Headers are here from Pride. Unfortunately, the flanges do not fit perfectly onto the engine block, so I will have to drill out the two outermost holes on each manifold before installation. However, I noticed much better finishing on the tubes and collectors compared to my 2012 version.
Engine Refresh 18
Titanium retainers from SOS. These are Supertech production and also apparently fit the K20 series.

Titanium retainers from SOS. These are Supertech production and also apparently fit the K20 series.
Engine Refresh 19
Starting the cleaning of the oil cooler. I am torn because I have a new cooler, but this 137k mile one is in much, much better shape than I anticipated. Not sure which way to go. I may simply install the new one and keep this old one as an emergency spare.

Starting the cleaning of the oil cooler. I am torn because I have a new cooler, but this 137k mile one is in much, much better shape than I anticipated. Not sure which way to go. I may simply install the new one and keep this old one as an emergency spare.
Melting the foil with a combination of muratic acid and hydrogen peroxide. You must first remove the paint layer before the solution can work on the foil.
I was wondering if you might expand on this a little. Did you split the muratic acid and peroxide 50/50? And just sand through the paint layer?
Thanks in advance,
Matt
I was wondering if you might expand on this a little. Did you split the muratic acid and peroxide 50/50? And just sand through the paint layer?
Thanks in advance,
Matt
Yes 50/50 mix for the solution. For the paint I used Goof Off paint remover. Spray it on, wait about 10 minutes and the paint just wipes off. Do this outside- the chemical reaction of the solution produces highly dangerous chlorine gas- the stuff they used in chemical weapons in World War I. It can cause permanent scarring in your lungs and kill you if you breathe too much, so stand clear. It takes a few days for the solution to fully melt the foil and it does not harm the plastic.
I was wondering if you might expand on this a little. Did you split the muratic acid and peroxide 50/50? And just sand through the paint layer?
Thanks in advance,
Matt
We used an aircraft paint stripper to remove the paint/clear coat first then rinsed the residue off after scraping the paint off. Underneath was a shiny foil layer. The chemical bath was 1:1 of 31% Muriatic Acid : 3% Hydrogen Peroxide
You MUST do this far away from painted surfaces and metal surfaces and this creates Chlorine gas as a byproduct so stand back/away and use proper PPE when dealing with it. The chemical bath will eliminate MOST of the foil after an hour or two but leave the items in there for a day or two and it will all be removed.
Last edited:
Yes 50/50 mix for the solution. For the paint I used Goof Off paint remover. Spray it on, wait about 10 minutes and the paint just wipes off. Do this outside- the chemical reaction of the solution produces highly dangerous chlorine gas- the stuff they used in chemical weapons in World War I. It can cause permanent scarring in your lungs and kill you if you breathe too much, so stand clear. It takes a few days for the solution to fully melt the foil and it does not harm the plastic.
We used an aircraft paint stripper to remove the paint/clear coat first then rinsed the residue off after scraping the paint off. Underneath was a shiny foil layer. The chemical bath was 1:1 of 31% Muriatic Acid : 3% Hydrogen Peroxide
You MUST do this far away from painted surfaces and metal surfaces and this creates Chlorine gas as a byproduct so stand back/away and use proper PPE when dealing with it. The chemical bath will eliminate MOST of the foil after an hour or two but leave the items in there for a day or two and it will all be removed.
Got ya, stay outside and away from things. After the 2 or 3 days the reaction and chlorine gas production will have ceased, correct? What about disposal of the used solution?
P.S. I know you have heard it a hundred times but this thread is fantastic. Thank you for documenting.
Got ya, stay outside and away from things. After the 2 or 3 days the reaction and chlorine gas production will have ceased, correct? What about disposal of the used solution?
P.S. I know you have heard it a hundred times but this thread is fantastic. Thank you for documenting.
The reaction slows, but it still throws off a pretty nasty smell. I just held my breath when I took the stuff out and then rinsed the parts with a garden hose. You should dispose of the solution per your local municipal guidelines. My town has a website that tells you what can go down the drain.
If you don't want to deal with fumes you can use ferric chloride instead. It's quite a bit more expensive than Honchos method though.
Last edited:
The AT left side axle. It's longer than the MT version.

So what's the big secret here? Everyone says this shaft is a different length, but did you adjust the length somehow to match the M/T version or is it okay just to re-use it without modifications?
That looks real good to me, I'd personally re-use it. I'm sure new ones will be discontinued soon if they aren't already, maybe you could hold it in the OEM bag as a collectors item like the tall oil filters but even betterStarting the cleaning of the oil cooler. I am torn because I have a new cooler, but this 137k mile one is in much, much better shape than I anticipated. Not sure which way to go. I may simply install the new one and keep this old one as an emergency spare.

>Everyone says this shaft is a different length,
The LH driveshaft length spec: MT = 513.5-514.0mm, AT: 519.5-520.0mm. The AT is 4.5-6mm longer than MT.
For completeness the RH half shaft axle on both AT and MT is 542.0-542.5mm.
BTW: The white stripe on the drive shaft and intermediate shaft appear to indicate AT.
>but did you adjust the length somehow to match the M/T version
It might be possible with some machine work. I suppose one could machine down a couple of millimeters of each spline at the ends of the axle so the spiders can seat closer to each other.
>or is it okay just to re-use it without modifications?
Reusing seems to be the consensus and there isn't any reported issues. In theory it might slam into the diff, but in practice there is probably enough tolerance for the longer shaft of the AT.
In effect, the AT drive shaft is 5mm longer and the AT intermediate shaft is 7-10mm longer....why Honda couldn't specify that the AT (or MT) to be in same relative position as each other is strange.
FYI: I find there is lot of "float" of the axle within the CV joints...so I'm not really concerned.
**
Reuse the existing cooler. It might outlast the vehicle and is that not that difficult to replace. Keep your sealed one, it might be worth a small fortune in the near future.
Last edited:
Similar threads
- Replies
- 4
- Views
- 445
- Locked
- Replies
- 2
- Views
- 418